Search
Repair Topics
How To Sand Drywall
Sanding drywall is a critical step. It does the final smoothing of the surface in preparation for paint. Sanding can range from very light for a good taping job to arduous for a poorly done coating job.
As a rule you use between 100 and 220 grit for sanding drywall. The finer grit is for the last coat. There are a number of types of sanders available, pole sanders, hand sanders, sanding sponges and plain old sanding paper. The idea is to have a fairly large flat sanding block. Avoid using sand paper. You can dig grooves in the mud with your fingers. Do not sand to much mud away. Get it smooth and stop. Use your hand to check for smoothness.
Wet sanding and vacuum sanding are ways to try and minimize the dust. See the article 'Dustless Drywall Sanding' for more information. Wet sanding can work for all but the last or final pass. Wet sanding is a misnomer, what you are doing is actually dissolving the mud and getting it on the rag. Be careful that you don't dissolve too much.
There are sanding heads available with vacuum attachments A lot of fooling around but it does help. Using mud with dustless technology is a good idea, especially for patches. The dust is designed to fall straight to the ground without becoming airborne. It is not completely mess free, but it is a definite improvement.
You want your taping mudding drywall repair to be smooth when it is done. Sand the drywall until you achieve the desired finish and stop. Light weight mud is pretty easy to sand. The danger is cutting away too much. Regular weight mud and setting type mud take a little elbow grease.
Skim Coating Drywall
Skim coating drywall is an important extra step that can minimize the amount of sanding that needs to be done. It can also help to produce a nicer finish for painting.
As the name implies, skim coating drywall involves a very thin coat of mud. Unlike other coats, where mud needed to be built up, skim coating only fills voids. The idea is to create a perfectly flat surface.
Mix the mud thinner for skim coating. Use a wide knife, like a 10" or 12". Coat the entire area of the seam or patch with mud. Then with a dry knife, drag the area tight with the knife. Very little mud will be left, only what is needed to fill voids and hollow spots. A skim coat will dry very quickly, since there is little build up.
A properly done skim coat will leave you with very little sanding. This is a good trade off for the extra work.
Wiring an Electric Hot Water Heater
 Why would wiring an electric water heater be something you would even think about attempting? To troubleshoot an electric water heater, you need to understand how the wiring works. There are safety concerns to be aware of. Are you willing to take a little time and become familiar with this type of problem? Will you follow the safety guidelines? This information will help you by providing a general knowledge of your electric water heater.
Did you answer yes to the two questions above? Yes, then you are allowed to continue reading. Safety when it comes to an electrical repair cannot be stressed enough. Serious injury and even death can result from an electrical shock. I am not even thinking about inserting something humorous here. Electric hot water heaters use 240 volt with significant amperage. More than enough to kill someone. Are you sufficiently afraid, actually respect is the correct word. You always need to have a respect for electricity when you work around it.
After this second warning are you still willing to proceed? Did you answer yes? How about a third warning, never touch anything on your hot water heater unless you are absolutely sure that the power is off. Use a tester to make sure.
Using Common Sense Header
What Can You Save?
Getting someone to come out to your home involves the proverbial 'service call'. This the fee that you pay for the privilege of meeting the serviceman. Prices vary, but the is usually $50 to $85. For a simple problem this will take care of it. With a water heater you may be faced with up selling. "Yes, i can fix it, but it may not last" might be the comment. Suddenly you are faced with a replacement project, maybe $500 to a $1,000. Whoa, at least make yourself familiar with your situation before you proceed. Make the repairman describe exactly what the problem is. Be armed with good questions.
How Hard Could It Be?
Wiring an electric water heater is an above average repair task. You have both skill issues and safety issues.
For and explanation of the terms in this section, see How to Use This Site.
Check the Simple Things!
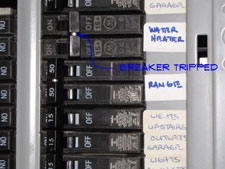
Check the breaker. No hot water? Is the breaker tripped? Unfortunately, a tripped breaker may be indicative of a more serious problem. Electric hot water heaters also have reset buttons (see below). Again bad news, if the reset trips it usually means something more serious is wrong.
What Can Go Wrong?
Did you read the beginning of this article? You have some very serious power going through your electric water heater. Be safe, take precautions. Water is also involved. Draining down a tank or flushing a tank will involve water, be prepared.
Understanding Electric Water Heater Wiring
Most hot water heaters are on a 30 amp two pole breaker. The two poles means it is a stated 240 volts or an actual 230 volts. As long as your water heater is not too far from the panel it will be wired with #10 wire. This is the common format for wiring an electric water heater, but it is not the only one.
Some newer two element tanks give you an option for simultaneous operation. What? In years gone by most electric water heaters with two elements were factory wired so that only one element would heat at a time. The upper thermostat would keep track of this, only allowing the lower element to heat when the upper one was finished. This is why electric water heaters have a longer recovery time than gas.
Now there is the option of wiring a hot water heater so the both elements run at the same time. This reduces the recovery time and will provide more hot water. The trade off it that it uses more amps and requires heavier wire.
Wiring an electric water heater with simultaneous element operation will mean a 45 Amp breaker and #6 wire. In a house that was wired any length of time back you probably don't have the right wiring for this configuration, even if you get a new hot water tank. You always want to check local codes before modifying any wiring in your home.
Hooking up the Wires
So how many wires do you get anyway? Wiring an electric water heater does not require that you use a plug in device. Therefore an extra conductor is not required. Most water heaters are wired with 10-2 w/Ground shielded cable. For long distances you may need to go with heavier wire. When you use this type of wire both the white and the black will serve as hot conductors. The bare ground wire will also be connected to the neutral lug.
Shielded metallic cable should be used from the water heater to the wall or ceiling. There will be an adapter connected to the top of the tank and the shielded cable will continue until it is out of the area where the wiring might be damaged.
You may find that a cable with an extra conductor has been used. This would be 10-3 w/Ground. In this case the red and the black wire will be used as the hot leads. You now have an redundancy with the ground and the white wire. The white wire is not needed. The long and the short of this story is that a water heater needs two hot conductors and a ground to work.
I have not mentioned 120 volt electric water heaters up to this point. For a residence they are highly impractical. They cost a lot to run and will not produce enough hot water to satisfy the needs of a home.
Checking for Power
The first thing you want to do is make sure that you are getting power to your electric water heater. See if the breaker has been tripped in the panel. Has it tripped? Yes, this is sort of good news. Reset the breaker and see if it holds. This could be a sign of another problem.
The next logical step would be to see if you have power to the water heater. The wiring is located on the top of the water heater. Before you take the cover off, shut the power off. Make sure that the power is off with the non contact voltage tester. Separate the wires enough to test the individual conductors.
Turn the power back on and use a non-contact tester to see if you are getting power to the water heater. The indicator light should light up when you are near a hot conductor. You should have two hot conductors coming into your electric water heater.
WARNING!! Make Sure the Power is OFF!!! BEFORE You Work on Electrical Devices!!!
Checking the Reset Button
There are two covers on the side of your electric hot water tank. Wiring and electric hot water heater also includes the high limit reset buttons. When they trip the water will not heat up.
The first thing you do is to shut off the power. After that there are two covers on the side of the hot water tank. Remove the covers, the insulation and the plastic shields. Make sure the power is off by using a working voltage tester. The upper and possibly the lower thermostats will have a red reset button. They pop out when they trip.
After you reset them you can put the covers on and turn on the power. If they keep tripping, something else is wrong, either with the thermostats or the elements. See Hot Water Heater Element Testing for information on how to check the components.
Checking the Heating Elements
The water heater elements do the actual work of heating the water. You likely have two of them. They are also the likely candidate when troubles arise. One or both elements can go bad. When the upper element goes bad you have no hot water. When the lower element fails you will have minimal hot water. So the elements are a big part of wiring an electric water heater.You can use a simple test to tell if the elements are bad. See the article Hot Water Heater Element Testing for instructions on how to check them. The article Repairing Hot Water Heater Elements has information on replacing them.
Sediment build up can cause the lower element to fail repeatedly. See Hot Water Heater Sediment for information on build up in your water tank.
Checking the Thermostats
Wiring an electric water heater also includes the thermostats. The thermostats tell the elements when to heat up. Most residential water heaters have an upper and a lower thermostat. These are usually set up for non-simultaneous operation. Meaning that only one element is allowed to heat at a time. The upper thermostat acts as the controller, allowing first the upper element to heat and then the lower element.
A bad upper thermostat will mean no hot water at all. When the lower thermostat acts up you will have hot water, just not very much. The upper thermostat will always have a reset button. Sometimes the lower one will have one to. This is a red button that pops when the thermostat overheats.
The thermostats also have temperature settings on them. Hot water heaters are set at the factory to 120 degrees. Any hotter than that and you run the risk of serious burns. Homes with elderly, handicapped or children should not have the temperature set above this level.
To find out if your thermostats are bad, you need to test them. See the article Hot Water Heater Element Testing for instructions on how to test them. For instructions on replacing the thermostats, see Repairing Electric Water Heater Thermostats for all the information you need.
Wiring an Electric Water Heater Summary
Were you able to figure out what your problem is? Wiring an electric water heater involves several electrical components. Since you have so many items involved it takes some investigating to locate your problem.
In this article you found some general information about how an electric hot water heater works. It could be that your problem was in the wiring. You were also directed to other resources that discuss the various components. The hot water heater elements are the hands down winners for be troublesome. Your wiring an electric water heater problem may have involved changing the elements. Hopefully you have found your problem and are now enjoying plenty of hot water.
Repairing Bypass Closet Doors
Repairing Bypass Closet Doors
Bypass closet doors were very popular for use in closets, a few decades ago. You still see them in many homes and some homeowners prefer them to bifold closet doors. These are also called sliding closet doors. 'Bypass' or 'Sliding' the idea is that one door moves in a straight line, in front of or in back of the other door. Unlike normal doors, this type has no hinges.
Instead of hinges they have hanger – roller assemblies, that are attached to the top of the door. The rollers follow a track that is mounted to the head of the door frame. The rollers ride on a metal track the full length of the closet opening
Bypass closet doors, as the name implies, pass by the other door. This is the main drawback to sliding doors. Only half the closet is visible when one of the doors is open. There must be an unwritten law that states that the thing you are looking for will always be on the hidden side of the closet. Bifold doors have increased in popularity in recent years. One of the reasons for this is that they open completely, not hiding anything.
Issues with Bypass Closet Doors
You may have guessed that the door hangers – rollers are the main trouble spot. When the door comes out of the track it can be hard to move and will scrape the floor. Some types of track are more prone to this problem. Learning how to put the door back on track can save calling a repairman.
The hangers are also where you adjust the door. There is an adjustment nut on each hanger. the height of the door and the margins on the sides can be adjusted by these nuts. There are guides at the bottom of the doors. These will keep the doors in alignment as they move back and forth. When the doors get outside the guides they will not move correctly.
Finding Help With Bypass Closet Doors
There are three main issues this type of closet door. (1) The lubrication of the rollers is important. When the rollers start to tighten the door will be hard to move. Trying to force the door will cause it to jump off the track, making the situation worse.
(2) Putting the doors back in the track or guides is a common problem. The door may be impossible to move when it is off the track. It could also fall if both hangers pop out of the track. (3) Adjusting the door is another concern. You may notice uneven gaps on the sides of the doors or the door may rub the floor or carpet when it moves. When this happens, adjustment is the only answer.
Repairing Bypass Closet Doors Summary
Did you learn what you needed to know about bypass closet doors? Most of the problems are pretty easy to fix. Lubrication and adjustment are two common problems. You can do this in just a few minutes.
Putting the doors back on track is another repair that needs to be done regularly. This can involve lifting the door, hopefully, you had some help. The article on repairing sliding doors should have given you all the information you need. Time to move onto your next home repair job.
Water Heater Gas Valve Problems
Working on a hot water heater gas valve is not a repair for your average homeowner. Replacing is is generally the only option.
There are several things you want to check before you assume your gas valve is bad. Make sure you rule out simpler repairs first. See the articles 'Hot Water Heater Pilot Litght', "Hot Water Heater Thermocouple', before you plan on replacing your gas valve.
See the article 'Gas Hot Water Heater Troubleshooting', if you are unsure of your problem.
How a Gas Valve Works
The gas valve sends gas to both the pilot light and the main burner. It senses electrical current from the thermocouple and shuts off the gas if the pilot is not lit. This is an important safety feature. There are not a lot of options if the gas valve is bad.
Replacing it is usually the only course of action. This is a bigger repair job and the part it fairly expensive. However, you would only look at the water heater gas valve after you have checked the thermocouple. The symptoms are the same.
Water Heater Gas Valve - The Issues
What Can You Save? - This is not a cheap repair. The part alone could run $80 to $250. The high end is brand named part vs. an after market replacement. There is a fair amount of labor. This could run you another $200 to $250. Then there is the 'why spend that much on an old water heater' pitch. You could get talked into an new water heater. Anywhere from $800 to $3,500.
How Hard Could It Be? - Replacing a water heater gas valve involves draining down the tank, unhooking the gas line, unhooking thermocouple and gas lines to the burner and actually changing the valve. A couple of hours of break a sweat work. These repairs will have a Difficulty Level of: A Bit of Work. These repairs require a Skill Level of: Determined Handyman. For and explanation of the terms in this section, see 'How to Use This Site'.
What Can Go Wrong? - You are dealing with natural gas. Make sure the gas is turned off and the area is well ventilated. There will be some residual gas in the lines when you take them apart. Also the water in your tank is hot, shut the tank off and run some hot water until it is lukewarm before you try to drain it. Not getting it fixed will leave you without hot water. This will likely generate a significant amount of complaining from the family.
Gas Valve Thermostats
The gas water heater thermostat is part of the gas valve. The thermostat cannot be replaced independently from the gas valve. In addition, there is no practical way to test it. You can replace the gas valve, although, unless your water heater is not working at all this should not be needed.
Are you convinced that the thermostat is not working properly? You could test the temperature of the water coming out of the tank. The reccommended temperature is 120 degrees.
You can make adjustments to compensate, if you find that the temperature is too low. Be very careful about raising the temperature above 120 degrees. Burns and scalding can occur. See the article 'Gas Water Heater Temperature Settings' for more information.
Take a look at the article 'Water Heater Gas Valve', if you think your gas valve has gone bad. Another thing you should check is the 'Gas Water Heater Thermocouple', this is the more likely candidate for issues with your gas valve. The gas valve will not work properly when the thermocouple is defective.
Purchasing a Gas Valve
Before you can replace your water heater gas valve, you need to purchase a new one. You may find that getting an exact match to the one you have difficult.
Shutting Off the Gas
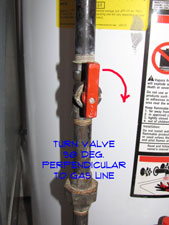
The first thing you need to do is shut off the gas to the hot water tank. This is done at the shut off valve that is in the gas line.
Turning the water heater gas valve to off is not the place to do this. The 'Off' position on the gas valve dial only means that it will not heat the water. The pilot light is still on and gas from the main supply line is still on.
You need to turn the inline valve ninety degrees so that it is perpendicular with the gas line.
Cooling off the Hot Water
Next you want to run some hot water into a sink until the water cools down to lukewarm. The water in your tank can be very hot and dangerous. Cooling it off will make the draining operation a lot safer.
Remember, no repair project is worth getting hurt over. You can get some information on Safety if you click that button on the sidebar.
WARNING!! Natural Gas Can Explode! Make Sure the Gas is OFF!!! Hot Water Can Cause Severe Burns!!! WARNING!!!
 Draining the Tank
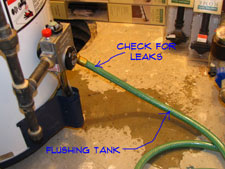
Shut off the water supply at the cold water inlet for the water heater. Next, hook up a garden hose to the water heater drain valve. Find a drain to run the garden hose to and make sure the hose will stay secure. Open the valve to allow the water to start draining. Open the pressure relief valve to allow air to get into the tank.
Does your tank have a sediment build up in it? This might be a good time to flush the tank. Go to the article Flushing a Hot Water Tank for instructions on what to do. You will have some wait time while the tank is draining. See Step Three for work you can get done in the mean time.
Unhooking the Lines
You will normally have four items that are hooked to the water heater gas valve. (1) The Gas Line (2) The Thermocouple (3) The Pilot Light Supply Line (4) The Main Burner Supply Line. A possible fifth item would be an electronic igniter that is attached to the side of the gas valve.
(1) For the Gas Line, you should find a union between the shut off valve and the gas valve. Loosen the union using two pipe wrenches. The gas line has a horizontal pipe that feed into the side. The other end is connected to a tee. You may have to take off the nipples on either side of the tee to be able to remove the nipple going into the water heater gas valve. Remove the gas line from the gas valve. Save the pieces, you will need them.
(2) Use an open end wrench or an adjustable wrench to remove the thermocouple. Be careful, some of them have left handed threads. If it won't loosen going the normal way, try the opposite direction.
(3) Next use an open end wrench or an adjustable wrench to remove the supply line for the pilot light. It will be the smaller of the two and likely on the far right.
(4) Use the proper size open end wrench or an adjustable wrench to remove the supply line to the main burner. This will be the larger line in the center of the gas valve.
(5) The igniter if you have one is not really a component of the gas valve. However, it may be attached to the side of it via a bracket. Use a screwdriver or nut driver to remove it as required.
Replacing the Gas Valve
Step Four – Replacing the Gas Valve
Removing the Gas Valve
You need a small pipe wrench to remove the gas valve. Make sure the tank has finished draining. The gas valve stands away from the tank housing. You likely have only 3/4" of space to work in. The jaws of the pipe wrench need to be about 5/8" wide. As you face the water heater, turn the gas valve counterclockwise to remove it.
You need to get a suitable gas valve replacement. There are a number of universal models available. There should be a model number on the side of your old gas valve. You can try searching for that model number to see if you can find an exact match. Your success will depend in part on the age of your water heater. For a universal one, the shank length is the main concern. They come in various lengths from 1 1/4" to 2 3/8". Make sure the one you get has the same shank length.
You want to put some pipe joint compound or Teflon tape on the threaded portion of the pipe that goes to the hot water heater. Use the pipe wrench to tighten the valve. Make sure it is tight. You should finish with the pilot knob facing up.
Filling the Tank
At this point you are ready to fill the tank. Close the drain valve and turn on the water supply. You want to make sure that there are no leaks around the gas valve.
When you start to get some water out of the drain for the pressure relief valve, you can close it. Open the a hot water faucet nearby and let it run until all of the air is bled out of the tank.
You will need to tighten the gas valve if the water is leaking. You will probably have to go a full turn to get the valve turned the right way.
Putting the Water Heater Back Together
You can re-install the lines coming into the bottom of the water heater gas valve in reverse order of taking them off. These fittings should not need any pipe dope or Teflon tape. Make sure the connections are tight. You will need to use a pipe joint compound on the gas line fittings that is rated for natural gas or one that is approved by your local building codes. Use pipe wrenches to put the gas line back together. Make sure you tighten the union.
Make sure the dial on the water heater gas valve is set to off. Turn the shut off valve on the gas line to the on position (parallel with the gas line). Use soapy water to check for leaks. Never use a lighter or any kind of flame to check for gas leaks.
After you are confident there are no gas leaks you can go through the pilot lighting procedure. You should have gotten some instructions with your new water heater gas valve. After the pilot is lit you can turn the valve to on and set the temperature. It should be set at the factory for 120 degrees. At this point you should use soapy water and check the fittings on the bottom of the water heater gas valve for leaks. Be careful about exceeding that, especially if you have children or anyone else that might inadvertently turn on just the hot water.
Put the instructions for pilot lighting you got with the new valve in a plastic bag. Tape it to the side of the water heater. Pilot lighting procedures differ slightly for valve to valve. You will want this information later.
Hot Water Heater Gas Valve Replacement Summary
Is it working now? That is great news. Was that a hard job? Yes it was kind of difficult. Draining the tank is a job in itself. Then removing the lines into the gas valve. You probably had to take at least a couple of the pipes for the gas line apart. Changing the gas valve and then putting it back together. At least two hours on a good run.
Now that you have that behind you, what are you going to do? Ambitious? Want to tackle something else? Tired? Why not take a breather before you get into another project.