 Knowing how to adjust a toilet float will help to prevent toilet tank issues. It only takes a few minutes to adjust the float and the only tool you will likely need is a screwdriver.
For other toilet repair topics see 'How To Fix a Toilet' and 'Plumbing Repair' for all of the plumbing articles.
Too much water in your tank will cause it to run and waste water. Too little water will cause flushing issues and possibly clogs.
Troubleshooting Toilet Floats
When you hear water running in your tank, the first guess might be to adjust the float. If the water runs constantly, even slowly, this is probably the correct assumption.
However is the toilet is making a trickling sound and the toilet refills periodically, even when it is not being used, you could have another problem. It could be the toilet flapper. See the article 'Toilet Flapper Repair' for more information on this problem.
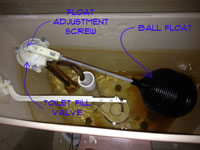
The first step to adjusting a toilet float is to determine what type of float device you have. The older toilets may still have a Ball cock type float device. This type usually has a screw nea r the valve that is used to adjust the fill level.
If the water is running constantly it indicates the water level is too high and the excess water is running over the top of the tube for the flush valve. Lowering the water level to just below the top of the flush valve tube will solve the problem.
Another reason you would want to make adjustments to the float is when the water level is too low. When a tank had too little water, it will not flush properly. This will result in blocked and clogged toilets. To determine the proper water level for you tank, see the article 'Setting the Toilet Tank Water Level'.
Adjusting a Toilet Float
There are two common types of floats for conventional toilets. Older toilets will have a large plastic or brass ball that is connected to a horizontal rod. The rod is connected to the toilet fill valve.
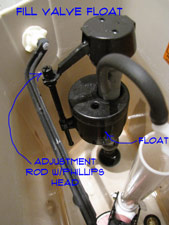
The other style is a float that moves up and down along the vertical pipe of the toilet fill valve. A common brand name for this type of float is Fluidmaster.
Adjusting Ball Cock Type Floats
Turn the screw (likely counterclockwise) to lower the float. Continue to turn the screw until the water stops running and then go a half of a turn past. If the screw is stuck or you are afraid you'll break it, you can use two hands to bend the rod for the ball cock (the manufacturer probably won't recommend this, but it works).
Flush the toilet and see where the water stops when it refills. It should be just below the top of the fill tube for the flush valve.
Water is no longer running and the toilet flushes, problem solved. Congratulations!
Adjusting Fluidmaster Type Floats
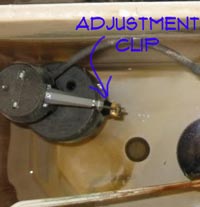
A fluid master type fill valve has an integral float that has an adjustment rod on the side of the assembly. You should be able to pinch the spring clip and adjust the float up or down. Move it down a half of an inch for a toilet that is running constantly. Let it go and see if the water stops running.
Still running, adjust it down again. When the water stops running, flush the toilet and see if the tank refills to the proper level. Refilled OK and the water stopped running? Yes, Congratulations, problem solved.
Some of these type of fill valves have a rod with a head on top that can be adjusted with a screwdriver. Follow the procedure above in a similar fashion for this type of float adjustment. That is all there is to fix a running toilet by adjusting the float.
What To Do When Adjusting the Toilet Float Doesn't Work
Toilet fill valves can go bad and no amount of adjustment will fix the problem. After adjusting the float you still cannot get the water level correct, the only recourse is to replace the toilet fill valve. See the article 'Toilet Fill Valve Repair' for instructions on how to solve this problem.


