 Why do you even need weatherstripping for doors? Why don't they make the doors so they fit tight and the air doesn't leak? Sounds great on paper, but you would never be able to open or close the door if it was that tight. Doors have a gap around the perimeter. Guess what? Air comes in around those gaps. In the middle of winter it can be very cold air.
For related information, see the articles 'Troubleshooting Exterior Door Problems' and 'Adjusting Exterior Doors'. Is is possible for your door to be out of adjustment, causing the weatherstrip to not work correctly.
Weatherstripping is used to provide a flexible seal between the door and the frame. It keeps out the cold air. There are many types and sizes of weatherstripping. Some work better than others. They all work on the same principle, they are intended to stop the air leaks.
Over time the seals can go bad or get loose. When this happens the air leaks in again and you need to do something about it. At this point, you are wishing your air conditioner would blow this much cold air in the summer time.
Weatherstripping for Doors - Information
What Can You Save?
A carpenter or a handyman service will need to charge you for coming out. Then you will need to pay for the new weatherstripping and the time it takes to put it in. This will run you between $50 and $100.
How Hard Could It Be?
Dealing with weatherstripping is pretty easy.
Check the Simple Things!
Weatherstripping is fairly simple. Some types are fastened with slotted screws. You may be able to loosen the screws and adjust the weatherstripping.
What Can Go Wrong?
Taking off the old weatherstripping without replacing it with new can leave you with a door that really leaks air. In a real pinch, put some masking tape over the cracks at night.
Weatherstripping for Doors - The Steps Involved
There are three types of weatherstripping that are commonly used on doors. In older homes, you may find metal weatherstripping that had two parts that fit together to form a seal. A common retrofit type is made of foam or rubber. Although this type is easy to install, it also does not last very long.
Newer doors, usually metal or fiberglass may have weatherstrip that fits into the frame of the door. The door pushes up against this type for a nice seal. This type only works on a door the specially mortised to recieve it.
Metal Weahterstripping
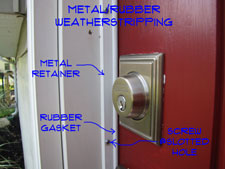 Adjusting metal weatherstripping is not difficult and can save a lot on heating and cooling. There are several styles of metal weatherstripping, most of them are adjustable. One type that is sold commonly today consists of an extruded aluminum track with a rubber seal that fits into it.
This type usually has slotted screws that allow for some adjustment. First check to make sure that the rubber seal is in good condition. It should still be pliable, not dried out or cracked. It should not be missing portions along the door.
Are you satisfied that the rubber seal is still working? Remember it is the rubber seal that is doing the work. Close the door and stand on the outside. Do you see any gaps between the rubber seal and the door. Loosen the screws and snug the rubber seal up to the door, slightly compressing the rubber. Tighten the screws. Check the entire perimeter of the door in this manner. The weatherstripping should be snug on all three sides of the door. That's all it took, loosening a few screws? Wow, another weatherstripping for doors success story.
You can buy a replacement set for this type of weatherstripping for about fifteen dollars. You need a hack saw to cut it to length. Use the screws that are provided to screw it in place. With the door closed snug the rubber gasket to the door. Run the screws into the slots in the metal track.
Foam Weatherstripping
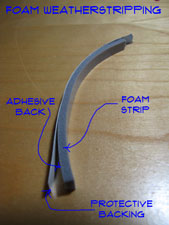 Replacing rubber weatherstripping is not that difficult. This is the kind that is either rubber or foam and has an adhesive strip on the back. There are several configurations of self stick weatherstripping available. Check to see if the original material was thick enough to seal the door. You may need to obtain thicker material if there were gaps. Remove with a scraper weatherstripping that is dried out, missing or cracked.
Packages of this type of weatherstrip come with enough material to do one door (17 lineal feet). Don't mess around, replace it all when you do it. Take a piece with you to obtain a similar product. The important feature is the thickness. It has to be thick enough to fill the gap and be compressed when the door is closed. Material that is too thick will interfere with the operation of the door.
Peel the backing paper off the new weatherstripping and press it into place, starting at one end and working to the other end of each side of the door. This stuff can be a little frustrating, take your time. Working with a wet noodle comes to mind. Use a utility knife to trim the excess. Close the door and check to see if you have a good seal all the way around the door. Everything looks good? Then you have mastered all the skills needed for dealing with weatherstripping for doors issues.
Integral Weatherstripping
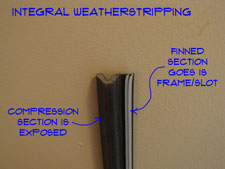 Replacing integral weatherstripping occurs when it has worn out. Integral weatherstripping is the type that seems like it is built right into the door frame. Actually, it is very easy to change.
Newer homes (say the last twenty years or so) may have exterior doors that have the stop rabbited into the door jamb. The door jambs are 5/4” material on the stop side of the frame and 3/4” on the door side. At the step there is a slot cut into the frame that provides a place for a specially made weatherstrip to be inserted. This is great stuff.
To remove it, you just firmly pull it out of the slot. No glue or screws. It is sold in 7' lengths at most lumber and home stores. You can replace one side or all sides as needed. White and black are the two available colors. Cut the length about a half of an inch long and install it. Use a utility knife to trim it as needed (sharp blade, be careful).
Summary
For related information, see the articles 'Troubleshooting Exterior Door Problems' and 'Adjusting Exterior Doors'. Is is possible for your door to be out of adjustment, causing the weatherstrip to not work correctly.
Repairing or replacing weatherstripping for doors is not too hard of a job. By now your door should be sealed up and you should be warm or cool, depending on the season, with no drafts from your door. Well done.