Before you begin an electric outlet installation, make sure the power is off. Turn off the breaker and put a piece of tape over it. Double check for power with a tester. Newer plugs all have three wires attached to them. A Hot (Black), Neutral (White) and a Ground (Bare or Green).
How a GFCI Outlet Works
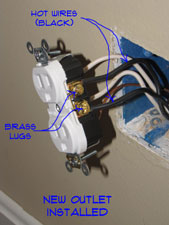
Unhook the wires from the old receptacle, noting the orientation. Attach the ground wire to the green ground lug. Then attach the neutral to the silver side of the outlet. Lastly, attach the hot wire to the brass side of the outlet. This coding system is fairly universal. Depending on the light you have, you may have to look close to tell between the silver and brass lugs.
 Some outlets may allow you to push the hot and neutral wires into the back of the outlet. There are round holes there. You strip the wire the proper distance, keeping it straight and simply push the wire in until the insulation touches the back of the receptacle. Tighten the screws and that is all there is to it. These push connections are sometimes only good for one size wire, such as 14 gauge. To hook to the lugs you will have curl the wires and hook them around the lugs. Tighten them snugly.
For outlets that had four wires attached you will need to reattach all of them. The extra two wires are to feed the next outlet in the circuit. As a safety precaution you want to wrap electrical tape around the lugs. This is especially needed if you have metal boxes.
The final step to install electrical outlets is to put it back together. Use the tester to make sure it is working. Attach the outlet back to the box and then install the cover plate. Got young children? Put the safety plugs back in. Congratulations! You can plug the lamp back in. It's time to move on to other electrical or home repairs.