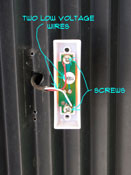
 With the wiring in place, installing a wired doorbell button is pretty easy. There are only two low voltage wires to hook up and two screws to hold it in place.
The articles 'Wired Doorbell Repair' and 'Wirelesss Doorbell Repair' provide information on all doorbell repair topics.
Installing a Wired Doorbell Button
Wired doorbell buttons are usually installed with two screws. They don't weigh much at all, so as long as the screws will seat into the material, it should not be a problem. Wood, vinyl, aluminum are all suitable materials to attach a doorbell button to. Brick or masonry, may require a plastic shield before you install the button.
Before you set the doorbell buttons you want to make sure you check how they are identified. One of them may be marked for the 'Front' door and one for the 'Rear'. Or they may numbered. Howevery they are identified you want to know where you put them before you set the chimes. Writing them down might be a good idea, especially if there are more than two.
Since there are no wires involved you are not limited on locations. You want the doorbell to be visible and easily reached. A standard mounting height is 48" above the floor. For handicapped accessible homes, 48" would be the maximum height. Often they are set slightly lower for wheelchair access.
Check the instructions, some buttons will have a base plate, allowing for battery replacement. Others will require that you have the batteries in place before you install it.
Adjusting the Doorbell Chimes to the Buttons
Your new wireless doorbell will likely have options for the sounds each doorbell makes. It may even have choices as to the type of sounds that are made. You will want to set each doorbell to ring differently. This way you will know which door to go to when the doorbell goes off.
To do this you will likely want to consult the instructions that came with the unit. This is not what you probably want to do. Unfortunately, it will save you time in getting the settings right. Why go through the aggravation.
Different manufacturers will use different systems for making these settings. First decide on the type of sound you want. Then follow the instructions for setting each doorbell button. The doorbells should have been marked in some fashion, so that you know which one is which. For a two button doorbell system, 'Front' and 'Rear' or something similar is likely. For doorbell systems with more than two buttons, numbers or letters might be used.
Once you have the settings the way you want them it is time to test the doorbell buttons. Check each doorbell to make sure it is working the way you want. Once you are satisfied you can put the cover back on the chime unit. Then you are done! See 'Wired Doorbell Repair' for more information.