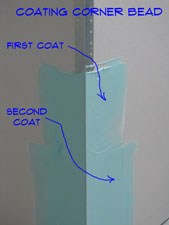
 Coating corner bead with drywall compound is another taping and mudding operation. Corner bead is used to reinforce and finish the drywall corners in your home. Corner bead is another item that is built up off the surface of the drywall. Therefore, it needs to be feathered into the surface.
So it is similar to a seam from a coating perspective. The difference is that the nosing of the corner bead provides a defined point for the knife to ride on. Corner bead should be coated with an eight inch and a ten inch knife. Although it is often done with a six and an eight.
Use a six inch knife to apply an even band of mud along each side of the corner bead. Corner bead takes a lot of mud so don't be surprised. With the mud in place, you can pull the an eight inch knife down each side of the corner bead. Keep the knife tight to the drywall and the nosing of the corner bead. This gives you a sloped surface of mud to feather the bead.
Coating corner bead with the second coat is similar, only wider. Apply the mud with an eight inch knife and pull it with a ten inch knife. Do you see a trend here. Use a knife that is wider than the mud you are blending in. The second coat on bead is a lot easier than the first coat. It is a good idea to brush off the lumps with a sanding sponge before trying to install the second coat.
For a skim coat you will want to lightly sand the coated area. Use thinner mud and a wider knife if you have one. It is not as critical at this point to stay on the nose of the bead. The idea is to fill any voids that may be remaining. Additionally you are providing some additional feathering. This is the difference between an average job and a great job.
Taping Inside Corners
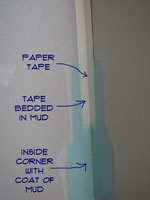
Taping & coating inside corners is the toughest and most time consuming of all the joints. The 'angles' in drywall speak, require that you put about two to three inches of mud on both sides of the corner. Crease the tape and cut it to length. You want it at approximately a ninety degree angle. Push the tape into the corner. Using a three or four inch knife press the tape into the corner, removing the excess mud. Work down one side and then the other.
Coating inside corners presents another challenge. It is almost impossible to coat two sides of an angle at the same time unless you have a specially made trowel. With only one trowel you will have to do one side and let it dry. After that you can do the other side. The light sanding rule applies in this instance too. Put the mud on an angle with a three inch knife and pull it with a four inch wide knife.
Make sure you cover the tape and feather the edges against the wall tight. A three or four inch wide joint is usually sufficient for an inside corner. Lightly sand the corner before applying a second coat. You may be able to keep the knife away from the corner enough to coat both sides at once. If not let one side dry and then do the other one. Apply the mud in a similar way if you have an angle trowel Pull both sides at once with this type of trowel. After the second coat, sand the angle and check for imperfections. Fill them as needed.
As you can see taping and coating inside corners requires the most work. But the effort is well worth it.