 Removing moldy drywall is the best choice for larger infected areas. Or if the paper on the drywall has been ruined and/or the core of the drywall has started to disintegrate. You will need to remove and replace the drywall.
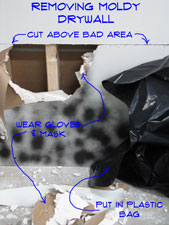
For drywall with mold on it, make sure you dispose of it in tightly sealed plastic bags. Take safety precautions, wear gloves and a mask when you are around moldy drywall.
See the government website for information on the issues, A Brief Guide to Mold, Moisture, and Your Home provides some good information. Disinfect the entire area after the bad drywall is removed. See the article 'Disinfecting Moldy Drywall' for more information.
Testing Moldy Drywall
You may be concerned that the mold that you have is the dangerous 'black mold' that everyone is afraid of. There are many thousands of types of mold that you could have in your home. Only a few of them are toxic and not all of the toxic ones are black.
There has been overactive use of scare tactics with regard to mold. Some of this comes from the media, and some of it comes from companies that want to sell expensive remediation services.
How can you tell what type of mold you have? You cannot tell by the naked eye. The only way to tell is to have it tested. With that said, testing can be expensive.
There are some relatively inexpensive test kits that can tell you whether or not you have a dangerous problem. You can find 'Test Kits' for purchase at the 'My Mold Detective' website. If you want to put your mind at ease, test the mold before you attempt to clean or remove it.
Preparation
Before you disturb moldy drywall, even if you are certain it is not the dangerous kind, you should seal off the area that you are working in. You do not want mold spores to be spread needlessly throughout the house. People with allergies, the young and the old are very sensitive to mold and may react to any type of airborne mold.
Use some plastic and blue or green tape to put a barrier around the area that you are working in. If you do not need to use a door, seal it off with tape. For doors that you need to go in and out of, create a flap in the plastic to walk through.
Remove unneeded items from the room such as carpets, draperies, loose furniture and anything else that you don't want mold spores to damage. If something is too big to move, cover it with plastic. If it is possible to have a fan exhaust the air to the outside this is good idea. Place the fan in a window with direction of air movement pointed to the outside.
Have a supply of large heavy duty trash bags on hand to place the moldy drywall and other debris in as you remove it. You will also need a broom and dust pan to sweep up the drywall dust.
Tools Required
You are going to need the following tools for this project:
- Hammer
- Pry Bar
- Keyhole Drywall Knife
- Utility Knife
- Tape Measure
- Battery Drill or Screwdriver
- 4' Level
Removing the Bad Drywall
For drywall that has been compromised by the water damage and mold you will need to replace it.
Drywall or sheetrock, as it is many times called, is fastened to the wood framing with nails and glue. If the house was built in the last thirty or so years it will likely have screws, especially in the field, holding it in place. To remove it, you need to locate the framing members.
Locating Framing Members
The first step is to determine how much drywall needs to be removed. You want to go somewhat beyond the moldy area. After that you are going to need to locate the studs. You can use a stud finder or tap the wall on either side of an electrical outlet. Since the outlets are attached to the studs, you will find a stud on one side or the other, of the outlet location. Find the center of the stud and measure in multiples of 16" from that point to the closest stud in the area you want to remove.
Once you have located the studs, use a level as a straight edge to mark out your cut lines. Ideally, it will be a square or a rectangle.
Where studs occur and the cut runs parallel, cut the drywall in the center of the stud.. It is harder to cut out the drywall at these locations, but is saves having to install extra framing members.
Cutting Perpendicular to the Studs
You can use a key hold saw to cut out the drywall that is perpendicular to the stud framing. You will have to stop at each stud or joist and skip over it. You should be able to get the majority of the cut done with the keyhole saw. You will need to finish off the cut over the framing with a utility knife.
Cutting Drywall Parallel With the Framing
You will need to use a utility knife to cut the drywall over the framing members. Ideally, you have located the center of the framing and drawn a line down the center. Initially, you will score this line with a utility knife. After you have scored the paper, you will run the utility knife over the cut repeatedly, applying more pressure each time until you cut completely through the drywall.
Removing Moldy Drywall
Make sure you are wearing your gloves and a mask prior to starting. The easiest way to remove sections of drywall is to use the hammer to knock a few holes in it. Once you have a hole you can get your fingers behind the drywall and pull outwardly. The drywall should pull away in bigger sections.
You are going to have places, especially around the fasteners where the drywall will be stubborn. You will need to use a pry bar and the hammer to loosen the drywall at these locations.
Place the pieces that you remove in the plastic bags as you remove them and keep the top of the back closed when not in use. The longer the moldy drywall is exposed, the more chance there is for mold spores to be released.
After you have remove all of the drywall, you will need to remove the leftover nails and screws. For nails you can use a claw hammer to pull them out. Use a Phillips bit in a battery drill to remove the screws. If you don't have a battery drill, you can use a screwdriver.
Replacing the Damaged Drywall
Installing new drywall involves cutting the sheets to the correct size and then fastening it in place. There are various measurements that need to be taken and laid out on the drywall panel. After that, the drywall needs to be cut correctly. Once the sheet is cut, it can be installed at the patch.
The article 'How To Cut Drywall' and 'Installing Large Drywall Patches' has information on all of the steps associated with installing new drywall patches.
Finishing the New Drywall Patch
After you have replaced the drywall where you tore out the old moldy drywall, you will need to tape and finish it. This situation is similar to any other drywall repair project, you have at most five steps to complete the finishing. (1) Applying the drywall tape. (2) Installing a first coat of drywall compound. (3) After a light sanding, you will apply a second coat of compound. (4) After another light sanding, you will want to skim the drywall with a light coat of mud to smooth out the surface. (5) The last step is to sand the drywall to prepare it for a coat of paint.
For a complete discussion on the steps involved with a drywall finishing project, see the article, 'Taping and Mudding Drywall'.
Conclusion
When you have too much of an area that is affected by mold, you will need to remove the drywall and replace it. This is a big job, but a neccessary one. Mold can cause health issues. It is also very dirty and gives off an offensive odor.
Going through the steps above should allow you to remove the drywall and dispose of it safely.