 Sanding spackle needs to be done when the spackling compound has dried completely. You should also sand lightly between coats. Sanding does not take very long, usually only a couple of minutes.
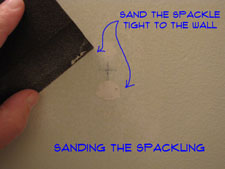
When the spackling paste is dry you can lightly sand it with a sanding sponge or sandpaper. Sand it flat with the wall surface around it.
For related information you want to see the articles on "How To Use Spackling', 'How To Repair Drywall' and 'Patching Drywall'.
Sanding Materials
Sanding Sponges
Sanding sponges are a convenient way to do light sanding especially on drwall and drywall products like spackling. They are made of synthetic material and have a grit formed into the surface. They come in a variety of sizes, with most of them fitting into the palm of your hand.
The other nice feature is that the sponge is formed into the shape of a block, so the surface of the sanding area stays flat. Sanding sponges are sold at the same place that you buy your paint and spackling.
Sand Paper
You can use standard sandpaper to sand spackling, although there are some cautions. The first would be the grit. If the grit is too coarse it will leave scratches on the spackling patch and the surface around it. The scratches can show through the paint and mar the appearance of your wall. If the sandpaper is too fine, you will work a lot harder to get the surface smooth. In fact you may not get the spackling flush with the surface around it.
For sanding drywall or spackling patches, you want to stay with a grit between 100 - 150. This grit range is fairly common and you may already have some sandpaper that matches.
The other concern with sand paper is grooving the surface. When you press down on the sandpaper with your fingers you create pressure points that will sand more away in some spots than others. This can leave you with depressions or grooves on the surface of your wall.
If you are going to use sandpaper it is a good idea to use a sanding block. The block or holder will keep the sanpaper flat against the surface of the wall or ceiling.
Sanding Screen
Sanding screen is typically used for sanding new drywall before it is painted. You can used it to sand patches and spackling. It is designed to fit on a drywall pole sander. This is a special type of sanding block that has a swivel head on it.
The grit range for sanding screen is 80 - 220. Use screen that is in the 100 - 150 range for sanding finished walls that have been repaired.
Sanding Blocks
Sanding blocks come in all shapes and sizes. There are some special ones that are designed specifically for drywall sadning. They take a special precut sheet of sandpaper or sanding screen. For small spackling repairs you probably do not need something this big.
A typical hand sanding block will accept a quarter sheet of sandpaper. These will do fine for sanding small spots where repairs have been made.
Orbital and Electric Sanders
It is not a good idea to use a power sander to sand spackling. You will likely do more harm than good. Spackling paste and putty is a fairly soft material and so is the wall surface around the patch. The power sander can easily dig in too deep and thus ruin the patch, requiring further repair.
Proper Sanding Technique
The main thing to keep in mind when you are sanding walls and ceilings is that you want a flat, smooth surface. Light will catch both indentations and protrusions, however slight they might be. When you patch the wall, you want the patch to be flush with the surface around it, not indented, not raised up, flush.
Try not to rough up the surronding area too much. Cutting grooves or scraching up the surface may show when you apply the paint. Remember, your walls are likely made of drywall. Drywall is a gypsum core sandwiched between two sheets of paper. Scuffing up the paper and raising the paper fibers is not desirable. If this happens, you will have to apply more drywall compound to tighten up the paper fibers.
Lightly sand the spackling with a flat sanding block or sponge. Ideally, at first, you will only sand the build up of spackling. When you get the spackling down close to the surface you want to go lightly, until the patch is blended into the area around it.
Run your fingers over the surface to check for any bumbs or depressions. If you feel raised spots, continue to sand them until they are flat. For indentations, you will need to apply more drywall compound or spackling and let it dry.
Wet Sanding
A slight variation to the above would be if you are trying not to create any dust. Wet sanding can allow you to smooth out the patches and repairs without making a mess. The use of the word 'sanding' is something of a deception. You don't really 'sand' the surface, instead, you dissolve the compound and smooth it out.
The same principles apply to wet sanding that apply to dry sanding. You want to keep the surface flat and blend the patch into the adjacent surface. To do this you use a damp rag wrapped around a sanding block or a sanding sponge. Another alternative would be stiff flat sponge.
You will need to rinse the rag or sponge out often, since you are dissolving the compound with it. Use clean water to do this, rinse the rag or sponge until the water is clear.
Dealing With the Spackling Dust
Dust in another thing to consider when you are using spackling paste or any other type of drywall compound. Sanding these materials will create dust, fine white dust that has a tendency to get everywhere. If you are just doing a few small spots, it is probably not a big concern.
There are four possible options for dealing with the dust, they are listed below along with links to articles that offer more explanation.
For a complete discussion on sanding drywall and drywall patches, see the article 'How To Sand Drywall' for more information.