Search
Drains
How To Install a Sink Drain
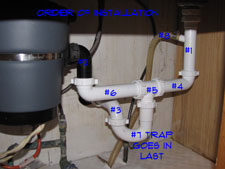 Their is a certain order that should be followed for assembling sink drain pipes. Tail pieces or waste outlets should be hooked up first. The outlet for the trap should go into the wall next. The tee (for a kitchen sink) should go in next.
Usually the last item would be the "J" for the trap. For a double kitchen sink you would want to put the tailpiece and waste arm on one side, then the tee and then the tailpiece and waste arm on the other side.
For a bathroom sink you start with the tailpiece/pop up assembly. Next would be the outlet that goes in the wall. Lastly the "J" for the trap.
Most of the time it is self explanatory. Even if you get them out of order, it is not a big deal to back up and redo them. Assembling sink drain pipes is one of the easier plumbing projects.
Put everything in hand tight to make sure it all fits. Snug up the fittings and check the alignment of everything. Once you are sure that everything is fitting you can tighten the nuts.
For plastic fittings they say hand tight is good enough. I usually don't trust that and go about a quarter to a half turn past hand tight with the adjustable pliers. Metal nuts may require a full turn or two past hand tight. There is some give in these types of fittings. So don't tighten them with a torque wrench.
The concepts are similar for replacing a single piece. Try to keep from disturbing the other pieces when you tighten the new one. Aggravating when you fix one leak and create two others.
Cutting
Cutting sink drain pipes is not difficult. Especially if you go with the less expensive pvc plastic pipes.
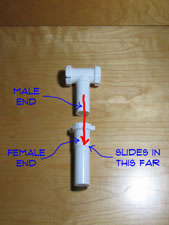
Notice the fittings fit inside one another. So the fittings that slip together have either a male or female end. No explanation on that on, you can figure it out. Some ends are threaded to mate up with a matching piece, like the P Trap.
Due to this feature you will have to allow for the overlap when you measure your pieces. You can tell on the outside of the female piece how far in the other piece will slide in. Mark the piece you are cutting accordingly.
Your use a hack saw to cut the pipe whether it is metal or plastic. The cuts do not have to be perfect due to the overlap. Dry fit the pieces to make sure the are fitting correctly. The piece of drain pipe that goes into the wall will also be cut long. It will go inside the pipe a couple of inches and be held in place by the nut and washer.
Assembling
Their is a certain order that should be followed for assembling sink drain pipes. Tail pieces or waste outlets should be hooked up first. The outlet for the trap should go into the wall next. The tee (for a kitchen sink) should go in next.
Usually the last item would be the "J" for the trap. For a double kitchen sink you would want to put the tailpiece and waste arm on one side, then the tee and then the tailpiece and waste arm on the other side.
For a bathroom sink you start with the tailpiece/pop up assembly. Next would be the outlet that goes in the wall. Lastly the "J" for the trap.
Most of the time it is self explanatory. Even if you get them out of order, it is not a big deal to back up and redo them. Assembling sink drain pipes is one of the easier plumbing projects.
Put everything in hand tight to make sure it all fits. Snug up the fittings and check the alignment of everything. Once you are sure that everything is fitting you can tighten the nuts.
For plastic fittings they say hand tight is good enough. I usually don't trust that and go about a quarter to a half turn past hand tight with the adjustable pliers. Metal nuts may require a full turn or two past hand tight. There is some give in these types of fittings. So don't tighten them with a torque wrench.
The concepts are similar for replacing a single piece. Try to keep from disturbing the other pieces when you tighten the new one. Aggravating when you fix one leak and create two others.
Sink Drain Plumbing Parts
 There are a lot of ways that sink drain plumbing parts can fit together. Different sinks and configurations will require different parts.
Not your problem? See 'Home Plumbing Repair' for a complete listing of all plumbing topics or 'Fixing Plumbing Drains' for a listing of drain related articles.
If you have the dreaded clogged sink see 'How To Unclog a Drain'.
It is impossible to cover every possible situation. Instead we will try to discuss the various parts, their purpose and how they fit together.
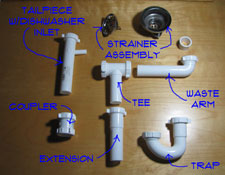
There are many variations of sink drain parts. We will try to address the common ones.
P Trap - This is a two piece fitting that makes the trap. Water stays in the bottom of the trap to keep sewer gases from getting into the house.
S Trap - Similar to the P Trap the S Trap is used when the drain is in the floor instead of the wall.
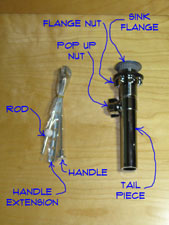
Tailpiece - This is the piece that is connected to the strainer on a kitchen sink. For a bathroom sink the tailpiece and pop up assembly are all one piece.
Tee - Tees are used for double sinks, usually in the kitchen.
Waste Arm - The waste arm connects the tailpiece to the tee on a kitchen sink. You will usually have two of them.
Elbow - Used sometimes on odd configurations. Most of the time this piece is not necessary.
 Extension Tube - Used to extend the tailpiece or other pieces that are too short.
Coupler - Used to connect two pieces of drain pipe together. Usually not needed but useful if you cut something too short.
Sink Strainer - The hole in the bottom of a kitchen sink is filled with a sink strainer. This piece seals the opening and directs the water into the drain pipes.
Pop Up Assembly - This assembly is used for a bathroom sink.
Before you disturb anything you want to take a picture of your configuration or make a sketch. Take some measurements, since many of the items come in multiple sizes. When you go to purchase parts you will want to take your picture or sketch. Try to identify each of the parts you have so that you can get the right ones.
Plastic fittings are definitely easier to work with. However, you do not want to mix them. For homes with chrome or brass fittings you want to use metal replacement parts. Unless you are replacing everything and then you can switch to plastic. Already have plastic? Great, no problem at all.
How To Use a Drain Snake
 Using a snake on drains is what most people think of for this type of problem. Snakes are made of coiled spring steel the allows them to twist and turn through a drain line. They have an end on them the will give the clog a good jab. Electric snakes range in size from a small drill mounted unit to very large main sewer line snakes.
For related information see 'Troubleshooting Drain Problems' and 'How To Clean a Drain'.
Size matters with snakes. A twenty five foot snake that works for you bathroom sink will be woefully deficient for a main sewer line. Distance is an issue. How far is your drain from the main sewer line. You need a long enough snake to reach that distance.
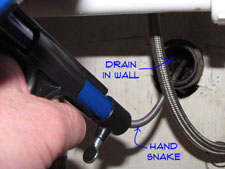
Another big problem with a snake are traps. Look below your sink. Do you see the "P" or "J" shaped piece of pipe? That is there to keep sewer gases from getting into the home. The trap always has water in it to stop the gases.
A floor drain, shower drain and bathtub drains all have traps that are hidden from view. Using a snake on drains with traps is harder. Hard, not impossible. Be aware that the resistance you get a few feet in is likely the trap and not the clog. Unless of course the clog is in the trap, which is common.
The article on 'Unclogging Kitchen Sink Drains' will give you better instructions on using a small snake. For a use of a snake on a bathtub, see 'Unclogging a Bathtub Drain' for more information. That will leave us with floor drains and shower drains as likely candidates for a snake. You are likely going to need an electric snake for these drains. If you have a hand snake, try it first. Apply pressure and turn the snake to get through the trap.
WARNING!! Electric Snakes Can Be Dangerous!!! Keep Control of the Snake at All Times!!!
When you use an electric snake you have keep the unit as close to the drain as possible. Hold the snake with rubber gloves and keep it straight as it turns. Apply pressure and let it work through the trap. Do not allow the snake to form a loop, it can double back on itself and twist up. Fingers that get caught in this will not do well. They can even be broken. Not to mention it can ruin the snake.
When the clog breaks free you want to keep going with the snake. Run it back and forth through the problem spot. In addition run some water down the drain while the snake is running. This will wash the debris away and help to clean the snake. Yes, this is dirty water. Learning how to unclog a drain with a snake is a little tougher. Hopefully you have gotten through it ok.
Sink Drain Plumbing
 In recent decades, sink drain plumbing is done with plastic pipe and fittings. This has mostly replace the old chrome plated brass pipe that was popular for a long time. Chrome plated brass is still available, but it costs more and is harder to install.
For related information see the articles 'Troubleshooting Drain Problems' and 'Repairing a Clogged Kitchen Sink'.
The drains take away the excess water when you run the sink. A lot of times the water is dirty and the drain takes it to the sewer. The sink drain also provides drainage for the dishwasher and garbage disposal. Any time you have water involved you can have leaks. When you have drains, you have a potential for clogs.
Years ago all sink drains were made of brass sometimes with a chrome coating. The metal pipes will corrode over time and need to be replaced. You can still buy the brass fittings, but they cost more than the plastic ones do.
Read on and find out if this is the kind of repair that you want to tackle. The evaluations will help you determine if it is worth your time. After you consider the information decide if you want to repair your sink drain plumbing.
Repairing Sink Drain Plumbing - Information
What Can You Save?
An experienced plumber can replace some or all the parts on your sink drain plumbing in a half an hour. It may take you a little longer. Allow $50 to $75 for the service call and $25 to $75 for parts. The higher figure would be for the chrome fittings.
How Hard Could It Be?
Working on sink drain plumbing is not that hard and requires a minimum of tools.
Check the Simple Things!
Leaks can often be taken care of by tightening one of the nuts. Try to determine which fitting is leaking and tighten it, gently, but firmly. See below for more info.
What Can Go Wrong?
Sink drains can be a little messy. The trap will have some dirty water in it. For a clogged sink you will have more dirty water. Take precautions for dealing with the water. Not having the right parts can also be a problem. Finding parts late at night may not be easy. Try to anticipate what you will need ahead of time a few extra nuts and washers is a good idea.
Troubleshooting Sink Drain Plumbing Problems
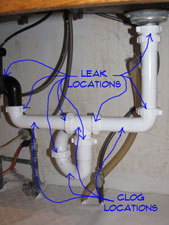
Troubleshooting sink drain problems is a process of elimination, several things can be wrong. The first would be leaks. A lot of time tightening the fittings is all that is needed.
For old chrome or brass pipes they may have corroded and started leaking. In that case you will have to replace them.
Tightening up the fittings can eliminate most leaks. It is easy, just use a pair of adjustable pliers. Hold the fitting with one hand and use the pliers on the nut. Don't over tighten. You want them snug not stripped.
Another reason would be a clogged sink. Getting rid of a clog might involve taking some of the drain pipes apart. Many times you will find the clog in the drains. Other times the line will need to be snaked to fix it. You will need to remove one or more fittings to get access to the drain line.
Modifications and home improvements can also cause you to disturb the sink drain plumbing. A new disposal or a new sink would be a great addition to the kitchen. You will probably need to make adjustments when you replace or revise the fixtures.
Knowing the names of the parts and what they look like is helpful. The article 'Sink Drain Parts', provided you with some pictures and a brief description of the various components you may need to use.
Most of the time, drain pipes will need to cut to fit. There are a few tricks and the article 'Cutting Sink Drain Pipes', showed you what they are.
Finally, the article 'Assembling Sink Drain Pipes' discussed putting the plumbing pipes together. Tightening them correctly is important so that you do not get leaks.
Summary
You have found out by now that sink drain plumbing is not that difficult. The hardest part is getting the right parts. If you take your time and cut everything the right length things will go smoothly. Sink drain plumbing can be rewarding.
Perhaps not as rewarding as painting or sculpting, but close. Well maybe not close, I've heard of painters that get really get into their work, maybe close. Now that you are done with this project you can decide what you want to do next on your list.
Using Water Pressure on Drains
 Using water pressure on drains sounds funny, but it can work. Yes you can, but you may need to get some special tooling. A tool called a drain bladder can be attached to a hose to clean out a drain.
For related information, see the articles 'How To Clean a Drain', 'Using a Snake on a Drain' and 'Troubleshooting Plumbing Pipes'.
Water Pressure Cautions
You need to use some caution when using pressure on a drain. A big concern with using water pressure is that you are introducing more water into the drain. If the drain does not open up, you could have a bigger mess on your hands.
Do not try to use pressure on the compression fittings under your sinks. You could blow them apart and make bigger mess. The same rules apply for putting pressure on a line as do a plunger. You will need to close off any other drains that are on the clogged side of the blockage.
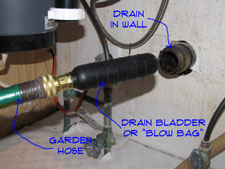
A blow bag is a simple device that fits into the drain and expands when you attach a garden hose to it. The water pressure builds up inside the pipe and the clog breaks free and is washed away. When it works properly, this method can be less messy than a snake. Unfortunately, it does not work for all types of clogs. Tree roots would be an example. Pressure will not remove them.
Using a Drain Bladder
Insert the blow bag with a garden hose attached to it, into the pipe in question. Turn the water on and wait for the bag to expand. Remember, you are introducing more water into this situation. Make sure you have stopped up any other drains connected to this line. If you don't the water will just come out there.
Not much else to do, just give it some time. You should be able to hear the water running freely in the line when the clog has been removed. Using water pressure on drains is not hard, but it can be messy.
Water Rams
Another pressure device is a water ram. This is not a common item in most homes. Think of it as a plunger on steroids. It sends a blast of air into the pipe that is hopefully strong enough to break up the clog. This method can work for clogs that are too difficult for a plunger.
Caution on the use of pressure is warranted with this device. The pressure will blow out at the weakest point. This could be the fittings on another sink or a corroded section of pipe in your basement.
A water ram will cost hundreds of dollars to purchase. Not normal homeowner fare. You may be able to rent one locally if you want to try this route. Get some instructions for its use if you do.
Summary
Using water pressure can be an effective way to clean a drain. The added water can help to wash all of the blockage down the drain. This method is not used as much as other methods and can sometimes cause additional problems.
If you were not successful in unclogging your drain, see the articles 'How To Clean a Drain', 'Using a Snake on a Drain' and 'Troubleshooting Plumbing Pipes'.