Exterior Doors
Fixing Exterior Door Weatherstripping
 Why do you even need weatherstripping for doors? Why don't they make the doors so they fit tight and the air doesn't leak? Sounds great on paper, but you would never be able to open or close the door if it was that tight. Doors have a gap around the perimeter. Guess what? Air comes in around those gaps. In the middle of winter it can be very cold air.
For related information, see the articles 'Troubleshooting Exterior Door Problems' and 'Adjusting Exterior Doors'. Is is possible for your door to be out of adjustment, causing the weatherstrip to not work correctly.
Weatherstripping is used to provide a flexible seal between the door and the frame. It keeps out the cold air. There are many types and sizes of weatherstripping. Some work better than others. They all work on the same principle, they are intended to stop the air leaks.
Over time the seals can go bad or get loose. When this happens the air leaks in again and you need to do something about it. At this point, you are wishing your air conditioner would blow this much cold air in the summer time.
Weatherstripping for Doors - Information
What Can You Save?
A carpenter or a handyman service will need to charge you for coming out. Then you will need to pay for the new weatherstripping and the time it takes to put it in. This will run you between $50 and $100.
How Hard Could It Be?
Dealing with weatherstripping is pretty easy.
Check the Simple Things!
Weatherstripping is fairly simple. Some types are fastened with slotted screws. You may be able to loosen the screws and adjust the weatherstripping.
What Can Go Wrong?
Taking off the old weatherstripping without replacing it with new can leave you with a door that really leaks air. In a real pinch, put some masking tape over the cracks at night.
Weatherstripping for Doors - The Steps Involved
There are three types of weatherstripping that are commonly used on doors. In older homes, you may find metal weatherstripping that had two parts that fit together to form a seal. A common retrofit type is made of foam or rubber. Although this type is easy to install, it also does not last very long.
Newer doors, usually metal or fiberglass may have weatherstrip that fits into the frame of the door. The door pushes up against this type for a nice seal. This type only works on a door the specially mortised to recieve it.
Metal Weahterstripping
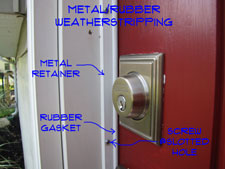 Adjusting metal weatherstripping is not difficult and can save a lot on heating and cooling. There are several styles of metal weatherstripping, most of them are adjustable. One type that is sold commonly today consists of an extruded aluminum track with a rubber seal that fits into it.
This type usually has slotted screws that allow for some adjustment. First check to make sure that the rubber seal is in good condition. It should still be pliable, not dried out or cracked. It should not be missing portions along the door.
Are you satisfied that the rubber seal is still working? Remember it is the rubber seal that is doing the work. Close the door and stand on the outside. Do you see any gaps between the rubber seal and the door. Loosen the screws and snug the rubber seal up to the door, slightly compressing the rubber. Tighten the screws. Check the entire perimeter of the door in this manner. The weatherstripping should be snug on all three sides of the door. That's all it took, loosening a few screws? Wow, another weatherstripping for doors success story.
You can buy a replacement set for this type of weatherstripping for about fifteen dollars. You need a hack saw to cut it to length. Use the screws that are provided to screw it in place. With the door closed snug the rubber gasket to the door. Run the screws into the slots in the metal track.
Foam Weatherstripping
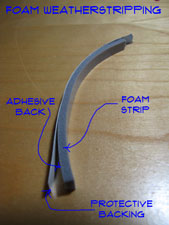 Replacing rubber weatherstripping is not that difficult. This is the kind that is either rubber or foam and has an adhesive strip on the back. There are several configurations of self stick weatherstripping available. Check to see if the original material was thick enough to seal the door. You may need to obtain thicker material if there were gaps. Remove with a scraper weatherstripping that is dried out, missing or cracked.
Packages of this type of weatherstrip come with enough material to do one door (17 lineal feet). Don't mess around, replace it all when you do it. Take a piece with you to obtain a similar product. The important feature is the thickness. It has to be thick enough to fill the gap and be compressed when the door is closed. Material that is too thick will interfere with the operation of the door.
Peel the backing paper off the new weatherstripping and press it into place, starting at one end and working to the other end of each side of the door. This stuff can be a little frustrating, take your time. Working with a wet noodle comes to mind. Use a utility knife to trim the excess. Close the door and check to see if you have a good seal all the way around the door. Everything looks good? Then you have mastered all the skills needed for dealing with weatherstripping for doors issues.
Integral Weatherstripping
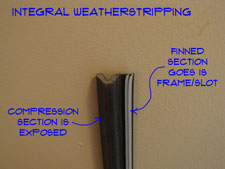 Replacing integral weatherstripping occurs when it has worn out. Integral weatherstripping is the type that seems like it is built right into the door frame. Actually, it is very easy to change.
Newer homes (say the last twenty years or so) may have exterior doors that have the stop rabbited into the door jamb. The door jambs are 5/4” material on the stop side of the frame and 3/4” on the door side. At the step there is a slot cut into the frame that provides a place for a specially made weatherstrip to be inserted. This is great stuff.
To remove it, you just firmly pull it out of the slot. No glue or screws. It is sold in 7' lengths at most lumber and home stores. You can replace one side or all sides as needed. White and black are the two available colors. Cut the length about a half of an inch long and install it. Use a utility knife to trim it as needed (sharp blade, be careful).
Summary
For related information, see the articles 'Troubleshooting Exterior Door Problems' and 'Adjusting Exterior Doors'. Is is possible for your door to be out of adjustment, causing the weatherstrip to not work correctly.
Repairing or replacing weatherstripping for doors is not too hard of a job. By now your door should be sealed up and you should be warm or cool, depending on the season, with no drafts from your door. Well done.
Repairing Exterior Doors
Repairing exterior doors is a common need! There is no need to install a new door when things go wrong, instead you can repair you existing door and get it working like new.
Locks, deadbolts, weatherstripping and adjustments are all important features of an exterior door. These items and wear out, break and get out of adjustment. With a few tools and a little know how, you can repair these items.
Not sure if this is your problem? See the article 'Fixing and Repairing Doors' for a complete listing of all of the door topics.
Most home have a front door and other doors that lead to the outside. One key issue with this type of door is security. The door and hardware protect us from unwanted visitors. Keeping the hardware working properly is an important safety feature. Another issue is the weather on the outside of our home. We need our exterior doors to keep us both warm in the winter and cool in the summer. Weatherstripping and thresholds accomplish this task.
Below you will find links to articles that discuss key topics about exterior doors. Try to find the article that best describes your problem. The articles will provide you with useful information and how to knowledge on repairing this type of door.
Repairing Exterior Doors - Finding Help
The introduction to each series of articles has an evaluation section. This section will help you decide if you want to repair your own exterior doors. The "What Can You Save?"and "How Hard Could It Be?" sections give you a quick overview of the repair. This will help you decide if it is using common sense or good judgment to make the repair yourself.
The "Check the Simple Things First" section will clue you in to easy, exterior door fixes to check for. The 'Simple Fixes' usually take five minutes or less. In an effort to warn you about what you are in for, there is the "What Can Go Wrong" section. Use this section to benefit from the experience of others, without the discomfort.
Entry Door Repair
Entrance doors take a lot of abuse, both from the weather and from constant use. Bringing things in and out of the home can damage the door. Heat, cold, snow and rain will all take a toll on the functioning of an exterior door.
There are three common things that will need attention. (1) The door itself will get out of alignment and need adjustment. (2) The hardware will wear out or start to malfunction. (3) The weatherstriping will fail and not keep out the elements. Follow this link for a discussion on these issues.
Rusty Hinges
The door is supported in the frame by hinges. Usually three or four on an exterior door. Hinges can rust and start to bind, making it difficult to close the door. In addition, they will make a lot of noise. What can you do with them? Lubrication or replacement are the two likely choices. Find out what it is that you need.
Screen Door Repair
Screen doors or 'Storm' doors as they are sometimes called are an added level of protection for a home. They can allow air into the house during moderate seasons. They also keep out the elements and protect the main door. These doors are installed and operate differently than traditional doors. This article discusses the problems and solutions.
Exterior Door Hardware
Entrance doors will often have both a door lock and a deadbolt. When they are bought as a set these locks use the same key. Lubrication and alignment are critical with door locks. Can door locks and deadbolts be repaired? Yes they can. At times they will need to be replaced. This series of articles will provide the needed skills.
Fixing a Screen Door Hinge
 Can you fix a screen door hinge? Most of the time the answer would be yes.
Not sure if you are in the right place? See 'Troubleshooting Door Problems' for more information.
The first thing to do would be to define what you mean by a 'screen door'. A screen door used to consist of a wooden frame with screening in the middle. This was to keep the bugs out when you opened the regular door on a hot summer day. Screen doors have evolved and become more complex
Now a screen door may include glass or plexiglas and be an all weather door. Via a sliding mechanism you still may be able to have a screen when you want it, but not always. Screen doors or 'Storm Doors' as they are called are also decorative. They add both beauty and protection to a home.
You can still get a plain old screen door with a wooden frame. Yes they still keep the bugs out on hot summer days. They don't come in decorator colors and they don't have glass to keep the wind out. The hinges for the simple wooden ones are easy to replace. The same is not true for many storm doors.
Fixing a Screen Door Hings - The Issues
What Can You Save? - Replacing hinges on a screen door is not too hard, provided that you can find the right size. Allow around $75 for someone to come out and do this. This is a good opportunity for you to be sold on a new storm door. When this happens, you could be looking at $250 of $400.
How Hard Could It Be? - Changing screen door hinges when you have ones that match is fairly easy. These repairs will have a Difficulty Level of: Simple. These repairs require a Skill Level of: Handyman. For and explanation of the terms in this section, see 'How to Use This Site'.
Check the Simple Things! - Try lubricating the hinges if they are just sticking or squeaking. A little oil can work wonders sometimes. See the article 'Fixing Squeaky Door Hinges', for more information.
What Can Go Wrong? - Don't take the door off unless you are sure you can find replacements for the hinges. Best thing to do is take off one hinge and try to find a set that matches. There is an aluminum rail that is mounted on the door frame. When this loosens up, it may seem like the hinges that are causing you trouble.
Lubricating Screen Door Hinges
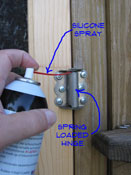 Lubricating screen door hinges can be quick and easy. Follow the instructions below.
The first thing you need to get, to lubricate a screen door hinge, is some silicone spray. You can get a can for less than five dollars at a home supply store. You want to get the kind of can that has the red tube taped to the side. Another important tool will be a rag.
Keep the rag handy during this operation. Quickly wipe up any excess oil, to avoid damage or stains to other surfaces. After you apply the lubricant, you want to repeat the process with the other hinges. Remember, take pins out one at time. You don't want the door to fall down. After you have lubricated all the hinges, open and close the door several times. The door should start to free up and quiet down.
For stubborn or long neglected doors you may need to repeat the process. Carefully apply additional oil until the door works smoothly and quietly.
Purchasing Screen Door Hinges
The old fashioned wooden screen doors will have spring loaded hinges. These hinges are normally surface mounted. For this style, size is not a critical issue.
It is still a good idea to take an old hinge with you when you go shopping. Color and hole alignment may matter. Replacing the hinges with the same size and style is the easiest.
Hinges for storm doors may be a little more of a challenge. They are usually fitted to the frame. The size will matter when you try to replace them. Again, the best course of action would be to take an old hinge with you to the hardware store. Remove the middle hinge for this step. The door will still be supported by the top and bottom hinge.
Storm door hinges will be made of either steel or aluminum. Hopefully, your home supply or hardware store will have a selection and you can match them up. The next step, would be to look online.
Before you do this you want to measure the hinge. Screen door hinges are measured by the height and the width across both faces of the hinge. You take this measurement when the hinge is lying flat. See the article 'Door Hinge Sizes' for more information on measuring hinges.
Replacing Screen Door Hinges
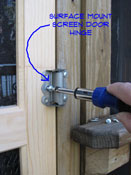 Replacing screen door hinges will only take a few minutes per hinge, as long as you have the right ones.
A screwdriver or a battery drill is all you need to replace most hinges. A traditional 'screen door' will have surface mounted hinges that will not require mortising.
Remove one hinge at a time and replace it with the new one. Most screen doors will have three hinges. You always want at least two hinges in place at any given time. If you only have two hinges or you have to take off more than one at a time, you will need to take the door off.
Make sure all the screws are snug before you move onto the next hinge. Repeat this process for all three hinges.
After you have replaced all the hinges, you want to try the door. Make sure it is closing properly. That's about all there is to it. When the door won't close, check to make sure you have everything tight. A screw head that is sticking up will bind the hinge and make the door not operate correctly.
Summary
How did things go with your screen door hinges? Were you able to lubricate them get them working again. That is good news. Oiling hinges is not that hard at all. Or were the hinges in too bad of shape? Then you probably needed to replace them. The trick to replacing them is finding the right size replacement hinges. After you found the hinges, replacing them only should have taken a few minutes.
Hopefully, you are all done with your screen door hinges. Now you can think about other projects that you have around the house. Check out all of the home repair articles for more help.
Door Threshold Replacement
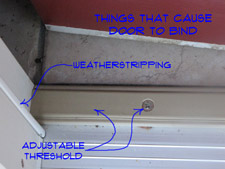 Entry door hardware and the weatherstripping can cause a door not to close properly. The entry door hardware includes the door lock, the deadbolt, the hinges and the door strike. Alignment and failed parts can be responsible.
Is something that is attached to the door or the frame, causing it to bind? Requiring you to make an entry door repair. Try to determine what is responsible. Weatherstripping may be too tight. You want it to stop the air, not stop the door from closing. Adjust or replace items as needed if they are binding the door.
You want an entry door to fit snugly, but not so snug that it takes two men and a little boy to get the door closed. Set the weatherstripping so it stops the air and allows the door to open and close. See the article on Weatherstripping for Doors, for more information.
The strike plates on the lock set can cause the door to bind. You can remove the strike plate and use a chisel to remove some wood from the mortise. The plate should be flush with the jamb and not protrude out. Strike plates should not be fastened on top of the jamb. They should be recessed in. See the article on Door Lock Repair, for information on the proper installation of the strike plate.
Adjusting Entry Doors
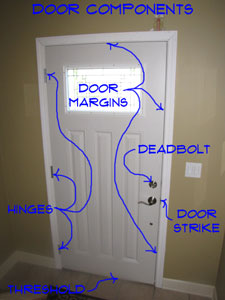 Adjusting entry doors is not that difficult. Most of the time the door is sagging and an adjustment to the top hinge will solve the problem.
Not sure if this is your problem? See the article 'Fixing Residential Doors' for a listing of all the door problems and links to the resources needed to fix them
Inspecting the Door
The first thing to do is look at the door from the inside when it is closed. There should be an even gap across the top and down the latch side. This gap occurs between the door and the frame or jamb. It should be about an eighth of an inch and be consistent.
Often, you will see that the door on the hinge side is tighter against the frame at the bottom of the door. This is where most of the weight of the door is pushing against. When this happens the gap at the top will be uneven, wider at the strike side of the door. The top of the door will be closer to the jamb or frame at the top.
Sagging Doors
If the door is tight against the frame at the top and there is a gap at the bottom, the door is sagging. If the door is hitting the sill, it will still be indicated in the margin along the latch side. Is the gap wider at the bottom and narrower at the top? Yes, then the door is sagging. The sill is keeping it from sagging as much as it wants to.
Sagging doors are the problem most of the time. The weight of the door pulls against the top hinge and over time the door will sag. This is especially true when the screws for the top hinge are not long enough to go into the door frame.
Problems With Hardware
A sagging door will also cause problems with the door locks and dead bolts. If the door sags too much the latches will not work correctly. Before you start replacing hardware, or moving the strike plates, make sure the door is properly adjusted in the frame. See the article on 'Adjusting Door Lock Strike Plates' and 'Aligning Doors to Strike Plates' for more information.
Fixing a Sagging Door
Open the door back up and remove the two inner screws for the top hinge. How long are they? An inch or less? This means that the hinge is only being supported by the door jamb itself, not the framing lumber for the wall. Are the screws long, say 2 ½ to 3 inches. That's good, all you will need to do is tighten them up. Adjusting entry doors could be that easy.
If you have long screws, make sure the heads are not stripped. For short screws you need to obtain some 3” number 8 screws. Square or Torx drive are better, but phillips head will work. Install the long screws, angling them slightly toward the center of the jamb.
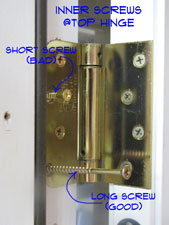 Snug them up and then check the margins again. Still sagging? Tighten them a quarter turn at a time until the margins are even and the door closes properly.
More is not better in this situation. If you over tighten the door will bind in another direction and you will have to start over on your adjusting entry doors project. Tighten until the margins are even and the door closes easily and then stop. With the long screws in place you may have to snug them a little from time to time. Five minutes now that you know how. Door closes, Great! Go to the next project on your list.
Adjusting the Door In Another Direction
It is possible that the door could be binding in another spot. The door may be tight against the bottom of the jamb. This is more likely due to a door jamb that is out of alignment. See the article on 'Fixing Door Jambs' for information on what can be done with the jamb.
A long screw per the procedure above could be used to draw up the lower hinge. It is rare that this would need to be done, so use caution when trying to adjust the lower hinge. Tightening it could make the top of the door go out of alignment again.
Summary
Many of the problems you will have with exterior doors can be corrected by getting the door properly aligned. From the above, you have learned that most of the alignment or adjustment issues are related to the top hinge.
Securing and adjusting the top hinge is not difficult, once you have the right fasteners and tools.


