Search
Toilets
How a Toilet Works
 How a toilet works is some helpful information that you might want to know. Fixing a toilet is a little easier when you know about the basic operation.
Not what you wanted? See 'How to Fix a Toilet' for all the toilet repair articles or 'Plumbing Repair' for all of the plumbing topics.
Toilets use water and pressure to flush. The pressure is created by gravity and pipe sizing. The water is stored in a tank until needed. When these two ingredients are properly balanced, the waste disappears and all is good.
Of course it is not quite that simple. The water needs to get into the toilet somehow. The tank needs to fill to a certain level. When the toilet is flushed the water needs to be released into the bowl. After all that, the tank needs to refill and be ready for the next time it is needed. All of these are related operations to the workings of a toilet.
Competition and government regulations have contributed to advancements in toilet technology. As time goes on, the functioning of toilets may change. For now, the basic operation is essentially the same as it was a few centuries ago. Does history interest you? See the article 'The History of the Toilet', for the exciting story of the development of the toilet.
How a Toilet Operates
 A toilet operates by allowing a large amount of water into the bowl quickly. This creates a siphon action that literally sucks the water and waste out of the bowl.
For toilet repair topics, see 'How to Fix a Toilet' or 'Home Plumbing Repair'.
To say that a lot of engineering goes into making that work, would be an understatement. Not only do you want the waste to go away, but well designed toilets also rinse the bowl out when it flushes.
Toilet Plumbing
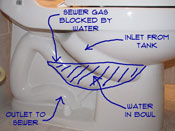
A toilet is connected to a household plumbing line that connects to the sewer at the street or a septic system. To keep from getting fumes back into your house, a toilet has a trap built into it. The pipe that goes through the base of the toilet is sort of 'S' shaped.
The shape of the trap insures that there is always water in the bowl. The water blocks the foul smelling air that would otherwise escape from the sewer line. Worse than 'foul smelling' sewer gas can be dangerous, that is why all plumbing devices in your home have a trap.
The Toilet Tank
The toilet tank stores a supply of water that is released quickly into the bowl when the toilet is flushed. When the water level in the tank is lowered the toilet fill valve engages refilling the tank. The fill valve has a float on it that shuts the valve off when the tank is at the proper level.
Toilets use a lot less water than they used to. This is driven by an effort to cut down on fresh water usage. See the article 'Toilet Water Usage' for more information. The government has imposed restrictions on how much water a toilet is allowed to use for each flush.
Toilet Flappers
The toilet flapper along with the flush valve is the part that releases the water into the bowl. The flapper lifts up when you engage the handle and allows all of the water in the tank to escape in a few seconds.
The flush valve has a short sectin of pipe with seals on it that provides a passageway from the tank to the bowl. In one piece toilets this may be part of the casting.
The Flushing Action
Gravity and the design of the inlet into the bowl create water pressure that is directed toward the outlet side of the trap. The rushing water creates a siphon effect that sucks the balance of the water and any waste out through the trap.
How a toilet works is controlled by the siphonic action of the water rushing through the trap. Gravity and water pressure are the two main factors. This is, of course, a simple explanation. Engineers that are working on toilets will say it is much more complex. The truth is that toilets have been in use for the last few centuries and a lot of improvements have been made over time. Yet, the basic functioning of a toilet has not changed that much.
Toilet Water Usage
 Toilets use water, so there is an expense for every flush. Obviously, toilets that use less water are desirable.
For toilet repair topics, see 'How to Fix a Toilet' or 'Home Plumbing Repair'.
Laws Concerning Toilets
In the past several years, the main focus has been on how much water a toilet uses. Since 1992 it has been a requirement that toilets use no more than 1.6 gallons per flush. This posed a problem for manufacturers, requiring major design changes.
Prior to that time toilets typically used 3.5 gallons. That was considered a 'water saver' style. Down from 5 and 7 gallons in decades gone by. In the beginning of this overhaul, they did little more than change the water level in the tanks.
Water Usage Developments
The first 1.6 gallon flush toilets did not work well at all. When the laws were first implemented, manufacturers did little more than lowering the level in the tank. With less water in a bowl designed for more, the toilets flushed poorly.
Many times the toilet would have to be flushed more than once. Flushing the 1.6 gallon toilet two or three times effectively defeated the purpose of lowering the water level.
In addition, the toilets clogged often. Clearing away a clog and then cleaning up afterward was not what people wanted.
Homeowners complained about the aggravation and mess. Steps were taken to make improvements. Engineers had to evaluate how a toilet works with the new standards in mind.
Improvements Over Time
Over time, engineers came up with better designs that flushed properly and did not clog using the 1.6 gallon requirement. The newer designs do a pretty good job on both flushing and water usage. Engineers were inspired by this and have now come up with toilets that use even less water.
There are toilets available that have a water usage of 1.2 gallons and only .8 gallons for liquids. This style of toilet makes use of pressure assist technology and tend to cost more than conventional toilets.
You will need to be the judge of whether these toilets are worth the extra money. Check out the reviews before you purchase this style to make sure the performance will be acceptable.
Common Toilet Repairs
With the new toilet designs, you might think that toilets are now problem free. They do have fewer problems than they used to, but they are not problem free.
For toilet repair issues, see the article 'How To Fix a Toilet'. For all plumbing problems you can review 'Home Plumbing Repair'.
Maintenance and repairs are still required from time to time. A clogged toilet is still a possibility. Foreign objects and too much volume can account for this. Toilet clogs are a dreaded occurrence, however, they can be taken care of quickly.
Toilets use water to operate. This means that leaks are a possibility. A toilet actually has several places that it can leak from. That is a little discouraging. Fortunately, when properly installed, leaks on a toilet are not that common.
Internal components like the 'toilet fill valve' and the 'toilet flush valve' can cause problems. Both of the devices control the water in the toilet. They are inexpensive parts and can be replaced.
Repairing Toilet Tank Levers
 It is rare that the toilet tank lever is responsible for problems with your toilet.
Do you have to jiggle the handle to get the toilet to flush correctly. This is probably not the handles fault. Check the 'Toilet Flapper' or the chain that is attached to it for correct adjustment. The same would hold true for a toilet that is running either constantly of intermittently. Go to the Article on 'Repair a Running Toilet' for the correct information for solving this problem.
Not sure what your problem is? See the article 'How to Fix a Toilet' to troubleshoot your problem.
The repair that you want to make may mean replacement. Follow the information below to check for problems and make the appropriate repairs.
Repairing Toilet Tank Levers - Information
What Can You Save?
If you call a plumber it would be a service call, $50 to $100 plus parts. Likely a new handle would be installed.
How Hard Could It Be?
This repair requires that you have some basic skills with simple tools. This is a very easy toilet repair.
Check the Simple Things!
Check the adjustment on the chain for the flapper valve before you buy a new handle. The chain should not have too much slack or the handle will not cause the flapper to lift high enough.
What Can Go Wrong?
Be careful when tightening or loosening the nuts for the toilet tank lever. You can crack the tank if you use too much force. If you are careful you should not splash any water on any other surfaces. Take precautions if you think you will splash water. You can flush the toilet by manually pulling on the flapper chain if for some reason you obtained the wrong handle.
Repairing a Toilet Tank Lever - The Steps Involved
There is not much that can go wrong with a toilet tank lever. Its only function is to move up and down to pull on a chain that is attached to the flapper valve. Adjusting the chain so that the flapper opens correctly is a simple task. The finish on the handle can corrode and look worn. You may want to replace the handle for that reason.
Types of Toilet Tank Levers
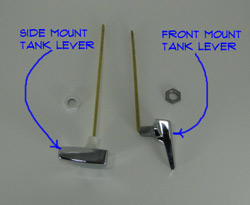 There are several toilet tank lever styles. The finish on the exposed part of the handle can vary. From a functional point of view there are two common styles of toilet tank levers. A front mount or a side mount.
Most of the time, the levers can be used on either side of the tank. The bar that lifts the chain needs to be reversed, depending on the handing that you need.
Front mount is the more common style. When purchasing a new tank lever, make sure you get the correct one. The package should be marked showing the front or side mount designation.
Getting the wrong handle may cause you to question your home repair skills. Don't, just go back and get the right one at the store. This is not a serious physiological issue, just a mistake.
Removing the Old Lever
Removing a toilet tank lever is not too hard. There is usually just one nut that holds it in place.
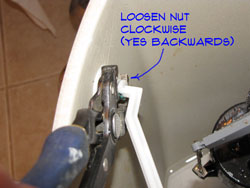
Shut the water supply off and drain down the tank by flushing it if you do not want to work in the cold water. Using a pair of adjustable pliers loosen the nut on the lever by turning clockwise. Yes this is correct the nuts are threaded left hand or backwards from what you would expect.
The nut may be badly corroded and difficult to loosen. Do not try to force it. Use a hack saw to cut through the shank nut. Unhook the chain from the flapper and the handle should be free. Remove and discard.
The hole that the lever was connected to may be discolored and corroded. This is a good opportunity to clean it up. Use a plastic scrubber and some bleach based cleaner to clean up the area. Now you are ready for the new toilet tank lever.
Installing a New Tank Lever
 Installing a toilet tank lever is simple once you have the old one removed. By now you should have purchased a replacement lever and you are ready to go.
Clean any corrosion or residue off of the finished surface of the toilet. Insert the new handle and tighten the nut with your fingers, turn counterclockwise, yes it is backwards.
Do not over tighten with pliers, you could crack the tank. Attach the chain for the flapper at the appropriate hole on the lever. More or less vertical from the flapper. Leave the minimum amount of slack on the chain so that the flapper will open correctly.
Flush the toilet a couple of times to make sure the flapper is opening and closing correctly. Everything working fine? Great, that's all there is to it. Good Job!
Summary
So, what were you faced with on this repair? Was the chain tangled? That should have been pretty easy to take care of. The toilet tank lever is such a simple device that repairing it usually involves replacing it with a new one.
Following the steps above you were able to successfully accomplish this task. This was an easy job and should not have taken up much of your time. Now you can move on to more pressing matters in your life. Maybe a well deserved nap.
How To Drain a Toilet
Knowing how to drain a toilet can save you a lot of mess when you are working on your toilet. There are several repair that cannot be performed without partially or completely draining the toilet. It is not hard, it just needs to be done before you work on the toilet.
For related information, see the articles 'Troubleshooting Toilet Problems', 'Fixing Clogged Toilets', 'Toilet Tank Problems', 'How To Fix a Leaking Toilet' and 'Toilet Bowl Issues'.
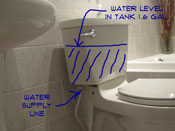
Shutting Off the Water
Shut off the water supply to the toilet. There should be a water shut off valve on the wall or floor below the toilet tank.
Draining the Toilet Tank
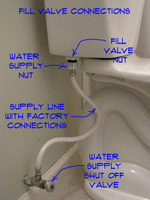
Draining the toilet tank is a must to replace a toilet fill valve. Depending on the age of your toilet, there could be as much as five gallons of water in the tank. The toilet fill valve is attached via a hole in the bottom of the tank.
Even after the tank has been flushed and the water is off, there is still a lot of water in the bottom of the tank.
Turn off the water supply to the toilet first. Most tanks have a fill line marked on the side of the tank. Some do not. You can use a marker to put a mark at the correct water level if it is missing. Usually the fill line is to the top of the flush valve tube.
If it has been replaced it may be at a different level. Shut the water off. After that, flush the toilet to drain out most of the water from the tank. Place a pail below the nut for the toilet tank inlet. Loosen the nut on the water supply line. Let the remaining water drain out of the loosened nut.
There will be about an inch of water left in the bottom of the tank. You can use rags to try and get the rest of this water to drain into the tank. Or you can loosen the nut to the fill valve and let the water drain into the pail. Any water that you do not remove is likely to wind up on the floor. It is clean water, but is still wet.
Draining the Toilet Bowl
Flush the toilet. This will drain most of the water out of the tank. Additionally, most of the water will siphon out of the toilet bowl to.
At this point you will still have some water left in the tank and some water in the toilet bowl. To drain the tank completely, you will need to loosen the large nut on the bottom of the tank that holds the toilet fill valve in place. It is the larger nut closest to the tank. The lower nut is for the water supply line. Use adjustable pliers or a large adjustable wrench for this nut, it will be plastic or possibly brass. Place a small pail under the connection to catch the water that drains out of the tank. Loosen the nut until the water starts to drain out around the rubber seal. This should drain most of the rest of the water out of the tank. The remaining water can be soaked up with a rag. Re-tighten the nut after you are finished.
Use a plunger to force the remaining water in the toilet basin out. Get as much out with the plunger as you can. You can ladle the remainder out with a small paper cup or use a rag to soak it up. Remember to wear gloves for this part of the exercise.
Leave the water supply shut off. You should remove the water supply line from the tank. Loosen the nut that is just below the nut that holds the toilet fill valve in place. It is the nut that connects the water supply line to the tank. You can use adjustable pliers for this task, the nut is plastic on most newer toilets, chrome or brass on older ones. Remove the nut completely, so that the supply line is free from the tank.
Summary
Draining a toilet is needed for several toilet repairs. You may need instructions on other repairs after you have the toilet drained. For related information, see the articles 'Troubleshooting Toilet Problems', 'Fixing Clogged Toilets', 'Toilet Tank Problems', 'How To Fix a Leaking Toilet' and 'Toilet Bowl Issues'.
Using a Toilet Flange Extender
You need a toilet flange extender when you add new flooring to your bathroom. Ceramic tile and laminate flooring will add a half an inch or more to the height of your floor. This will leave the toilet flange in a depression below the line of the floor.
For related topics you want to see the articles 'Repairing a Toilet Flange' and 'Troubleshooting Toilet Problems' for more information.
If you replace the toilet without building up the toilet flange you could be faced with a leaking toilet base. This type of leak means dirty water on your floor.
Another scenario you might have is a toilet that is leaking at the base. When you try to repair it you find that the flange is too low for the height of the current flooring.
Using a toilet flange extender once the toilet is removed is not hard and does not cost very much. It is better to do the job right at this point and not have problems later.
Purchasing a Toilet Flange Extender
You can find toilet flange extenders online, at a hardware store or a home supply store. They can range in price from $5 to $20. The more expensive ones have multiple inserts to adjust the height more precisely.
Most types allow you to leave your old wax ring in place. The new one will install over top of the old one.
Installing a Toilet Flange Extender
You are going to want to follow the instructions for the particular part that you purchased. If you have the option of adding inserts, you will want to do a dry fit to see what works best for you flooring situation.
The extension rings for your tolet flange should screw into your sub floor with long plated wood screws. The new ring will form a bond with the old one.
At this point you are going to want to install new toilet flange bolts or tee bolts as they are sometimes called. You want to double nut them so you will not have trouble loosening or tightening them in the future. See the article 'Replacing Toilet Flange Bolts' for more information on this subject.
Toilet Water Supply Lines
 A toilet water supply line usually will not get noticed too often. When you notice a drip or puddle on the floor near your toilet you start to give it attention.
Leaks are the main reason you would have an interest in you toilet water supply line. See the article on 'Leaking Toilet Water Supply Lines' for instructions on how to deal with leaks. If you need to replace the supply line you want to see the articles 'Types of Toilet Water Supply Lines' and 'Connections for Toilet Supply Lines'.
Not sure if this is your problem? See the article 'Troubleshooting Toilet Problems' for a listing of all the toilet topics.
When the supply line is old you may get it leaking when you work on the toilet. The leak may not be the supply line, it might be the shut off valve.
Can you repair a toilet water shut off valve yourself? It is not a difficult job and the parts are not expensive. A few common tools is all that you need. Leaks waste water and can damage things in your home. Don't wait, solve this problem now.
Older toilets may have brass tubing that serves as the water supply. These are a little tougher to work with. They are also notorious for starting to leak when disturbed. The good news is that you can replace them with a flexible line.
Toilet Water Supply Lines - The Issues
What Can You Save? - This is not a big job for a plumber. However, he has to drive out to your house and actually install the part. The part is usually less than ten dollars. A plumber will likely charge between $65 and $100 for replacing it.
How Hard Could It Be? - Repairing or replacing a toilet water supply line is not a difficult task. These repairs will have a Difficulty Level of: Simple. These repairs require a Skill Level of: Job Jar Specialist. For and explanation of the terms in this section, see 'How to Use This Site'.
Check the Simple Things! - Make sure your problem is not condensation on the toilet tank. Depending on the temperature and humidity, you can get drips from the tank. Making sure the fittings are tight would be the next easy thing. Always use two wrenches when trying to tighten plumbing fittings. Don't over tighten.
What Can Go Wrong? - Old plumbing fittings can be delicate. Sometimes a well meaning attempt to tighten something, results in a bad leak. Even worse you may ruin something. Make sure the water is off and the valve is working before you attempt to tighten the fittings. After tightening, gingerly turn the water back on.
Troubleshooting Toilet Water Supply Lines
The article 'Types of Toilet Water Supply Lines' talks about the different types of lines that are available and the issues with fixing them. The article also has some instruction on how to install the different types.
The article 'Toilet Water Supply Line Connections' discusses the items that the supply line connects to. It could be these items that are causing the problem. There are fittings that are close to the water supply line that may make it difficult to determine where the leak is coming from.
Summary
How did you make out with your toilet water supply line? It should not have been that big of a job. Did you decide to be a purist and stay with the brass style line? As long as you were careful and did not kink it, you were probably fine.
Most homeowners opt for the easier way out and use flexible lines. Factory installed fittings. No cutting or measuring, is that great or what? Less than ten minutes to change it. This really was not a hard home repair at all.