Search
Appliances
How To Clean a Dryer Vent
Your dryer’s efficiency may be significantly reduced if some treacherous lint starts to clog up slowly in the dryer venting. This build up can gradually become a fire hazard if it isnot cleaned out regularly. If you have been cleaning up the dryer filter thinking that everything is all set, then think again.
When water is removed during a drying process, lint is always deposited slowly especially on the crevices inside the lint filter trap which also extents along the dryer vent hose. So, if you just cleaned up the filter trap, then a whole load of lint awaits deep inside the dryer vent hose. The following are tips on how to clean dryer vent.
How To Clean a Dryer Vent - Preparation
Cleaning up a dryer venting requires a set of equipment that can allow you to effectively get rid of all the clogging inside it. Before beginning any cleaning procedure, make sure that the following are right inside your toolbox:
- Duct tape
- Screwdriver
- Soapy water (it is recommended to use warm water)
- Toilet brush (clean it first)
- Old towel
- Gloves
- Broomstick
Once you have the above in place, then you are ready to go.
The Cleaning Procedure
1. If your dryer is gas powered, then detach the horse. On an electric dryer, unplug power supply cable from the wall socket. Always do this before doing anything.
2. Turn off the main gas supply. After detaching the gas hose from the dryer, remember to turn off the gas supply as a safety measure. In case you experience any problem in turning off the gas, just get some assistance from the gas company or call a specialist to assist. Do not clean the dryer until the gas supply is fully turned off.
3. Unhook the vent by pulling the dyer about 2 feet from the wall.
4. Detach the vent from the dryer by unscrewing the clamp holder.
5. Slowly lay the vent on the floor right beside the dryer after detaching it from the wall.
6. Use the toilet brush to gently remove the lint buildup inside the flexible vent. If you have a vacuum cleaner, you can still use it as long as it has a wand attachment. Using a vacuum cleaner would require you to seek some assistance from another person. Note that coat hanger or any other pointed objects should not be used at least not for this step because you might easily poke a hole on the vent.
7. Take the old towel and wrap it around the broomstick. Then use it to slide into the vent back and forth until it is cleaned up.
8. Locate the covering louver of the vent outside the house and unscrew it. Clean it up and be careful as some wasps may sting you.
9. You can then wash the louver with warm soapy water before replacing it back.
10. You can now start reassembling the dryer back at the house. Take the precautions the same way as you were detaching the dryer vent hose.
Generally, learning how to clean dryer vent is not a difficult task and anyone can learn it quite easily.
DIY Appliance Repair
For most of us, the idea of fixing an appliance our self, conjures up feelings of fear and inadequacy. So the term 'DIY Appliance Repair' may not sound that appealing. Whether this a practical choice depends a lot on what is wrong with our appliance.
Understanding what your problem is will help you, even if you decide to call someone to come and fix it. Using the 'Troubleshooting' guide below will save you from having unnecessary items sold to you during the repair. This alone can save you some serious money.
When Does 'DIY Appliance Repair' Make Sense?
Below, we have listed some 'Pro's' and 'Con's' to trying to fix an appliance yourself. In the end it is up to you to decide. Take a look at the list and see what you think:
Pro's
- Many repairs can be accomplished for just the 'price of the parts' and some of your time.
- Some repairs, don't even require any parts.
- No one will have to be at the house to meet the repairman.
- No worry about being sold things that you don't need.
- You can save between $100 and $500 on a single repair.
Con's
- You may not be physically able to wrestle with a large heavy appliance to fix it.
- You may not be able to determine what your problem is.
- You may not be able to locate the parts, or purchase them even if you find them.
- Some repairs that require specialized tools that are expensive to purchase and unlikely to be on hand.
Troubleshooting Appliance Problems
Below we have links and descriptions of the various troubleshooting articles for appliances on this website. Even if you are going to 'call someone', it is a good idea to review the information and try to determine your problem.
Garbage Disposals
Garbage disposals are both a plumbing device and an appliance. The cost enough and are sufficiently difficult to install that they constitute an major investment. Keeping them in good working order just makes sense.
Clothes Dryer Troubleshooting
There are two common types of clothes dryers. Gas and Electric, with electric being the most common. Drums and controls are similar, the main difference is the heat source.
Gas Dryer Troubleshooting
A gas dryer uses natural gas to provide the heat source for drying the clothes. So you have some of the same issues with a gas dryer that you do with other gas appliances. They need to be vented properly, the ignition system (pilot light or electronic) needs to be functioning properly.
In addition to the gas issues you have a drum that is driven by a belt that is connected to a motor. Along with that you have the control board the takes care of the various cycles on the dryer. Some of the cycles rely on sensors with in the dryer to tell when the clothes are properly dried.
See the article 'Gas Dryer Troubleshooting' for a discussion on the various issues and how to narrow your problem down.
Electric Dryer Troubleshooting
An electric dryer is simpler than a gas dryer. The heating element is electric and you don't have all the gas related issues that come from using natural gas. However, electric heating elements can go bad and the are fairly expensive to replace.
You have the same motor, belt and drum issues with an electric dryer that you do with a gas one. You can also have the same control board problems.
See the article 'Electric Dryer Troubleshooting' for a discussion of the problems and guidelines on how to narrow down your issue.
See the article 'How To Clean a Dryer Vent' for information on keeping the dryer working at peak performance.
Washing Machine Troubleshooting
Washing machines can have several issues. Since they use water, both hot and cold, leaks are an obvious malady. There is also a drive motor for the drum that can be direct or belt driven.
Other issues are clogged filters, pumps and of course the controls. As with any appliance the more features it has the more opportunity you have for issues.
See the article 'Washing Machine Troubleshooting' for a listing of all the problems, symptoms and methods for fixing them.
How To Fix a Stove
Stoves or ranges are a standard feature in most kitchens these days. We use them for cooking of course. Some of us may even have and older wood version that also heats your home. The two popular fuels for a stove is natural gas and electricity. NOTE: Not much that can go wrong with a wood burning stove.
Free standing stoves include an oven for baking. Cook tops only have burners for cooking with the oven being another appliance in the kitchen.
Gas Stove Troubleshooting
For a stove to work, it has to have the gas burning. Newer stoves use electronic ignition systems. Older stoves may still rely on a pilot light. Of course when such fails the low tech method of using a match or lighter is still common.
The flow of gas is controlled by the knobs on the appliance. There usually are not any thermocouple devices associated with the burners. So if they don't light, it can be dangerous. The oven will likely have some safety features that won't allow the gas to continue to run without it igniting.
Parts burning out and ignition issues are some of the common problems with this type of stove. See the article 'Gas Stove Troubleshooting' to locate your issue and get it fixed.
Electric Stove Repair
Electric stoves like gas stoves are meant for cooking. Instead of a flame you have an electric element that gets red hot and provides the heat. The debate rages on among discriminating cooks worldwide as to weather or not electric gives you the ability to adjust the heat acceptably. Whether it is the best heat or not, many a meal gets cooked on electric ranges every day.
Of course the heating elements are the big issue with electric stoves. Next would be the controls. Since it involves electricity, shorts are possible and at times people do get shocked from an electric stove.
See the article 'Electric Stove Repair and Troubleshooting' for more information and directions on how to solve your problem.
Dishwasher Troubleshooting
No mystery here, this is the appliance the cleans the dishes. It is a common appliance in most modern homes.
Dishwashers use water and of course water has its own set of problems. Not the least of which are leaks. The other issue with water is that it needs to be drained away. A dishwasher that does not drain properly will not clean the dishes effectively. There are pumps that help the dishwasher to drain.
Some dishwashers have heating elements for both the water and to dry the dishes. Add to that some filters and you have a potential for several problems.
See the article, 'Dishwasher Troubleshooting' to identify your problem and work toward getting it fixed.
Refrigerator Troubleshooting
The main moving part in a refrigerator is the compressor. The good news is that they are fairly reliable and have been known to last for decades. The bad news is that if they go bad, they are expensive to replace.
There are other issues that are less dire. Water supply lines, temperature controls and seals to name a few. Problems, such as frozen vegetables in the crisper drawer can be a little aggravating.
To locate and solve you refrigerator issues you want to see the article 'Refrigerator Troubleshooting'.
Ice Maker Troubleshooting
Although it is technically part of the refrigerator, the freezer, to be more exact, it is really a separate appliance. It has its own water supply and mechanism the ejects the ice when the cubes are ready. There is definitely the potential for problems with this appliance.
See the article 'Ice Maker Troubleshooting' for a complete run down on the problems and solutions.
Objects Stuck in Disposal
 Removing objects stuck in a disposal will need to be done even after you get it freed up. Disposals will not grind up certain things, so removing them is the best course.
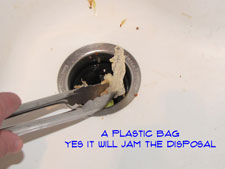
Coins and rings are a couple of things that can jam a garbage disposal. They get wedged between the turntable and the side of the housing and can be difficult to dislodge. Try to locate the object if you can.
I know, you were probably trying to use it when the jam occurred. Try to remove the water and food and see if you can identify the object. Use pliers, a screwdriver or tongs to get it free. No fingers, please.
Once the object is free, use the tongs to extract it. Go back to the allen wrench and make sure the jammed garbage disposal is moving freely now.
When it is moving freely, you can remove the wrench and turn the power back on. Check to see that the disposal is working correctly. It's grinding and the water is going down? Wonderful this jammed garbage disposal will soon be a forgotten memory.
Prying the Disposal
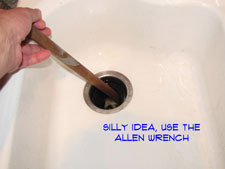
Prying a jammed disposal with a broom handle or another similar object is not a good idea. See the article 'Using a Garbage Disposal Wrench' for the best method on freeing up a jam.
I'm not sure whether using a broom handle to free a jammed garbage disposal is a last resort or creative thinking. If you don't have an allen wrench and it is too late to go out, it is creative thinking. If all else has failed then it is a last resort. I do not believe that a broom handle will generate much more force than the allen wrench and a pair of pliers would. If it makes you feel better, try it.
At this point, you may be faced with a tough decision. Assuming you cant' free up the motor and you cannot find an object that can be removed, you may be faced with replacing your disposal.
Try one more time with the allen wrench to worry it loose. Still stuck? I feel your pain. A new disposal will run between $75 and $200. The difference is for power, features and whatever else they use to get you to spend more. It will take an hour or so to replace.
Garbage Disposal Allen Wrench
 Using a garbage disposal allen wrench when you have a stuck garbage disposal is the best course of action.This method applies positive force at the right location to free up the impeller. Better yet, you don't have to take anything apart and most of the time it will take less than five minutes to get it working.
Most garbage disposals use a standard 1/4" allen wrench. The wrench that came with your disposal is probably shaped like a lazy 'Z'. If you can find that wrench, so much the better. The angle helps you keep your hand down where you won't hurt yourself if the wrench slips.
Not sure if this is your problem? See the article 'How To Fix Your Garbage Disposal' for all of the garbage disposal repair topics.
Purchasing a Garbage Disposal Allen Wrench
It would not be a suprise nor is there any shame in the fact that your garbage disposal allen wrench is lost. There are numerous reasons why you might not have it. It didn't come with the house, its in the basement somewhere or when my toolbox came back from by brother in law, it was missing.
No matter, you can purchase a complete set of allen wrenches for less than ten dollars. It will likely be a quarter inch allen wrench and you may have one of those. Worst case you have to go to the hardware store and buy a new set of allen wrenches.
Locating the Garbage Disposal Flywheel Lug
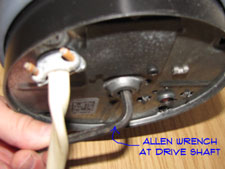
To you your garbage disposal wrench you need to locate the drive shaft lug that it fits into. You will have to clear out the cabinet below your sink for this operation. You are going to need to see the underside of your disposal.
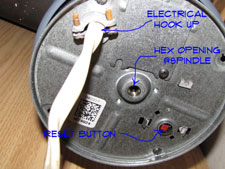
On the bottom of your garbage disposal you will find a hex shaped opening in the center of the housing. this hex opening is attached to the drive shaft. Before you start working on the disposal you want to turn off the power. Unplug the disposal or shut the breaker off to make sure that no one inadvertently turns the switch on.
Loosening a Stuck Garbage Disposal
 Put the garbage disposal allen wrench into the socket and try to free up the unit. You may need to worry it back and forth several times to free up the jam. Use the pliers on the allen wrench if you need a little more torque. Keep working with it until the spindle turns freely.
If possible you want to remove the object from the disposal before you turn it on. Get a flash light and see if you can figure out where it is. Use tongs, pliers or a magnet to remove the object. No fingers or hands in the disposal, please.
With the object removed you can turn the power back on. Try the disposal and make sure it is running freely. Working? Great you have successfully dealt with a jammed garbage disposal. If you keep a journal you may want to make an entry.
WARNING!! Keep Your Fingers Out of the Disposal!!! Turn the Power Off Before Working On It!!! WARNING!!!
Summary
The hex shaped opening in the bottom of a garbage disposal is a great way to get the disposal unjammed. You should have gotten a wrench with your disposal. If not, no worries, you can get a replacement allen wrench that will work.
Fixing a Stuck Garbage Disposal
 A stuck garbage disposal is evident by the loud electrical sound that it makes when you try to turn it on. With the motor unable to turn the disposal it strains to get it moving. Turn it off quickly, you do not want to burn up the motor. Even with the safety switch, this is not good for the motor.
Solving this problem should not be too difficult and will not take too long. Unless you have one of those rare situations where a metal item is lodged securely and cannot be removed. This is the exception, not the rule.
Usually, it is a couple of minutes with an allen wrench. Take a look at the information below and see if you feel confident trying to perform this repair. Most to the time this is something a homeowner can take care of.
Fixing a Stuck Garbage Disposal - Information
What Can You Save? - The serviceman will want to stand around and talk for a few minutes. This keeps you from realizing that it only takes him couple of minutes to free up a jammed garbage disposal. You will have to pay for a service call, $50 to $75. Rarely the disposal will be beyond repair and a new unit could run from $150 to 200 or more for a high end unit.
How Hard Could It Be? - Most of the time fixing a jammed garbage disposal is not too difficult. These repairs will have a Difficulty Level of: Simple. These repairs require a Skill Level of: Job Jar Specialist. For and explanation of the terms in this section, see 'How to Use This Site'.
Check the Simple Things! - As a rule this repair is fairly simple. It is possible to pop the breakers, so check them if the disposal won't come back on.
What Can Go Wrong? - You can burn up the motor by repeatedly trying to turn on the switch. The limit switch will trip when the motor gets hot enough. However, you can damage the motor by repeated attempts.
Using the Garbage Disposal Tool
Using a garbage disposal wrench is not difficult. It is the best method for freeing up a jammed disposal.
On the bottom of your garbage disposal you will find a hex shaped opening in the center of the housing. this hex opening is attached to the drive shaft. You should have gotten a wrench with your unit that fits here.
You know where it is, great, get it. Don't know where it is, bummer. It should take a standard allen wrench. Find one that fits, usually, this will be a 1/4" allen wrench.
Before you start working on the disposal you want to turn off the power. Unplug the disposal or shut the breaker off to make sure that no one inadvertently turns the switch on.
Put the allen wrench into the socket and try to free up the unit. You may need to worry it back and forth several times to free up the jam. Use the pliers on the allen wrench if you need a little more torque. Keep working with it until the spindle turns freely.
If possible you want to remove the object from the disposal before you turn it on. Get a flash light and see if you can figure out where it is. Use tongs, pliers or a magnet to remove the object. No fingers or hands in the disposal, please.
With the object removed you can turn the power back on. Try the disposal and make sure it is running freely. Working? Great you have successfully dealt with a jammed garbage disposal. If you keep a journal you may want to make an entry.
Removing Stuck Objects
Removing objects stuck in a disposal will need to be done even after you get it freed up. Disposals will not grind up certain things, so removing them is the best course.
Coins and rings are a couple of things that can jam a garbage disposal. They get wedged between the turntable and the side of the housing and can be difficult to dislodge. Try to locate the object if you can.
Prying a Jammed Garbage Disposal
Prying a jammed disposal with a broom handle or another similar object is not a good idea. See the article 'Using a Garbage Disposal Wrench' for the best method on freeing up a jam.
At this point, you may be faced with a tough decision. Assuming you cant' free up the motor and you cannot find an object that can be removed, you may be faced with replacing your disposal.
Try one more time with the allen wrench to worry it loose. Still stuck? I feel your pain. A new disposal will run between $75 and $200. The difference is for power, features and whatever else they use to get you to spend more. It will take an hour or so to replace.
Summary
Hopefully you have been able to unstick your stuck disposal. Most of the time you can use the special wrench that came with the disposal or use an allen key of the same size. Working the disposal back and forth with the wrench will fix the problem most of the time.
Ninety percent of the time the allen wrench will take care of the jammed garbage disposal in less than ten minutes. You may have been unfortunate enough to have a more serious problem. Just remember, if it was hard for you it would have been hard for a repairman. Worst case you had to purchase a new garbage disposal.
Hopefully, one way or another you were successful. Now that you are done with your jammed garbage disposal you can consider your next course of action. Climbing the worlds seven tallest peaks is worth a look.