Search
Plumbing
Sink Drain Plumbing Parts
 There are a lot of ways that sink drain plumbing parts can fit together. Different sinks and configurations will require different parts.
Not your problem? See 'Home Plumbing Repair' for a complete listing of all plumbing topics or 'Fixing Plumbing Drains' for a listing of drain related articles.
If you have the dreaded clogged sink see 'How To Unclog a Drain'.
It is impossible to cover every possible situation. Instead we will try to discuss the various parts, their purpose and how they fit together.
There are many variations of sink drain parts. We will try to address the common ones.
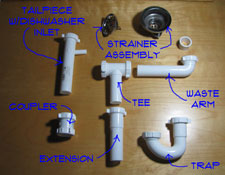
P Trap - This is a two piece fitting that makes the trap. Water stays in the bottom of the trap to keep sewer gases from getting into the house.
S Trap - Similar to the P Trap the S Trap is used when the drain is in the floor instead of the wall.
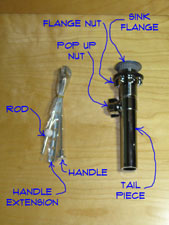
Tailpiece - This is the piece that is connected to the strainer on a kitchen sink. For a bathroom sink the tailpiece and pop up assembly are all one piece.
Tee - Tees are used for double sinks, usually in the kitchen.
Waste Arm - The waste arm connects the tailpiece to the tee on a kitchen sink. You will usually have two of them.
Elbow - Used sometimes on odd configurations. Most of the time this piece is not necessary.
 Extension Tube - Used to extend the tailpiece or other pieces that are too short.
Coupler - Used to connect two pieces of drain pipe together. Usually not needed but useful if you cut something too short.
Sink Strainer - The hole in the bottom of a kitchen sink is filled with a sink strainer. This piece seals the opening and directs the water into the drain pipes.
Pop Up Assembly - This assembly is used for a bathroom sink.
Before you disturb anything you want to take a picture of your configuration or make a sketch. Take some measurements, since many of the items come in multiple sizes. When you go to purchase parts you will want to take your picture or sketch. Try to identify each of the parts you have so that you can get the right ones.
Plastic fittings are definitely easier to work with. However, you do not want to mix them. For homes with chrome or brass fittings you want to use metal replacement parts. Unless you are replacing everything and then you can switch to plastic. Already have plastic? Great, no problem at all.
Sink Drain Plumbing
 In recent decades, sink drain plumbing is done with plastic pipe and fittings. This has mostly replace the old chrome plated brass pipe that was popular for a long time. Chrome plated brass is still available, but it costs more and is harder to install.
For related information see the articles 'Troubleshooting Drain Problems' and 'Repairing a Clogged Kitchen Sink'.
The drains take away the excess water when you run the sink. A lot of times the water is dirty and the drain takes it to the sewer. The sink drain also provides drainage for the dishwasher and garbage disposal. Any time you have water involved you can have leaks. When you have drains, you have a potential for clogs.
Years ago all sink drains were made of brass sometimes with a chrome coating. The metal pipes will corrode over time and need to be replaced. You can still buy the brass fittings, but they cost more than the plastic ones do.
Read on and find out if this is the kind of repair that you want to tackle. The evaluations will help you determine if it is worth your time. After you consider the information decide if you want to repair your sink drain plumbing.
Repairing Sink Drain Plumbing - Information
What Can You Save?
An experienced plumber can replace some or all the parts on your sink drain plumbing in a half an hour. It may take you a little longer. Allow $50 to $75 for the service call and $25 to $75 for parts. The higher figure would be for the chrome fittings.
How Hard Could It Be?
Working on sink drain plumbing is not that hard and requires a minimum of tools.
Check the Simple Things!
Leaks can often be taken care of by tightening one of the nuts. Try to determine which fitting is leaking and tighten it, gently, but firmly. See below for more info.
What Can Go Wrong?
Sink drains can be a little messy. The trap will have some dirty water in it. For a clogged sink you will have more dirty water. Take precautions for dealing with the water. Not having the right parts can also be a problem. Finding parts late at night may not be easy. Try to anticipate what you will need ahead of time a few extra nuts and washers is a good idea.
Troubleshooting Sink Drain Plumbing Problems
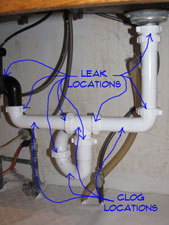
Troubleshooting sink drain problems is a process of elimination, several things can be wrong. The first would be leaks. A lot of time tightening the fittings is all that is needed.
For old chrome or brass pipes they may have corroded and started leaking. In that case you will have to replace them.
Tightening up the fittings can eliminate most leaks. It is easy, just use a pair of adjustable pliers. Hold the fitting with one hand and use the pliers on the nut. Don't over tighten. You want them snug not stripped.
Another reason would be a clogged sink. Getting rid of a clog might involve taking some of the drain pipes apart. Many times you will find the clog in the drains. Other times the line will need to be snaked to fix it. You will need to remove one or more fittings to get access to the drain line.
Modifications and home improvements can also cause you to disturb the sink drain plumbing. A new disposal or a new sink would be a great addition to the kitchen. You will probably need to make adjustments when you replace or revise the fixtures.
Knowing the names of the parts and what they look like is helpful. The article 'Sink Drain Parts', provided you with some pictures and a brief description of the various components you may need to use.
Most of the time, drain pipes will need to cut to fit. There are a few tricks and the article 'Cutting Sink Drain Pipes', showed you what they are.
Finally, the article 'Assembling Sink Drain Pipes' discussed putting the plumbing pipes together. Tightening them correctly is important so that you do not get leaks.
Summary
You have found out by now that sink drain plumbing is not that difficult. The hardest part is getting the right parts. If you take your time and cut everything the right length things will go smoothly. Sink drain plumbing can be rewarding.
Perhaps not as rewarding as painting or sculpting, but close. Well maybe not close, I've heard of painters that get really get into their work, maybe close. Now that you are done with this project you can decide what you want to do next on your list.
Hot Water Heater Condensation
Hot water heater condensation can scare you when it happens. It may appear that your tank is leaking.
Sometimes when you run a lot of cold water into the tank, for instance when it is used quite a bit, you will get condensation that drips onto the floor. How can you tell if it is condensation?
First, it will be a minimal amount of water and it will stop when the tank warms up. Wait a few hours and see if the water is still dripping. Is it gone? Good, it dried up and you don't have a leaking hot water heater after all.
Is it still dripping after a few hours or the next day? You're sure the water in the tank is hot and you still have a drip? This is not good news. See the article 'Leaking Water Heater Tank' and see if it is your tank that is leaking.
Leaking Hot Water Heater Tank
A leaking hot water heater tank is generally a death knell for your water heater. Once the tank goes bad there is little you can do. However, water heater tanks do last a long time, so you want to make sure that it is not something else before you assume that the tank is bad.
Not sure if this is your problem? See the articles 'Gas Water Heater Troubleshooting' and 'Troubleshooting Electric Water Heaters' for a complete listing of water heater topics.
Water Leaking Onto the Floor
Just because you see water on the floor does not mean that your tank is leaking. It could be leaks from other spots on the water heater that are less costly to fix.
Is the water leaking at the base of the tank? Look inside the metal casing below the tank. Do you see water? Is the water persistent? Have you checked the other fittings on the tank?
Water Heater Drain Valves
The water heater drain valve is near the bottom of the hot water tank. They can and do start to leak. A bad enough leak at this location can puddle up on the floor and make you think the tank is leaking.
See the article 'Leaking Water Heater Drain Valves' for information and instructions on what to do with this component.
Pressure Relief Valves
The temperature and pressure relief valve is located near the top of the hot water tank. However, it has an extension pipe that directs the water toward the floor. Sometimes this is routed to a drain.
If the relief valve vents water it will wind up on the floor. Although this is a problem, it is not as serious a problem as a leaking water tank. See the article, 'Checking a Water Heater Pressure Relief Valve' for instructions to rule out this possibility.
Condensation
Condensation is a somewhat rare occurance that would only happen when the tank is filled with cold water. When you start up a water heater that is new or has been worked on, it is filled with cold water. When you start it up, the tank will get some condensation on it that will drip down onto the floor.
Make sure it is not condensation, see the article 'Water Heater Condensation' for more information. The tank is likely corroded or cracked. Your really do have a leaking hot water heater.
Other Leak Locations
Water Lines
The hot water heater has a cold water supply line and a hot water outlet line that are filled with pressurized water. Leaks from the water line may be an issue.
See the article on 'Leaking Hot Water Heater Pipes' for information on what to look for and how to correct this problem.
Vent Back Draft
Gas water heaters have vents at the top. A vent that is back drafting can cause condensation on the top of the hot water heater. See the article 'Checking Water Heater Vent Draft' for information and what to look for.
Leaking Tanks
A chronic leak at the floor, that cannot be explained any other way probably means that the tank is leaking.
Unfortunately, you cannot repair the tank. The water heater will need to be replaced. How long to you have before it lets go completely? Great question, but there is no good answer. You may get away with mopping up the water for a while until you can replace it. Or, worst case scenario, it could let go immediately and you will have a big mess on your hands.
Changing the water heater is a big job. Depending on he location of the hot water heater the age of the plumbing and your own skill level you may not want to tackle this job.
See the articles 'Installing a Gas Water Heater' and 'Installing an Electric Water Heater' for a description of what is involved.
Leaking Hot Water Heater Pipes
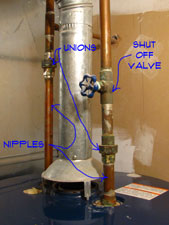 A leaking hot water heater can result from leaks in the pipes. At the top of your hot water heater you have an inlet and an outlet pipe. The cold water comes in and hot water goes out. There is usually an union on each one that allows for the removal of the hot water tank.
Not sure if this is your problem? See the articles 'Troubleshooting Gas Hot Water Heaters' and 'Electric Water Heater Troubleshooting' for a listing of all of the water heater problems and solution resources.
Condensation
Just because you see water droplets on the pipes or the top of the water heater does not necessarily mean you have a leak. It could be condensation. Cold water lines will sweat during hot humid conditions. At times this water may run down the pipe and puddle up on the top of the tank.
Before you assume that you have a leak, dry off the pipes and try to determine where the water is coming from. If the only water is coming from condensation on the pipe, then you don't have a leak.
For gas hot water heaters there may be another type of condensation if your vent is not operating correctly. If you are getting a back draft from your vent, it can cause some condenstion and staining on the top of the tank. See the article on 'Venting Gas Water Heaters' for instructions on what to do.
Types of Leaks
When we are talking about the piping for water heaters we are generally talking about water lines. Although on a gas water heater you will also have a gas line. Gas lines have fittings to and can leak, but that is a different subject.
The only other pipe on a water heater that can leak is the drain valve. For a discussion on how to stop the drain valve from leaking, see the article, 'Repairing Water Heater Drain Valves'.
Water Pipe Fittings
For leaks that occur at the unions you will need to tighten them. Use two pipe wrenches to do this. You put the pipe wrenches on in opposing directions. It will take a little muscle to tighten them.
The other place that the pipes might leak is at the nipple where the pipes enter the tank. Are the connections old and corroded? This could be a problem. The tank may have started to rust. Messing with this connection could render the tank unusable. Their is not much you can do if you damage the threads going into the tank. Do they seem OK, just leaking a little?
You can try tightening them. Shut the water off on the cold water inlet. Open a valve in a sink near by to drain down the water in the pipes. You will need to loosen the unions above the nipples. With the union loose you can tighten the nipple with the pipe wrench. It will take some force, but be careful.
Don't go much more than a quarter to a half a turn. Still leaking? Nuts! Go the other way and take the nipple out. Clean up the threads and put new pipe dope or Teflon tape on them. Put the nipple back in and tighten it up. Tighten the union and turn the water back on. This should take care of a leaking hot water heater, when the nipple is leaking.
Water Line Valves
You should have a valve on the cold water inlet side of the tank. Valves have washers in them and can start to leak around the valve stem. See the article 'Fixing Leaking Valves' for instructions on how to fix this problem.
Summary
If you do have a leak, tightening the fittings should solve the problem. It may be that you have some condenstaion, lowering the humidity in the area where the water heater is will solve this problem.