Repair Topics
Using a Toilet Flange Extender
You need a toilet flange extender when you add new flooring to your bathroom. Ceramic tile and laminate flooring will add a half an inch or more to the height of your floor. This will leave the toilet flange in a depression below the line of the floor.
For related topics you want to see the articles 'Repairing a Toilet Flange' and 'Troubleshooting Toilet Problems' for more information.
If you replace the toilet without building up the toilet flange you could be faced with a leaking toilet base. This type of leak means dirty water on your floor.
Another scenario you might have is a toilet that is leaking at the base. When you try to repair it you find that the flange is too low for the height of the current flooring.
Using a toilet flange extender once the toilet is removed is not hard and does not cost very much. It is better to do the job right at this point and not have problems later.
Purchasing a Toilet Flange Extender
You can find toilet flange extenders online, at a hardware store or a home supply store. They can range in price from $5 to $20. The more expensive ones have multiple inserts to adjust the height more precisely.
Most types allow you to leave your old wax ring in place. The new one will install over top of the old one.
Installing a Toilet Flange Extender
You are going to want to follow the instructions for the particular part that you purchased. If you have the option of adding inserts, you will want to do a dry fit to see what works best for you flooring situation.
The extension rings for your tolet flange should screw into your sub floor with long plated wood screws. The new ring will form a bond with the old one.
At this point you are going to want to install new toilet flange bolts or tee bolts as they are sometimes called. You want to double nut them so you will not have trouble loosening or tightening them in the future. See the article 'Replacing Toilet Flange Bolts' for more information on this subject.
Removing Pocket Door Rollers
 There are a couple of might make sense. One is that, it is easier to lubricate and free them up when they are not up inside the track.
The other is that you might think that running down to the home supply store and getting new ones is the easiest course of action. It could be, if you can find ones that match.
The article 'Troubleshooting Pocket Doors' has all of the topics related to this subject. If this is not your problem, try this link.
Pocket Door Hardware Concerns
One thing you need to realize is that there are no standards for pocket doors. Every manufacturer has different configurations for the tracks, hangers and rollers on pocket doors. Even the same manufacturer may offer multiple styles or change the configuration over time.
The Warning here, is that the rollers much match the track that is installed in the pocket door frame. They are usually not interchangeable.
About now you are saying, 'OK, I'll just replace the track'. Not a good idea most of the time. Replacing the track will usually involve tearing a wall apart and not be worth the trouble. Try to work with the rollers you have, or go online and try to find matching ones (not impossible, just tedious).
Removing a Pocket Door
You cannot remove the rollers without taking the door off. To take the door off you will need to release the door from the hangers.
Different pocket doors will release differently. Some have a slide stop that you push back. Others will have a spring loaded catch that needs to be pushed back to release the door. See the article 'How To Remove a Pocket Door' for more information and instructions.
Some doors will slide off the hanger sideways, others will drop down. An older door may stick a bit, so be patient.
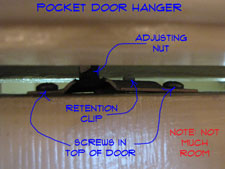
 There is a retaining clip that holds the bracket, that is attached to the door, to the hanger. Release the retention clip over and the door, along with the bracket, will slide off the hanger. Pick up the door and angle it, working it out of the opening. When the second hanger is in the door opening you can remove the door from it.
Removing Pocket Door Rollers
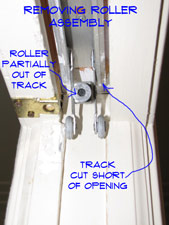
With the door removed it is easy to remove the rollers. Roll the first one to the end and allow the wheels to drop down through the opening at the end of the track. Tilt the roller assembly downward, moving it forward until the second set of wheels drops down through. Repeat the process for the second roller assembly.
With the pocket door rollers removed, you can take measurements to find a matching set. You can also take them with you to the supply store to find ones that match.
Toilet Water Supply Lines
 A toilet water supply line usually will not get noticed too often. When you notice a drip or puddle on the floor near your toilet you start to give it attention.
Leaks are the main reason you would have an interest in you toilet water supply line. See the article on 'Leaking Toilet Water Supply Lines' for instructions on how to deal with leaks. If you need to replace the supply line you want to see the articles 'Types of Toilet Water Supply Lines' and 'Connections for Toilet Supply Lines'.
Not sure if this is your problem? See the article 'Troubleshooting Toilet Problems' for a listing of all the toilet topics.
When the supply line is old you may get it leaking when you work on the toilet. The leak may not be the supply line, it might be the shut off valve.
Can you repair a toilet water shut off valve yourself? It is not a difficult job and the parts are not expensive. A few common tools is all that you need. Leaks waste water and can damage things in your home. Don't wait, solve this problem now.
Older toilets may have brass tubing that serves as the water supply. These are a little tougher to work with. They are also notorious for starting to leak when disturbed. The good news is that you can replace them with a flexible line.
Toilet Water Supply Lines - The Issues
What Can You Save? - This is not a big job for a plumber. However, he has to drive out to your house and actually install the part. The part is usually less than ten dollars. A plumber will likely charge between $65 and $100 for replacing it.
How Hard Could It Be? - Repairing or replacing a toilet water supply line is not a difficult task. These repairs will have a Difficulty Level of: Simple. These repairs require a Skill Level of: Job Jar Specialist. For and explanation of the terms in this section, see 'How to Use This Site'.
Check the Simple Things! - Make sure your problem is not condensation on the toilet tank. Depending on the temperature and humidity, you can get drips from the tank. Making sure the fittings are tight would be the next easy thing. Always use two wrenches when trying to tighten plumbing fittings. Don't over tighten.
What Can Go Wrong? - Old plumbing fittings can be delicate. Sometimes a well meaning attempt to tighten something, results in a bad leak. Even worse you may ruin something. Make sure the water is off and the valve is working before you attempt to tighten the fittings. After tightening, gingerly turn the water back on.
Troubleshooting Toilet Water Supply Lines
The article 'Types of Toilet Water Supply Lines' talks about the different types of lines that are available and the issues with fixing them. The article also has some instruction on how to install the different types.
The article 'Toilet Water Supply Line Connections' discusses the items that the supply line connects to. It could be these items that are causing the problem. There are fittings that are close to the water supply line that may make it difficult to determine where the leak is coming from.
Summary
How did you make out with your toilet water supply line? It should not have been that big of a job. Did you decide to be a purist and stay with the brass style line? As long as you were careful and did not kink it, you were probably fine.
Most homeowners opt for the easier way out and use flexible lines. Factory installed fittings. No cutting or measuring, is that great or what? Less than ten minutes to change it. This really was not a hard home repair at all.
Toilet Water Supply Line Connections
Your toilet water supply line connects to your homes water supply and to the toilet tank.
Do you have a different Problem? See 'Plumbing Repair' or 'How to Fix a Toilet' for a complete listing of related topics.
Connection at the Water Supply
A toilet water supply line needs to be connected to the homes water supply. There should be a shut off valve at this location, but not always. If there is not shut off valve, you will likely need to shut the main water supply off for the house to work on it.
Toilet water supply lines require a 3/8" compression fitting at the valve. If there is no valve, there is an adapter to 3/8" compression.
We have already mentioned the water shut off valve. If the supply line is old the valve probably is also. It might be wise to change it now. See the article 'Repairing Water Shut Off Valves' for more information on what to do.
Connection at the Toilet Tank
The other end of the toilet water supply line connects to the toilet fill valve. This valve is mounted in the toilet tank and the nipple for it protrudes out of the bottom of the tank.
There are gaskets and a large nut that keeps the toilet fill valve held in place. At times a leak from this connection can look like it is coming from the water supply line.
The other end of the toilet water supply line connects to the toilet fill valve. The toilet fill valve uses a floatation device to control the amount of water in the toilet tank. Water running constantly in a tank is a sign of a poorly adjusted or bad toilet fill valve. See the article 'Fixing Toilet Fill Valves' for information on how to adjust and replace this device.
Types of Toilet Water Supply Lines
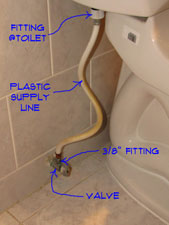 Toilet water supply line come in three styles. Most of the time, you have a 3/8" fitting at the shut off valve and a 7/8" fitting at the toilet tank.
Do you have a different Problem? See 'Plumbing Repair' or 'How to Fix a Toilet' for a complete listing of related topics.
Chrome Plated Brass
In the past you had to purchase a 3/8" brass tube that had a special flared end on it. This tubing was often chrome plated. The tubing had to be bent and cut to length. At the valve, a compression fitting is used.
The brass tubing has a couple of draw backs. First the tubing is stiff and needs to be bent into the proper shape to align properly. Kinking the tubing is a very real possibility. A kinked line should be thrown away and another supply line obtained. The other issue is cutting it to length. Obviously, cutting it too short renders it unusable.
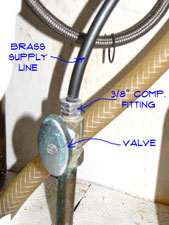 A brass toilet water supply line is a bit more difficult to deal with than a flexible one. For one thing, brass has a tendency to corrode.
A point of reference is that even if your supply line is silver, it is still brass inside. When the brass fittings and pipe corrode, the brass gets delicate. The result is that when you tighten the fittings you may do more harm than good. Sometimes the leak gets worse.
Never try to tighten a leaking line with just one wrench. This is especially true when the fittings are old and corroded. Use two wrenches, one on the fitting you are tightening and the other on the valve or pipe you are tightening to.
For small leaks you can try tightening the fittings. Be careful and don't over tighten. Too much torque and you can make things worse, a little leak becomes a big leak. Go a quarter turn at a time and check to see if it is still leaking. Dry the fitting off with a rag and rub you finger across it. A dry finger should mean no leaks.
If the toilet water supply line is too corroded you will need to replace it. Shut the water off at the water shut off valve. Is the valve old and corroded to? See the article 'Repairing Water Shut Off Valves', for information. With the water off you will want to loosen the fittings. The two wrench thing applies even when you are removing the old one.
Two things you have to do with the supply line. First you have to shape it to the right bends. Use a tubing bender or your thumbs to carefully bend the pipe. Don't kink it. Dry fit the tubing to the flange on the toilet and mark the length to cut it. Use a hack saw to cut the tubing to length.
Get a new nut and ferrule for the end that goes into the valve and a large nut for the closet connection. Make sure the supply line you buy is for a toilet and not a sink, they are different. Put the nut, then the ferrule on the line and start the tubing into the valve. Turn the nut finger tight. Put the nut on the toilet and tighten finger tight. Tighten them down if you are sure they fit. Turn the water back on and check for leaks.
Flexible Supply Lines
A more popular choice in recent history is a flexible line with factory installed fittings. Since the line is flexible you can move it as needed for proper alignment. The fittings screw onto the valve and toilet tank without any additional parts. Simple, less than ten minutes to install one of these.
Toilet water supply lines come in two styles. Plastic lines are less expensive and are usually white. Stainless steel lines cost a little more. The steel lines are still flexible and are a little tougher.
 Flexible toilet supply lines have factory installed ends on them. These ends have integral washers built into them, so they are ready to go.
Tightening a Leaking Supply Line
The likely problem with this type of line is a leak at one of the fittings. Tightening them up is usually the solution.
A flexible toilet water supply line is a little easier to tighten. It is still a good idea to use two wrenches. This is just to make sure that you don't damage anything else. Tighten the fitting that is leaking a quarter turn at a time until the leak stops. Use a dry rag and your finger to check for leaks.
Replacing a Toilet Supply Line
Replacing the supply line is pretty easy. Shut the water off before you loosen the fittings. Loosen the fittings and remove the old supply line. See the article on 'Toilet Supply Line Fittings' for information on getting the supply line connected correctly.
Obtain a flexible toilet water supply line that is close to the length you need. Do not get a supply line for a sink, it will not work on a toilet. One end of a toilet supply line is much larger than a sink line.
Start the fittings onto the proper male threads at the valve and toilet. The large end goes under the toilet tank.
Use two wrenches when you tighten the fittings, you don't want put stress on the valve and get it leaking. Tighten up the fittings and check for leaks. That's it, not much to it.
Supply Line Sizes
These lines come in various lengths, such as 9", 12" , 15" and 20". Try to get a length that is slightly longer than what you need. Too long and you will have to loop it under the tank. Not the end of the world, but less desirable.


