Search
Repair Topics
Using a Pocket Door Wrench
You need a pocket door wrench when you work on you pocket doors. The thin profile will fit in the tight space above the door. You use the wrench to adjust the bolts on the pocket door hangers up or down.
For all the information on 'Pocket Doors' see the article 'Troubleshooting Pocket Doors'.
The wrench is similar to the tools you get with a put together furniture item. As a result, they often get lost. Do you know where your pocket door wrench is? What can you do if you don't?
Locating a Pocket Door Wrench
The first thing you want to try to do is find the wrench that came with the hardware for your pocket door. It is a small thing wrench that can be straight or may have a funny bend in it. It was in the bag of hardware that came with your pocket door. Check the tool and junk boxes.
It may be that you never had it. The builder that installed the door may not have left it for you. Or your house has changed hands a few times and the wrench is in the previous owner's tool box.
Purchasing a Pocket Door Wrench
Now that you need one you probably think it is a simple matter to just buy one. There are a couple of problems with this. First, there is no standardization for pocket door hardware. As a result, each manufacturer will use a different adjustment wrench.
To make matters worse, even if you know the manufacturer of your pocket door hardware, not many of them sell the wrenches by themselves. They will come in a kit.
Try to determine what brand of pocket door hardware you have. With that information you can search online for the wrench. Johnson Hardware and manufacturer of pocket door hardware does sell an adjustment wrench, try this link 'Johnson Pocket Door Wrench'. However, other popular manufacturers such as Stanley do not sell the wrenches individually.
You could purchase the entire kit, just to get the wrench. This will set you back $10 to $20 just to get the wrench.
Adjusting a Pocket Door Without a Wrench
It is possible to adjust the pocket door without the wrench. There are a couple of things you can try.
Using Needle Nose Pliers
They make needle nose pliers that have an offset nose on them that you should be able to get for less than ten dollars. If the door is not too tight, you might be able to get these to work. See the article 'Adjusting a Pocket Door' for information on how to make the adjustments.
Taking the Door Off the Hangers
Another option would be to take the door off the hangers to make the adjustments. This is obviously going to be more work. You may have to take the door down a few times before you get it right.
See the articles 'Removing a Pocket Door' and 'Adjusting a Pocket Door' for more information.
Using a Pocket Door Wrench - Summary
Hopefully you were able to locate your pocket door wrench and make the needed adjustments. If not, there are other ways to solve the problem. With a little extra effort you should have been able to adjust your door.
How To Replace a Circuit Breaker
When installing a new circuit breaker, the first thing you need to find out is who the manufacturer is. Breakers need to match the panel they are used in. Ideally you would take the name of the manufacturer and the old breaker with you when you go to the supply store. Make sure you get an exact match.
Size does matter when you are installing new circuit breakers. First you need to make sure you get a breaker with the same amperage. Common single pole breakers are 15 and 20 amp. That does not mean a 30 amp single pole is never used. Get a breaker that is the same amperage as the original one.
Are you confused now? Did I forget to explain the single pole, double pole thing. You have two types of breakers in your panel. You guessed it, single pole (120 volt circuits) and double pole (240 volt circuits). Both types can be in several different amperage ratings. To get the sense of it, your outlets and lights will usually be on single pole circuits. Your range and dryer will be on a double pole circuit.
With that said, you want to get a breaker with the 'right number of poles' (What's a pole, anyway?), the right 'amperage' and made by the right manufacturer. Simple, right? Actually it is not that hard. There are not that many manufacturers and the amperages are standard. Installing a new circuit breaker with the wrong breaker will not work.
Oh! I'm sorry, I forgot, there is the physical size of the breaker. To add insult to this, most manufacturers make full size and half size breakers. Usually, 1" for full size and 1/2" for half size (minis as they are often called). So all of the above applies to two different sizes.
Mini breakers are ideal for adding circuits to a panel that is full. Two minis take the place of one full size breaker. Are you faced with this problem? You will have to replace one breaker with two breakers if you are adding to a panel that is full.
Wow, did I say this was easy. Installing a new circuit breaker the right way, takes a little bit of effort. Think it through and you will be fine.
One more issue with the circuit breakers. Newer homes are equipped with arc fault circuit breakers. These are designed to improve safety. They are more expensive and are wired differently that normal breakers. These are required in homes built since 2008 for many circuits in a home. These breakers have a test button, a neutral terminal and an extra wire that goes to the neutral bar. You will need to check with your local building department for arc fault requirements in your area.
Installing the Breaker
A circuit breaker is very similar to a light switch. It interrupts the hot conductor or power conductor. The difference is that a circuit breaker has limits to the amount of power it allows to go through. Remember, the 'electricity police'.
So you really only have two elements for the circuit breaker. The breaker and the slot it goes into. The other element is the hot wire(s) for the circuit. It's really not that simple, but it sounds good. I take that back. Installing a new circuit breaker in a replacement situation is that simple. One wire and the slot.
Almost every circuit has two other elements. The neutral wire and the ground wire. The neutral wire completes the path so the electrons have a loop to go through. Don't ask questions at this point, you won't understand the answers.
The last element is the ground. The ground is a safety feature. If the neutral ever fails the electricity will go to the ground before it goes through your body. Great feature in my opinion. You can liken it to a safety harness on an iron worker. Fifty stories up it is a hassle to put on a harness. As long as he does not slip the harness is never used. One slip and the harness saves his life. Well worth the hassle.
Before you begin installing a new circuit breaker, make sure the main breaker is off. The circuit breakers are friction fit into the panel. Generally you pull up on the side away from the center and they pop out. You hook them in the center, keeping them at an angle and press them into place. How easy is that? The breaker has a lug or lugs on it to hook up the hot wires.
For a single pole circuit it will usually be the black wire. Sometime a red wire if two circuits are being fed with a three conductor cable. Double pole breakers have two lugs. Sometimes a black and a red wire. Sometimes a black and a white. You put the hot wires in the lugs for the breaker. The neutral goes on the neutral bar (mostly white wires attached) and the ground goes into the ground bar (all bare copper wires attached)
Sheetrock vs Drywall
 Sheetrock vs. Drywall, what is the issue. None really, it is mostly a difference in what you call the same product.
Are you involved in a 'Drywall Repair Project'? See the articles 'Drywall Patching', 'Repairing Water Damaged Drywall' and 'Taping and Mudding Drywall' for additional help.
What is Sheetrock?
To clarify, 'Sheetrock' is a brand name, owned by the United States Gypsum company. They have an entire line of products with the 'Sheetrock' designation, such as 'gypsum panels', 'joint compound' and 'joint tape'.
Sheetrock (used as a generic term), wallboard, drywall, plasterboard and sometimes, just plain 'rock', refer to paper faced panels with a gypsum core. In the last several decades, there have been several types and styles developed. Over the years, gypsum panels have replaced 'plaster' to provide smooth surfaces for walls and ceilings in many countries around the world.
So, officially, 'Sheetrock' is a Trade Name for a branded product, gypsum products manufactured by the United States Gypsum Company. What is interesting is that some dictionaries list it as a 'noun' the refers to paper faced gypsum panels. So, the name has been in use so long that some think of 'gypsum panels' as 'sheetrock', no matter what company actually made it.
The History of 'Sheetrock'
Lime based plaster has been around for thousands of years. Some of the famous architecture that we have admired down through the centuries employed various plastering techniques.
The problem with plaster is that when mixed and applied by hand, it is a fairly labor intensive activity. It also requires multiple coats to get the desired finish. Add to that the lengthy drying time that is often involved and you can see the need for a better product.
Toward the end of the nineteenth century, several manufacturers started using gypsum to replace lime based plaster. This material was cheaper and easier to deal with.
By the 1930's a paper faced sheet product had been developed that had a gypsum core. This was the forerunner of modern day gypsum panels that come in four foot wide sheets. Most homes in the united states have gypsum panel products fastened to the framing members to create a smooth wall surface. In fact, whether we realize it or not, very few people in this country can get through a day without seeing a wall or ceiling that has been covered by a gypsum panel product or 'sheetrock'.
The United States Gypsum Company has been and industry leader in gypsum based technology throughout the twentieth century and into this century.
Sheetrock vs. Drywall
Paper faced gypsum panels are now manufactured by several manufacturers. Each one has their own trade name for the materials that they produce.
So, what's in a name? If you are just referring to generic gypsum panels, not much. The names we call them tend to be localized, following certain regions in the country. The Midwest leans strongly toward 'Sheetrock', since USG is based in Chicago. Other areas around the country use 'wallboard', 'gyp-board', 'drywall', 'plasterboard', or 'rock' (my personal favorite), No crime using any of them.
Each manufacturer has many proprietary products that have unique features that might be important to us. A visit to each specific website will provide you information on these products.
Summary
Call it what you like, 'Sheetrock' or 'Drywall'. The fact is that gypsum based panels hold up the paint in most homes and businesses in the United States and many other countries around the world. It is a great labor saving product.
Purchasing Hot Water Heater Elements
 If you have determined that your water heate elements are bad, you are going to need to purchase new ones. There are a few things to keep in mind before you run to the hardware store or order online.
Not sure if your elements are bad? See the article, 'Electric Water Heater Element Testing' for information on how to check the elements.
Not sure if the elements are even the problem? See 'Troubleshooting Electric Water Heaters' or 'Gas Water Heater Troubleshooting' for a complete listing of problems and solutions.
Types of Hot Water Heater Elements
There are both 'high density' and 'low density' hot water heater elements. Low density elements are considered better, they last longer and are less prone to build up. The low density elements have more surface area and therefore do not need to get as hot.
Density has to do with the surface are of the heating element. Low density elements have more surface area. They are also coated and/or made from different materials to resist corrosion.
Low Density Elements
This type of element is made from copper with a magnesium oxide and nickel coating. This type of element provides more heating surface and is less prone to corrosion. Low density elements are a little more expensive than high density types. This style will have a screw type fitting to install it.
High Density Elements
This type is the least expensive and will likely be he type installed originally in your water heater. This type will come in either a screw type or flange type connection. High density elements are the most suceptible to corrosion and failure due to the high heat generated. This type is made from copper and may have a zinc coating.
Extra Low Density Elements
This type is the best element that you can get. Some of them come with a lifetime gaurantee. They are made from high grade stainless steel. They are less prone to build up and will not burn out. These are also the most expensive elements.
You may have trouble finding a low density element with a flange assembly. You can purchase an adapter kit to use a screw in type on a flanged set up. It's up to you. For a screw type element you should not have a problem finding either density. Of course the low density elements cost more. Did you think you would get something for nothing? It's not a lot, a few dollars more for the better one. Make your choice on the density thing, use the salesman in you need to. After that you are ready to get things back together.
Water Heater Element Wattage
The wattage on hot water heater elements can range from 1500 to 5500 watts. Wattage is determined by voltage so you want to match the voltage and wattage for your new elements.
The best place to find the wattage and voltage information is on the label that is attached to the side. You will usually see two wattage numbers for each element. A lower number and a higher one. The reason for this is the acceptable voltage range that the water heater will operate at.
Most homes in the United States are wired for 120/240 Volts, but the voltage can go as low as 208 volts. Since wattage is based on voltage, the lower number you see on the label is based on the minimum voltage requirement.
There may be a 'Total Connected Wattage' number on the label. If it matches the wattage for the individual elements it means that only one element at a time will heat on the water heater.
Heating Element Attachment Types
There are two types of attachment types for electric water heater elements. Most newer water heaters are threaded and screw into the side of the tank. You need a large wrench to remove and install this type.
Older water heaters may have a flange type element. The bolts are smaller, but there are more of them, usually four. Before you purchase new elements yuo want to make sure that you have the correct flange for your water heater.
What Is the Next Step?
If you are purchasing water heater elements you will likely need to install them. See the article on 'Installing Electric Water Heater Elements' for complete instructions.
This job will require that you shut down and drain the water heater. See 'Shutting Down and Electric Water Heater' for information on what is involved.
Testing Water Heater Element Continuity
 Testing a water heater element for continuity is fairly simple when you have the right tester. If power is not going through the element, it will not heat. No heat, no hot water, simple.
Not sure if this is the right place? See 'Troubleshooting for Electric Water Heaters' or 'Gas Water Heater Troubleshooting' for all of the water heater problems and resources.
What Is Continuity
Simply put, continuity is the ability of the wire or element to complete an electrical circuit. Electricity needs a continuous path to work. Any break or interuption will cause it to fail.
For a hot water heater, the elements are submerged in water constantly. The repeatedly heated to heat the water in the tank. Over time they deteriorate and corrode. When this happens they may lose the ability to carry an electrical current. A simple test will tell you whether or not they are still viable heating elements.
Getting the Right Tester
There are lots of fancy testers out there that can cost quite a bit of money. For this test, you just need a simple continuity tester. All it does is run an electrical charge through the element. If the current goes through and gets back to the tester, it lights up.
A continuity tester is different from a voltage tester. A voltage tester relies on the power in the wires to work. Wheras a continuity tester provides its own current via a battery. You can purchase a continuity tester for $10 to $15 at a home supply store or online.
It shold have a single lead that connects to a pen like tool that has a contact on it and a small light. The lead will have a clip on it that can attach to an electrical terminal.
NOTE: The tests noted below can also be done with a multi meter. Multi meters are a little tricky to use and beyond the scope of this article. Check out Using a Multi meter, for more information.
Testing the Element
Shutting Down the Water Heater
The first thing you want to do is turn off the power. Shut off the breaker and tag it so that no one turns it back on. Water heater element testing should only be done when the power is off.
It is very important to make sure the power is off. See the article on 'Shutting Down an Electric Water Heater' for more information. If you elements do turn out to be bad, you are going to have to follow all of the shut down steps.
Accessing Electric Water Heater Elements
An electric water heater has two elements, an upper and a lower. There are cover plates on the outside of the tank that are held in place by a couple of screws. Remove the cover plates to get to the element ends and the thermostats.
There may be some insulation that needs to be pushed back out of the way. See the picture to help you identify the element.
Performing the Continuity Test
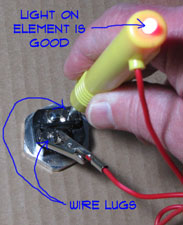
Before you begin, you want to make sure your tester is working. Touch the leads together to make sure it is working. They have a light on them that should glow or light up when you touch the leads. If the tester fails to light up you will probably need to replace the batteries. If batteries don't help, you will need to get another tester.
One last safety check, use a voltage tester to double check that the power is off.
There are two terminals on the element. To test for continuity, attach the clip to one of the terminals, no it does not matter which one. Touch the lead to the other terminal. The light on your tester should light up or buzz depending on the tester that you have. If it does, your element is still able to accept electrical current.
The Element Passed - Next Steps
Passing this test does not necessarily mean that you are out of the woods. Obviously, you are here because you either don't have enough hot water or you have no hot water. So, if the element passed the continuity test, there is still something wrong.
You will also need to test and see if you element is grounding out. See the article, 'Testing a Water Heater Element for Ground'. This is another simple test that determines whether or not the insulation on the element is still intact. If the element grounds out, it will not work.
What If the Test Fails?
If the test fails, the element is bad and will need to be replaced. There are no other choices, they cannot be repaired and there are no moving parts.
You need to test both elements to see if they are both bad. Perform the continuity test on the other element to see if it is working.
Replacing the Elements
What If Only One Element Failed?
New elements will cost between $15 and $40, so there is a cost consideration when only one is bad.
With that said, there is some common sense to be applied here. If only one element has gone bad it is very likely that the other one is not far behind. There is a fair amount of work involved to change one element. It makes sense to replace both of them at the same time.
Purchasing and Installing Elements
Replacing the elements is a job that requires draining the tank. You will want to see the article 'Installing Electric Water Heater Elements' for complete instructions on performing.