Search
Installation
Drywall Taping Tools
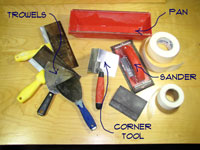 Drywall taping tools include pans, knives and sanding heads. Drywall knives come in a lot of sizes. Unfortunately, you need at least a few of them to be able to do a taping job. A 4”, 6”, 8” and 10” will take care of the majority of the situations you encounter.
For a one time repair, there are plastic knives that will do a passable job. Remember they are plastic and will break easily. A plastic drywall pan is quite useful. They're not that expensive. A bread pan will work in a pinch. Don't buy a sanding pole unless you have a lot of repairs to do.
If you only want to buy one decent knife, make it a 6”. I would venture to say that I do about 65% of my drywall repair work with a six inch knife. Of course I must admit that the other thirty five percent comes up regularly and having multiple knives is important.
You can equip yourself with a basic set of drywall taping tools (shown in the picture), for less than a hundred dollars. They will last for years. You'll be all set for your next taping mudding drywall experience.
How To Tape Drywall Corners
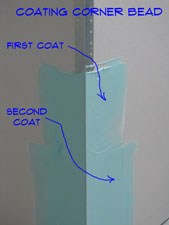 Coating corner bead with drywall compound is another taping and mudding operation. Corner bead is used to reinforce and finish the drywall corners in your home. Corner bead is another item that is built up off the surface of the drywall. Therefore, it needs to be feathered into the surface.
So it is similar to a seam from a coating perspective. The difference is that the nosing of the corner bead provides a defined point for the knife to ride on. Corner bead should be coated with an eight inch and a ten inch knife. Although it is often done with a six and an eight.
Use a six inch knife to apply an even band of mud along each side of the corner bead. Corner bead takes a lot of mud so don't be surprised. With the mud in place, you can pull the an eight inch knife down each side of the corner bead. Keep the knife tight to the drywall and the nosing of the corner bead. This gives you a sloped surface of mud to feather the bead.
Coating corner bead with the second coat is similar, only wider. Apply the mud with an eight inch knife and pull it with a ten inch knife. Do you see a trend here. Use a knife that is wider than the mud you are blending in. The second coat on bead is a lot easier than the first coat. It is a good idea to brush off the lumps with a sanding sponge before trying to install the second coat.
For a skim coat you will want to lightly sand the coated area. Use thinner mud and a wider knife if you have one. It is not as critical at this point to stay on the nose of the bead. The idea is to fill any voids that may be remaining. Additionally you are providing some additional feathering. This is the difference between an average job and a great job.
Taping Inside Corners
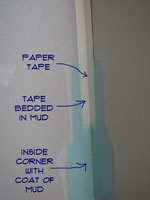
Taping & coating inside corners is the toughest and most time consuming of all the joints. The 'angles' in drywall speak, require that you put about two to three inches of mud on both sides of the corner. Crease the tape and cut it to length. You want it at approximately a ninety degree angle. Push the tape into the corner. Using a three or four inch knife press the tape into the corner, removing the excess mud. Work down one side and then the other.
Coating inside corners presents another challenge. It is almost impossible to coat two sides of an angle at the same time unless you have a specially made trowel. With only one trowel you will have to do one side and let it dry. After that you can do the other side. The light sanding rule applies in this instance too. Put the mud on an angle with a three inch knife and pull it with a four inch wide knife.
Make sure you cover the tape and feather the edges against the wall tight. A three or four inch wide joint is usually sufficient for an inside corner. Lightly sand the corner before applying a second coat. You may be able to keep the knife away from the corner enough to coat both sides at once. If not let one side dry and then do the other one. Apply the mud in a similar way if you have an angle trowel Pull both sides at once with this type of trowel. After the second coat, sand the angle and check for imperfections. Fill them as needed.
As you can see taping and coating inside corners requires the most work. But the effort is well worth it.
Taping Drywall Joints
 Coating drywall seams is the trickiest part of a taping job. Professionals can do it in four steps tape, first coat, second coat and sanding. For an amateur we have to add some steps, although they are not lengthy. It will go something like this: Tape, light sanding, First Coat, light sanding, Second Coat, light sanding, Skim Coat and Sanding.
Until you develop a feel for working with drywall compound you will need the extra steps. Do not try to do too much with each coat. Also remember that drywall mud is mixed with water. When the water evaporates the mud shrinks. Taping mudding drywall is easier when you are patient.
Types of Drywall Seams
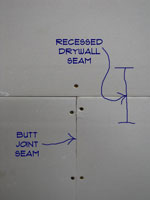
There are two types of drywall seams that are encountered with taping mudding drywall. The easiest to deal with is called a 'flat'. Along the long dimension of the drywall there is a 'recess' rolled into edges of the drywall. This provides a depression for the mud and tape when two recess edges are next to each other. These joints are much easier to finish and are naturally flat when done.
The depression created by the recess allows the mud and tape to finish flush with the face of the drywall. This allows you to get a flat surface when the sanding is done.
Unfortunately, for repair work you are always faced with a 'butt' joint. For a 'butt' joint the mud and tape go on top of the flat surface and have to be feathered in. Poorly done butt joints will show even after a wall is painted.
 That is why it is important to keep the tape and the build up of compound as tight as possible. Just try to keep it in your mind that a drywall joint is like a mountain range on your wall. The lower the height of the range and the wider and flatter the slopes, the less visible it will be.
How To Coat Drywall Joints
At this point you lightly sand the joint. The idea is to just knock the lumps off so that your successive coats will go smoothly. It only takes a few seconds to brush off a seam or joint. Those few seconds are well worth it. You'll be sorry if you don't listen about this.
For coating drywall seams, I like to use a six or an eight inch knife. One swipe down each side of the crack with a six inch knife is usually good for the first coat. You want to apply a coat of about and eighth of an inch of mud, maybe a little more over the entire patch or joint. The mud should go past the edge of the tape by a couple of inches. You want to take a trimming pass on the edges of the mud. The idea is to flatten or feather the edge so that the mud will not ooze out around the knife when you pull it. With the mud applied pull the knife down each side of the crack with the corner of the knife on the flat portion of the wall staying tight to the surface. Let the other side of the knife ride up off the center of the crack so that a coating of mud stays over the tape.
When you are done, can you see the tape? No, that's good. Yes, you pulled it too tight try again. The idea is to get just enough mud over the tape so that you have a surface to work to for the next coat. You don't want a small mountain but you do want at least a sixteenth of an inch of mud over the tape. Now walk away and let it dry, don't mess with it anymore. Did you hear me? Walk away, you'll only make it worse.
It gets easier from here. Hit the seam or joint again with the sanding sponge to get rid of any ridges or lumps. Select a knife that is two inches wider than the one you did the first coat with. Each coat should go out onto the flat surface slightly farther than the last. Remember the mountain range, your taping mudding drywall range is about and eighth of an inch high. Ideally the slope will be eight to twelve inches wide.
By getting the tape covered with and even coat of mud you have established a high point for your patch or joint. The wall surface is the low point. The idea with this coat is to fill the voids left by the shrinking mud. You do not want to put anymore build up on the patch. Run the knife down each side of the patch keeping it tight as you go.
How does it look? Smooth and even? Good, walk away and let it dry. See some voids, try it again. With the second coat applied you will need to wait for it to dry. The drying time should be less. Don't worry, you're almost done with coating drywall seams.
Brush off the patch with the sanding sponge and use mud that is fairly loose (extra water in it) to skim the patch. Keep the knife tight against the surface. You are only filling in the last of the voids. The seam or joint won't take much mud at this point. It is this final skim coat that will get your taping mudding drywall projects looking as good as a pro's do. Wait for the mud to dry and use the sanding sponge to do a final sand. Check it with your hand to make sure it is smooth. If you feel any lingering imperfections, you can hit them again with some drywall mud. Satisfied?
The added sanding and the extra skim coat will give you a fighting chance at a really professional looking patch. Coating drywall seams is not that satisfying if it looks bad after it is done. Of course once everything is painted the sign of a good taping job is that you don't notice it.
Taping Screws and Nails

Taping screws and nails is a necessary part of a drywall taping job. This is the easiest thing to do when taping mudding drywall. Screws leave a deep depression in the drywall. For this activity, you want to use mud that is a little stiffer. Thin mud will shrink too much when coating.
Always put three coats of mud on them. Fill the screw or nail with mud and drag the knife across it, keeping it tight to the surface of the wall. When done, you will sand the surface flush with the wall. You should not leave a build up of mud around the screw head.
If a screw is too high, get a drill and run it in until the head is below the surface of the wall. Do not try to build up mud around the screw head. This will leave an ugly blotch on your wall. Nails can be knocked in with a hammer or the handle of your drywall knife.
That's all there is to taping drywall screws and nails. Not that hard.
How To Apply Drywall Tape
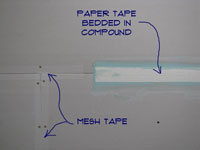 Before you can learn how to apply drywall tape, you need to determine which kind you want to use. There are two types of tape that are commonly used for drywall repairs, one is made from paper, the other is made from fiberglass mesh.
Some related articles are 'Taping and Mudding Drywall', 'How To Patch Drywall' and 'How To Install Drywall', see this information for futher instruction.
Using Paper Drywall Tape
Installing drywall tape with paper tape will require one extra step. First you have to apply mud and wipe the tape down to get it to stick to the drywall. Spread about and eighth of an inch of compound along two opposite sides of the seam or joint.
Cut a piece of paper tape about two or three inches longer than the joint you are taping. Center the tape over the joint. Use a four or a six inch knife to wipe the tape down, pressing the excess mud out from under it. The tape should be fairly tight to the wall. The flatter the better.
Repeat this for the other seams or joints you are working on. Where joints intersect, make sure the tape laps onto the other pieces of tape by at least an inch. Also you need to make sure that there is mud between the layers of tape. Wipe out the excess mud and then walk away. I will repeat that 'WALK AWAY', you have to let it dry.
Do not attempt to coat the joint with compound over wet tape. You will be very angry in a hurry. Find something else to do until the tape dries. Don't blame me, if you had spent the extra couple of dollars on the fiberglass tape, you would not be doing this step. Taping mudding drywall is all about drying time, mesh tape eliminates one drying phase.
To cut the tape hold it in the spot you want to cut it against the wall with a drywall knife. Hold tight and pull the tape, it should tear cleanly at the edge of the knife. Try it a couple of times for practice.
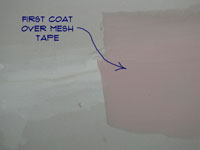
Installing drywall tape when using mesh tape is a little simpler. The mesh tape has some adhesive on it that allows it to stick to the wall. You cut the tape similar to paper tape. You do not have to apply mud to the tape prior to installing it. When you have the tape the way you want it, you coat over it with compound.
How To Install Fiberglass Tape
Fiberglass Mesh Tape sticks to the wall by itself and the holes allow the mud to bleed through and stick to the wall. You can put a first coat of mud on immediately. For taping mudding drywall repair projects this tape is the best.
For small jobs fiberglass tape is preferred, even though it costs more. It saves one step, thus saving time. The exception to this rule is taping inside corners. Fiberglass tape does a poor job in corners. You want to use paper tape instead. For about ten dollars, you can get a roll of each, should last you for a long time on home repair projects.
Fiberglass mesh tape has a self stick feature. You do not need to apply drywall compound to install the tape. Instead, you apply it to the wall at the locations that you need it.
How To Tape and Mud Drywall
 Knowing how to tape and mud drywall can save you a lot of time and money over time. If you own a house, eventually you will need to patch and repair some of the walls and ceilings. This article and the related information will give you all the tools you need to successfully finish drywall projects in your home.
For related information see the articles, 'Troubleshooting Drywall Problems', 'How To Patch Drywall' and 'How To Install Drywall Patches'.
Years ago all walls and ceilings were plastered. The plasterers thought that drywall was a flash in the pan product. Unfortunately for them it has lasted. Drywall introduced two entirely new trades into the industry. Drywall hanging and drywall taping or finishing.
Plasterers have found other occupations in the construction industry, but there are far fewer of them than there are drywallers or sheetrockers. With a little practice and a few inside tips you can do an acceptable job at taping mudding drywall.
Taping and Mudding Drywall - The Steps Involved
This article on taping mudding drywall is informational. It is intended to provide basic how to skills to get a job done. We do not classify this information as a repair. In this series we provide you with information about materials and techniques. The information below gives you a summary of the various things involved. There are several steps, but none of them take very long.
Replacing Damaged Drywall
If you have a hole or large crack in your wall or ceiling, it is likely that you will need to replace some of the drywall. For instructions on removing and installing new drywall for patches, see the article 'Patching Drywall Holes With New Drywall'.
How To Apply Drywall Tape
The first step in taping and mudding drywall is installing the tape. Any time you have a break or crack in the surface paper, you need to bridge it with tape. There are two different kinds of tape that are commonly used for drywall repairs.
The methods for installing them are slightly different. For instructions on installing paper and fiberglass mesh tape, see the article 'How To Apply Drywall Tape'.
Installing Compound on Drywall Joints
After the tape is installed and the mud is dry, you can apply the first and second coat of compound. Most patches will require two and sometimes three coats of compound.
The reason for this is that the compound shrinks as it dries. So to get a smooth surface, you need to apply progressively thinner coats of compound.
You also do not want to try and do too much with each application of compound. For instructions on applying the first and second coat of compound, see the article 'How To Tape Drywall Joints'.
Skim Coating Drywall Seams
Skim coating is a very thin layer of compound that is applied as a final coat. Prior to skim coating, joints are lightly sanded. The skim coat is done by keeping the trowel tight against the surface, allowing the compound to fill any low spots.
For instructions on how and when to apply a skim coat, see the article 'How To Skim Coat Drywall'.
How To Sand Drywall
Sanding is an integral part of any taping and mudding project. A final sanding prior to painting is a must to eliminate any ridges in the compound. Light sanding between coats of compound can also reduce the amount of mud used.
Drywall finishing is a touch trade and skilled professionals are able to reduce the amount of sanding by accurately applying the compound. For the rest of us, we may have to do a bit more sanding to achieve a nice finish. See the articles 'How To Sand Drywall', 'Wet Sanding Drywall' and 'Dustless Drywall Sanding' for information on the various sanding options.
Drywall Taping Tools
There are a few tools you will need to complete a drywall finishing project. However, you may not need too many. See the article on 'Drywall Taping Tools' for information on what the tools do and which ones you need.
Types of Drywall Joint Compound
What do you mean, 'types of drywall compound'? It's the white stuff, right? Actually there are several types of drywall compound and depending on what you are doing you may want to be aware of some of them. Most drywall compound comes ready mixed, but some types are still powder mixes.
I am going to run through these quickly, for most of us the type to use is All Purpose. All purpose comes in standard weight, mid weight and light weight forms. All purpose mud can be used for taping and coating. It can also be used for texture if you plan to paint the ceiling.
Taping Mud
Taping mud is used for just that. It has extra glue in it to help it adhere to the wallboard at the joints. It is not as workable for coating the seams and it is harder to sand.
Topping Mud
Topping mud does not have glue in it and is only used for coating seams and texturing. Topping mud is usually whiter and can be used for texturing without painting (that's if you want a white ceiling of course).
All Purpose Compound
As the name implies, this is a general purpose compound that can be used for all phases of a drywall finishing project. This mud has both taping and topping properties and is a good choice if you have a small project. It will dry a light gray if you use it to texture, so you should plan on painting it.
Mid & Light Weight Mud
Mid weight and light weight muds are lighter versions of their standard weight cousins. Light weight muds are easier to work with (especially for amateurs) and much easier to sand. They entrain air into the mud during the manufacturing process.
One of the key advantages or drawbacks, depending on how you look at it is how easy it is to sand. This is a definite plus for novices. However, it is also much easier to groove it and sand too deeply, sometimes exposing the tape. Use caustion when sanding this mud.
Setting or Quick Set Compounds
Setting type muds have chemicals in them that allow them to dry quicker. You purchase them by the proposed drying time, anywhere from 5 minutes on up to 210 minutes. The actual drying times differ depending on a number of factors. These muds are powdered and have to be mixed when used. Do not mix some twenty minute compound and then go off and have your dinner. It will be rock hard in your pan when you come back. There are two kinds of setting muds, the original and a newer easy sand version. Make sure you get the easy sand, only the most skilled tapers can work with the original and most of them hate the stuff. It's main attraction is that it is one of the most durable compounds on the market and can fill some ugly holes.
Dust Control Mud
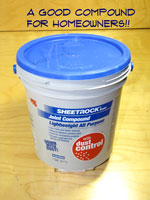
The newest innovation is a dust control mud. This is a good choice for a home repair. It comes in a light weight version and is a lot less messy than the regular muds. USG makes a light weight all purpose mud with dust control. Definitely the best of all worlds. This is the best all around mud to use for your taping mudding drywall projects. If you are in a hurry get the setting type muds (Durabond is the brand name for USG), 20 or 45 minute will allow you to put multiple coats on a patch in a single day.
Types of Drywall Tape
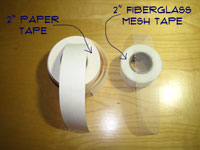
Again there are a number of types of drywall tape. There are only two types that you will probably ever need. There is paper joint tape, usually sold in 250' or 500' rolls. This tape has a ridge down the middle that allows it to be folded and used in corners. Fiberglass mesh tape is the second option. For repair work this is the king.
Both types types of drywall tape come in two inch widths. Wider widths for fiberglass tape are available.
- Paper Tape has to be installed with drywall compound and allowed to dry before it can be coated.
- Fiberglass Mesh Tape sticks to the wall by itself and the holes allow the mud to bleed through and stick to the wall. You can put a first coat of mud on immediately. For taping mudding drywall repair projects this tape is the best.
For small jobs fiberglass tape is preferred, even though it costs more. It saves one step, thus saving time. The exception to this rule is taping inside corners. Fiberglass tape does a poor job in corners. You want to use paper tape instead. For about ten dollars, you can get a roll of each, should last you for a long time on home repair projects.
Mixing Drywall Compound
Mixing drywall compound is always required, even if you have 'ready mixed'. I already mentioned that most compounds come ready mixed. With that said, you usually have to add a small amount of water to get the mud workable. Use the water sparingly, a little bit goes a long way on ready mixed joint compounds.
You can mix a pan full right in the pan or you can use a paddle and a battery drill to mix it in the pail. As a rule the mud should start out stiffer and with each coat get a little thinner. Stiff mud right out of the pail is not good to tape with, you will not get enough of it out from under the tape and it will cause your joints to be heavier.
Powdered muds should be mixed in a pail with a paddle and drill. Mixing them by hand often leaves lumps that will be quite aggravating during your taping mudding drywall operation. Add water gingerly until you get an even workable consistency. There are no gauges to tell you when it is right. When mixing drywall compound, it should have some body, but be workable. Mud that falls off the knife is too thin. If it feels like you are working with concrete on a hot day, it needs some water.
The particular thing you are doing affects how to mix the mud. For taping, you want the mud thinner. When you are 'first coating' or 'bed coating seams and bead, the mud should be stiffer, so that it does not shrink as much. Skim coating as a final pass will require, thinner mud.