Search
Texturing
Orange Peel Texture
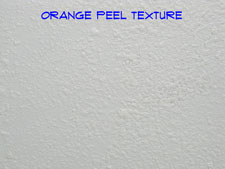 Orange peel drywall texture looks like, well you guessed it, an orange peel. The drywall compound form light bumps on the surface that looks similar to an orange peel.
For related information, see the articles 'How To Repair Drywall Texture', 'Patching Drywall' and 'How To Fix Drywall'.
This type of texture is also done using spray equipment. Homeowners will probably not have the equipment or the expertise to perform this type of operation themselves.
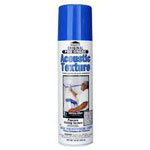
For a patching project you still have options. There are aerosol products available for patching this type of texture. A can runs around fifteen dollars and will cover about six square feet, depending on the density of the bead pattern.
Obtain a can and make your repair following the instructions on the can. This will be the same as other texturing repair projects, you will need to experiment. Be careful though, this material is expensive and does not go very far. Texturing drywall can be that easy.
Popcorn Ceiling Texture
 Acoustic ceiling texture is very popular in homes built in the last few decades. Certain geographic locations also favor this style. This type of texture is done by putting styrofoam beads in the drywall mud and then using a special hopper to spray it on the ceiling.
Homeowners will probably not have the equipment or the expertise to perform this type of operation themselves.
For related information, see the articles 'How To Repair Drywall Texture', 'Drywall Patching' and 'Taping and Mudding Drywall'.
All is not lost though. There are aerosol products available for patching this type of texture. A can runs around fifteen dollars and will cover about six square feet, depending on the density of the bead pattern.
Purchase a can and follow the instructions for making you repair. Just like all of the other textures mentioned, some experimenting is needed to get a good match. The repair cans are expensive, so use the material gingerly. All done? Good job, you texturing drywall project has succeeded.
Trowel Applied Wall and Ceiling Texture
Originally, texture similar to drywall trowel texture were found in plastered homes. However, drywall compound has been used to achieve the same appearance. It will take more practice and experimenting to match this type of texture. The first thing to do is determine if anything has been added to the mud, such as sand.
Not sure if this is the right texture? See the article 'Types of Drywall Texture' for more information on all the texture types. Need to patch some drywall? See the article 'How To Patch Drywall' for instructions.
Generally a drywall trowel texture will be done with a fairly stiff mud. You apply the mud with a trowel and then use the trowel to achieve the pattern. Spanish textures are globs of mud flattened out. The trowel is often 'hooked' at the end of the stroke to give it a look (experiment, remember?). Fans, circles and other patterns are done by applying the compound in the desired pattern.
There are many, many variations and you will have to keep trying until you get something that works. This is definitely not an exact science. Even if you call a professional, they will need to experiment to get the right look. Trowel texturing drywall or imitating plaster textures is more difficult. Hopefully you were able to get something you are happy with.
Drywall Roll Texture
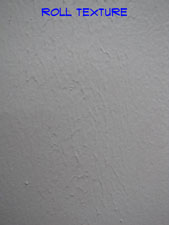 Drywall roll texture is done by rolling the drywall compound onto the surface. The roller creates a pattern in the mud. Once the pattern is semi consistent the mud is allowed to dry. Use a heavy nap roller, around 3/4".
Mix the mud so that it can be rolled. Much heavier than paint, but thinner than taping compound, approaching a liquid state. Roll the mud on and try to blend it into the surrounding area. If your texture seems too heavy or light, adjust the consistency of the mud. Or try a different nap on the roller.
Don't despair, drywall roll texture is a pretty messy operation. Make sure you cover everything you don't want drywall mud on. You will still have some clean up to do.
This is by far the easiest texture to deal with. Step back and give it an inspection. Not satisfied? Scrape it off and try again. Looks good? Great, your drywall texturing experience has been successful. Time for another exciting activity, like cleaning the basement.
See the articles 'How To Repair Textured Ceilings' and 'Home Drywall Repair' for additional information and a listing of related articles.
Knockdown Ceiling Texture
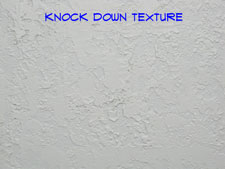 Knock down texture as the name implies is done by knocking down the stipples. Follow the instructions for a 'Stipple Drywall Texture' that is discussed in step one. This will give you an area textured with a stipple pattern. You will have to go through the experimenting phase to come up with something that looks similar to what you have. Let the texture start to dry.
You are trying to get the classic flattened look that is the trademark of a knock down drywall texture. Even among professionals, keeping a consistent look is difficult.
Use a plastic trowel or a piece of stiff but pliable rubber to 'knock down' the stipples. You want the trowel to ride lightly over the surface. Do not push it tight to the drywall. Apply enough pressure to get a knock down look similar to the surrounding area.
Step back and give it an inspection. Not satisfied? Scrape it off and try again. Looks good? Great, your texturing drywall experience has been pleasant. Now you can move onto other repairs in your home.
For more information on drywall texture, see the articles 'How To Repair Drywall Texture' and 'Patching and Repairing Drywall'.