Search
Texturing
Stipple Drywall Texture
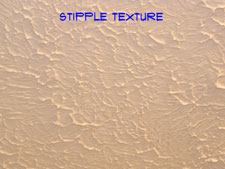 Stipple texture is recoginized by it's pronounced raised points that can resemble tiny mountain ranges. Actually, in the last few decades this type of texture has been toned down quite a bit. Instead of the heavy looking stalagtite typs points, a much flatter, subtle looking texture is preferred.
Due to this feature it is primarily used on ceilings. A close cousin is "Knock Down Texture", this texture is first stippled and then the points are flattened. See the article "Patching Drywall" for information on fixing the drywall prior to repairing the texture.
This article covers how to patch a texture ceiling that is already installed. The problem is, that to match the texture, you need to use the same techniques that the original installers used.
Variations in Texture
Whether the stipple texture is heavy or light, the methods for installing it are the same. The texture is applied by rolling or spraying drywall compound onto the ceiling. The pattern is created by 'stopmping' the ceiling with a round or oval texture brush. The indectations and raised portions are created by the brush.
Stipple drywall texture can range from very light, usually done with a sprayer, to heavy. You want to thin the the mud accordingly. For a heavy stipple the mud should be stiff but workable.
For a very thin texture the mud might be the consistency of a heavy paint. The pattern is also important. You may not have a brush that matches the one used.
The thicker the mud, the more pronounced and sharper looking the stipple will be. You may need to experiment with the thickness to get a stipple similar to the one you have currently.
Finding a Texture Brush
The two common ones are round and oval. You can buy them at a home supply store. A texture brush and be found near the drywall supplies. They are around ten dollars. The have a threaded fitting in them so that any broom handle or painting extension stick will work.
For a very small patch it may be possible to use a brush that you already have, even a paint brush. However, it will take some experimenting to get the pattern to look the same.
Patching Stipple Texture
Mixing the Mud
The thicknes of the mud will determine how sharp or flat the pattern looks. Start with thicker mud and keep adding water until you have the consistency that will create the correct pattern.
Installing the Patch
Roll the drywall compound onto the area that needs to be patched. Roll the wet mud onto the existing texture by a couple of inches. The stippling is where you tap or 'stomp', as it is called in the industry, the brush into the wet mud. You may have to experiment with how vigorous the 'stomping' is, again this is to get the pattern you want. The bristles of the brush are kept perpendicular to the drywall and when you pull the brush away it leaves a stipple.
Play with it a little bit until you get your stipple drywall texture right. Blend the texture into the existing edges. Normally you would want to rotate the brush in your hand as you stomp it, this keeps the pattern as random as possible
Step back, how does it look? If you are satisfied, let it dry and paint the area. Not satisfied. Scrape it off while it is still wet and try again. No shame in that. You will probably never find the guy that did it the first time. Even if you did he probably could not exactly match his own work. Texturing drywall is very common you will be glad over time the you are able to install a stippled texture when you need to.
Summary
As you can see from the above, matching an existing texture as a trial and error process. With a little experimentation and practice you should be able to get the patch to look the same as your existing ceiling. You should paint the entire ceiling after the patch has dried. This will help the texture to blend.
Types of Drywall Texture
One could probably write an entire book on all of the different types of drywall texture that one might encounter. We will try to address the common ones.
The names below may vary from area to area and even between those who install the texture. Hopefully the descriptions will help you identify what type you have.
Stipple Textures - This type of texture is done by rolling or spraying on a layer of drywall compound and then 'stippling' it with a brush. The pattern may be round, oval or monolithic.
Knock Down Texture - This is often accomplished by adding a third step to the stippled texture. When the texture is partially dry a plastic or rubber trowel is dragged over the stipple to achieve the 'knock down' look.
Roll Textures - This type is done by applying drywall compound to the wall or ceiling with a paint roller. This type is typically used in closets and garages. It is the easiest of all of them to match.
Trowel Texture - These textures are a carry over from the plastering era. As the name implies they are done with a trowel. Spanish texture, the fan pattern on other similar patterns are done in this manner. Sometimes sand or other aggregates are added to the mud or plaster to give the texture a grainy look.
Acoustic Texture - This type is done with special equipment and looks like small beads sprayed onto the ceiling.
Orange Peel - Or spattered textures are also done with spray equipment.
Textured Ceiling Repair
 Texturing drywall is an art that is shrouded in mystery, the secrets passed on for generations in quiet whispers. Not really, it just sounded good. Repairs can be made on drywall texture. Read on and see if you want to try.
Drywall textures are most commonly used to give ceilings some visual appeal and hide imperfections on a surface that is prone to showing the seams. When done correctly a textured ceiling does not need to be painted initially, thus saving on construction costs.
There are many types of drywall textures. For each type there are numerous variations. The pattern and the thickness of the drywall compound used affect the final appearance. To make it worse, drywall texturing done by two different installers, using the same type and pattern of texture will have a different look.
Texturing is another 'touch' or 'feel' trade that allows for some individuality. Don't worry, often with a little experimenting you can imitate the texture you have.
Texturing Drywall - Information
What Can You Save?
Texturing drywall is usually the last step in the drywall repair process. A drywall finisher will charge between twenty-five and fifty dollars an hour, perhaps more. They may quote you a price of $75 and get it done in fifteen minutes. Depending on how much work is needed you could save anywhere from $25 to $200, doing it yourself.
How Hard Could It Be?
Due to the learning curve we are classifying texturing drywall as a more difficult task.
Check the Simple Things!
Texturing drywall is both simple and difficult at the same time. For a homeowner there is some experimenting to do. For a small area you may be able to dab some compound onto the surface and blend it in with your finger.
What Can Go Wrong?
When you are all done and get the area painted you may find that you can tell that it was patched. Texturing drywall is also messy. Use drop clothes and plastic to protect the area. Try not to track the mud through the house.
Texturing Drywall – The Steps Involved
- Step One -This section provides a description of the various types of texture that are common in most homes.
- Step Two - For Stipple Textures take a look at at this segment.
- Step Three - Knock Down Textures are covered in this step.
- Step Four - Roll Textures are discussed here.
- Step Five - Go to this article for information on Trowel Textures.
- Step Six - In this article we deal with Acoustic Texture.
- Step Seven - Finally there is orange peel or spattered texture.
One other option for a texture repair is to redo the entire area. If the ceiling or wall is small you may want to consider this. For a spot in the middle of the living room ceiling this probably is not practical.
For the best results, experiment on a piece of drywall or other surface. Adjust both the thickness of the mud and the pattern until you feel you have the 'look'. Practicing and experimenting ahead of time will help you to blend the texture in, thus achieving a patch that does not look like a patch. Texturing drywall when you are trying to match something takes a little more patience.
Summary
The 'Introduction' to this series on 'Texturing Drywall' provided you with an idea on what the cost might be to get someone to fix this for you. We also provided some tips on simple ways to fix your problem and information on the problems you could encounter.
'Types of Drywall Texture' is and article on the various types of texture you might encounter. Different parts of the country favor some over others.
Dealing with repairing 'Stipple Texture' was covered in this step.
Another type of stipple texture is the 'Knock Down Texture'. Matching this texture will require one extra step.
'Roll Texture' is the easiest one to repair. We told you how to go about doing it in this step.
'Trowel Textures' require additional skills to duplicate. They are a throw back to the plaster textures of years gone by.
'Acoustic Textures' are a popular spray applied texture that include a particulate in the drywall. It is possible to repair them as described in this segment.
Another popular spray applied texture is 'Orange Peel Texture'. It is also possible to repair this one.
There are a lot of different textures that you may encounter. They are mostly variations on a few different types. With a little patience you should have been able to repair or patch your area. Texturing drywall is not that hard, it is just a different type of skill.
The old proverb 'practice makes perfect', applies to texturing drywall. Trying out your skills on a scrap piece of drywall will go a long way toward getting a good match. The right mud and additives are the other part of the equation. Hopefully you were successful in your endeavor.