Doors
Adjusting Garage Door Springs
 Adjusting garage door springs is only possible if the springs are not broken. If one or both springs are broken, you will need to replace them, no other choice, see 'replacing garage door springs' for information.
Not sure if the springs are your problem? See the article 'Troubleshooting Overhead Garage Doors' for a complete listing of all the garage door topic.
Types of Garage Door Springs
There are two types of springs on garage doors. Extension springs are the ones that run alongside the overhead door track and have a pulley and cable attached to them.
Torsion springs are mounted over the door and a long round shaft goes through them, with a wheel for the cable on each end. Torsion springs are generally used for larger heavier doors, usually 10' or greater in width.
Problems With Garage Door Springs
Without the springs the door is very difficult to lift. At times the springs may do to good of a job and keep the door from closing all the way. When this happens adjusting is in order. The other situation would be if door is not closing level.
It could be that one spring is putting more force on the door than the other. An adjustment could solve this problem. Read on to find out if adjusting garage door springs is something you want to tackle.
Garage Door Spring Adjustment Information
What Can You Save?
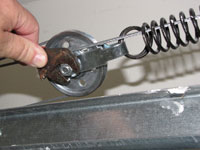 Most of the time, this is a simple job for a service man. Unless something is broken, you won't need parts. A $50 to $75 service call would be the minimum. The serviceman may tell you that it is best to replace the springs a $150 to $200 job. An added danger is that the repairman may take the opportunity to try and sell you a new door. They can be quite convincing when telling you about poor quality and performance of your current door. A new door could run into the thousands of dollars. Do you really hate your current door? No, well then just fix it yourself or have it repaired.
How Hard Could It Be?
The difficulty level of adjusting garage door springs, varies with the type. Extension springs are easy to adjust. Torsion springs are dangerous and should only be attempted by those that have a good knowledge of how they work.
- These repairs will have a Difficulty Level of: A Bit of Work
- These repairs require a Skill Level of: Handyman
For and explanation of the terms in this section, see 'How to Use This Site'.
Check the Simple Things!
Adjusting extension springs is fairly simple. There are different holes for the hook that holds the cable. The simplest fix would be to move the hook to a different hole. See Step One for instructions.
What Can Go Wrong?
Do not dismantle the spring, if you do not get it back together the door will not work. If you adjust the spring the wrong way the condition will be worse. Is the gap at the bottom of the door bigger after adjustment. Take two steps back.
Troubleshooting Garage Door Springs
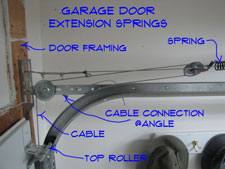
Adjusting garage door springs is a common repair. Garage door springs are used to offset the weight of the door. Without the springs the door is very difficult to lift. When garage doors won't close all of the way, or they close unevenly, spring adjustment may be called for.
Adjusting Garage Door Extension Springs
Extension springs are the ones that run just above the overhead track. They have cables threaded through them and a cable that is threaded around a pulley. This type does need to be adjusted at times.
The next article discussed 'Adjusting Overhead Extension Springs'. This type of spring is used on smaller doors, usually eight or nine feet wide. Smaller doors are lighter and easier to deal with. It is not that difficult to adjust this type of spring. You can go over this topic again by following this link.
Adjusting Garage Door Torsion Springs
The other kind is mounted on the wall above the door. There is a long round bar with pulleys on the end for the cables. This is a torsion spring. This type of spring can be dangerous, due to the fact that you have to work on it while it is under tension. You may want to hire someone to take care of this problem. However, understanding how they work is helpful when dealing with a serviceman.
Do 'Garage Door Torsion Springs' get out of adjustment? Yes they do. The problem is that you have to work on them when the springs are in tension. The door has to be done and the springs are extremely dangerous when they are in this state. It is not recommended that the average person work on this type of spring. You can review the warnings and find out other resources by following this link.
WARNING!! Torsion Springs can be VERY DANGEROUS, Precautions and thorough knowledge are REQUIRED!!! Do not attempt this repair without the proper skills.
Summary
You are clear on the fact that 'Garage Door Spring Adjustments' are only advised for extension springs. We do not recommend adjusting torsion springs unless you have a thorough understanding of them and feel comfortable doing it. They can be dangerous.
You should have been able to adjust your extension springs without too much trouble. Did it go well? Are you happy? Hopefully you found this information on adjusting garage door springs helpful.
Adjusting a Binding Garage Door
 Adjusting a binding garage door is rarely needed when the door is installed properly.
This is not a common problem, more likely you need to see the articles on 'Garage Door Track', this adjustment is not hard. Or the article on 'Adjusting Garage Doors' may cover your issue.
Reasons for Binding Garage Doors
When the trim board is installed too close to the door it can bind. This binding will usually occur when the door is almost closed. The track on can be adjusted away from the frame with one exception.
The clip assembly that holds the top garage door roller in place is not adjustable. The bolt holes in the track are not slotted. Operating your door manually would allow you to give it and extra push right at the end. It works, but not ideal. With a garage door opener, the motor may not have the strength to push the door down all the way.
Watch the door as it closes and see if it is binding at the end. Is there a gap at the floor when the door is closed? Can you pull the door down manually to eliminate the gap. Try to see if the door is bound at the very top. With the door up, examine the trim. Is it sticking in past the framing for the door? The trim board should be flush or slightly behind the framing. It should not be further inside the garage than the framing.
Fixing a Binding Garage Door
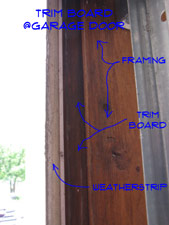 You have two choices at this point. The first is to chisel off the excess wood until the trim board is flush with the framing lumber. This spot is concealed most of the time and if you use a sharp chisel you can do a neat job.
The other options would be to shim the top bracket to pull it away from the framing. This will only work if the distance is minimal, say one or two flat washers thick. Loosen the top clip and slip a flat washer between the metal plate and the door. Put one washer behind each of the three or four bolts holding the roller assembly in place.
Check the door and see if this helped. I would not go beyond two washers to solve the problem this way. More than that and you need to chisel away the excess trim board. Work with the trim board until the door closes freely. Were you successful at adjusting a binding garage door? Yes, well that is good news. You're done.
Adjusting Garage Door Track
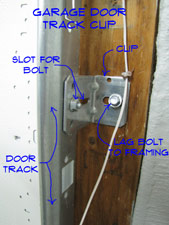 This article covers adjusting a garage door track. When the track is out of adjustment it can cause the garage door to not operate correctly. In extreme cases the door can even come out of the track.
For other garage door repair issues see 'Troubleshooting Garage Doors' or 'Garage Door Opener Problems'.
There are two ways that you can adjust garage door track. (1) You can align the track with the door itself, so that the rollers work properly. (2) You can adjust the track so that the door aligns with the weatherstripping.
A related topic would be 'Adjusting Garage Door Springs'.
Adjusting Garage Door Track to the Rollers
Adjusting the Track to the Rollers. The garage door track is attached to the door frame with metal clips. The track acts as a guide for the garaged door rollers. Adjusting a garage door track may involve setting the the track to the proper alignment for the rollers. See the article 'Garage Door Rollers', for more information on the correct alignment.
The clips have slots in them that allow for side to side adjustment. Rule of thumb, you should have about 1/2" to 3/4" between the edge of the door and the track. This leaves some room for the rollers to move in and out of the sleeves. When the track is too close to the door, the door will bind. Too far away and the rollers could pull out of the sleeves.
Safety First!!
When you are adjusting garage door track, you want the door down. Only loosen one track at a time and do not remove the lag bolts completely. Loosen the lag bolts that hold the track to the jamb and slide the bracket until the distance is correct. You may have to loosen more than one of the clips. Get the track where you want it and tighten the clips back down. Make sure the lag bolts that attach the clips to the framing are tight.
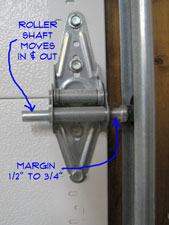
Adjusting the garage door track margins keeps the track properly aligned with the door itself. When it is resting on the ground the door establishes where the tracks should be. You want the tracks to be parallel with the door and have a consistent margin for the full height of the door.
Adjusting the margins along the side of the door is similar to adjusting it in and out. The brackets are fastened to the jamb with lag bolts. The hole in the bracket is also slotted. This allows the bracket to move from side to side the length of the slot. Hopefully, the installer put the lag in the center of the slot.
You will need a wrench to loosen the lag bolt. Loosen the bolt and adjust the bracket in the desired direction. You may need to loosen two brackets at a time if they are binding.
Adjust the brackets on both sides of the door until you have a consistent garage door track margins. You should be able to see about 1/2" to 3/4" of the shaft.
Adjusting the Overhead Track
 The overhead portion of the garage door track only has one adjustment point. The overhead track should be the same distance away from the door as the wall track. Do not try to adjust the track with the door up. The brackets that hold up the track have slots and additional holes in them. The end of the track will need to be moved to to adjust it.
Loosen the bolts or remove them if a new hole needs to be used. Move the end of the track closer or away from the door as needed. Do not move it very far each time. If the track is too far away from the door, the door could fall. Too close and the door will bind. Move the end of the track the minimum increment and try the door. You want the track to be parallel with the door, 1/2" to 3/4" away from the door. Tighten the bolts as needed and carefully try the operation of the door. Do not stand underneath it and watch carefully for binding or pulling away of the rollers.
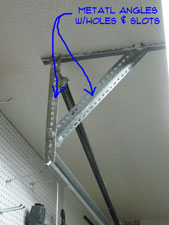
Adjusting overhead garage door track is similar to adjusting the tracks along the side of the door. The difference is that the track only has one place that you can adjust it at. Assuming that the overhead garage door track is not bent, this will work fine.
The ends of the garage door tracks are usually held in place by metal angles that are attached to the ceiling or rafters. The metal angles have holes in them, some are slotted and some are not. The idea is to have the track parallel to the door in its up position.
You want the rollers to show about 1/2" to 3/4" margin on them. Raise the door and check the alignment. Note which way the track needs to move and how much.
WARNING!!! Do not work on the overhead tracks with the door in the up position! WARNING!!!
To adjust the track you will need to move the vertical angle in the proper direction. Remove the bolt from the angle and move the angle over one or more holes to get the desired margin. You can use wrenches to loosen the bolts. Do one track at a time with the door in the down position. Raise the door carefully the first time to make sure that the rollers will not pull out of the sleeves.
WARNING!! DO NOT Try to Adjust the Door When It Is Up!!! Lower the Door Before You Work On It!
Adjusting Garage Door Track to the Weatherstripping
Often, you will need to adjust the track to the weatherstripping. For all but the top clip, there are slotted bolt holes where the track is attached to the clip. With the door closed the door should be touching the weatherstripping. Do you see daylight or feel cold air coming in? You can loosen the bolts and move the track toward the framing. Snug, but not too tight. Tighten the bolts back up and check the operation of the door.
It is possible that you will have to adjust more than one of the clips. Do not force the track. If it won't move the proper distance, loosen the clips above or below it. Get the full length of the track adjusted so that the door is snug against the weatherstrip (no daylight, right?). Tighten the bolts up and you're done. Adjusting garage door track did not turn out to be that tough. Good Job!
For more information on 'Garage Door Weatherstripping', follow this link.
Summary
So you can see that there are several adjustments on a garage door that involve the track. Fortunately, most of the time it is not that difficult to make these adjustments. Hopefully your door is operating better now.
Adjusting a Garage Door
 Adjusting a garage door will include one of two things. (1) The Garage Door Track guides the door and (2) The Garage Door Springs control the weight as it travels up and down. Both can be adjusted, however, some of these adjustments are simple, others are more difficult. Can you make these adjustments?
Not sure if this is the right place? See the articles 'Troubleshooting Garage Door Problems' and 'Garage Door Opener Problems' for a full listing of all of the garage door topics.
Do you know what your problem is? Check the Article Contents to the left to quickly jump to your subject. Unsure what the problem is? Read through the article and then decide whether you want to tackle the problem. This section contains general information that will clue you in to the possible costs and difficulty of this type of repair.
Before you call a professional, see if it is something you can do yourself. Why pay someone for something you could do in ten minutes?
What Can You Save?
Most of the time, this is an easy job for a service man. Unless something is broken, you won't need parts. A $75 to $125 service call would be the minimum. The danger is that the repairman may take the opportunity to try and sell you a new door or expensive repairs. They can be quite convincing when telling you about the woes of your current door. A new door could run into the thousands of dollars. Do you really hate your current door? No. Another option might be to fix it yourself.
How Hard Could It Be?
Making adjustments on your garage door should not be that hard. The exception to this would be adjusting torsion springs.
- These repairs will have a Difficulty Level of: Simple
- These repairs require a Skill Level of: Handyman
For and explanation of the terms in this section, see 'How to Use This Site'.
Check the Simple Things!
Check for loose bolts along the track. Push the door back into place and tighten the bolt. See Step Three.
What Can Go Wrong?
Adjusting means exactly that, it is not dismantling your door. Make minor adjustments and see if the operation of the door improves. You could adjust your door incorrectly until it no longer works.
Troubleshooting Garage Door Adjustment Problems

In this series of articles on 'Adjusting Garage Doors' we discussed practical adjustments that you can make.
The easiest thing to adjust is the garage door track. It keeps the door aligned in two ways. The tracks guide the door as it goes up and down. Either by lifting or via a garage door opener. The track also keeps the door in alignment against the weatherstripping. Slots in the brackets make adjusting the track fairly straightforward. If you need to review the topic on 'Adjusting a Garage Door Track', you can follow this link.
Adjusting garage doors when the springs are involved is more challenging. Garage door springs do most of the work when it comes to lifting your garage door. The proper tension on the springs is important. Too much tension and the door won't close completely. Too little, and the door will be difficult to open and will be dangerous when closing. Unfortunately, adjusting the springs can be beyond the skills of most homeowners. The topic on 'Adjusting Garage Door Springs' discusses this subject in more depth.
A binding garage door is an unusual condition that is caused by a poorly installed door. The door will be difficult to close completely and may have a gap at the bottom. The garage door track is designed to draw the door tight to the weather strip in the last few inches of its travel. When the door tightens up to quickly, it may not close. See what you can do about a 'Binding Garage Door' by following this link.
Summary
Many times all it takes is a few minor adjustments to get your door working correctly. There is no need to pay someone for this type of garage door repair. Instead you can take a few minutes and solve the problem yourself. The bonus is that you can also save some money.
We hope that adjusting your garage door was successful and that you can now move on to other projects. What are your options. Scuba diving? Mountain climbing? Another job on your list? Bummer, but that's whey we are here.


