Repair Topics
Replacing a Water Heater Pressure Relief Valve
 Replacing a water heater pressure relief valve is not a difficult repair. It will require that you shut down the hot water tank prior to starting the repair.
Are you sure that you need a new pressure relief valve? See the article 'Checking a Water Heater Pressure Relief Valve' to see if yours is bad. Not sure if this is your problem, see the articles 'How To Troubleshoot a Gas Water Heater' and 'Electric Water Heater Troubleshooting' for a listing of all of the water heater repair problems.
Purchasing a Pressure Relief Valve
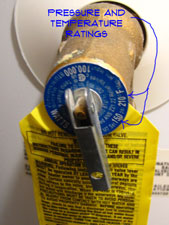
Before replacing a water heater pressure relief valve, you need to get a new one. They are less than $20 at a home or plumbing supply. There are different pressure and temperature ratings. A standard one would be 150 psi and 210 degrees for temperature. There should be a little plate on the valve that gives you these figures. Take the old one with you and get one that matches.
Shutting Down the Water Heater
To change you water heater pressure relief valve you are going to need to drain the tank down part way. Turn the breaker off or turn the gas valve to pilot. Run some hot water in one of the faucets until the water is lukewarm.The water coming out of the tank will be pretty hot if you don't cool it off. Shut off the cold water inlet valve. Hook up a garden hose to the drain valve at the bottom of the tank. Run the hose to a floor drain or bathtub nearby. You need to drain the water down below the water heater pressure relief valve.
See the articles 'Shutting Down an Electric Water Heater' and 'Gas Water Heater Shut Down' for instructions on the correct procedure to follow. You can damage the internal parts on a water heater if you do not shut them off properly.
There is no good way to tell what the water level is in the tank. Go with how long it takes to fill a bathtub. That will be plenty. If water starts gushing out when you loosen the valve, you need to drain some more water.
Installing the New Relief Valve
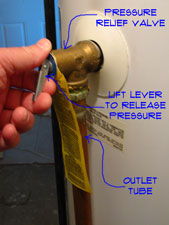
You will need a pipe wrench to remove the old water heater pressure relief valve. You may or may not have a outlet tube attached to it. Remove it first. Save the tube you can re-use it with the new valve. Clean it up, as required.
With the outlet tube removed you can take out the old pressure relief valve. It will take a bit of effort to get it loosened. Remove the old valve and clean up any residue around the opening. I am not aware of any arts or crafts that use old pressure relief valves, so you will probably just want to throw it away.
Put some pipe dope or Teflon tape on the threads for the new water heater pressure relief valve. Thread the new valve into the opening and tighten it down. The outlet should be turned down. Put a little pipe dope or Teflon tape on the nipple for the outlet tube and then install it.
Starting Up the Water Heater
Similar to the procedure needed to shut down the water heater, you also want to follow a procedure for properly starting your water heater. See the articles 'Starting Up an Electric Water Heater' and 'Gas Water Heater Start Up' for instructions on the correct steps.
Summary
The usual solution is to replace the valve. It is not that big of a job and the part is not that expensive. You should have paid about $15 dollars for a new valve. Hopefully you were able to deal with your valve.
Checking a Water Heater Pressure Relief Valve
 Checking a pressure relief valve can tell you if it needs to be replaced. Since it is some work and cost to replace it, you want to check first.
Not sure if this is your problem? See the articles, 'Gas Water Heater Troubleshooting' and 'Troubleshooting Electric Water Heaters' for a listing of all the water heater topics.
Checking the Valve
It is possible the water heater pressure relief valve is not seating correctly. The find out you will need to open it up a few times to blow off some of the water. The water will wash out any sediment or obstructions.
Before you do this you are going to want to cool the water down. Shut off the power to the hot water tank. For and electric hot water tank you can shut of the breaker. On a gas hot water tank, you will want to turn the gas valve to 'Pilot' or 'Off'. Run hot water into a sink or tub. When the water is lukewarm and not dangerous you can stop.
Get a pail to catch the water from the valve. You want to hold the pail under the outlet when you release the pressure. The valve does not turn, instead you lift it up to open it. Open the valve or a few seconds and then close it. Do it a few times.
Turn the power or gas back on and let the water heat back up. See if the hot water heater pressure relief valve holds. Is it holding? Yes, well that is good news. NO? Then you will need to replace the valve.
WARNING!! The Water In Your Hot Water Tank Is EXTREMELY HOT!!! WARNING!!!
Replacing the Valve
If the pressure relief valve will not seat properly, or it is still venting when there is no pressure build up, you will need to replace it. See the article 'Replacing a Water Heater Pressure Relief Valve' for instructions on how to install it.
Hot Water Heater Pressure Relief Valve
 Repairing a hot water heater pressure relief valve is not that difficult. Usually 'repair' means 'replacement'. The parts are inexpensive and it takes less than an hour.
See 'Troubleshooting Hot Water Heaters', if this is not your problem.
There are two things that can be done with the valve. First review the article 'Checking a Pressure Relief Valve' to see if the valve is bad or just has sediment in it. This information will help you check to make sure it is seating correctly. Second, if the valve is bad, the only option is to replace it, see 'Replacing a Pressure Relief Valve', is the more common scenario.
A pressure relief valve, well, as the name implies relieves the pressure in your tank. Heated water generates pressure. Should that pressure go beyond what it considered safe or into the danger zone. The lowly valve acts as a safety feature. It relieves the pressure before your hot water tank blows up.
So what happens when the valve fails. Does the tank blow up? You would see a lot of 'film at eleven' spots if it did. Instead, when it fails it goes the other way. It starts releasing pressure before the danger level. What does that mean exactly? It means hot water spraying all over the place around your hot water tank. Basically a mess.
Not a lot of options when this happens. Installing a new valve is usually the fix. Read on and see if you are up for the challenge.
Hot Water Heater Pressure Relief Valve - Information
What Can You Save?
A new valve is less than $20. I don't want to upset you, but, when they start acting up they are usually terminal. Call in the family and get the arrangements worked out. $100 to $150 to have someone come out and change it. It takes a half an hour, you be the judge.
How Hard Could It Be?
Replacing a hot water heater pressure relief valve is not that hard, it will take less than an hour, including the trip to the supply store. Do you live in Montana? Maybe a little longer.
Check the Simple Things!
There is a chance that something got caught in it. How did that happen? It hasn't moved in years. I said a chance, take a look at Step One.
What Can Go Wrong?
You don't have a lot of choices here. You cannot use the hot water tank without the hot water heater pressure relief valve installed. No hot water is no fun, no other way to put it.
Troubleshooting Water Heater Pressure Relief Valves
How can I check and test my pressure relief valve?
It is possible that the valve was not seated properly. There is a simple way to check this and see if the valve is still functioning correctly.
See the article 'Checking a Water Heater Pressure Relief Valve', for information on what to do.
My pressure relief valve is bad, what do I need to do to replace it?
Changing the pressure relief valve is not a big job and they are fairly inexpensive. It will involve finding a replacement valve, removing the old one and installing the new one.
The article 'Replacing a Water Heater Pressure Relief Valve' covers these topics and the steps needed to complete the task..
Summary
There are not many options for a troublesome water heater pressure relief valve. Once in awhile the valve gets something it and it won't seat properly. As a rule the valve works without complaint for years and then one day it starts venting. All of us do that from time to time, can we blame the valve?
The usual solution is to replace the valve. It is not that big of a job and the part is not that expensive. You should have paid about $15 dollars for a new valve. Hopefully you were able to deal with your valve.
How To Flush a Water Heater
 A hot water heater flush for sediment is an important maintenance item. This procedure can prevent sediment from building up inside the tank.
There are three steps associated with this project that are outlined below: (1) 'Shutting Down the Water Heater', (2) 'Flushing a Hot Water Heater' and (3) 'Restarting a Hot Water Heater'.
Not sure if this is your problem? See 'Troubleshooting Gas Water Heaters' and 'Electric Water Heater Troubleshooting' for a complete listing of all the water heater issues along with the related solutions.
Why Should You Flush a Water Heater?
The main reason for flushing a water heater is to prevent sediment build up inside the tank. See the article 'Hot Water Heater Sediment Problems' for information on why this can be a serious issue.
The benefits of flushing the tank are increased efficiency for your hot water tank. Sediment build up reduces the amount of hot water you have. Heating the sediment will waste fuel and increase your utility costs.
Heating elements inside of electric hot water heaters can be damaged by sediment. You can read the information below to find out what you need to do to get rid of it. Replacing your tank or a heating element can be expensive. Why go to all that expense when you can prevent it with a scheduled flushing each year.
You should consider doing it annually. Do you have very hard water? You may need to do it more often. Fortunately, it is not a difficult or time consuming project.
Flushing a Water Heater - The Issues
What Can You Save? - Not a hard job, but someone has to come out. It will probably run around $100 to $150. Not bad pay when you can get it.
How Hard Could It Be? - Assuming your sediment is not deeply entrenched and hard, a water heater flush is a fairly easy job. These repairs will have a Difficulty Level of: Simple. These repairs require a Skill Level of: Job Jar Specialist. For and explanation of the terms in this section, see 'How to Use This Site'.
Check the Simple Things! - This is already pretty simple. We can't make it much easier.
What Can Go Wrong? - The water in your hot water tank is hot. Depending on the setting, you can be burned or scalded by it. You are dealing with water on this. Take precautions and make sure that the hose is tight and the drain is working. Keep some rags and a pail handy for any spills.
How To Flush a Water Heater
Shutting Down Your Water Heater
Shutting down the hot water heater is essential. You cannot have the water heater firing up while it is being flushed. This is dangerous and can ruin the heater.
The water inside the tank can be very hot. Turn on a hot faucet somewhere and run the water until it gets lukewarm. You do not want to get burned or scalded when you open the drain valve. Shut the faucet off when you are satisfied that the water temperature is safe.
Imagine turning on the shower with not cold water mixed in. That is how hot this water will be if you don't mix in some cold. Water that is 150 degrees can scald you in less than a second.
WARNING!! The water in your hot water tank can be VERY HOT. Make sure the water is cool before you open any valves. BE CAREFUL!!! WARNING!!!
Shutting Down an Electric Water Heater
For an electric hot water heater there are some steps you want to follow that include shutting off the power. You do this at the breaker panel. The water heater breaker should be marked. Shut if off and put a piece of tape on it.
See the article 'Shutting Down an Electric Water Heater' for the procedure that you should follow.
Shutting Down a Gas Water Heater
On a gas hot water heater turn off the gas. The gas valve is located near the bottom of the tank. Turn the dial to the off position. You can also set it to 'Pilot'. You just want to make sure it doesn't fire up while you are flushing it.
For instructions on the right procedure for shutting down a gas hot water heater, see the article 'Shutting Down a Gas Water Heater'.
Flushing a Hot Water Heater
 Flushing a hot water tank will not take long once you have the hose attached that leads to a drain.
Hooking Up the Hose
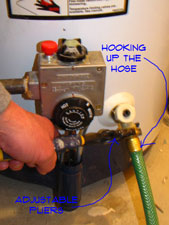
At the base of your hot water tank there is a drain valve with a threaded fitting on it. It is very similar to a spigot for your garden hose. You need somewhere for the water to go. A floor drain is perfect if you have one. A bathtub or a sink could work. The drain, sink or tub you choose should be lower than the drain valve.
Hook the hose up to the drain valve and make sure it is tight. Put the other end of the hose in the location that it is draining into. Secure the hose and make sure it can't jump free when you open the valve. Check for leaks after you open the valve. Tighten things as needed and you are ready to begin.
Flushing the Hot Water Heater
Open the valve to begin your hot water heater flush. Make sure the cold water inlet valve is on. You want fresh water running into the tank to purge it. Also make sure that other hot water valves and faucets are closed.
The water coming out of the drain valve may be quite dirty at first. As the tank purges it should get cleaner and cleaner. You want to keep running water through the tank until the water is clear. Sorry, I know you wanted it to be harder, but this is all there is to a hot water heater flush.
Starting Up the Water Heater
There is also a procedure that you need to follow to start up your water heater. Doing things out of order can damge the tank or other components inside the tank.
For the correct procedure on starting up a gas or electric water heater, see the article 'Starting Up a Water Heater'. Remember, do not turn the breaker on or try to light the pilot light until you have followed these steps.
Summary
Flushing a water heater is more of a maintenance item that a repair. It can be a repair for a electric hot water tank. Sediment can burn out the elements.
Ten minutes to set it up, fifteen tops and another fifteen to clean up. That was all the work involved. You were probably able to do other things while the water was flushing out the tank. This won't be so bad, less than and hour once a year. Congratulations for completing your hot water heater flush.
Replacing a Water Heater Drain Valve
Replacing a water heater drain valve is the last resort after you have tried tightening it. Another option would be to cap it if the leak is not too bad.
See the articles, 'Tightening a Water Heater Drain Valve' and 'Capping a Water Heater Drain Valve' if you have not tried this yet. Need other water heater information? See 'Troubleshooting Electric Water Heaters' and 'Gas Water Heater Troubleshooting' for a list of water heater problems.
Is the valve leaking a lot? Is it leaking where it connects to the hot water tank? You will need to replace the drain valve. The ones that come with the tank are made of plastic and are not very durable.
Purchasing a Water Heater Drain Valve
If you are going to the trouble of replacing the drain valve, you want to get a decent on. Instead of plastic, you should go with brass and hopefully eliminate future problems. Water heater drain valves are use a male 3/4" iron pipe thread and should be universal.
You can get a brass one for less than ten dollars a plastic one is about half that much. Is it worth the difference.
Shutting Down the Hot Water Tank
You will need to follow a procedure for shutting down the hot water tank. The procedure is different for a gas water heater than it is for an electric one.
Shutting Down an Electric Water Heater
It is important that the power is turned off and that no one will turn it back on while the water heater is being worked on. See the article 'Proper Shut Down Procedures for an Electric Water Heater' for more information.
Shutting down a Gas Water Heater
Both the gas valve and the gas supply line need to be shut off along with other steps for a gas water heater. See the article 'How To Shut Down a Gas Water Heater' for complete instructions.
Draining the Tank
You will need a hose and somewhere to drain the water. Hook the hose up to the drain valve and put the other end in a drain. Make sure the hose is going to stay in the drain. Open a hot water valve near the tank to allow the tank to get air. Use a screwdriver to open the water heater drain valve.
For complete instructions on draining a water heater see the article 'Draining a Hot Water Heater'. This article provides step by step information on what to do.
Removing the Old Drain Valve
Getting the old valve out may be a problem. They are plastic and break easily. Use the adjustable pliers or a small pipe wrench. You want to get a good grip on the valve. Firmly try to worry it free. When the seal breaks you should be able to unscrew it. It might be a good idea to use some penetrating oil if the fitting is metal and it is corroded. Be careful, you do not want to break the valve.
Plastic valves especially are prone to breaking. If this happens, you need to get the threaded part of the valve out of the water heater. Use a bare hack saw blade to put a slice in the plastic pipe going into the tank. Be careful not to cut into the metal threads. Use a screwdriver and a hammer to chisel out the plastic. Careful with the threads.
Installing the New Drain Valve
Put some pipe dope or Teflon tape on the threads before you put the valve into the opening. Use a pipe wrench to tighten it. Get it snug and make sure the spigot is turned down. Close the valve and turn the water back on. Let the tank fill with water and then check for leaks. No leaks? Good turn the power or gas back on. You are done replacing your water heater drain valve.
Starting the Water Heater
You want to follow the right steps to turn the water heater back on. Turning the power on too soon can result in damage to the water tank or its internal components. See the article 'How To Start Up a Water Heater' for instructions and cautions.
Summary
Under ideal circumstances it may only take five minutes to change a water heater drain valve. Unfortunately, there is a lot of preparation that goes into changing one. You have to shut down and drain the water tank before you start.


