Patching
How To Patch Small Holes in Drywall
 Learning how to patch small holes in drywall will not take you very long and you will save both time and money in the future. You may already have the tools and the materials are inexpensive.
When it comes to holes in drywall, size does matter. There are three categories of holes that need to be patched and repaired. Check to make sure you are reading the right information for the problem you have.
Small Holes, Dents and Dings
Really small holes like nail holes or the holes left from picture hangers can usually be fixied with spackling. No need for mud, tape and pieces of drywall. This type of hole is the easiest to fix.
Spackling small holes in drywall only takes a few minutes and a little sanding. If you are preparing a wall for a fresh coat of paint, you want to see the article 'How To Spackle a Wall' for a complete discussion on this type of repair.
How To Patch Small Holes in Drywall
Let's say you move a piece of furniture or an appliance into your home and you put a deep gouge into the wall. Another scenario might be a full blown hole the size of a quarter in the drywall. No questions asked on how it got there, but it is definately more that you are going to be able to fix with spackling.
Holes of this type cannot be fixed with just a little spackling compound. However, they are not big enough to require new drywall to be installed. You have just entered into the world of fixing holes with tape and drywall compound. Yes, you can fix a wide variety of seemingly serious drywall problems with some paper or fiberglass tape and some all purpose drywall compound.
For this type of hole, you are reading the right series of articles. See below for more information and links to the steps involved with this type of repair.
How To Patch a Large Hole in Drywall
For big holes you need a bigger solution. Suppose the appliance tore a hole in the drywall that your dog could fit through while your were moving it. Spackling and tape are not going to fix this problem. You are going to have to replace some drywall.
This is not the end of the world, just a bit more work. It will also involve a little more material. See the series of articles on 'How To Patch a Large Hole in Drywall', for complete instructions on what to do.
How To Patch Small Holes in Drywall - The Issues
What Can You Save? - Patching a small hole will involve taping, which involves drying time. Even with quick setting compound you can be looking at one to two hours to take care of something. When it is your house you can go an do other things. Someone you hire will either wait or make return trips. The size of the patch matters but let's say between $100 and $200 dollars to hire someone to repair drywall in your home.
How Hard Could It Be? - Patching small holes in drywall will require taping and that takes a bit of practice and patience. These repairs will have a Difficulty Level of: A Bit of Work. These repairs require a Skill Level of: Skill Level Here. For and explanation of the terms in this section, see 'How to Use This Site'.
Check the Simple Things! - See if it is just an indentation before you use tape and mud. Small holes and indentations can be repaired with just compound or spackling. Go to the article 'How to Spackle Drywall', for more information.
What Can Go Wrong? - Using the wrong size knife can make a mess of the spot you are trying to fix. Failing to take your time and make sure that the drywall hole patch is smooth can leave a patch that will show after it is painted. You would be amazed at how unforgiving drywall can be when the right light hits it. Drywall is messy in it's own way, take precautions to deal with the mess. That is only needed if you care what your spouse will say.
Preparation for Drywall Patches
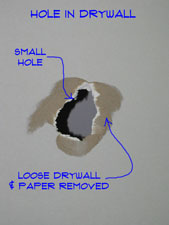
The first step in making a drywall hole patch is the hardest and most time consuming. You need to prep the hole to make sure you are not taping over loose material.
If you apply drywall compound over loose material you will get poor results. The mud will flake away since it is not attached to anything that is solid. Make sure everything is tight before you start applying drywall compound.
With a sharp utility knife (be careful, it cuts skin to) carefully cut away any loose paper. Remove any loose gypsum from the hole. Got it cleaned out? Good now you are ready for the tape.
At this point, you want to determine if you can patch this hole with just tape. It may have looked smaller before you removed all of the loose paper.
Is the hole smaller than the width of the tape? If it is, you can safely patch it with with mud and tape. Is it bigger? See the article 'Repairing Bigger Holes in Drywall' for information on what to do.
Taping and Finishing Drywall Patches
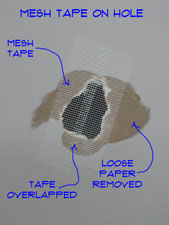
Taping and mudding a drywall hole patch will involve three or four steps. Make sure let the mud dry between each application.
The following is the steps you need to follow to tape and finish the drywall hole patch. For complete instruction of drywall finishing, see the article 'Taping and Mudding Drywall'.
Applying the Drywall Tape
You can use paper drywall tape or fiberglass mesh tape to repair the hole. Mesh tape is preferred by most pros for patching since it saves you a step.
Make sure you completely cover the crack and have the tap onto solid wall surface. This may mean that you have more than one width of tape. If you use paper tape, make sure you have compound between the layers of tape.
Coating the Crack With Compound
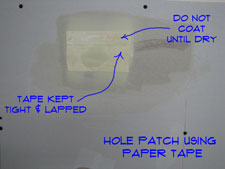 You will likely have to apply two coats of compound and a skim coat to get a nice finish. Lightly sand the high spots down between each coat.
Do not try to do too much with each pass. The first coat will be the heaviest. You want to completely cover the tape and feather the edges toward the flat surface of the wall.
Allow the drywall mud to completely dry before you apply another coat of mud. This is a common mistake, being impatient. If the mud underneath is not dry it will roll up and make a mess of your patch.
Skim the repair with a wide knife on the third pass to eliminate in hollow spots and tool marks left from the previous passes. See the article 'Taping and Mudding Drywall', for additional instructions.
Sanding and Painting
Sand the repair lightly until you have a smooth surface suitable for paint. Paint the wall and the hole in your wall is gone.
Summary
OK, it was several steps, but none of them should have taken that long. The trick is to be patient. Taping and first coat are the most work. You have to shape the patch on this step. After that it gets easier. Except for the sanding, no one likes to sand.
Allow a drywall patching job to run over the course of a couple of days. Find other things to do while the mud is drying. We hope your drywall hole patch has been a successful project. Now that you are done with it you can start living your life again.
Causes for Drywall Cracks
The causes for drywall cracks will vary considerably depending on the circumstances. The age of a home, materials used and quality of workmanship are all factors.
Got another drywall problem? See 'Drywall Repair' for a listing of drywall topics and 'Drywall Patching' for information about fixing drywall.
Cracks In New Homes
New homes will get cracks during the first year or two after constructions. One reason for this is settling of the material on the foundation. When the structure settles unevenly, it will create stress points in the drywall.
The drywall will crack at these stress points. Hairline cracks are nothing to be concerned about. Cracks that cause the drywall to separate may mean a more serious issue.
Poor Workmanship
Drywall is installed in flat panels that are typically from eight to twelve feet long. Between the panels there are joints. Tape and drywall compound is used to finish the joints.
Joints should not be place at the sides of doors or other stress points. Tape and mud by themselves are not strong enough to keep from cracking. A heavy door that is slammed can crack drywall if there is a joint in the wrong spot.
Plaster Walls
Many older homes have plaster walls instead of drywall. Plaster can be more brittle than drywall making it prone to cracking.
Plaster will sometimes develop a multitude of spider cracks. The same stress point issues that apply to drywall also apply to plaster. Cracks in plaster walls can be fixed the same way that you do on drywall.
Fixing Bigger Drywall Cracks
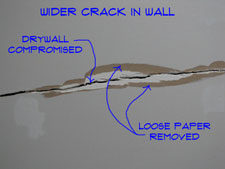 Bigger cracks take a little more effort to deal with. Are all cracks bad? A big crack in your drywall is bad.
Got another drywall problem? See 'Drywall Repair' for a listing of drywall topics and 'Drywall Patching' for information about fixing drywall.
You want to remove any loose paper and gypsum from the crack. Use a utility knife or a scraper to clean out the debris.
It is a good idea to fasten the drywall with some screws. Try to locate the studs and run some screws into them on either side of the crack. This will stabilize the drywall and hopefully keep it from cracking again.
Set the screws so that they are sunken into the drywall. Not so far that it breaks the paper, but far enough so that the mud will 'key' into the indentation. Drywall screw guns have a depth gauge for this. Using a battery drill will work, but you have to use a light touch. Ease the screw in and pull back just as it starts into the paper.
How wide is the crack? Is there a gap? For cracks that have a separation between the two sides you should pre fill them with drywall compound. These would be cracks where, there is clearly a separation.
Use a knife that is wider than the crack. With stiff drywall compound (right out of the pail without any water added), pack some mud into the crack. Drag the knife lengthwise with the crack, removing the excess mud. You should keep the knife tight to the flat portion of the wall. Check and make sure you have filled the crack completely. Add some mud and drag it again, when you see voids.
Now put down the knife and step back from the crack. Let the mud dry before you try and tape it. At this point the crack is ready for the mud and tape. You have a few steps to go for this drywall crack repair. Don't despair, others have survived and not been seriously damaged.
Fixing Minor Drywall Cracks
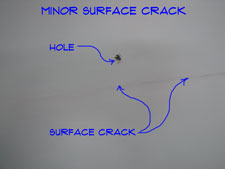
A minor crack can be fixed with spackling, once you have cleared away the loose material.
Examine the crack. Is it just a hairline crack? Take something and dig into the crack a little bit. You probably won't believe this, but the tool I like for this job is the sharp point of a bottle opener. When you dig a small groove into the crack does it appear that the paper below is still intact? Yes, that's good, this won't be that hard.
Use something, like the 'bottle opener', to dig out the crack. You want to dig out the loose material and create a groove to accept some new mud or compound. Dig it out the entire length.
Be careful you don't want to make the situation worse. Make sure you have all the loose material removed. Additionally, you want to have a place for the mud to 'key' into (it's an old plastering term). The more area the mud has to stick to, the better.
Now all you have to do is fill the crack with compound or spackling. Use a knife that is wider than the crack. Pull the mud tight against the flat surface of the wall on either side of the crack. It will take two or three applications to get a smooth surface. Use a sanding sponge to lightly sand the area after each coat. For additional information go to the article 'How to Spackle Drywall'.
Taping and Mudding Drywall Cracks
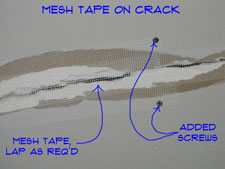
Taping and mudding a drywall crack will involve a few steps. You will need to let the mud dry between each application.
The following is the steps you need to follow to tape and finish the crack. For complete instruction of drywall finishing, see the article 'Taping and Mudding Drywall'.
Applying the Drywall Tape
You can use paper drywall tape or fiberglass mesh tape to repair the crack. Mesh tape will save a step, allowing you to coat it immediately after the tape is installed.
Make sure you completely cover the crack and have the tap onto solid wall surface. This may mean that you have more than one width of tape. If you use paper tape, make sure you have compound between the layers of tape.
Coating the Crack With Compound
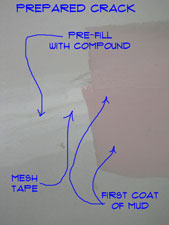 You will likely have to apply two coats of compound and a skim coat to get a nice finish. Lightly sand the high spots down between each coat.
Do not try to do too much with each pass. The first coat will be the heaviest. You want to completely cover the tape and feather the edges toward the flat surface of the wall.
Allow the drywall mud to completely dry before you apply another coat of mud. Skim the repair with a wide knife on the third pass to eliminate in hollow spots and tool marks left from the previous passes. See the article 'Taping and Mudding Drywall', fior additional instructions.
Sanding and Painting
Sand the repair lightly until you have a smooth surface suitable for paint. Paint the wall and your crack is gone.
How To Repair Drywall Cracks
 Drywall crack repair differs from other drywall repairs in one key way. As a rule there is no obvious reason why a crack appears.
For related information see the articles 'How To Patch Drywall', 'How To Cut Drywall' and 'Taping and Mudding Drywall'.
Cracks in drywall will occur for two reasons in residential construction. There are probably more than two, but I am not going to discuss them. One is settling, over time the house will settle and the drywall may crack due to the stresses put on it by the structure. You don't want to blame the drywall, it is doing its job. The second reason would be ill advised placement of joints in the drywall.
The bad news is that if the problem that caused the crack is still there, the crack may reappear. Stopping a house from settling is not possible and repairing subtle structural problems is also not practical. The likely case scenario would be to fix the drywall and hope the crack does not reappear.
Drywall Crack Repair - The Issues
What Can You Save? - Drywall crack repair could be as simple as spackling or as involved as a full blown drywall patch. Even with quick setting compound you can be looking at one to two hours to take care of something. When it is your house you can find other things to do, maybe watch some television. Someone you hire will either wait or make return trips. The size of the patch matters but let's say between $50 and $200 dollars to hire someone to repair drywall in your home.
How Hard Could It Be? - A drywall crack repair may require taping and that takes a bit of practice and patience. It could be very simple. These repairs will have a Difficulty Level of: A Bit of Work. These repairs require a Skill Level of: Determined Handyman. For and explanation of the terms in this section, see 'How to Use This Site'.
Check the Simple Things! - See if the paper has been compromised. A crack that is just in the drywall mud can be repaired with just compound or spackling. See Step One below for instructions.
What Can Go Wrong? - Failing to take your time and make sure that your drywall crack repair is smooth can leave a patch that will show after it is painted. You would be amazed at how unforgiving drywall can be when the right light hits it.
There is nothing quite as bad as finishing the painting on a wall and having someone comment 'boy that patch really shows'. Drywall is messy in it's own way, take precautions to deal with the mess. Yes the dust can wind up in a room that is on the other end of the house. In fact it may get there quicker than you can.
Troubleshooting Drywall Cracks
There are two types of cracks to address. The first and easiest is one that has not broken through the tape or paper on the drywall. The second is a severe crack that may have split the drywall all the way through. Even if only the paper is broken, you will have to use tape to bridge the gap.
The first article on 'Causes for Drywall Cracks' provids some insight into the reasons for cracks. It also explained why some of them come back after they are fixed.
Some cracks are fairly minor and only require filling and sanding. When does a drywall crack become a serious issue? When the paper face of the drywall has been compromised, you will need to apply new tape. The article 'Fixing Cracks in Drywall Walls and Ceilings' coversd this topic.
Fixing a crack will involve the use of mud and tape. There are steps you need to follow when you are patching drywall cracks. The article 'Taping and Mudding Drywall Cracks' gave you the information you need to perform this task.
Summary
They say that drywall installers and finishers are a breed of their own. That is probably because not too many people like doing it. OK, it was several steps, but none of them should have taken that long. The trick is to be patient. Allow a drywall crack repair to run over the course of a couple of days. Find other things to do while the mud is drying.
We hope that your experience with drywall crack repairs has not been too traumatizing. From this point forward, try to forget the past and move forward. Cracks may occur in your drywall again. Now you have the strength of character to face up to them.

