Search
Patching
Sanding Spackle
 Sanding spackle needs to be done when the spackling compound has dried completely. You should also sand lightly between coats. Sanding does not take very long, usually only a couple of minutes.
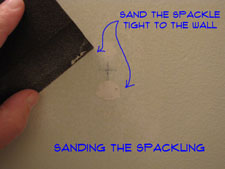
When the spackling paste is dry you can lightly sand it with a sanding sponge or sandpaper. Sand it flat with the wall surface around it.
For related information you want to see the articles on "How To Use Spackling', 'How To Repair Drywall' and 'Patching Drywall'.
Sanding Materials
Sanding Sponges
Sanding sponges are a convenient way to do light sanding especially on drwall and drywall products like spackling. They are made of synthetic material and have a grit formed into the surface. They come in a variety of sizes, with most of them fitting into the palm of your hand.
The other nice feature is that the sponge is formed into the shape of a block, so the surface of the sanding area stays flat. Sanding sponges are sold at the same place that you buy your paint and spackling.
Sand Paper
You can use standard sandpaper to sand spackling, although there are some cautions. The first would be the grit. If the grit is too coarse it will leave scratches on the spackling patch and the surface around it. The scratches can show through the paint and mar the appearance of your wall. If the sandpaper is too fine, you will work a lot harder to get the surface smooth. In fact you may not get the spackling flush with the surface around it.
For sanding drywall or spackling patches, you want to stay with a grit between 100 - 150. This grit range is fairly common and you may already have some sandpaper that matches.
The other concern with sand paper is grooving the surface. When you press down on the sandpaper with your fingers you create pressure points that will sand more away in some spots than others. This can leave you with depressions or grooves on the surface of your wall.
If you are going to use sandpaper it is a good idea to use a sanding block. The block or holder will keep the sanpaper flat against the surface of the wall or ceiling.
Sanding Screen
Sanding screen is typically used for sanding new drywall before it is painted. You can used it to sand patches and spackling. It is designed to fit on a drywall pole sander. This is a special type of sanding block that has a swivel head on it.
The grit range for sanding screen is 80 - 220. Use screen that is in the 100 - 150 range for sanding finished walls that have been repaired.
Sanding Blocks
Sanding blocks come in all shapes and sizes. There are some special ones that are designed specifically for drywall sadning. They take a special precut sheet of sandpaper or sanding screen. For small spackling repairs you probably do not need something this big.
A typical hand sanding block will accept a quarter sheet of sandpaper. These will do fine for sanding small spots where repairs have been made.
Orbital and Electric Sanders
It is not a good idea to use a power sander to sand spackling. You will likely do more harm than good. Spackling paste and putty is a fairly soft material and so is the wall surface around the patch. The power sander can easily dig in too deep and thus ruin the patch, requiring further repair.
Proper Sanding Technique
The main thing to keep in mind when you are sanding walls and ceilings is that you want a flat, smooth surface. Light will catch both indentations and protrusions, however slight they might be. When you patch the wall, you want the patch to be flush with the surface around it, not indented, not raised up, flush.
Try not to rough up the surronding area too much. Cutting grooves or scraching up the surface may show when you apply the paint. Remember, your walls are likely made of drywall. Drywall is a gypsum core sandwiched between two sheets of paper. Scuffing up the paper and raising the paper fibers is not desirable. If this happens, you will have to apply more drywall compound to tighten up the paper fibers.
Lightly sand the spackling with a flat sanding block or sponge. Ideally, at first, you will only sand the build up of spackling. When you get the spackling down close to the surface you want to go lightly, until the patch is blended into the area around it.
Run your fingers over the surface to check for any bumbs or depressions. If you feel raised spots, continue to sand them until they are flat. For indentations, you will need to apply more drywall compound or spackling and let it dry.
Wet Sanding
A slight variation to the above would be if you are trying not to create any dust. Wet sanding can allow you to smooth out the patches and repairs without making a mess. The use of the word 'sanding' is something of a deception. You don't really 'sand' the surface, instead, you dissolve the compound and smooth it out.
The same principles apply to wet sanding that apply to dry sanding. You want to keep the surface flat and blend the patch into the adjacent surface. To do this you use a damp rag wrapped around a sanding block or a sanding sponge. Another alternative would be stiff flat sponge.
You will need to rinse the rag or sponge out often, since you are dissolving the compound with it. Use clean water to do this, rinse the rag or sponge until the water is clear.
Dealing With the Spackling Dust
Dust in another thing to consider when you are using spackling paste or any other type of drywall compound. Sanding these materials will create dust, fine white dust that has a tendency to get everywhere. If you are just doing a few small spots, it is probably not a big concern.
There are four possible options for dealing with the dust, they are listed below along with links to articles that offer more explanation.
For a complete discussion on sanding drywall and drywall patches, see the article 'How To Sand Drywall' for more information.
Spackle Tools
Knowing which spackle tools to use is helpful when you are getting ready for a painting job. Spackling is applied to dents, dings and holes in your walls that need to be painted. Applying spackling with the right tools only takes a few minutes.
For related articles see 'How To Spackle Drywall', 'Patching and Repairing Drywall' and 'Taping and Mudding Drywall'.
Putty Knives
A putty knife or spackling knife is a flexible flat blade with a handle on it. It is uses for spreading the spackling onto the wall or ceiling in a thin layer. These knives are typically from 1" to 3" wide. They can be made from either plastic or metal.
For small holes and dings in walls and ceilings a 2" or 3" putty knife will do the job. The plastic ones are inexpensive and work great for small or infrequent projects.
Trowels
Drywall knives or trowels are wider than putty knives and are needed for wider joints. These knives are more expensive and are only needed when you have bigger patches to deal with. See 'How To Patch Drywall' for more information.
Sanding Sponges
Sanding sponges are a great innovation for the home repair culture. The are fairly inexpensive, versatile and very effective for a wide variety of home repair projects. When is comes to spackling and drywall repairs they are perfect.
A sanding sponge is a spin off from a concept that has been around for a long time. Sanpaper works very well for sanding a variety of surfaces. One drawback to sandpaper is the need to keep it flat on flat surfaces. Attaching the sanpaper to a block was the solution. The sanding sponge, takes this concept another step.
Using synthetic materials, a sanding sponge provides the shape of a sanding block along with a flat sanding surface. For semi soft surfaces this has turned out to be an excellent product.
Drywall compound, spackling compound and a variety of other surfaces respond well to the abrasion provided by sanding sponges. Gypsum is a fairly soft material, so it is well suited for sanding sponges.
For information on sanding sponges see the article, 'Using Drywall Sanding Sponges'.
Sanding Blocks
The idea of a sanding block has been around as long as we have had sandpaper. Sand paper is a versatile product that has many uses. The one drawback is that it is very flexible. When you sand spackling, you need to keep the sandpaper flat. A sanding block is the ideal choice.
There is a tendency when you sand with sheets of sand paper to put grooves in the surface. This creates and uneven surface.
Sanding Screen
Drywall sanding screen is a popular way to sand drywall and spackling. It comes in precut sheets that fit onto a speacial sanding block. For larger amounts of sanding, this is a better choice.
Another advantage is that you will get less grooving when you sand. This means a flatter smoother surface. For coplete information on purchasing and using sanding screen, see the article 'How To Use Drywall Sanding Screen'.
Vacuum Cleaner
Dust is a big problem when working with spackling and drywall. There are methods that can eliminate or reduce the amount of dust created. See the article 'Dustless and Wet Sanding Drywall' for more information.
A shop vac is useful for cleaning up the dust when you sand your spackling patches. For small quantities you can use the hose attachment on a regular vacuum cleaner.
A word of caution. Drywall or spackling dust is very fine and can clog the filter quickly on a vacuum cleaner. You may need to change or clean the filter if you vacuum up very much dust.
How To Spackle a Wall
 Do you know how to spackle a wall? If you are trying to get the bedroom painted and your son's truck has made some significant dents in the wall, it could be.
Spackling paste or putty works best for small holes, dents and dings that have not compromised the paper on the drywall or the drywall itself. Is the paper damaged? Is the core of the drywall damaged? Yes to either one. Go to the article on 'Drywall Patching', for instructions on using mud and tape to patch drywall.
Are the holes small, perhaps from picture hangers or nails? If you have dents are they less than a quarter of an inch deep? Then spackling should take care of the problem.
What is Spackle or Spackling?
Spackling paste, compound or putty is a common product that you will find at hardware and home stores. It is a gypsum based product that usually comes premixed and has a consistancy similar to drywall compound. It comes in small cans and is often found near the painting supplies.
There are some popular brands that have been around for years and are easily recognizable. Manufacturers in a effort to sell more products and increase the cost have come out with several options. Vinyl spackling 'Fast Drying Spackling, spackling that changes color as it dries. If you read the labels, just about everyone will offer some special features that make it better than the competition.
Spackling is used to fill small dents, dings and holes in your plaster or drywall surfaces. This is done prior to painting to rid the surface of blemishes. Spackling will often require more than one coat with some drying time in between. Prior to painting the spackling will need to be sanded.
For what it does, spackling is kind of expensive. You can pay $3 to $10 for a small can. When it is kept sealed it will last for a long time, so you do not need to purchase it every time you paint.
There are a few tools you will need to use when you are using spackling. Most of them you will already have on hand. See the article 'Using Spackle Tools' for more information.
How long does it take spackling to dry? This is an important question, especially when you are trying to get a painting project completed. See the article 'Spackle Dry Time' for more information on how long you will have to wait before you can paint.
How to Spackle Drywall – The Steps Involved
Step One - Preparing the Surface
Before you can apply a first coat of spackling, you need to prepare the surface. This is not a difficult job, but it is important.
The first thing you want to do is give the spackling paste a place to go. Especially when you are filling screw or nail holes you may find that there is a burr around the hole. Take the corner of your hammer and gently tap the paper down until you have an indentation. Not too hard. Check it with your finger, no lumps? Feels like a depression? Good.
Select a knife that is larger than the hole or dent you are trying to fix. For a one inch wide dent, use a three inch knife. You want the edges of the knife to be riding on  the smooth surface of the wall. There are no absolute rules here, as long as the knife is wider than the hole. It might be a lot wider.
Step Two - Applying a First Coat of Spackling
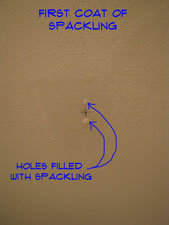 With your dent or hole properly detailed you want to put enough spackling paste on the knife to fill the hole. You want to pull the knife across the indentation, completely filling it with paste. For a nail or screw hole, try and work some of the paste deep into the hole. Drag the knife tight against the flat surface of the drywall. Do not build the paste up above the surface of the wall. One even stroke should do it once you have the hole filled with spackling.
How does it look? Do you see any voids? Give it another pass with a little more material if you see voids. The dent or hole should be filled and flat or even with the adjacent wall. Satisfied? Now this is important. Step Away From The Spackling. Walk away and do not touch it until it dries. Check the can for drying time, but remember the more compound you use, the longer it will take to dry.
Step Three - Applying the Second Coat of Spackling
Why would you need to apply a second coat of spackling? Even the best products will shrink, especially when they are filling a deep hole. When the spackling paste is dry you can lightly sand it with a sanding sponge or sandpaper. Sand it flat with the wall surface around it.
Apply another thin coat of spackling to the repair. Remember to keep it tight with the adjacent surface. Does it look good? Yes, then Step Back From The Spackling. Do not touch it, let it dry. It should not take as long this time.
When it is dry you can lightly sand it again. Remember the idea is to blend it into the surface around it. Don't sand grooves into it with your fingers. A flat sanding sponge is the best thing to use. For bigger dents and holes you may need to add a third coat. You don't want to see the patch after you paint. If you do, you'll still have a spot that needs repair.
Step Four - Finding Other Spackle Problems on Your Walls
Spackling multiple holes while you are at it, is just an efficient way to do it. Generally, you have some drying time and clean up with spackling. So why not make the best use of these steps and go through and hit all the locations you can find at once.
So if you have more than one spot that needs spackling. Do the first coat on all the spots at the same time and repeat the second and third coats for all the spots. Usually you can go around and hit all the spots in a room in a few minutes.
Let them dry and then hit them again. You will be much happier with the results if you take the time to properly prepare the walls. It's not rocket science but learning how to spackle drywall can be rewarding.
It is pretty aggravating when you finish painting the wall and you see dents and dings that you did not repair. The little bit of time it takes to spackle is well worth it.
Step Five - Sanding Spackling
After the spackling is completely dry, you want to sand it smooth. The idea is that you want it flush with the wall or ceiling surface and smooth to the touch. Sand lightly with a sanding sponge until the surface is ready for paint.
If you feel a depression, you need to apply another coat of spackling paste to fill it.
For more information on methods and best practices for 'Sanding Spackle', follow this link.
Alternatives to Spackling Paste
Spackling paste, putty or compound is sold in small cans that tend to be expensive. The formulas for the material are mostly gypsum and water. With that said, it is safe to say that spackle or spackling is not much different than drywall compound.
Can you use drywall compound in place of spackling? Yes you can. Drywall compound was used to finish all of the seams and joints in your home and it provides an excellent surface for painting. If you already have some on hand, there is nothing wrong with using it instead of spackling paste.
Drywall compound is cheaper than spackling and come in both ready mixed and dry forms. For patching walls, including spackling, there are fast set types they dry in as little as fifteen minutes.
How To Patch Drywall
Knowing 'How To Patch Drywall' will save you a lot of money. The skills that you need are not that hard to learn. That combined with the 'Step by Step' instructions that we provide on this website will make you a 'Drywall Patching Pro' in no time.
Not sure if this is your problem? See the articles 'Troubleshooting Drywall Problems' and 'How To Spackle a Wall' for a listing of all the common drywall issues.
Of course you are probably wondering about whether you have a big drywall or sheetrock problem, compared to a relatively easy patching problem.
The next section provides a brief description of the various levels of difficulty you may be faced with. We start with the easiest problems and move on to more difficult ones.
Troubleshooting Drywall Patches
Before you learn how to patch drywall, you should understand what the various types of problems that you may encounter are like. Below, we describe the various drywall patches. These are described by the level of difficulty with the first being the easiest to deal with:
Dents, Dings and Small Holes
Okay, you want to paint the living room and when you take everything off the walls you find a lot of inmperfections. Places that had pictures or other items hung up, now have holes left in the wall. In addtion, you notice a lot of small dents in the wall. What do you do?
This is a common problem and is not that hard to solve. A small amont of wall preparation and a little bit of spackling compound will take care of this. For complete instructions, see the article 'How To Spackle a Wall'. We give you instuctions on what type of material to use and how to apply it.
Fixing and filling small holes will not take a lot of time,especially if you do it the right way. Follow the links in this section for comprehensive instructions.
Cracks In Drywall Walls and Ceilings
Everything seems perfect, the paint looks good, the wall is smooth, but wait! There is a hairline or maybe not so hairline crack. What caused this? Is someone to blame for this? What do I do?
There are lots of reasons for cracks in your walls and ceilings. Ranging from poor drywall installation to natural settling to a poorly constructed house. For some insight on the reasons for your cracks, take a look at this article that discusse 'reasons for cracks in drywall walls and ceilings'.
Is your house older? No builder to call and complain to? Well you will be faced with hiring someone or fixing it yourself. The first thing to determine is the 'size' or 'severity' of the crack.
Hairline or Small Cracks - Hairline cracks may appear and stay the same size for some time. If they don't change after a period of time you can repair them. Hairline cracks are covered in the article 'Fixing Minor Drywall Cracks'. This is the easiest crack repair and will not take a lot of time.
Then there are the cracks that look like a fissure caused by a severe earthquake. This type of crack will take a bit more work. The problem is that joint compound alone will not solve the problem. You are going to need some tape and multiple coats of compound to deal with it.
Still not the end of the world, just takes a little longer. For this problem, you need to see the article 'Fixing Big Drywall Cracks'. Yeah, these are macho cracks and need a serious 'Home Fixer' to take care of them.
Fixing Holes In Drywall
Again we are in an area that is by degree. How 'big', 'Big', 'Big', 'Big', 'Big' is the hole? Well, you get the idea.
We talked about small holes, such as those left by a nail that hung a picture in the 'Spackling' section. Now we are talking about holes that are bigger, maybe you can put your finger through it or worse, maybe your cat can crawl through it.
To keep it simple we have narrowed it down to three sizes of holes. (1) Small holes that can just be filled with spackling. These are generally 1/4" or less in diameter. The 'spackling' segment above covered this. (2) The next step up is holes that are from 1/4" to 1 1/2". Why this distinction? Well, this hole can be dealt with using drywall tape and compound, replacing drywall is not required. (3) Large holes from 1 1/2" and up. These holes will require a drywall patch. Not insurmountable, just a bit more work.
Patching Textured Walls and Ceilings
Your patching project may be complicated by textured surfaces. These can occur both on walls and ceilings. When you have this issue you both have to patch the drywall and the textured surface.
I wish I could tell you that this was an easy problem to fix. However, it is not. First of all you need to understand that there are lots of styles of texture. To make it worse, each style will vary, depending on who installed it. Whoah! Wait a minute, am I saying that textures will vary depending on, not only the type, but also the installer? Are there no standards? No, not really.
Patching and fixing drywall texture will require a bit of expermintation.
How To Patch a Large Hole in Drywall
 Why would you need to make a drywall hole repair? Maybe you had to repair something in your wall, perhaps plumbing, electrical or another concealed item. Could be that you had a water leak and the drywall is rotted and needs to be replaced. Or it could be the kids were wrestling and a hole resulted. Whatever the reason you are here because you need to replace some drywall.
Not sure if this is your problem? See the articles 'How To Fix Drywall', 'Patching Drywall' and 'How To Spackle Drywall' for more information.
Drywall is supported by the wood framing in your home, usually 2 x 4's. When you cut out drywall you will have to provide support for it. Most residential framing is spaced at 16" on center, although you will find 24" on center framing at some ceilings and even some walls.
Cutting the drywall back to the framing would seem to be the logical choice for providing support. There are a few reasons why you might not want to do that.
Drywall Hole Repair - Information
What Can You Save?
A drywall hole repair is a bit more involved than some other drywall repairs. Some drywall needs to be replaced and then taping needs to happen. Even with quick setting compound you can be looking at one to four hours to take care of something. There is some down time with drying time for the mud. Someone you hire will either wait or make return trips. The size of the patch matters but let's say between $50 and $250 dollars to hire someone to repair drywall in your home.
How Hard Could It Be?
A drywall hole repair will require replacing drywall and taping. Both of these activities require some work.
Check the Simple Things!
When you have a big hole in your wall there is nothing simple to do. Take a deep breath and prepare yourself for the character building experience you are about to have.
What Can Go Wrong?
Failing to take your time and make sure that your drywall hole repair is smooth can leave a patch that will show after it is painted. You would be amazed at how unforgiving drywall can be when the right light hits it. For a repair that is located at picture height you can find a picture to hang there. At other locations you will still have a problem to address. Drywall is messy in it's own way, take precautions to deal with the mess. Yes the dust can wind up in a room that is on the other end of the house. In fact it may get there quicker than you can.
Drywall Hole Repair – The Steps Involved
Adding Backing for Drywall Holes
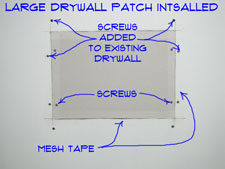
Another acceptable method for supporting drywall is adding backing for drywall patches. This consists of screwing wood supports to the existing drywall.
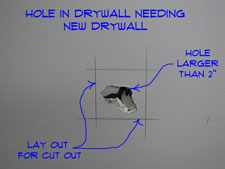
Use the tape measure, level, pencil and keyhole saw to lay out a square or rectangular box around your hole. You want to be back to the undamaged portion of your drywall. There is no mystery about the square or rectangle, it is just easier to cut a new piece of drywall that is one of those shapes. Make sure you have the right thickness of drywall for the patch, usually 1/2", sometimes 3/8" or 5/8". Cut the patch about 1/8" to 1/4" smaller than the hole.
Find a couple pieces of scrap wood that are about three or four inches longer than the shorter dimension of the hole. Anything will work that will fit into the hole and still leave you enough room to get your fingers behind the wood. Furring strips, 1" x 2" or 1" x 3" are great.
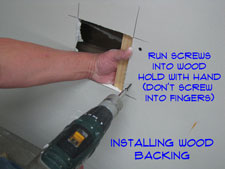 Hold the wood against the back side of the drywall with your fingers. Run three or four screws through the drywall into the wood to hold it in place. You need another piece of wood on the opposite side of the hole. You only need wood on two sides of the drywall hole repair. Install your replacement piece of drywall and run a couple of screws on each side into the wood. Gently, it is only the drywall holding the wood in place. Adding backing for drywall patches using this method is not that difficult, once you get the hang of it.
Now that you have your replacement piece of drywall installed you can jump to Step Five for instructions on taping and finishing the drywall. I admit that I have a lot of experience working with drywall. Still, comparing less than five minutes to install a patch to between twenty and thirty minutes for a 'hot patch'. I just think that this would involve a short debate. Of course debaters pride themselves on being able to say a lot about almost nothing. Well OK, that is really another discussion.
Big Holes in Drywall
Fixing big holes in drywall is a bit more work. Bigger holes that are larger than the spacing for the framing need to be attached to the framing members. Drywall has a span rating, 1/2" drywall can span sixteen inches both horizontally and vertically, although you may find it spanning twenty four inches. 5/8" Drywall can span twenty four inches.
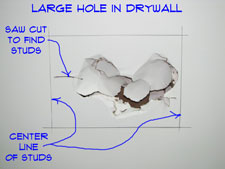
Your first task is to find the framing members on either side of the hole that needs to be repaired. You can use a stud finder or you can use as keyhole saw to cut laterally in each direction to find the framing. Once you have found your studs you want to lay out your patch on the centers of the studs.
Make sure you know which way the framing is running. For walls it is easy, vertically. For ceilings it is usually perpendicular to a bearing wall. Which walls are bearing? Great question with no easy answer. Outside walls that run the long dimension of your home are usually bearing, no guarantee though. You're patching the drywall anyway, make the hole a little bigger and stick you hand up there to find out.
 You need to cut back to the framing members to fix big holes in drywall. You can use the keyhole saw to cut laterally between the framing. For cutting along the framing you are going to have a bit more trouble. The problem is that there are nails or screws that hold the drywall in place. You will need to score the drywall with a utility knife along the stud.
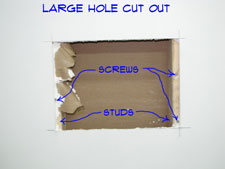
Keep scoring the drywall deeper and deeper until you cut completely through it. When you hit a nail or a screw you are going to break the tip off the blade and it will not cut very well. In addition the gypsum dulls the blades quickly.
Replace or sharpen the blade as needed. Remember, utility knife blades are very sharp and cut skin easily. There is a tendency for blade to slip out of the groove and fly past where you want it to go. Make sure you are cutting away from any body parts. Be careful, I cannot stress that enough. With the patch removed you need to pull out the screws or nails. The edges of the remaining drywall will need some additional fastening. Install screws as required.
Adding New Drywall
Patching with new drywall is not uncommon. The main thing is that you want to get the right size drywall for the patch. The article 'Drywall Sizes' gives you some tips on doing that.
Cut a replacement piece of drywall. Make sure you have the right thickness of drywall for the patch, usually 1/2", sometimes 3/8" or 5/8". Cut the patch about 1/8" to 1/4" smaller that the hole. Install the patch with drywall screws into the framing members.
When your patch bridges multiple studs you will need to install screws in the field of the drywall. Maximum spacing for screws in drywall is twelve inches. Put more than that as needed.
With your replacement piece of drywall installed you are ready to move onto Steps Five for taping and finishing the drywall. Depending on the size of your drywall hole repair you may have a sizable taping job. Don't worry, it is not much more work to do a big patch, than it is to do a small one.
Taping and Finishing a Large Hole Patch
For a complete discussion on taping and finishing drywall patches, see the aticle, 'Taping and Mudding Drywall'.
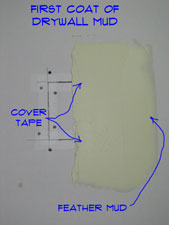
Taping a drywall patch begins with, you guessed it, the tape. You have two options on the tape. You can use 2” wide paper tape or fiberglass mesh tape. For a drywall hole repair, paper tape will require one extra step. First you have to apply mud and wipe the tape down to get it to stick to the drywall. Spread about and eighth of an inch of compound along two opposite sides of the drywall hole repair.
Cut a piece of paper tape about two or three inches longer than the joint you are taping. Center the tape over the joint. Use a four or a six inch knife to wipe the tape down, pressing the excess mud out from under it. The tape should be fairly tight to the wall. The flatter the better. Repeat this for the opposite side of the repair. After two sides are taped repeat for the remaining two sides. Make sure the tape laps onto the other pieces of tape by at least an inch.
Fiberglass mesh tape will stick to the surface of the drywall on its own. You do not need to put mud on first. You can install fiberglass tape on all four sides of the repair at the same time. You can apply a first coat of mud directly over the fiberglass tape. Fiberglass tape is definitely better for a drywall hole repair. Fiberglass tape is a little more expensive, six to eight dollars per roll for a full size roll. Compare that with two or three dollars for paper tape. I think it is worth the extra money for the time it saves. Taping a drywall patch will go quicker if you use mesh tape.
For a paper taped patch you have to leave and let it dry. Do not try to apply a coat of mud over top of wet tape, it will make you sad and you will blame yourself for a long time. Did you decide to use mesh tape, good, you are ready for the first coat of mud. When the paper tape is dry, you are also allowed to move on to the next step.
Summary
They say that drywall installers and finishers are a breed of their own. That is probably because not too many people like doing it. OK, this was a bigger job with several steps, but none of them should have taken that long. The trick is to be patient. Allow a drywall hole repair to run over the course of a couple of days. Find other things to do while the mud is drying. We hope that your experience with drywall hole repairs has not been too traumatizing. If you were traumatized, try to find a support group in your area. With the skills you have developed you will be ready to deal with holes in the future.