Search
Doorbells
Installing and Replacing Doorbell Wiring
Installing doorbell wiring involves running wiring from the doorbell transformer to the chime unit and then to each doorbell. This usually means one pair of wires to each location.
Obviously, this is a big job in an existing home. It will often mean fishing wires which is not impossible, but difficult.
You might want to consider a wireless doorbell unit at this point. See the article, 'Wireless Doorbell Installation' for more information.
Doorbell wire is usually #20 awg and would be two conductors. You may find it in different colors, sometimes 'red' and 'white', other times different colors where both conductors are the same.
The color of the conductors for a doorbell is usually not important. Either conductor can be hooked to either terminal at each connection point. You will want to check the instructions that came with your kit to make sure you are getting the right wire.
Assuming you have a path to route the wire through an attic or basement, this will not be too difficult. Secure the wire with small cable staples and leave enough extra at each termination.
Installing a Doorbell Transformer
Installing a doorbell transformer requires two basic steps. Finding a location and then setting the transformer. The second step is hooking up the wiring. Most of the time, you are going to replace a transformer that is already in place. This is the easiest installation.
Not sure if you need to replace the doorbell transformer? See the articles, 'How To Fix a Doorbell' and 'Troubleshooting Wired Doorbells' for more information.
Locating the Transformer
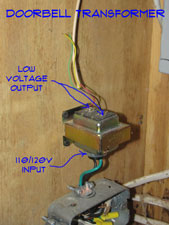
A doorbell transformer has to have a supply of the 110/115 volt power from your homes electrical power supply. It needs to be in a location where wiring can be run to it. Near the main panel, subpanel or junction box would be a likely choice. You will need to consult local building codes and have an understanding of how to add electrical wiring if this is a totally new installation.
The articles 'Basic House Wiring' and 'Electrical Safety Tips' can provide some useful information. Never work on wiring with the power on. Always double check with a tester before you disturb or alter any wiring. Consulting an electrician would be a wise choice if you are unfamiliar with electrical wiring.
The decision is much simpler if you already had a transformer and you are just replacing it. You can install the new transformer in the same location as the old one. Make sure the Power is Off!! before you remove the old transformer. Unhook the wires on either side of the transformer. You will have the two power wires (and possibly a ground), on one side. On the other side you will have two low voltage wires.
Hooking Up the Wires
With the transformer in place you can hook up the wires. First hook up the power supply wires and the ground wire if a lug is provided. Check the instructions that came with your doorbell kit to verify that you are using the right terminals. After the power supply is hooked up, you can install the low voltage wires. Generally, it does not matter which wire is hooked to which terminal. If the neutral and hot are indicated and the doorbell wire is color coded, such as 'red' and 'white'. You can hook the white wire to the neutral and the 'red' or colored wire to the hot lug.
Many times you will find that the doorbell wire is not color coded and the terminals are not marked. Check the instructions to make sure that wires can be generically installed. Hook one wire to each terminal or as indicated in the instructions.
Leave the power to the transformer turned off until the rest of the doorbell wiring is done.
Summary
The transformer is a simple device. All it does is reduce the regular household current down to a voltage that the door bell can use. If you already have one, replacing them is not that hard.
Wired Doorbell Installation
A wired doorbell installation involves more work than installing a wireless doorbell. A wired doorbell has one more component than a wireless unit. This is the transformer. The big difference will be the wiring. If your wiring is still intact, and all you are doing is changing the components, then the job is not so difficult.
Not sure if you need to replace your doorbell? See the article on 'Fixing and Troubleshooting Doorbells' or 'Repairing Wired Doorbells' for listings of all the doorbell topics.
Selecting a new doorbell will probably be the biggest job. There are options and choices that need to be made. How many doors do you have that need a doorbell? The number of buttons that the doorbell supports can vary. Two buttons are common, but more are available.
There is also the appearance and finish. You can get units that have cases with nice finishes and decorative chimes. The nicer ones will obviously cost more.
It is an easy job and should not take very long.
Wired Doorbell Installation - Information
What Can You Save?
If you decide to hire someone to install your doorbell system, it could run you $100 to $175, even more for a high end system. You will still have to purchase the unit so your savings would be the labor to install it, around $50 to $75.
How Hard Could It Be?
Installing a wired doorbell can involve some work, especially if new wiring is needed. It also involves working with electricity. Caution is needed.
Check the Simple Things
Loose or broken wires at the buttons or chime unit can cause the doorbell to not work. Check the connections before you give up on your doorbell.
What Can Go Wrong?
Wired doorbells as the name implies, involve wiring. Running wiring inside of an existing home is a little difficult, unless you have access to the areas needed. Another caution is that wired doorbells are hooked to your home's power supply. Electrical shocks are possible and dangerous. Never work on wiring unless the power is off.
Wired Doorbell Installation – The Steps Involved
For some tips on how to purchase a wired doorbell, see the section below on 'purchasing doorbells'. Some useful tips are provided for when you go shopping.
The power for a wired doorbell is provided by the transformer. The article on 'Installing a Doorbell Transformer' gives you instructions on how to set and wire the transformer.
Wiring is the key feature for this type of doorbell. Running new wire through an existing home is a big job. Usually, the wiring is already in place. The article 'Installing Doorbell Wiring' provides information on adding or modifying wire if needed.
'Setting the Doorbell Chime Unit' discusses where to locate the chime unit based on a few key factors.
The article 'Installing Wired Doorbell Buttons' provides information on wiring and installing the buttons and how to coordinate them with the chimes.
Purchasing a Wired Doorbell Unit
There are a lot of options for purchasing a wired doorbell. Home supply stores will have a few to choose from. The internet will have a lot of options. Deciding what you want is always the first battle in making a purchase like this. Once you are past that, the installation will seem easy.
You can buy a basic wired doorbell kit that includes everything you need for one or two doorbell buttons for as little as $20 or $25. It may not be the most attractive thing you have ever seen, but it will be functional
In the $25 to $100 range you can find a wide variety of doorbell kits that will likely suit your needs. Multiple doorbell buttons and multiple types of chimes are supported. Some will even have metal chimes that hang down for a more elegant look. Some units even have the option of enabling a wireless feature for the doorbell buttons. This could be quite handy when adding doorbell buttons.
Appearance is always a consideration. This is especially true when the chime unit is in an area where it can be seen. Seeing the actual unit on the wall in a store would be preferred. When shopping on the internet, try to find as many pictures as possible. Remember, pictures on the internet are 'low' resolution and do not always accurately reflect appearance. Finding .pdf pictures on a manufacturer's website may help.
Another issue is the chimes. Some units have several options for the 'chimes' or 'tones' that the doorbell generates when the button is pushed. They are set up so that the sounds are different for each door. Read the information about the 'chiming sounds' if you have a preference for this feature.
Purchasing a Wired Doorbell - Checklist
- Does the doorbell have support for the number of doorbell buttons you need?
- Are all the buttons you need provided with the kit?
- Does the unit provide a variety of chimes that you can choose from? If not, will you like the ones provided?
- Does it match your decor?
- Are replacement parts available?
With all of these options, it may take you a little while to decide. Once you have decided you can get ready to install your new doorbell. The next article gets you started.
Summary
Once you have selected a new doorbell, replacing the components for a wired doorbell is not too hard. Replacing wiring if any is damaged or missing takes some extra work.
Wiring Doorbell Transformers
 Wiring doorbell transformers is not too difficult. Make sure the Power is OFF! before you work on it.
Doorbell transformers need to provide the required voltage for the unit in question.The transformer reduces the 120 volt power in your home to the desired voltage for your doorbell. This is usually between 12 and 24 volts.
For related information, see the articles 'How To Fix a Wired Doorbell' ,'Wired Doorbell Buttons' and 'Wired Doorbell Installation'.
You will need to use a multi meter to tell if the transformer is working properly. Measure the voltage between the two terminals on the transformer.
Multi meters are a little tricky to use, take a look at, Using a Multimeter, for more information.
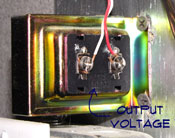
Does it match the secondary voltage that is needed. If not, you will need to replace the transformer. The 'secondary' or 'output' voltage should be marked on the transformer. It will be on an namplate, possibly embossed on the plastic shield where the low voltage wires are connected.
For the transformer listed in the picture the voltage should read 16 volts.
They are about ten to fifteen dollars. You can get them one from a home supply store. Obtain a new one with the same ratings as the one you have.
 Turn off the power and hook up the wiring the same as the old on. Use a voltage tester to make sure the power is off. One side of the transformer has the 120 volt wiring attached to it. This is the side that will shock you if the power is not off. Tag the wires if you need to.
The low voltage side will have two small wires attached to it. The polarity for these two wires does not matter. Remove both sets of wires from the transformer.
After you have removed the wires you can unscrew the transformer and install the new transformer and hook up the wires. The 120 volt wires go to the 'Line' side of the transformer and the low voltage wires connect to the 'Load' side.
Fixing Transformers
Doorbell transformers need to provide voltage for the doorbell unit in question. You will need to use a multi meter to tell if the transformer is working properly.
There is not much you can fix on a doorbell transformer that is not converting the power correctly.
When this happens you will need to replace the transformer. They are about ten dollars. Obtain a new one with the same ratings as the one you have.
Turn off the power and hook up the wiring the same as the old one. Tag the wires if you need to.
For related information, see the articles 'How To Fix a Wired Doorbell' ,'Wired Doorbell Buttons' and 'Wired Doorbell Installation'.
Wired Doorbell Chimes
 Wired doorbell chimes are the part that makes the bell or chimes ring. There are a lot of different doorbell manufacturers with a lot of different models. The chime units themselves are architectural units and may be quite costly. So fixing them can be worth the effort
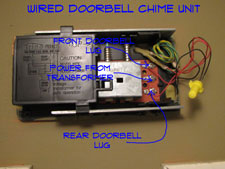
You have a low voltage wire coming in from the transformer and additional wires coming in from one two or more doorbell buttons. The wired doorbell chimes ring differently for the different doors. One key thing is to check the connections for the low voltage doorbell wiring. An obvious loose or corroded wire should be fixed. The other big question would be, whether or not you are getting power from the transformer.
You can use voltage meter to check and see if you have power first to the chime unit from the transformer and then AC power to the transformer. Carefully use the leads on a multi meter or a voltage sensor to see if you have power. A low voltage sensor should be used at the chime unit and the outbound side of the transformer. A 120V AC sensor can be used at the inbound side of the transformer. Repair faulty wiring when you find it. Remember to turn the power off before messing with the wires.
Side Note: A note about testing circuitry. Meters and testers are other tools that you may need from time to time. For as little as twenty or thirty dollars you can arm yourself with a couple of voltage testers and a multi meter. I would suggest a standard voltage tester, a low voltage tester (non-contact testers are the best) and an inexpensive multi meter. Multi meters are a little tricky to use, try these resources for additional information, Using a Multimeter, for more information. With this testing equipment you will be able to trace down what is happening with electrical items in your home.
If you find that you have proper current and the buttons are in good order, then it is the chime unit. Time to go to the home improvement store and find another one. Pick out one you like and can afford. Follow the installation instructions. Presto, you now have a new doorbell and completed your doorbell wiring repair.
WARNING!! Make Sure the Power is OFF!!! BEFORE You Work on Electrical Devices!!!
Fixing Wired Doorbell Chimes
We are headed into uncharted waters here. Not really, but there are a lot of different doorbell manufacturers with a lot of different models. The chime units themselves are architectural units and my be quite costly. Simply put, you have a low voltage wire coming in from the transformer and additional wires coming in from one two or more doorbell buttons. The chimes ring differently for the different doors. One key thing is to check the connections for the low voltage wiring. An obvious loose or corroded wire should be fixed. The other big question would be, whether or not you are getting power from the transformer.
You can use voltage meter to check and see if you have power first to the chime unit from the transformer and then AC power to the transformer. Carefully use the leads on a multi meter or a voltage sensor to see if you have power. A low voltage sensor should be used at the chime unit and the outbound side of the transformer. A 120V AC sensor can be used at the inbound side of the transformer. Repair faulty wiring when you find it. Remember to turn the power off before messing with the wires.
Side Note: A note about testing circuitry. Meters and tester are other tools that you may need from time to time. For as little as twenty or thirty dollars you can arm yourself with a couple of voltage testers and a multi meter. I would suggest a standard voltage tester, a low voltage tester (non-contact testers are the best) and an inexpensive multi meter. Multi meters are a little tricky to use, try these resources for additional information, Using a Multimeter, for more information. With this testing equipment you will be able to trace down what is happening with electrical items in your home.
You can use voltage meter to check and see if you have power first to the chime unit from the transformer and then AC power to the transformer. Carefully use the leads on a multi meter or a voltage sensor to see if you have power. A low voltage sensor should be used at the chime unit and the outbound side of the transformer. A 120V AC sensor can be used at the inbound side of the transformer. Repair faulty wiring when you find it. Remember to turn the power off before messing with the wires.
If you find that you have proper current and the buttons are in good order, then it is the chime unit. Time to go to the home improvement store and find another one. Pick out one you like and can afford. Follow the installation instructions. Presto, you now have a new doorbell and completed your doorbell repair.