Search
Receptacles
What Is a Grounded Outlet
Outlets without grounding can be a safety issue. Electrical shocks can result when an outlet is not properly grounded. Newer home built under modern codes are required to have grounding for all electrical outlets.
Older homes may not have grounded receptacles. Using adapters is not a good practice, due to the fact that they still need to be grounded. You can ground to the box if it is hooked to metal conduit.
This is rare in residential homes. The ground wire is a safety feature the prevents electrical shock in the event of a neutral failure.
Homeowners that have outlets without grounding may want to consider upgrading their wiring. This is a big undertaking and beyond the scope of this article. You will need to hire an electrician. It is possible that you can get grounding installed on certain key outlets, such as those that need GFCI protection. Again you will need to consult an electrician or develop basic wiring skills of your own.
How To Install an Outlet
Installing electrical outlets, there could be several reasons why you would need to do that. Before you replace it though, make sure it is not something simpler. Is this something you can do? Is is something you want to do? In most cases yes, just be careful, electricity can be dangerous. A couple of simple tests will tell you where you are at with your outlets.
For the last few decades you will notice that the vertical slots are different sizes and all plugs that are made now have two sizes on the prongs. This is done to orient the polarity of the outlet. Devices with switches could be damaged by outlets that have the polarity reversed.
Not sure if this is your problem? See the articles, 'Troubleshooting Electrical Problems', 'Electrical Wiring Repairs' and 'Basic House Wiring' for more information and a listing of all the electrical subjects.
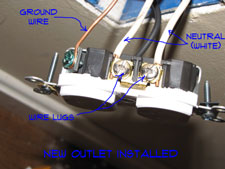
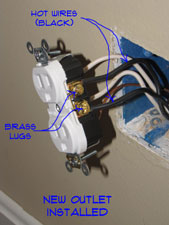
Before you begin an electric outlet installation, make sure the power is off. Turn off the breaker and put a piece of tape over it. Double check for power with a tester. Newer plugs all have three wires attached to them. A Hot (Black), Neutral (White) and a Ground (Bare or Green).
Removing an Old Outlet
Unhook the wires from the old receptacle, noting the orientation. Attach the ground wire to the green ground lug. Then attach the neutral to the silver side of the outlet. Lastly, attach the hot wire to the brass side of the outlet. This coding system is fairly universal. Depending on the light you have, you may have to look close to tell between the silver and brass lugs.
Using Push In Connections
 Some outlets may allow you to push the hot and neutral wires into the back of the outlet. There are round holes there. You strip the wire the proper distance, keeping it straight and simply push the wire in until the insulation touches the back of the receptacle.There should be a strip gauge on the side of the receptacle that tells you how far back to strip the insulation.
Even when you use the push in connection, you still want to tighten the lugs. These push connections are sometimes only good for one size wire, such as 14 gauge.
Using The Wire Lugs on an Outlet
Many homes use #12 wire for the outlets. This wire is rated tor up to 20 amps and can accommodate hight wattage items in kitchens and other locations.
The draw back to #12 wire is that unless you have an outlet rated for 20 amps, the push connectors will not work. They are made to work with #14 wire. This is assuming that you have purchased an inexpensive 15 amp receptacle.
You need to use a pair of wire strippers to bend the end of the wire to the correct shape to fit on the lugs. There is a hole above the handle that you can insert the wire into. Curl the strippers around 180 degrees to create a loop in the wire.
Loosen the lug as far as you can without removing it, before you try and put the loop in place. You may need to squeeze the loop a bit to get to fit onto the lug properly. Once you have the the wire curled around the lug, tighten the screw with a screwdriver.
Connecting Multiple Outlets
For outlets that had four wires attached you will need to reattach all of them. The extra two wires are to feed the next outlet in the circuit. This saves having to make additional connections inside of the box. It is a time saving feature that is very common.
Wrapping an Outlet.
As a safety precaution you want to wrap electrical tape around the lugs. This is especially needed if you have metal boxes. Use standard electrical tape and wrap it around the outlet two or three times. This helps protect the lugs from touching any other metal surface or wire inside of the box.
Finishing the Outlet Installation
The final step to install electrical outlets is to put it back together. Use the tester to make sure it is working. Attach the outlet back to the box and then install the cover plate. Got young children? Put the safety plugs back in. Congratulations! You can plug the lamp back in. It's time to move on to other electrical or home repairs.
This article covers a standard outlet that has the correct wiring inside of the box. For a GFCI outlet, see the article 'Installing GFCI Outlets'. If you are missing the ground wire, see the articles 'What Is a Grounded Outlet?' and 'How To Ground an Outlet' for more information and additional instructions.
How To Test an Outlet
 Outlet polarity issues, what on earth is that? What it means in layman's terms is that many devices are wired to have the power go through them in a certain direction. The larger and smaller prongs on the plugs keep them oriented correctly.
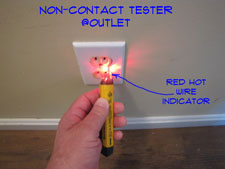
This works great as long as the outlets are wired correctly. Sometimes the white and the black wire are hooked up to a device backwards, thus an outlet polarity issue. This can cause switches to not work correctly and may damage motors. You can purchase a polarity tester for between $5 and $10. Check the outlets in your home to see if they are all wired correctly.
Find one that is backwards? Shut the power off and remove the switch plate. Double check with a tester to make sure the power is off . Unscrew the outlet from the box and pull it out to expose the wires. The black wire should be hooked to the brass side of the outlet. The white wire should go on the side of the silver screws.
Use a screwdriver and switch the wires. Turn the power back on and check the polarity again with the tester. Got it? Great! Turn the power back off and put the outlet back together. Time to move on to other things. No need to install electrical outlets this time.
Troubleshooting Outlet Problems
 When you are troubleshooting outlet problems you first want to make sure it is not something simple. Checking the circuit breaker or fuse is a good first try. A loose plug is another simple problem.
Not sure if this is your problem? See the articles on 'Troubleshooting Wiring Problems' and 'Electrical Repair for Homeowners' for a listing of related electrical topics. For some related topics, see 'How To Install an Outlet', 'Installing a GFCI Outlet', 'How To Ground an Outlet' and 'How To Test an Outlet' for more information.
Follow these steps (1) Use a tester or a device that is working to see if you have power. If you have power, it is the device that needs attention.
(2) Check the device – Is the light bulb good? Is the light, appliance, tool or electronic device working? Try hooking it up to another outlet that you know is working.
( 3) Check to see if a GFCI (Ground Fault Circuit Interrupter) is tripped. Many times the outlets that follow a GFCI in a circuit are also protected. See if the button has tripped on this or a nearby GFCI receptacles. Reset the GFCI and see if the outlet works.
(4) Check the breaker to see if it has tripped. Are you overloading the circuit? Try moving some items to different plugs and reset the breaker.
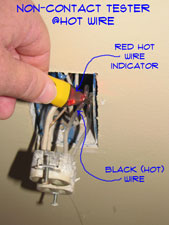
Did the tester indicate that you do not have power and you do not have a breaker or GFCI tripped? Turn the power off and carefully pull the receptacle out from the box. Double check with the tester to make sure the power is off.
Remove the cover plate and unscrew the outlet from the box. Turn the power back on and use the tester to see if you have power to the black wire attached to the outlet.
WARNING!! Make Sure the Power is OFF!!! BEFORE You Work on Electrical Devices!!!
You have power in the box, but the outlet does not work. Turn the power back off and see if the wires connected to the outlet are loose or corroded. Tighten or clean them and try again. Got it working? Yes, well that's good, your work here is done. Still not working? You will want to replace the outlet with a new one. Shut the power off and obtain a new outlet.
Go to the article 'Installing Electrical Outlets' for instructions on how to install electrical outlets. No power at all to the outlet box? You have a more serious electrical problem that is beyond the scope of this article. Check out the article 'Basic House Wiring' for more information. You may need to call an electrician to trace down and repair the problem.
Summary
Electrical outlets are fairly simple devices that normally work fine. However, the devices themselves are inexpensive and the quality is not always the best. The installation can also be a factor. Fixing them is not that hard.