Doors
Fixing a Screen Door Hinge
 Can you fix a screen door hinge? Most of the time the answer would be yes.
Not sure if you are in the right place? See 'Troubleshooting Door Problems' for more information.
The first thing to do would be to define what you mean by a 'screen door'. A screen door used to consist of a wooden frame with screening in the middle. This was to keep the bugs out when you opened the regular door on a hot summer day. Screen doors have evolved and become more complex
Now a screen door may include glass or plexiglas and be an all weather door. Via a sliding mechanism you still may be able to have a screen when you want it, but not always. Screen doors or 'Storm Doors' as they are called are also decorative. They add both beauty and protection to a home.
You can still get a plain old screen door with a wooden frame. Yes they still keep the bugs out on hot summer days. They don't come in decorator colors and they don't have glass to keep the wind out. The hinges for the simple wooden ones are easy to replace. The same is not true for many storm doors.
Fixing a Screen Door Hings - The Issues
What Can You Save? - Replacing hinges on a screen door is not too hard, provided that you can find the right size. Allow around $75 for someone to come out and do this. This is a good opportunity for you to be sold on a new storm door. When this happens, you could be looking at $250 of $400.
How Hard Could It Be? - Changing screen door hinges when you have ones that match is fairly easy. These repairs will have a Difficulty Level of: Simple. These repairs require a Skill Level of: Handyman. For and explanation of the terms in this section, see 'How to Use This Site'.
Check the Simple Things! - Try lubricating the hinges if they are just sticking or squeaking. A little oil can work wonders sometimes. See the article 'Fixing Squeaky Door Hinges', for more information.
What Can Go Wrong? - Don't take the door off unless you are sure you can find replacements for the hinges. Best thing to do is take off one hinge and try to find a set that matches. There is an aluminum rail that is mounted on the door frame. When this loosens up, it may seem like the hinges that are causing you trouble.
Lubricating Screen Door Hinges
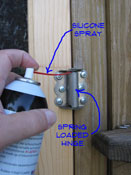 Lubricating screen door hinges can be quick and easy. Follow the instructions below.
The first thing you need to get, to lubricate a screen door hinge, is some silicone spray. You can get a can for less than five dollars at a home supply store. You want to get the kind of can that has the red tube taped to the side. Another important tool will be a rag.
Keep the rag handy during this operation. Quickly wipe up any excess oil, to avoid damage or stains to other surfaces. After you apply the lubricant, you want to repeat the process with the other hinges. Remember, take pins out one at time. You don't want the door to fall down. After you have lubricated all the hinges, open and close the door several times. The door should start to free up and quiet down.
For stubborn or long neglected doors you may need to repeat the process. Carefully apply additional oil until the door works smoothly and quietly.
Purchasing Screen Door Hinges
The old fashioned wooden screen doors will have spring loaded hinges. These hinges are normally surface mounted. For this style, size is not a critical issue.
It is still a good idea to take an old hinge with you when you go shopping. Color and hole alignment may matter. Replacing the hinges with the same size and style is the easiest.
Hinges for storm doors may be a little more of a challenge. They are usually fitted to the frame. The size will matter when you try to replace them. Again, the best course of action would be to take an old hinge with you to the hardware store. Remove the middle hinge for this step. The door will still be supported by the top and bottom hinge.
Storm door hinges will be made of either steel or aluminum. Hopefully, your home supply or hardware store will have a selection and you can match them up. The next step, would be to look online.
Before you do this you want to measure the hinge. Screen door hinges are measured by the height and the width across both faces of the hinge. You take this measurement when the hinge is lying flat. See the article 'Door Hinge Sizes' for more information on measuring hinges.
Replacing Screen Door Hinges
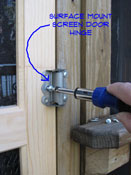 Replacing screen door hinges will only take a few minutes per hinge, as long as you have the right ones.
A screwdriver or a battery drill is all you need to replace most hinges. A traditional 'screen door' will have surface mounted hinges that will not require mortising.
Remove one hinge at a time and replace it with the new one. Most screen doors will have three hinges. You always want at least two hinges in place at any given time. If you only have two hinges or you have to take off more than one at a time, you will need to take the door off.
Make sure all the screws are snug before you move onto the next hinge. Repeat this process for all three hinges.
After you have replaced all the hinges, you want to try the door. Make sure it is closing properly. That's about all there is to it. When the door won't close, check to make sure you have everything tight. A screw head that is sticking up will bind the hinge and make the door not operate correctly.
Summary
How did things go with your screen door hinges? Were you able to lubricate them get them working again. That is good news. Oiling hinges is not that hard at all. Or were the hinges in too bad of shape? Then you probably needed to replace them. The trick to replacing them is finding the right size replacement hinges. After you found the hinges, replacing them only should have taken a few minutes.
Hopefully, you are all done with your screen door hinges. Now you can think about other projects that you have around the house. Check out all of the home repair articles for more help.
Fixing a Rusty Hinge
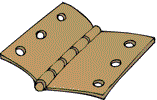 What can you do with a rusty hinge? This is a real problem for door hinges. Your door may not open or open with difficulty. The door will be noisy when it operates.
Rust is usually found on hinges that are old and perhaps of poor quality material. What are the options? Is it something you can take care of? Salvaging the hinge is possible, replacing it is another option. Both of options are within reach, for a homeowner.
Not sure if this is your problem? See the article 'How To Fix a Door' for a complete listing of all the door topics.
Hinges in days gone by were made of iron and low grade steel. Rust was a common problem. Oil or grease would be the common solution for battling the rust. The hinges would still disintegrate over time and eventually quit working. Since then better methods and better materials have changed hinges. Quality door hinges are made of brass or metal alloys that don't rust. Poor quality hinges may only have a protective coating on them the breaks down over time, then rust can appear.
This leaves you with two basic options. You can try to lubricate a rusty hinge and get it working again. This does not help much with the appearance. The other option would be to replace the hinge with a new one. This will help the door to work smoothly and the door will look nicer.
Fixing a Rusty Hinge - Information
What Can You Save?
There is a range of cost here for a normal door. Lubricating and freeing up the hinges or replacing them with a set that is the same size could run from $50 to $100. Taking an older door down and modifying it for a new set of hinges could run from $100 to $200.
How Hard Could It Be?
Fixing rusty hinges could involve some work if the door is old and the hinge style is no longer available. Lubricating hinges to get the working is not hard.
Check the Simple Things!
Lubrication is the quick solution for a rusted hinge. You may need to start with penetrating oil and then move up to silicone spray or white lithium grease.
What Can Go Wrong?
Old hinges may be of a style and size that is no longer available or only available from specialty hardware sources. Fitting newer hinges onto an old door can involve some work. Lubricating a stiff rusty hinge can involve a lot of oil. Oil makes a mess, so make sure you have rags handy to clean up the excess.
Troubleshooting a Rusty Hinge
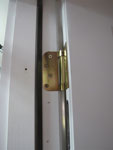 Troubleshooting rusty door hinges is the first step you should take in deciding what to do with a tight squeaking door. First determine if the hinge is still serviceable.
When you have a rusted hinge, you first need to determine how badly the metal is damaged. Surface rust will make the hinge look bad, but it should still work. Deep rust may have deteriorated the metal to the point where it is ready to break. It may be broken already. You don't want the hinge to break and the door fall off and hurt someone.
Visually inspect the hinge and try to determine the level of rust. Does the door work, can you open it? Do the hinges appear to be functional? Do large flakes of rust fall off when you move the door? These are some question you might consider when checking the hinges.
For surface rust you are safe to lubricate the hinge and start using the door. Lubrication will not fix the appearance issues. Some soap and a scrub brush or steel wool could help with the appearance. See the article 'Lubricating Rusty Hinges' for more information. Replacing the hinges is still a consideration if they look too bad.
WARNING!! Get Help When You Remove a Door, They Are HEAVY!!! WARNING!!!
Lubricating Rusty Hinges
See 'How To Lubricate a Door Hinge'
Cleaning Up Door Hinges
Cleaning up door hinges is the last step in fixing your squeaky hinges. The oil can continue to ooze out for a while, so cleaning up is a must.
Keeping a rag handy while you are oiling the door hinges will save the amount of cleaning up the door hinges you have to do. Careful use of the oil or grease is also important. Putting too much on the pin will cause it to ooze out and run down the door.
After you have move the door back and forth several times, you can check for any excess lubricant. Use the rag to wipe any residue off. It is a good idea to do a couple of checks over the next few days. Wipe off any excess lubricant the works out of the cracks in the hinge. Once the mess is cleaned up, you are done with this squeaky door hinge project.
Summary
How did it go with your rusty hinge? Were you able lubricate them and clean them up. That is good news. Were they too far gone or did they look too bad for this procedure? Did you decide to replace them? Hopefully, you found hinges to match and the replacement was not difficult.
Worst case you had to fit new hinges to an old door. This can be done, although it involves using a chisel and some lay out. Now that your rusty hinge issues are behind you, what are you going to do? You probably have other home repair projects on your list. Keep at it, there is an afternoon off somewhere on the horizon.
Garage Door Torsion Spring Replacement
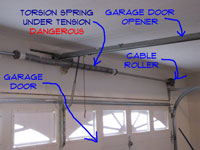 Most homeowners should not attempt to adjust or replace 'Garage Door Torsion Springs'. The problem is that they have to be worked on when the door is down and the springs are under tension. When you release the set screw you have to have a rod in place and be holding it to control the force of the spring. Replacing garage door springs of this type is not recommended for the average homeowner.
WARNING!! Torsion Springs can be VERY DANGEROUS, Precautions and thorough knowledge are REQUIRED!!! Do not attempt this repair without the proper skills.
There are those die hard do it yourself pros that insist on doing everything themselves. Are you one of those? Well then you should check further online for instructions on replacing garage door springs. Look for torsion springs. Clopay a manufacturer of residential garage doors has some instructions that may apply to your situation , Follow this link to check it out. There is another article that gives you and in depth discussion of this type of spring. The article provides installation instructions for springs and adjustment information, follow this link, to review the article.
I have been in construction most of my life and I personally know a few garage door installers. I have worked on garage door torsion springs and I must confess that it made me nervous. I will not relate some of the horror stories, however, I will say that people have been seriously hurt, messing around with this type of spring.
Hiring a Serviceman for Garage Door Torsion Springs
Before you call a garage door serviceman, write down exactly what the door is doing. Verify by examining them that the springs are broken. Springs either work or the don't, there is not much in between. Write down the width and height of your door and the type of door you have. Ask for a quote over the phone for a cost on replacing both springs. Make sure you specify both. Sometimes they will try to quote you for one spring and want to charge you double when they show up. Replacing garage door springs gets expensive when your taken advantage of.
Call at least three places and try to make sure they are actually different places. Get quotes from all three. If they won't quote it over the phone, call someone else. A door that works, but does not close all the way does not need to be replaced. Make up your mind that you are not buying a new door. You have established that one of the springs is broken. You need to replace them both. You should be able to get them replaced for $150 to $200 unless you have an unusually large door.
Torsion springs have cycle ratings. The minimum is 10,000 with the highest being 100,000. Ask about the cycles and get the longer lasting ones if you can. You will need to weigh the cost of better quality springs and decide if you want to spend the extra money. It should not be a lot more. The labor is the same so it is just the cost of the springs. You don't want to be replacing garage door springs any time soon.
Garage Door Extension Spring Replacement
 Installing extension springs will be easier if you were able to keep the cable threaded and hanging to the side? Yes, well now you may need to get someone to give you a hand. One person to hold the spring and another to lift and hold the cable assembly. Attach the spring to the hook or clip at the hanger bracket and then lift the spring and the cables up to meet each other.
For related information, see the articles 'Troubleshooting Garage Door Problems' and 'Fixing Garaged Door Openers'.
Carefully put the clevis on the end of the spring and bolt the clevis to the pulley. Do you have to stretch the spring to get them to connect? You may have to move the hook that holds the cable on the bracket back a notch or two. The Spring should be completely relaxed when the door is up all the way. Repeat this process for the other spring.
Installing Extension Springs - The Safety Cable
Next you need to install the safety cable. You may have gotten a new set of these with your springs. The safety cable attaches to the bracket at the door head, probably through a hook and cable clamp. There may be a guide hole on the clevis. Thread the cable through the guide hole and then through the spring. The cable then attaches to the hanging bracket at the end of the track. It does not need to be tight just snug so it does not tangle. Repeat this process for the other spring. When you get this far, you're almost done replacing garage door springs.
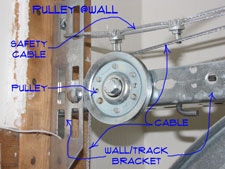 With both springs installed you can release the clamps and slowly lower the door. Make sure the pulleys and cables are moving in the right way and do not jump off one or both of the pulleys. Try the door a couple of times. Is it working? Great you are done replacing garage door springs. Is it working but needs adjusting? See the article 'Adjusting Garage Door Springs' for instructions. Did the cables pop off and need to be re-threaded? Then read on, hopefully you took those pictures. Replacing garage door springs is easier with pictures.
Threading the Cable
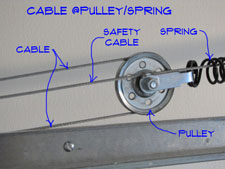 If the cabling pulled off and needs threading follow these steps. It is still a good idea to get help. Someone to hold the spring until everything is threaded. First attach the clevis and the pulley to one end of the spring. Use the bolt you took out and two wrenches to tighten it up. Next you will want to attach the one end of the spring to the hook on the hanging bracket. If you had a hook or a bracket you should have been able to leave it in place.
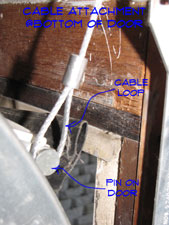
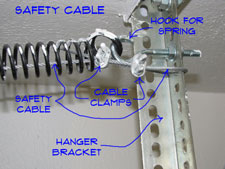 Have your partner hold the spring in its approximate location. There is a loop on the end of the cable that hooks to the pin on the bottom of the garage door. The cable next goes to the pulley that is attached to the bracket on the wall. The cable threads to the inside of the pulley. Look at the pictures. The new box for the springs should have a generic diagram. Pictures of your installation would be better. The cable now goes around the pulley at the end of the spring, through the clevis. Next it attaches to the hook at the bracket that is attached to the overhead track. The hook location may need to be adjusted. Don't give up your almost done replacing garage door springs.
You may have had to loosen the clamp on the cable at the hook. Tighten the cable back up and set the hook so that the spring is elevated, but not in tension. Install the safety cables (go back four paragraphs, too much repetition). Repeat the process for the other spring. With everything hooked up carefully lower the door and watch that the cables are staying in place. Does the door close? Yes, good job, now you are done replacing garage door springs. Take a look at Adjusting Garage Door Springs, if your door needs adjustment (the link is three paragraphs back). ,if the door is not closing quite right.
Replacing Garage Door Springs
 Replacing Garage Door Springs is the only option when the springs break. There are two types of springs on garage doors.
Extension springs are the ones that run alongside the overhead door track and have a pulley and cable attached to them. Torsion springs are mounted over the door and a long round shaft goes through them, with a wheel for the cable on each end. Torsion springs are generally used for larger heavier doors, usually 10' or greater in width.
Without the springs the door is very difficult to lift. If you are here you have determined that you have a broken spring. A broken spring cannot be repaired, it must be replaced. Extension springs could be replaced by a homeowner. Do they just need adjustment? See the article 'Adjusting Garage Door Springs'.
Torsion springs should not be attempted unless you have a good understanding of how they work, feel comfortable doing them and have taken safety precautions. Read on to find out if replacing garage door springs is something you want to tackle.
Replacing Garage Door Springs - Information
What Can You Save?
Replacing the springs is a $150 to $200 job. If you decide to do it yourself you will spend between $30 and $50 for the parts. You could save between $120 and $150 if you do it yourself. An added danger is that the repairman may take the opportunity to try and sell you a new door. They can be quite convincing, when they are done you wonder how you survived this long with you outdated, cheaply made and poorly installed door. I suppose it is true sometimes. A new door could run into the thousands of dollars. Do you really hate your current door? No, well then just fix it yourself or have it repaired.
How Hard Could It Be?
The difficulty level of replacing garage door springs, varies with the type. Extension springs are challenging to replace. Torsion springs are dangerous and should only be attempted by those that have a good knowledge of how they work.
For and explanation of the terms in this section, see 'How to Use This Site'.
Check the Simple Things!
I wish there was something simple. Either the spring is broken or it is not. If it is broken you have to replace it.
What Can Go Wrong?
With a broken spring your door won't work. You're already in kind of a pickle. The cables for a garage door extension spring can get a little tricky. You may struggle to get them hooked up. Worst case you may not finish the job in an evening. Take a breath and walk away if you get frustrated.
Garage Door Springs - Safety Concerns
 DIY Garage Door Spring Replacement requires above average mechanical skills. There are cables, rollers and tracks to deal with. The springs need to be unhooked from the door prior to replacement. This means the entire weight of the door will have to be dealt with. Safety concerns are very real.
The other issue is getting the right springs. You will need several pieces of information before ordering new springs. Getting the weight of the door might be difficult and could involve actually weighing the garage door, see 'Purchasing Garage Door Springs'.
A reputable firm will take care of your garage door spring replacement project for a few hundred dollars. You will not be able to save that entire amount, even if you do the work yourself. You will still have to buy the springs.
WARNING!! Garage Doors can be VERY HEAVY! Take Safety Precautions and get help before you attempt to lower a door that is not hooked to the springs!!!
This is where I tell you to think about hiring this job out. The door is dangerous, the cables can be tricky and the job could take you several hours. You should be able to find someone to replace them for about $150 to $250. Don't think it is worth it? Read the next couple of paragraphs for some tips on calling a serviceman.
Hiring a Repairman to Fix Garage Door Springs
 Before you think about 'Hiring a Garage Door Repairman', write down the size and type of door that you have. Verify by examining them that the springs are broken. Springs either work or they don't, there is not much in between. Ask for a quote over the phone for a cost on replacing both extension springs. Make sure you specify both. Sometimes they will try to quote you for one spring and want to charge you double when they show up.
It is always best to replace both springs. Garage door springs are rated for a certain number of cycles. When one breaks the other one won't be far behind.
Call at least three places and try to make sure they are actually different places. Get quotes from all three. Try to get quotes over the phone, even if they are a range of costs. You want to avoid the 'hard sell' of a salesman. Remember, a door that worked before the spring broke does not need to be replaced.
Make up your mind that you are not buying a new door. Get the best price you can for replacing garage door springs. Make up your mind not to be up sold when they come out. I say this as a warning, there are many honest and reputable firms out there. Unfortunately, it is sometimes difficult to tell the difference over the phone. Do your friends know anyone? Just an idea.
Hiring a garage door repairman is a good choice if you don't want to tackle a big job like fixing a garage door. Just make sure you only pay for what you need.
Purchasing Garage Door Springs
The following instructions are for 'Purchasing Garage Door Springs' that are the overhead type for smaller doors. These are commonly called 'Extension Springs'. See the article 'Garage Door Torsion Springs' for information on torsion springs. Extension springs are the ones that run alongside and above the tracks. Generally, extension springs are used for smaller doors, 8' or 9' in size.
You are going to need three pieces of information before you purchase your new springs. (1) The size of the ga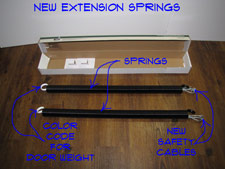 rage door, 'Width' x 'Height'. (2) The weight of the door. (3) The length of the old springs.
Use a tape measure to get the width and height of your door. It should be a nominal size such as, 8' 0" Wide X 7' 0" High. The length of the spring needs to be taken when the door is up or the spring is relaxed. Measuring the sum of the two pieces of broken spring will also work.
Getting the weight may be more of a challenge. Many doors will not have the weight on it. You might be able to find the weight on the ID Tag for the door. Another option would be to look the weight of the door up online. To do this you will need to know the manufacturer, model number and style of the door. Use this information to search the Internet for the correct weight.
Purchasing Garage Door Springs - Getting the Door Weight
For doors without an ID Tag, you will need to weigh the door. You can use a common analog bathroom scale for this exercise. You will need one or two short 2" x 4" pieces of lumber to place on the scale.
When one spring is broken, place the scale under the corner of the door on the side with the broken spring. This will give you one half of the door weight. Multiply by two to get the correct weight. If both spring are broken you can place the scale in the center of the door. You may need some help lifting the door. The springs do most of the real work in lifting a garage door. Without them, the doors are heavy.
With the above information in hand, you can get your replacement springs. You can get garage door extension springs from most home supply stores. They come in sets and don't even consider replacing one of them. When one breaks the other is not far behind. Get springs that are the closest to your garage door weight. You can also get them over the Internet. This takes a little longer, but may save you a few dollars. Purchasing garage door springs is not that difficult once you know the weight of your door.
Removing Broken Springs
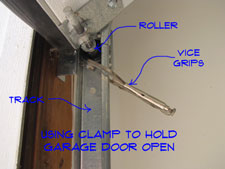 To start 'Removing Broken Garage Door Springs', raise the door as far up as you can and install vice grips or C clamps in the track. You don't want the door coming down while you are working on it. Try tugging on the door to make sure the clamps are tight. With door in the up position the tension in the spring is relaxed and it is safe to work on.
Before you start take a good look at how the cables are threaded and connected. In fact, do you have a digital camera? Take some pictures, you may thank yourself later. Replacing garage door springs is easier if you can look at how they were.
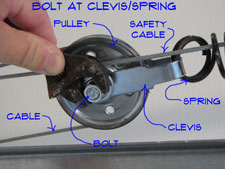 Next you will have to remove the safety cable. This cable is there so that the spring will not hurt anyone when it breaks. Remove the cable at the metal hanger near the end of the door track. There should be some type of eye bolt. The cable should have a clamp on it that can be loosened to give some slack in the cable. Pull the cable out of the spring and let it hang neatly off to the side until you are ready to re-install it. Remove the half of the spring that is connected to the eye bolt at the hanger.
The other half of the spring is connected to the pulley via a metal clevis. You will have to use wrenches to unbolt the clevis from the pulley. Hold the pulley in place and put some tape around it to secure it to the cable. Lower the cable down and let it hang in a safe place. By now you should have a new set of springs to install. Replacing garage door springs is pretty hard if you don't get the new ones.
Summary
In this series of articles we discussed all of the issues and steps that would be involved garage door spring replacement. This 'Summary' will give you a quick review of what was discussed. In addition, links are provided take you back to articles that you want review again or that you missed.
Hopefully you have been successful in getting your problem taken care of. Either you hired someone to take care of it or you replaced your extension springs yourself.


