Search
Doors
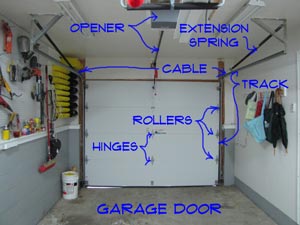
Overhead Garage Door Repair
 Overhead garage door repair, can you develop the skills you need? Garage doors are the biggest heaviest doors in any home. No surprise that they often need attention.
See the descriptions below for all the topics or take a quick jump here:
'Adjusting a Garage Door', 'Garage Door Spring Repair', 'Garage Door Opener Problems', 'Weatherstripping for Garage Doors', 'Garage Door Hinges', 'Garage Door Rollers'. Follow these links for more information and instructions.
They also have the most moving parts. Parts can wear out or break, things can get out of alignment. All it takes is one item that is not working and the whole door can be rendered useless.
The garage door springs do the heavy lifting. When the door is down they are stretched. When you lift the door, the springs recoil and lift the weight of the door for you. The door follows tracks and uses rollers to stay in place. The moving parts need to be lubricated and and the tracks need to stay in alignment. There are also hinges that hold the panels together. If any of these items fail, you will need to make an overhead garage door repair. You can get the know how, to repair garage doors without too much difficulty. Read on.
Overhead Garage Door Repair - Finding Help
Below you will find some common problems that you might encounter with your garage door. There is a brief description and a link that will lead you to additional information on garage doors and the related repair issues. Our evaluation sections of the pages will help you to decide if you want to make the repair. The "What Can You Save?"and "How Hard Could It Be?" sections give you a quick overview of the repair. After you have reviewed this section, you can decide if it makes sense for you to attempt your own 'Overhead Garage Door Repair'.
 The "Check the Simple Things First" section will clue you in to easy fixes to check for. Garage doors, like other household items have simple things that break or quit working properly. Many times something easy will eliminate a problem without the aggravation of an involved repair. In an effort to warn you about what you are in for, there is the "What Can Go Wrong" section. Forewarned is forearmed as they say. Knowing what to watch out for is always helpful.
Overhead Garage Door Repair Topics
Below you will find brief descriptions of the issues you may have run into. Click the link for the related article to find out more information.
Garage Door Spring Repair
The springs are the workhorse of your garage door. Over time, metal fatigue can cause them to break. With a broken spring the door is very difficult if not impossible to lift. For broken springs you will need to replace them. See 'Replacing Garage Door Springs', for more information.
The quality of the springs can vary and the difficulty level changes with the type. You may not want to tackle this repair, but understanding what you will need will allow you to hire someone at a reasonable cost.
Your garage door spring problem might be an adjustment issue. It could be very simple. Take a look at 'Adjusting Garage Door Springs' for more information.
Adjusting a Garage Door
When the door is out of alignment it can bind and not work correctly. Adjusting the garage door may be an inexpensive solution to your problem.
Before you call the repairman, find out if an adjustment is all you need.Find out what you can to adjust the door without doing a complete overhaul.
Repairing Garage Door Rollers
The garage door rollers allow the door to move up and down in the track. They can break or seize up. You can either lubricate them or replace them as needed. Replacing them is not that hard, they are less than five dollars. Ten minutes and you're done.
Use this link to find out everything you could possibly want to know about garage door rollers. There is really not that much to know, but it sounds good.
Repairing Garage Door Hinges
The garage door hinges are used to allow the door panels to move independently of each other. On the sides of the door, they have a sleeve for the rollers built into them. Hinges can rust, seize up or break. This is also an inexpensive and simple repair.
Learn the secrets about garage door hinges that have been passed down through the centuries via a secret code. No, not really, they are pretty easy click the link above for more information.
Garage Door Opener Problems
With a garage door opener, you have no lifting at all, just push a button. It does not eliminate the need for springs. It has moving parts and is also an electrical device.
A garage door opener is one of those things that can have some simple problems that cause it not to work. Check out the simple repairs first. Find out what repairs are practical to make by clicking the link above.
Repairing Garage Door Weatherstripping
For an attached garage you want to keep out both cold and heat. The garage door is a big opening. The weatherstripping will cut down on the air leaks and save you money on fuel. Click the link above and check out this topic.
Overhead Garage Door Repair - Finding Help
We have attempted to provide you with links to the information that you need. Hopefully after examining the specific topics you were able to determine if you want to make your own overhead garage door repair. Many of the repairs are practical for the average homeowner.
Lubricating Bifold Closet Door Hardware
 Lubricating bifold doors is the solution when things are sticking or making noise. Just like other door hardware the hinges can start to squeak. A little oil can do a lot of good on a troublesome door.
The hinges, rollers and pivot pins are the moving parts. Use a good quality silicone lubricant. Keep a rag handy and don't over do it. Work the door panels back and forth until the move freely and don't make noise. Watch for drips and clean them up with the rag. Lubricating bifold doors move is not rocket science and you should be able to focus on the spots that are causing problems.
You may need to work the door back and forth a few times after you oil it. Keep a rag handy for the oil that oozes out. While you are at it, check all the moving parts on the door. Add some oil gingerly and you won't have to do this again for a while. That's all there is to lubricating bifold doors.
Replacing Bifold Closet Door Hardware
 Replacing bifold door hardware is not difficult. You can purchase both individual parts and complete kits for bifold hardware. Try to isolate which part is bad and find a matching component.
Before you assume that you need to install new hardware, you should see if the door can be repaired. See the articles 'Repairing Bifold Doors' and 'Adjusting Bifold Doors' for information on getting an existing door working properly.
How the Hardware is Installed
The pins and rollers are press fit into the holes in the door panels. The tracks and base clips are screw attached to the door frame and floor. There are also hinges and alignment clips, these are screw attached.
New Bifold Hardware Cost
Replacing bifold door hardware begins with a new kit. You can get a complete hardware replacement kit for between $15 and $30, depends on the size of the door. Individual parts can be as little as a couple of dollars. Before you buy anything, try lubricating the parts. Step Five talks about this. Although it's a simple concept, if it moves, oil it.
Installing the New Hardware
When you purchase parts, you will probably get some instructions. I hate to say this, but take a look at them and follow the steps. I consider myself fairly handy. I wish I could get an accurate count on how many times I have tried to install something, messed it up and humbly had to go back and check the instructions. Save time, take a look at them. The parts for a bifold are pretty straightforward, so I am not spending a lot of time on them. After you have installed the hardware, you can pat yourself on the back. You have completed an interior bifold door repair. Well Done!
Adjusting Bifold Door Height and Margins
 Adjusting bifold door height is accomplished by using the second adjustment feature of the bottom pivot pin. Two reasons that I can think of that would require you to adjust the height of the door.
Not sure if this is your problem? See the articles 'Troubleshooting Bifold Doors' and 'Solving Closet Door Problems' for a listing of all of the closet door topics.
Adjusting the Bifold Door Height
(1) You have a four panel dour and the margins are all parallel, but the two sets of panels don't line up. You can adjust the height until they do.
(2) The rollers are popping out of the track when you use the door. Raise the door until the rollers stay in place.
The bottom pin can adjust the height due to the fact that it is threaded. Just get a wrench and turn it turn clockwise to lower the door and counterclockwise to raise it. The design of the floor bracket should allow it to turn in place without disturbing the other alignment you may have done. Every thing working? Good job, you have been successful at adjusting bifold door height on your door.
Adjusting the Bifold Door Margins

Adjusting bifold doors is part of the installation. There is a clip in the track that the top pivot fits into. This clip has a set screw that holds it in place. Assuming that the opening is square and plumb you want the margins around the door to be even. You loosen the set screw and move the door closer to the frame or father away. Is the door binding on the frame when you try and open it? It is too close to the frame and needs to be moved away. Is the door binding against the other door or the far side of the frame? In that case you want to move the pin closer to the frame.
The safest thing to do is take the door out when you adjust the clip. Lift the door up and tilt the bottom out of the opening. The problem with this is that you have to keep putting the door in and out to check the adjustments. With the door open you can hold onto the door (better yet, have someone else hold it), and loosen the set screw with the door in place. Adjust as needed and tighten the screw.
Depending on where the door is binding, you may have to also adjust the bottom pin. The idea is to have the door far enough away from the frame so that it opens without friction. The door should not be so far away that it binds with the other door or the far side of the frame. A quarter of an inch of gap is about right, although it could be wider.
A properly aligned door should have a consistent margin along the top, sides and if it is a four panel door, down the center. For a four panel door the tops of the two doors should be even with each other and the center gap should be even. It takes a little practice to get the sense of how the movement of the pins affects the overall alignment of the door. Be patient, once you get the idea you'll always have that understanding.
The bottom pivot pin works similarly to the top one. The difference is that this pin is set in a toothed clip. To adjust the margin on the door you pick the door up and move it toward or farther away from the frame. The same adjustment principles apply with both pivot pins. Remember also, that moving the pin in or out also affects the top margin. I know, sometimes it can be aggravating. Use a pry bar to lift the door and try to move it one notch at a time until you get it right. The notch system is a little less sensitive than sliding the top clip. You may need to make a minor adjustment on the top, once you have the bottom pin the way you like it.
Okay, I know, you're probably wondering why I didn't tell you to work on the bottom pin first. If it is clear that you will have to move both pins, then this is a good idea. Unfortunately, it is usually not that clear and sometimes you go back and forth between the two of them, or four if it is a four panel door. Right, wrong or indifferent, I always start with the top pin. So that's how I wrote the article.
Keep making adjustments until everything lines up and the doors operate freely. Adjusting bifold doors takes time, but it is worth effort to have a door that operates smoothly.
Summary
Adjusting a bifold door involves some trial and error. However, after a few minutes, you should be able to get the door working again. If you have not done so already, you want to lubricate the hardware to keep things running smoothly. See the article, 'Lubricating Bifold Doors' for instructions.
Is the door too far gone or damaged? You may need to consider replacing it. See the article 'Replacing a Bifold Door' for more information.
Adjusting Bifold Closet Door Hardware
 Adjusting bifold closet door hardware is a needed periodically when the doors start to operate poorly. Most of the time it only takes a few minutes to adjust the door. It is easier when you have some help to hold the door.
For related topics, see the articles 'Troubleshooting Closet Door Problems' and 'Fixing Residential Doors' for a full listing of all the door topics.
Adjusting the Top Pivot Pin
The first step in adjusting bifold hardware is the top pivot. There is a clip in the track that the top pivot fits into, it will be near the jamb. This clip has a set screw, usually a Phillips tip, that holds it in place. Hopefully, the opening is square and plumb you want the margins around the door to be even.
You loosen the set screw to move the top of the door closer to the frame or father away. Does the door bind on the frame when you try and open it? It is too close to the frame and needs to be adjusted. Is the door binding against the other door or the far side of the frame? In that case you want to move the pin closer to the frame.
You should probably take the door out when you make these adjustments. Lift the door up and tilt the bottom out of the opening.See the articles 'Removing a Bifold Door' and 'How To Install a Bifold Door' for instructions on taking the door in and out.
The problem with this is that you have to keep putting the door in and out to check the adjustments. With the door open you can hold onto the door (better yet, have someone else hold it), and loosen the set screw with the door in place. Adjust as needed and tighten the screw.
A properly aligned door should have a consistent margin along the top, sides and if it is a four panel door, down the center. For a four panel door the tops of the two doors should be even with each other and the center gap should be even. It takes a little practice to get the sense of how the movement of the pins affects the overall alignment of the door. Be patient, once you get the idea you'll always have that understanding.
Adjusting the Bottom Pivot Pin

Adjusting bifold pivot pins is a key element. The bottom pivot pin works similarly to the top one. The difference is that this pin is set in a toothed clip. To adjust the margin on the door you pick the door up and move it toward or farther away from the frame. The same adjustment principles apply with both pivot pins. Remember also, that moving the pin in or out also affects the top margin.
I know, sometimes it can be aggravating. Use a pry bar to lift the door and try to move it one notch at a time until you get it right. The notch system is a little less sensitive than sliding the top clip. You may need to make a minor adjustment on the top, once you have the bottom pin the way you like it.
Okay, I know, you're probably wondering why I didn't tell you to work on the bottom pin first. If it is clear that you will have to move both pins, then this is a good idea.
Unfortunately, it is usually not that clear and sometimes you go back and forth between the two of them, or four if it is a four panel door. Right, wrong or indifferent, I always start with the top pin. So that's how I wrote the article.
Keep making adjustments until everything lines up and the doors operate freely. It works like you expect. That is good news, you can continue repairing your other interior bifold doors. Only one was bad? Then your done, move on to your next project.