Search
Repair Topics
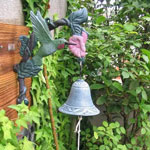
Wireless Doorbell Repair
Wireless doorbell units are a popular option since not wiring is required. There are some things a homeowner can do to repair them and get them working properly. The fixes are inexpensive and simple.
Not sure if this is your problem? See the article 'Fixing and Troubleshooting Doorbells' for more information.
Doorbells have been around ever since 1831. In the early nineteen hundreds they became practical and common. Chimes and bells are a newer development, it used to be a buzzer, are you old enough to remember?. Today, we consider doorbells to be standard item in a home. Knocking is still an option, it's just that not everyone thinks to do it.
Wireless units do not require internal hard wiring to operate. This is a great feature when you are retrofitting in an existing home. Remembering to change the batteries is the main drawback to this style of unit.
Wireless Doorbell Repair - Information
What Can You Save?
There are only a few things you can fix on a wireless doorbell, so a service call will run between $50 and $75 for an electrician to come out. You could be sold on a new system which might run $100 to $175 installed, even more for a high end system. The items that can be fixed are simple. So your savings could be from $50 to $175.
How Hard Could It Be?
Wireless doorbells are the simplest ones to work on. When it can't be repaired, replacing the entire system is not that hard.
Check the Simple Things!
Check the batteries, both buttons and chime units have batteries. Replacing the button would be the next simple step. Although the buttons on a wireless unit need to match the chime unit.
What Can Go Wrong?
Make sure you are working on a wireless unit. The batteries are the obvious clue. When the transmitter goes bad there is not much that can be done. Replacing the system is the only option. You can buy a whole new system for between $25 and $75, for a standard system, not the end of the world.
Troubleshooting Wireless Doorbells
'Replacing Doorbell Batteries' covered the most common problem with wireless doorbells. Both the chime unit and the doorbell buttons have batteries.
Wireless doorbell buttons are fairly fragile and exposed to the elements. It is likely they will fail over time. The article 'Fixing Wireless Doorbell Buttons' explained what you need to do.
When the unit fails there is not a lot you can do to repair it. 'Replacing Wireless Doorbells' talked about this topic.
Summary
Hopefully you have been successful in solving your wireless doorbell problem. Your guests will be able to push the button and you will know that they are there. How cool is that?
Troubleshooting Wireless Doorbells
Wireless doorbells as the name implies do not have wires that connect them to the house's electrical supply.
In fact, they are powered by batteries and use transmitters to relay signals when the doorbell is depressed. This is a great feature for a retrofit situation when running wires is difficult.
The repair issues with wireless doorbells are different than wired ones. The article 'Wireless Doorbell Repair' discusses this subject in depth. Follow this link to find out what to do to repair this type of doorbell.
Wireless have several features that make them popular, some of them are as follows:
(1) They are inexpensive.
(2) Usually have several options for chimes.
(3) Do not require hard wires to operate. In homes without wiring installed or that have damaged wiring, they can be a good option.
(4) Easy to install, usually in an hour or two.
Drawbacks are as follows:
Tones may not be as rich as full chimes in more expensive doorbells.
(1) Batteries run out of power and the doorbell quits working. Both the chime unit and each individual doorbell button require batteries.
(2) Chime units cannot be repaired, replacement is the only option.
Troubleshooting Wireless Doorbell Problems
Batteries
Batteries, Batteries, Batteries are the operative word with a wireless doorbell. If it starts to act up, check the batteries. Each doorbell button will have a battery. In addition, the doorbell chime unit will also have batteries. There should be a test button on the doorbell chime unit. If you push it and the doorbell works, then it is the batteries for the doorbell button.
The article 'Replacing Wireless Doorbell Batteries' covers the issues with the batteries and provides instructions on replacing them.
Wireless Doorbell Buttons
Wireless doorbell buttons are fairly fragile and exposed to the elements. It is likely they will fail over time. Make sure you check the batteries first, see above. If the batteries are good and the button won't work, it may be bad. The article 'Fixing Wireless Doorbell Buttons' explained what you need to do.
When All Else Fails
When the unit fails there is not a lot you can do to repair it. Make sure you have first checked the batteries in both the doorbell buttons and the chime unit. If the chime unit works and the buttons don't, replace the buttons. If you still cannot get it to work, then you will have to get a new doorbell. See the article 'Replacing Wireless Doorbells' talked about this topic.
Hopefully you have been successful in solving your wireless doorbell problem. Your guests will be able to push the button and you will know that they are there. How cool is that?
Drywall Sanding Screen
Drywall sanding screen is a special product that is designed for, well you guessed it, sanding drywall. Your first question will likely be, 'How is it different from sandpaper?'. Put simply, it is truly a screen and the holes allow the dust to fall away without 'loading' up the grit. Another key feature is that it can be flipped over since it has grit on both sides.
There are several related topics that you are likely going to be interested in. See one or all of the articles, 'Patching Drywall', 'Fixing Holes in Drywall', 'Taping and Mudding Drywall', 'Plaster Wall Repairs' and 'Spackling Drywall'.
Many drywall finishing professionals prefer sanding screen to sand paper. However, the consensus is not conclusive, there are a significant number of professionals that also say that sand paper is the better way to go.
For a homeowner with a small drywall patch to deal with it may be a moot point. For small jobs, it does not matter that much whether you use, sanding screen, sandpaper or a sanding sponge. The determining factor is going to be, 'What do you have in your garage or basement?'.
When you have a larger project and need to purchase supplies, you may want to consider your options. The information below covers the way that drywall sanding screen is used, the advantages, drawbacks and instructions on how to use it.
Drywall Sanding Screen Uses
Sanding large areas of drywall that have been recently finished is where drywall sanding screen really shines. It works best on fresh drywall compound that is completely dry. Using it on compound that is not dry will cause it the load and fill the holes, rendering the screen useless.
You can also use sanding screen on a pole sander to prepare for painting. However, paint will fill and load the holes in the sanding screen. When the build up gets to a certain point the screen will not work effectively. Even turning the sheet over will not give you much more sanding power.
Drywall sanding screen does not work well at all on wood or painted surfaces. Paint tends to gum it up quicker than it does sandpaper. For bare wood surfaces it has a tendency to raise the grain and separate the fibers, making for a poor finishing surface.
Drywall Sanding Screen Pros
The main advantage to drywall sanding screen is that, it has holes in it. The holes allow the drywall dust to dissipate and not build up. Clogging of the aggregate on sand paper is the thing that will render it ineffective. Sanding screen allows the dust to fall away and not build up on the abrasive surface.
Another main advantage is that it has grit on both sides. When you where down one side, you can flip it over and continue using it. Effectively, sanding screen will last much longer than sand paper.
This material comes mostly in pre-cut sheets that are made to fit on the head of a sanding pole. This is the common tool used by drywall finishers for sanding duties. Simply loosen the clamps on the head and insert the pre-cut sheet and away you go.
Drywall Sanding Screen Cons
It designed for use on gypsum finishing products. It does a poor job on other surface.
It gums up easily when used on painted surfaces. It will work to prep walls for painting, but you will not get your moneys worth, since the paint will bind it up quickly, making the second side useless.
Where Do You Purchase Sanding Screen?
Drywall sanding screen is usually sold at locations that sell drywall and drywall finishing products. Big box stores like Home Depot and Lowes will have it. Most hardware stores and some paint stores will also carry it.
It is usually sold in pre-cut sheets that are approximately 4 1/4" x 11 1/4". It can be found in full size sheets that are the same as regular sandpaper, but this is less common.
The sheets are packaged with as few as (1) sheet and as many as (100) sheets. Two to five sheets in a package is the likely amount. For a small repair job, a single sheet will be more than enough.
How to Use Drywall Sanding Screen
Sanding screen is not that hard to use. Most of the time it comes in pre-cut sheets that are attached to a special sanding head. This head is either hand held or attached to a pole that has a pivoting head.
Using the Sanding Head
The sanding block will have a clamp on each side to hold the sanding screen in place. You will notice the sheets are notched at the location for the bolt that holds the clamp in place. There are also notches at the corners where the sheet is intended to fold over the sanding block.
Loosen the clamp on one side and insert the screen into the clamp, centering it on the sanding block. Tighten the wing nut on the clamp and fold the sanding screen back over the face of the sanding block.
Loosen the other clamp and fold the screen over the end of the block. You want to get the screen underneath the clamp and pushed in as far as it can go. Tighten the clamp and you are ready for action.
Using a Sanding Pole
When you have large areas to sand, a sanding pole is the tool of choice. The head pivots allowing you to get into corners and change directions at will. The pole also allows you to reach larger areas from one position. You can also sand normal height ceilings from the floor without using a bench or ladder.
A sanding pole takes a little getting used to. When you try and change directions you may find that the head tends to flip over, sometimes denting or marking the surface you are sanding. Change directions slowly until you get used to the feel of how it pivots, it will save you some touch up.
You don't want to press too hard on the head. Let the sanding screen do its job. The idea is to get the area smooth for painting. If you cut too deeply into the compound you will groove it, or take all of the mud off the tape. When this happens you will have to apply more compound.
If the surface is too uneven, you may have to brush off the high points and skim it with compound another time. Use your hand and a light to see if you are getting the surface prepared properly. If you feel high spots, hit it again with the sanding screen lightly until you get a smooth surface.
You can also check your work with a light. Hold a light at a low angle to the surface that you are sanding to check for shadows. The light will pick up every imperfection in your wall, so only do it if you think you are missing something. If you see obvious flaws with the light you can continue sanding or applying another coat to depressions. Don't look for perfection, you just want it to look smooth when it is painted.
Sanding Screen Warnings
One caution that cannot be overemphasized is not to sand too hard. If you have to sand hard you probably have not properly filled all of the voids with drywall compound.
The danger is that you will sand through the compound and into the tape or paper. When that happens, you need to start over in applying the compound. You will likely be faced with two more coats of compound. You will have to wait for them to dry and your painting project will be further delayed.
So be gentle when you use sanding screen. This counsel is even more important when you are using lightweight compound. This type of compound is softer than the standard stuff, and cuts away quickly when sanded.
Drywall Sanding Screen Summary
In this article we have provided you with an overview of what drywall sanding screen is used for. It is a fairly inexpensive and versatile product that can help you with any drywall or sheetrock project.
There are several related topics that you are likely going to be interested in. See one or all of the articles, 'Patching Drywall', 'Fixing Holes in Drywall', 'Taping and Mudding Drywall', 'Plaster Wall Repairs' and 'Spackling Drywall'.
You also learned where you can purchase sanding screen at and what type of packaging it comes in. If you are doing a small job, you may be able to buy as little as one or two sheets. Normally, sanding screen is used with some special sanding heads. They are not a big investment and they make the job a lot easier.
Finally we talked about how to use drywall sanding screen. There are some cautions and you want to tread lightly with this tool, or you might wind up doing some of your work over again.
We hope your project is going as planned and that the sanding screen meets your expectations.
How To Fix a Doorbell
 Learning how to fix a doorbell is a skill that will save you time and money. Doorbells are simple electrical devices that are easy to fix or replace. You can buy a entire doorbell kit for under $20 to $50, unless you want something fancy. So this is not an expensive repair.
There are two types of doorbells, wired and wireless. Wired units are connected to your homes power supply. A transformer is used to reduced the power down to a low voltage. The doorbell buttons and chimes are interconnected with low voltage wire. For information on repairing wired doorbells, see the article 'Fixing Wired Doorbell Units'.
Wireless units work with small transmitters that are powered by batteries. This type of doorbell is easier to install and is an excellent choice for a replacement when the wiring is compromised or not located to your liking. For information of fixing and replacing wireless doorbells see the article 'Fixing and Replacing Wireless Doorbells'.
What Type of Doorbell Do You Have?
How can you identify whether or not your doorbell is wired or wireless. There are several ways that you can do this.
Checking for a Transformer
Wired doorbells use a transformer to provide the low voltage power for the doorbell. So, if you have a transformer that is located somewhere near you your electrical panel, you are pretty sure that you have a wired doorbell.
Checking for Wiring
Checking for wires is another way to tell. Pop the cover off of the doorbell chime unit and look for wires. See any? Or do you see some batteries? Wires mean wired, batteries signify wireless.
Checking for Batteries
Same as the previous subheading, batteries are needed for both the doorbell chime and the doorbell buttons. Fairly simple to remove the covers to look for them.
Fixing Doorbells - Related Articles
Below you will find links to series of articles that discuss the various problems that you are likely to have with your doorbells. Descriptions are provided that will help you zero in on the specific problem you are having. When you follow the links you will find further detail that will help you quickly navigate to the right topic.
Repairing Wired Doorbells
Wired doorbells are tied into your homes power supply via a transformer. The power is reduced down to a low voltage level. Low voltage wiring needs to run from the transformer to the chime unit and then to the doorbells. Most units support at least two doorbell buttons, some support more.
The wiring is fragile and the connections can cause malfunctions. Use this link to find out what you need to do to repair this type of doorbell.
Wiring Doorbells
Generally, you will not want to try and retrofit your home with doorbell wiring if it is not already in place. Understanding how the wiring works will help you to track down a problem you are having. Loose and broken wires are a common problem. The fix could be as simple as cleaning up a wire and reconnecting it.
Repairing Wireless Doorbells
Wireless doorbell units rely on transmitters and batteries to operate. There are not as many things that can be fixed. If repairs can be made, they are usually quite simple. Follow this link to find out what you can do with your wireless doorbell.
Replacing Doorbells
Sometimes, given the cost of a new doorbell, it just makes more sense to replace it. Wired and wireless units can be purchased for a reasonable amount. You might want to weigh the amount of time and trouble involved with trying to repair a doorbell. Replacing it may make more sense. See 'Replacing Wired Doorbells' for units with a transformer. The article 'Replacing Wireless Doorbells' covers the battery operated type. Yes, you can replace a wired unit with a wireless one.
Fixing Doorbells - Finding Help
The introduction to each series of articles has a helpful evaluation section. The "What Can You Save?", "How Hard Could It Be?" and "Tools You Will Need"sections give you a general understanding of the repair and the issues involved. This will help you decide if it is in your best interest to make the repair yourself.
The "Check the Simple Things First" section describes easy repairs that only take a few minutes. In an effort to warn you about what you are in for, there is the "What Can Go Wrong" section. Use this section to benefit from the experience of others, without the discomfort.
Installing Wired Doorbell Buttons
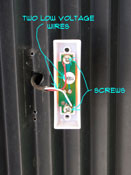 With the wiring in place, installing a wired doorbell button is pretty easy. There are only two low voltage wires to hook up and two screws to hold it in place.
The articles 'Wired Doorbell Repair' and 'Wirelesss Doorbell Repair' provide information on all doorbell repair topics.
Installing a Wired Doorbell Button
Wired doorbell buttons are usually installed with two screws. They don't weigh much at all, so as long as the screws will seat into the material, it should not be a problem. Wood, vinyl, aluminum are all suitable materials to attach a doorbell button to. Brick or masonry, may require a plastic shield before you install the button.
Before you set the doorbell buttons you want to make sure you check how they are identified. One of them may be marked for the 'Front' door and one for the 'Rear'. Or they may numbered. Howevery they are identified you want to know where you put them before you set the chimes. Writing them down might be a good idea, especially if there are more than two.
Since there are no wires involved you are not limited on locations. You want the doorbell to be visible and easily reached. A standard mounting height is 48" above the floor. For handicapped accessible homes, 48" would be the maximum height. Often they are set slightly lower for wheelchair access.
Check the instructions, some buttons will have a base plate, allowing for battery replacement. Others will require that you have the batteries in place before you install it.
Adjusting the Doorbell Chimes to the Buttons
Your new wireless doorbell will likely have options for the sounds each doorbell makes. It may even have choices as to the type of sounds that are made. You will want to set each doorbell to ring differently. This way you will know which door to go to when the doorbell goes off.
To do this you will likely want to consult the instructions that came with the unit. This is not what you probably want to do. Unfortunately, it will save you time in getting the settings right. Why go through the aggravation.
Different manufacturers will use different systems for making these settings. First decide on the type of sound you want. Then follow the instructions for setting each doorbell button. The doorbells should have been marked in some fashion, so that you know which one is which. For a two button doorbell system, 'Front' and 'Rear' or something similar is likely. For doorbell systems with more than two buttons, numbers or letters might be used.
Once you have the settings the way you want them it is time to test the doorbell buttons. Check each doorbell to make sure it is working the way you want. Once you are satisfied you can put the cover back on the chime unit. Then you are done! See 'Wired Doorbell Repair' for more information.