Search
Repair Topics
Fixing a Pocket Door Off Track
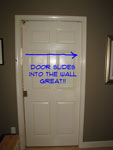 When a pocket door is off the track, you will have difficulty opening and closing it. Depending on the weight of the door, it may be very difficult to move. To fix this problem the door will need to be re-attached to the hanger. The method will vary depending on which hanger has let go.
Not sure if this is your problem? See the article on 'Fixing and Troubleshooting Pocket Doors' for a complete listing of all the problems and the solutions for them.
Troubleshooting a Pocket Door Off the Track
Check the edge of the door that is by the door jamb. Is there still a gap between the corner of the door and the floor? Yes, then it is the back hanger that has released. If the door is on the floor at the jamb, it is the front hanger that has let go.
Locating the Front Pocket Door Hanger
The first thing you need to do is determine where the hanger is. If it is visible hanging from the guide track in the door opening, your job is much easier. Pull the hanger over into the center of the door opening.
The hanger may be inside of the pocket. You will need to get a flashlight to try and locate it. Look in the narrow space above the door that goes back into the pocket. The hanger will look like a bolt hanging down below the track.
Try to use a wire, screwdriver or something else to slide the hanger out into the door opening. Try not to push it any farther back into the pocket. It may take a little bit of patience. A wire with a hook on it is probably your best bet.
If the hanger is too far back in the opening to reach you will have to go to plan "b". Pick up the front edge of the door off the floor a little so it does not scrape. Slide the door as far as you can into the opening. The back roller and hanger will push the front one out to where you can reach it. Do this carefully, you do not want to pop the back hanger off.
When you have the front door hanger in the opening, you are ready to put the pocket door on the track.
Locating the Back Pocket Door Hanger
When the back pocket door hanger is off the track, it is a bit more of a problem. You are going to have to remove the pocket door to get the hanger out where you can work on it.
Moving the door when the back side is sliding on the ground is a little difficult. Try holding your foot against the bottom of the door and pull gently on the top of the door to lift the back side. Work the door slowly into the opening in this manner.
Bring the door to within a few inches of the strike side jamb. You may want some help at this point. Someone to hold the door while you release the retention clip on the door hanger. See the article 'Removing a Pocket Door' for more information on taking the door off.
After the door is taken out and leaned against the wall, you will have to locate the pocket door hanger. A broom handle works well for coaxing the hanger out of the pocket.
Use a flashlight so that you can see what you are doing. With the broom handle, slide the roller carriage out into the door opening.
Putting the Pocket Door Back On the Track
When you go put the door back on the track, you want to get the hanger on the top of the door aligned with the bolt and wheel assembly inside of the track. Putting a pocket door back on the hangers has an order to it like most other things. There are two sides to the door, the strike side (where the lock is) and the pocket side. With a pocket door you want to attach the hanger that is closest to the pocket side of the door.
Slide the pocket side hanger to where it is about six to eight inches from the edge of the jamb. You will need to angle the door, so that the strike side is out of the opening. You cannot get the door into the opening until the back hanger is installed. It is a good idea to have some help at this point.
There are basically two types of retention clips. One kind allows the hanger to slide sideways onto the hanger bolt. This type is more prone to coming off. The other type has the hanger going straight up onto the bolt. This type may require that you hold the retention spring open while lifting the door. You definitely want help with this style.
Make sure the retention clip is released and attach the clip to the back hanger. At this point you can start to slide the door into the pocket. You will have to pick up on the front side so that it does not drag on the floor. Be careful and adjust the angle of the door until it is inside the opening with the front edge four to six inches away from the strike side jamb.
After the back hanger is in place slide the door part way into the pocket. Repeat the process with the front hanger. Line up the front roller assembly with the hanger on the door. Make sure the retention clip is released and attach the front hanger.
Make sure the retention clips are engaged before you start to use the door. Otherwise, it will come off the track again.
Pocket Door Off the Track - Summary
Having your pocket door come off the track can be a little irritating. It is best to have help when you are trying to install or remove a pocket door.
Getting the roller carriages out of the pocket may have been the hardest part of this process. Hopefully, you were able to get your pocket door working properly again.
How To Remove a Pocket Door
Knowing how to remove a pocket door can be a useful skill. You may need to take the door down to paint or you want to replace the hardware for the pocket door. Certain adjustments to the door may also require that you remove it.
If this is not your problem, you want to see the article 'Troubleshooting Pocket Doors' for other pocket door topics.
Pocket doors are installed differently than conventional doors. A regular door has hinges on the side that have pins in them. All you have to do is remove the pins and the the door will come off.
A pocket door is similar, except that it is supported by hangers at the top of the door.
Releasing Pocket Door Hangers
The pocket door hangers are attached to rollers that glide along a track that allows the door to slide back and forth. The jambs on each end of the door keep you from rolling it out the end.
The hangers are designed with a retention clip that holds the door hanging clip onto the bolt for the rollers. Unfortunately, every manufacturer uses a different type of hanger and clip. You will have to determine where the release for the clip is before you try and remove the door.
You may need a screwdriver to push the release lever. Some of the clips require that you hold them open until the door is take off the hanger.
Removing a Pocket Door
Make sure you have some help before you attempt to remove the door. The door is probably not too heavy unless it is a solid core door. Even a hollow core door can be a little awkward to handle. Just having someone to steady it will help a lot.
To remove the door you want to slide it until it is within three or four inches of being closed. Even when the door is closed, part of the door is still inside the pocket, making it seemingly impossible to remove the door.
With the door almost closed have someone hold the edge of the door while you release the clip that is closest to the strike side of the door. Once the clip is released carefully set the door down.
Pick the door up at the edge and slide it as far toward the strike as you can. Then pull the door toward you until the edge of the door is past the jamb. With the door at an angle, you can pull it completely out of the pocket.
Have someone hold the door and release the second clip. Carefully remove the door and lean it against the wall. That is all there is to it.
You put the door back on in reverse order of the way you took it down.
Putting the Pocket Door Back On
Similar to removing the door, it is a bit of a trick to get the door back on. See the article 'Replacing a Pocket Door' for instructions on what to do.
Removing a Pocket Door - Summary
Hopefully you were able to get your pocket door removed without too much difficulty. This job is not too hard, especially if you have handled doors in the past.
Installing a Pocket Door
This article is about how to install a pocket door. It is not common to install a pocket door in an existing home, they require framing in the walls to make them work.
You may not need to replace your pocket door, see the articles 'How To Adjust a Pocket Door', 'Fixing a Pocket Door Off the Track' and 'Troubleshooting Pocket Door Problems'.
Installing a pocket door frame can only be done when you are remodeling or during new construction. The wall needs to be open at the door opening and at the pocket location.
In addition, you cannot have electrical, plumbing or heating lines at this location. If there are any at this location, they will need to be moved or eliminated.
The following is an overview of the steps involved in installing a pocket door frame.
Pocket Door Sizes
A pocket door can be any standard door size. This statement is made with the understanding that the pocket door hardware must allow for the door size used.
There are several complete pocket door kits that allow for all of the door sizes between 2' 0" and 3' 0". The adjustment to the sizes is made by cutting the top head rail and track. Most of the time, pocket doors are used in rooms that people go in and out of. Therefore, it is unlikely that you will have a pocket door that is less than 2' 0".
Some common pocket door sizes are:
- 2' 0" - 24" Single Leaf
- 2' 6" - 30" Single Leaf
- 2' 8" - 32" Single Leaf
- 3' 0" - 36" Single Leaf
- 4' 0" - 48" Double 24" Leaves
- 5' 0" - 60" Double 30" Leaves
- 6' 0" - 72" Double 36" Leaves
Something to keep in mind is that you need the the same amount of room inside of the wall as the door size. Things such as wiring and plumbing cannot be installed in the area where the pocket goes.
Framing a Pocket Door Opening
The first requirement for a pocket door is a rough opening in the wall the will allow for a pocket door. This opening is usually slightly more than twice the width of the door with allowances made for jamb material. When the wall is being built the layout of the wall will need to be coordinated with the instructions in the pocket door kit.
A header needs to be installed that will support the pocket door track. Different kits and pocket door hardware have different height requirements. Consult the instructions for the correct framing height.
Installing the Head Rail
The head rail in a kit is made up of the pocket door track and some support framing. The support framing provides a place to fasten the vertical framing members. The jamb material for the head of the door is also provided.
The head rail assembly will fasten to the frame work on each end via a provided clip. Check the instructions that were provided with the kit for locating the rail. Usually, the head rail is not fastened to the header. This is done so that any sagging in the header will not be transferred to the door framing.
Installing the Pocket Door Framing
Most pocket door kits use four or six vertical framing members. These are usually metal sleeves with wood inserts. The wood inserts allow for the fastening of the drywall.
The framing members are attached to the floor via metal clips. The clips will need to be placed at the correct locations per the instructions. At the top the framing members are screwed to the head rail at the prescribed framing member.
Installing Pocket Door Jambs
After the framing is installed the remaining work is done after the drywall is installed and the painting is done. The jambs would be the next step.
Pocket door jambs are similar to the jambs on a regular door with one key difference. The jambs at the head and pocket side of the door are split. This provides an area for the door to slide back and forth.
The jamb at the head of the door is usually provided with the head rail. this provides a guide for installing the other jamb members. The jambs need to be installed and shimmed to the proper location in relationship to the pocket door.
Pocket Door Trim
After the jambs are installed the trim can be put in place. The only difference between pocket door trim an normal trim is the fasteners. On the head and pocket side of the door the fasteners cannot be longer that the combination of the framing members, drywall and trim. A longer fastener will protrude inside the pocket and damage the door.
Angling the nails can help, but extreme caution should be used. You only have about 1 1/2" to work with to fasten the trim. Gluing can minimize the number of fasteners needed.
Hanging the Pocket Door
There are two hangers or brackets that need to be installed on the top of the door. They are installed with screws and should be centered on the top of the door. The hangers should be located about four inches from each end of the top of the door.
Install the hanger at the back of the door first (the portion of the door that goes into the pocket). Release the retention spring and attach the door to the hanger. After that, align the front hanger with the front roller and attach it to the bolt on the roller.
Installing a Pocket Door Frame - Conclusion
For related topics, see the articles 'How To Adjust a Pocket Door', 'Fixing a Pocket Door Off the Track' and 'Troubleshooting Pocket Door Problems'.
Replacing a locks on a pocket door should not have taken you too long, once you found a replacement. We hope this article helped to get your pocket door lock installed correctly.
Repairing Exterior Doors
Repairing exterior doors is a common need! There is no need to install a new door when things go wrong, instead you can repair you existing door and get it working like new.
Locks, deadbolts, weatherstripping and adjustments are all important features of an exterior door. These items and wear out, break and get out of adjustment. With a few tools and a little know how, you can repair these items.
Not sure if this is your problem? See the article 'Fixing and Repairing Doors' for a complete listing of all of the door topics.
Most home have a front door and other doors that lead to the outside. One key issue with this type of door is security. The door and hardware protect us from unwanted visitors. Keeping the hardware working properly is an important safety feature. Another issue is the weather on the outside of our home. We need our exterior doors to keep us both warm in the winter and cool in the summer. Weatherstripping and thresholds accomplish this task.
Below you will find links to articles that discuss key topics about exterior doors. Try to find the article that best describes your problem. The articles will provide you with useful information and how to knowledge on repairing this type of door.
Repairing Exterior Doors - Finding Help
The introduction to each series of articles has an evaluation section. This section will help you decide if you want to repair your own exterior doors. The "What Can You Save?"and "How Hard Could It Be?" sections give you a quick overview of the repair. This will help you decide if it is using common sense or good judgment to make the repair yourself.
The "Check the Simple Things First" section will clue you in to easy, exterior door fixes to check for. The 'Simple Fixes' usually take five minutes or less. In an effort to warn you about what you are in for, there is the "What Can Go Wrong" section. Use this section to benefit from the experience of others, without the discomfort.
Entry Door Repair
Entrance doors take a lot of abuse, both from the weather and from constant use. Bringing things in and out of the home can damage the door. Heat, cold, snow and rain will all take a toll on the functioning of an exterior door.
There are three common things that will need attention. (1) The door itself will get out of alignment and need adjustment. (2) The hardware will wear out or start to malfunction. (3) The weatherstriping will fail and not keep out the elements. Follow this link for a discussion on these issues.
Rusty Hinges
The door is supported in the frame by hinges. Usually three or four on an exterior door. Hinges can rust and start to bind, making it difficult to close the door. In addition, they will make a lot of noise. What can you do with them? Lubrication or replacement are the two likely choices. Find out what it is that you need.
Screen Door Repair
Screen doors or 'Storm' doors as they are sometimes called are an added level of protection for a home. They can allow air into the house during moderate seasons. They also keep out the elements and protect the main door. These doors are installed and operate differently than traditional doors. This article discusses the problems and solutions.
Exterior Door Hardware
Entrance doors will often have both a door lock and a deadbolt. When they are bought as a set these locks use the same key. Lubrication and alignment are critical with door locks. Can door locks and deadbolts be repaired? Yes they can. At times they will need to be replaced. This series of articles will provide the needed skills.