Search
Repair Topics
Types of Drywall Texture
One could probably write an entire book on all of the different types of drywall texture that one might encounter. We will try to address the common ones.
The names below may vary from area to area and even between those who install the texture. Hopefully the descriptions will help you identify what type you have.
Stipple Textures - This type of texture is done by rolling or spraying on a layer of drywall compound and then 'stippling' it with a brush. The pattern may be round, oval or monolithic.
Knock Down Texture - This is often accomplished by adding a third step to the stippled texture. When the texture is partially dry a plastic or rubber trowel is dragged over the stipple to achieve the 'knock down' look.
Roll Textures - This type is done by applying drywall compound to the wall or ceiling with a paint roller. This type is typically used in closets and garages. It is the easiest of all of them to match.
Trowel Texture - These textures are a carry over from the plastering era. As the name implies they are done with a trowel. Spanish texture, the fan pattern on other similar patterns are done in this manner. Sometimes sand or other aggregates are added to the mud or plaster to give the texture a grainy look.
Acoustic Texture - This type is done with special equipment and looks like small beads sprayed onto the ceiling.
Orange Peel - Or spattered textures are also done with spray equipment.
Textured Ceiling Repair
 Texturing drywall is an art that is shrouded in mystery, the secrets passed on for generations in quiet whispers. Not really, it just sounded good. Repairs can be made on drywall texture. Read on and see if you want to try.
Drywall textures are most commonly used to give ceilings some visual appeal and hide imperfections on a surface that is prone to showing the seams. When done correctly a textured ceiling does not need to be painted initially, thus saving on construction costs.
There are many types of drywall textures. For each type there are numerous variations. The pattern and the thickness of the drywall compound used affect the final appearance. To make it worse, drywall texturing done by two different installers, using the same type and pattern of texture will have a different look.
Texturing is another 'touch' or 'feel' trade that allows for some individuality. Don't worry, often with a little experimenting you can imitate the texture you have.
Texturing Drywall - Information
What Can You Save?
Texturing drywall is usually the last step in the drywall repair process. A drywall finisher will charge between twenty-five and fifty dollars an hour, perhaps more. They may quote you a price of $75 and get it done in fifteen minutes. Depending on how much work is needed you could save anywhere from $25 to $200, doing it yourself.
How Hard Could It Be?
Due to the learning curve we are classifying texturing drywall as a more difficult task.
Check the Simple Things!
Texturing drywall is both simple and difficult at the same time. For a homeowner there is some experimenting to do. For a small area you may be able to dab some compound onto the surface and blend it in with your finger.
What Can Go Wrong?
When you are all done and get the area painted you may find that you can tell that it was patched. Texturing drywall is also messy. Use drop clothes and plastic to protect the area. Try not to track the mud through the house.
Texturing Drywall – The Steps Involved
- Step One -This section provides a description of the various types of texture that are common in most homes.
- Step Two - For Stipple Textures take a look at at this segment.
- Step Three - Knock Down Textures are covered in this step.
- Step Four - Roll Textures are discussed here.
- Step Five - Go to this article for information on Trowel Textures.
- Step Six - In this article we deal with Acoustic Texture.
- Step Seven - Finally there is orange peel or spattered texture.
One other option for a texture repair is to redo the entire area. If the ceiling or wall is small you may want to consider this. For a spot in the middle of the living room ceiling this probably is not practical.
For the best results, experiment on a piece of drywall or other surface. Adjust both the thickness of the mud and the pattern until you feel you have the 'look'. Practicing and experimenting ahead of time will help you to blend the texture in, thus achieving a patch that does not look like a patch. Texturing drywall when you are trying to match something takes a little more patience.
Summary
The 'Introduction' to this series on 'Texturing Drywall' provided you with an idea on what the cost might be to get someone to fix this for you. We also provided some tips on simple ways to fix your problem and information on the problems you could encounter.
'Types of Drywall Texture' is and article on the various types of texture you might encounter. Different parts of the country favor some over others.
Dealing with repairing 'Stipple Texture' was covered in this step.
Another type of stipple texture is the 'Knock Down Texture'. Matching this texture will require one extra step.
'Roll Texture' is the easiest one to repair. We told you how to go about doing it in this step.
'Trowel Textures' require additional skills to duplicate. They are a throw back to the plaster textures of years gone by.
'Acoustic Textures' are a popular spray applied texture that include a particulate in the drywall. It is possible to repair them as described in this segment.
Another popular spray applied texture is 'Orange Peel Texture'. It is also possible to repair this one.
There are a lot of different textures that you may encounter. They are mostly variations on a few different types. With a little patience you should have been able to repair or patch your area. Texturing drywall is not that hard, it is just a different type of skill.
The old proverb 'practice makes perfect', applies to texturing drywall. Trying out your skills on a scrap piece of drywall will go a long way toward getting a good match. The right mud and additives are the other part of the equation. Hopefully you were successful in your endeavor.
Drywall Taping Tools
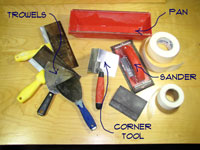 Drywall taping tools include pans, knives and sanding heads. Drywall knives come in a lot of sizes. Unfortunately, you need at least a few of them to be able to do a taping job. A 4”, 6”, 8” and 10” will take care of the majority of the situations you encounter.
For a one time repair, there are plastic knives that will do a passable job. Remember they are plastic and will break easily. A plastic drywall pan is quite useful. They're not that expensive. A bread pan will work in a pinch. Don't buy a sanding pole unless you have a lot of repairs to do.
If you only want to buy one decent knife, make it a 6”. I would venture to say that I do about 65% of my drywall repair work with a six inch knife. Of course I must admit that the other thirty five percent comes up regularly and having multiple knives is important.
You can equip yourself with a basic set of drywall taping tools (shown in the picture), for less than a hundred dollars. They will last for years. You'll be all set for your next taping mudding drywall experience.
How To Tape Drywall Corners
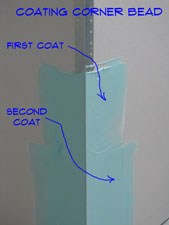 Coating corner bead with drywall compound is another taping and mudding operation. Corner bead is used to reinforce and finish the drywall corners in your home. Corner bead is another item that is built up off the surface of the drywall. Therefore, it needs to be feathered into the surface.
So it is similar to a seam from a coating perspective. The difference is that the nosing of the corner bead provides a defined point for the knife to ride on. Corner bead should be coated with an eight inch and a ten inch knife. Although it is often done with a six and an eight.
Use a six inch knife to apply an even band of mud along each side of the corner bead. Corner bead takes a lot of mud so don't be surprised. With the mud in place, you can pull the an eight inch knife down each side of the corner bead. Keep the knife tight to the drywall and the nosing of the corner bead. This gives you a sloped surface of mud to feather the bead.
Coating corner bead with the second coat is similar, only wider. Apply the mud with an eight inch knife and pull it with a ten inch knife. Do you see a trend here. Use a knife that is wider than the mud you are blending in. The second coat on bead is a lot easier than the first coat. It is a good idea to brush off the lumps with a sanding sponge before trying to install the second coat.
For a skim coat you will want to lightly sand the coated area. Use thinner mud and a wider knife if you have one. It is not as critical at this point to stay on the nose of the bead. The idea is to fill any voids that may be remaining. Additionally you are providing some additional feathering. This is the difference between an average job and a great job.
Taping Inside Corners
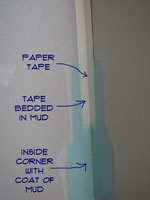
Taping & coating inside corners is the toughest and most time consuming of all the joints. The 'angles' in drywall speak, require that you put about two to three inches of mud on both sides of the corner. Crease the tape and cut it to length. You want it at approximately a ninety degree angle. Push the tape into the corner. Using a three or four inch knife press the tape into the corner, removing the excess mud. Work down one side and then the other.
Coating inside corners presents another challenge. It is almost impossible to coat two sides of an angle at the same time unless you have a specially made trowel. With only one trowel you will have to do one side and let it dry. After that you can do the other side. The light sanding rule applies in this instance too. Put the mud on an angle with a three inch knife and pull it with a four inch wide knife.
Make sure you cover the tape and feather the edges against the wall tight. A three or four inch wide joint is usually sufficient for an inside corner. Lightly sand the corner before applying a second coat. You may be able to keep the knife away from the corner enough to coat both sides at once. If not let one side dry and then do the other one. Apply the mud in a similar way if you have an angle trowel Pull both sides at once with this type of trowel. After the second coat, sand the angle and check for imperfections. Fill them as needed.
As you can see taping and coating inside corners requires the most work. But the effort is well worth it.
Taping Drywall Joints
 Coating drywall seams is the trickiest part of a taping job. Professionals can do it in four steps tape, first coat, second coat and sanding. For an amateur we have to add some steps, although they are not lengthy. It will go something like this: Tape, light sanding, First Coat, light sanding, Second Coat, light sanding, Skim Coat and Sanding.
Until you develop a feel for working with drywall compound you will need the extra steps. Do not try to do too much with each coat. Also remember that drywall mud is mixed with water. When the water evaporates the mud shrinks. Taping mudding drywall is easier when you are patient.
Types of Drywall Seams
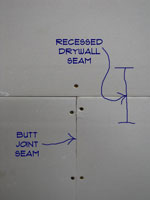
There are two types of drywall seams that are encountered with taping mudding drywall. The easiest to deal with is called a 'flat'. Along the long dimension of the drywall there is a 'recess' rolled into edges of the drywall. This provides a depression for the mud and tape when two recess edges are next to each other. These joints are much easier to finish and are naturally flat when done.
The depression created by the recess allows the mud and tape to finish flush with the face of the drywall. This allows you to get a flat surface when the sanding is done.
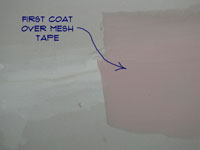
Unfortunately, for repair work you are always faced with a 'butt' joint. For a 'butt' joint the mud and tape go on top of the flat surface and have to be feathered in. Poorly done butt joints will show even after a wall is painted.
 That is why it is important to keep the tape and the build up of compound as tight as possible. Just try to keep it in your mind that a drywall joint is like a mountain range on your wall. The lower the height of the range and the wider and flatter the slopes, the less visible it will be.
How To Coat Drywall Joints
At this point you lightly sand the joint. The idea is to just knock the lumps off so that your successive coats will go smoothly. It only takes a few seconds to brush off a seam or joint. Those few seconds are well worth it. You'll be sorry if you don't listen about this.
For coating drywall seams, I like to use a six or an eight inch knife. One swipe down each side of the crack with a six inch knife is usually good for the first coat. You want to apply a coat of about and eighth of an inch of mud, maybe a little more over the entire patch or joint. The mud should go past the edge of the tape by a couple of inches. You want to take a trimming pass on the edges of the mud. The idea is to flatten or feather the edge so that the mud will not ooze out around the knife when you pull it. With the mud applied pull the knife down each side of the crack with the corner of the knife on the flat portion of the wall staying tight to the surface. Let the other side of the knife ride up off the center of the crack so that a coating of mud stays over the tape.
When you are done, can you see the tape? No, that's good. Yes, you pulled it too tight try again. The idea is to get just enough mud over the tape so that you have a surface to work to for the next coat. You don't want a small mountain but you do want at least a sixteenth of an inch of mud over the tape. Now walk away and let it dry, don't mess with it anymore. Did you hear me? Walk away, you'll only make it worse.
It gets easier from here. Hit the seam or joint again with the sanding sponge to get rid of any ridges or lumps. Select a knife that is two inches wider than the one you did the first coat with. Each coat should go out onto the flat surface slightly farther than the last. Remember the mountain range, your taping mudding drywall range is about and eighth of an inch high. Ideally the slope will be eight to twelve inches wide.
By getting the tape covered with and even coat of mud you have established a high point for your patch or joint. The wall surface is the low point. The idea with this coat is to fill the voids left by the shrinking mud. You do not want to put anymore build up on the patch. Run the knife down each side of the patch keeping it tight as you go.
How does it look? Smooth and even? Good, walk away and let it dry. See some voids, try it again. With the second coat applied you will need to wait for it to dry. The drying time should be less. Don't worry, you're almost done with coating drywall seams.
Brush off the patch with the sanding sponge and use mud that is fairly loose (extra water in it) to skim the patch. Keep the knife tight against the surface. You are only filling in the last of the voids. The seam or joint won't take much mud at this point. It is this final skim coat that will get your taping mudding drywall projects looking as good as a pro's do. Wait for the mud to dry and use the sanding sponge to do a final sand. Check it with your hand to make sure it is smooth. If you feel any lingering imperfections, you can hit them again with some drywall mud. Satisfied?
The added sanding and the extra skim coat will give you a fighting chance at a really professional looking patch. Coating drywall seams is not that satisfying if it looks bad after it is done. Of course once everything is painted the sign of a good taping job is that you don't notice it.
Taping Screws and Nails

Taping screws and nails is a necessary part of a drywall taping job. This is the easiest thing to do when taping mudding drywall. Screws leave a deep depression in the drywall. For this activity, you want to use mud that is a little stiffer. Thin mud will shrink too much when coating.
Always put three coats of mud on them. Fill the screw or nail with mud and drag the knife across it, keeping it tight to the surface of the wall. When done, you will sand the surface flush with the wall. You should not leave a build up of mud around the screw head.
If a screw is too high, get a drill and run it in until the head is below the surface of the wall. Do not try to build up mud around the screw head. This will leave an ugly blotch on your wall. Nails can be knocked in with a hammer or the handle of your drywall knife.
That's all there is to taping drywall screws and nails. Not that hard.