Repair Topics
Garage Door Extension Spring Replacement
 Installing extension springs will be easier if you were able to keep the cable threaded and hanging to the side? Yes, well now you may need to get someone to give you a hand. One person to hold the spring and another to lift and hold the cable assembly. Attach the spring to the hook or clip at the hanger bracket and then lift the spring and the cables up to meet each other.
For related information, see the articles 'Troubleshooting Garage Door Problems' and 'Fixing Garaged Door Openers'.
Carefully put the clevis on the end of the spring and bolt the clevis to the pulley. Do you have to stretch the spring to get them to connect? You may have to move the hook that holds the cable on the bracket back a notch or two. The Spring should be completely relaxed when the door is up all the way. Repeat this process for the other spring.
Installing Extension Springs - The Safety Cable
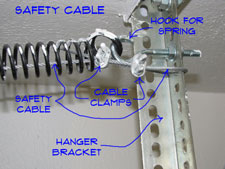
Next you need to install the safety cable. You may have gotten a new set of these with your springs. The safety cable attaches to the bracket at the door head, probably through a hook and cable clamp. There may be a guide hole on the clevis. Thread the cable through the guide hole and then through the spring. The cable then attaches to the hanging bracket at the end of the track. It does not need to be tight just snug so it does not tangle. Repeat this process for the other spring. When you get this far, you're almost done replacing garage door springs.
 With both springs installed you can release the clamps and slowly lower the door. Make sure the pulleys and cables are moving in the right way and do not jump off one or both of the pulleys. Try the door a couple of times. Is it working? Great you are done replacing garage door springs. Is it working but needs adjusting? See the article 'Adjusting Garage Door Springs' for instructions. Did the cables pop off and need to be re-threaded? Then read on, hopefully you took those pictures. Replacing garage door springs is easier with pictures.
Threading the Cable
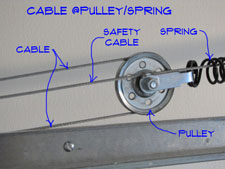 If the cabling pulled off and needs threading follow these steps. It is still a good idea to get help. Someone to hold the spring until everything is threaded. First attach the clevis and the pulley to one end of the spring. Use the bolt you took out and two wrenches to tighten it up. Next you will want to attach the one end of the spring to the hook on the hanging bracket. If you had a hook or a bracket you should have been able to leave it in place.
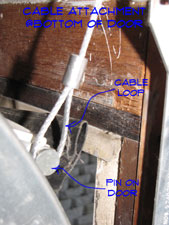
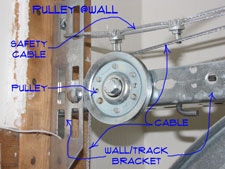
 Have your partner hold the spring in its approximate location. There is a loop on the end of the cable that hooks to the pin on the bottom of the garage door. The cable next goes to the pulley that is attached to the bracket on the wall. The cable threads to the inside of the pulley. Look at the pictures. The new box for the springs should have a generic diagram. Pictures of your installation would be better. The cable now goes around the pulley at the end of the spring, through the clevis. Next it attaches to the hook at the bracket that is attached to the overhead track. The hook location may need to be adjusted. Don't give up your almost done replacing garage door springs.
You may have had to loosen the clamp on the cable at the hook. Tighten the cable back up and set the hook so that the spring is elevated, but not in tension. Install the safety cables (go back four paragraphs, too much repetition). Repeat the process for the other spring. With everything hooked up carefully lower the door and watch that the cables are staying in place. Does the door close? Yes, good job, now you are done replacing garage door springs. Take a look at Adjusting Garage Door Springs, if your door needs adjustment (the link is three paragraphs back). ,if the door is not closing quite right.
Replacing Garage Door Springs
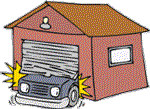 Replacing Garage Door Springs is the only option when the springs break. There are two types of springs on garage doors.
Extension springs are the ones that run alongside the overhead door track and have a pulley and cable attached to them. Torsion springs are mounted over the door and a long round shaft goes through them, with a wheel for the cable on each end. Torsion springs are generally used for larger heavier doors, usually 10' or greater in width.
Without the springs the door is very difficult to lift. If you are here you have determined that you have a broken spring. A broken spring cannot be repaired, it must be replaced. Extension springs could be replaced by a homeowner. Do they just need adjustment? See the article 'Adjusting Garage Door Springs'.
Torsion springs should not be attempted unless you have a good understanding of how they work, feel comfortable doing them and have taken safety precautions. Read on to find out if replacing garage door springs is something you want to tackle.
Replacing Garage Door Springs - Information
What Can You Save?
Replacing the springs is a $150 to $200 job. If you decide to do it yourself you will spend between $30 and $50 for the parts. You could save between $120 and $150 if you do it yourself. An added danger is that the repairman may take the opportunity to try and sell you a new door. They can be quite convincing, when they are done you wonder how you survived this long with you outdated, cheaply made and poorly installed door. I suppose it is true sometimes. A new door could run into the thousands of dollars. Do you really hate your current door? No, well then just fix it yourself or have it repaired.
How Hard Could It Be?
The difficulty level of replacing garage door springs, varies with the type. Extension springs are challenging to replace. Torsion springs are dangerous and should only be attempted by those that have a good knowledge of how they work.
For and explanation of the terms in this section, see 'How to Use This Site'.
Check the Simple Things!
I wish there was something simple. Either the spring is broken or it is not. If it is broken you have to replace it.
What Can Go Wrong?
With a broken spring your door won't work. You're already in kind of a pickle. The cables for a garage door extension spring can get a little tricky. You may struggle to get them hooked up. Worst case you may not finish the job in an evening. Take a breath and walk away if you get frustrated.
Garage Door Springs - Safety Concerns
 DIY Garage Door Spring Replacement requires above average mechanical skills. There are cables, rollers and tracks to deal with. The springs need to be unhooked from the door prior to replacement. This means the entire weight of the door will have to be dealt with. Safety concerns are very real.
The other issue is getting the right springs. You will need several pieces of information before ordering new springs. Getting the weight of the door might be difficult and could involve actually weighing the garage door, see 'Purchasing Garage Door Springs'.
A reputable firm will take care of your garage door spring replacement project for a few hundred dollars. You will not be able to save that entire amount, even if you do the work yourself. You will still have to buy the springs.
WARNING!! Garage Doors can be VERY HEAVY! Take Safety Precautions and get help before you attempt to lower a door that is not hooked to the springs!!!
This is where I tell you to think about hiring this job out. The door is dangerous, the cables can be tricky and the job could take you several hours. You should be able to find someone to replace them for about $150 to $250. Don't think it is worth it? Read the next couple of paragraphs for some tips on calling a serviceman.
Hiring a Repairman to Fix Garage Door Springs
 Before you think about 'Hiring a Garage Door Repairman', write down the size and type of door that you have. Verify by examining them that the springs are broken. Springs either work or they don't, there is not much in between. Ask for a quote over the phone for a cost on replacing both extension springs. Make sure you specify both. Sometimes they will try to quote you for one spring and want to charge you double when they show up.
It is always best to replace both springs. Garage door springs are rated for a certain number of cycles. When one breaks the other one won't be far behind.
Call at least three places and try to make sure they are actually different places. Get quotes from all three. Try to get quotes over the phone, even if they are a range of costs. You want to avoid the 'hard sell' of a salesman. Remember, a door that worked before the spring broke does not need to be replaced.
Make up your mind that you are not buying a new door. Get the best price you can for replacing garage door springs. Make up your mind not to be up sold when they come out. I say this as a warning, there are many honest and reputable firms out there. Unfortunately, it is sometimes difficult to tell the difference over the phone. Do your friends know anyone? Just an idea.
Hiring a garage door repairman is a good choice if you don't want to tackle a big job like fixing a garage door. Just make sure you only pay for what you need.
Purchasing Garage Door Springs
The following instructions are for 'Purchasing Garage Door Springs' that are the overhead type for smaller doors. These are commonly called 'Extension Springs'. See the article 'Garage Door Torsion Springs' for information on torsion springs. Extension springs are the ones that run alongside and above the tracks. Generally, extension springs are used for smaller doors, 8' or 9' in size.
You are going to need three pieces of information before you purchase your new springs. (1) The size of the ga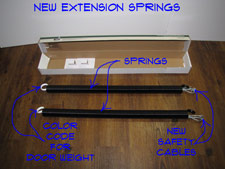 rage door, 'Width' x 'Height'. (2) The weight of the door. (3) The length of the old springs.
Use a tape measure to get the width and height of your door. It should be a nominal size such as, 8' 0" Wide X 7' 0" High. The length of the spring needs to be taken when the door is up or the spring is relaxed. Measuring the sum of the two pieces of broken spring will also work.
Getting the weight may be more of a challenge. Many doors will not have the weight on it. You might be able to find the weight on the ID Tag for the door. Another option would be to look the weight of the door up online. To do this you will need to know the manufacturer, model number and style of the door. Use this information to search the Internet for the correct weight.
Purchasing Garage Door Springs - Getting the Door Weight
For doors without an ID Tag, you will need to weigh the door. You can use a common analog bathroom scale for this exercise. You will need one or two short 2" x 4" pieces of lumber to place on the scale.
When one spring is broken, place the scale under the corner of the door on the side with the broken spring. This will give you one half of the door weight. Multiply by two to get the correct weight. If both spring are broken you can place the scale in the center of the door. You may need some help lifting the door. The springs do most of the real work in lifting a garage door. Without them, the doors are heavy.
With the above information in hand, you can get your replacement springs. You can get garage door extension springs from most home supply stores. They come in sets and don't even consider replacing one of them. When one breaks the other is not far behind. Get springs that are the closest to your garage door weight. You can also get them over the Internet. This takes a little longer, but may save you a few dollars. Purchasing garage door springs is not that difficult once you know the weight of your door.
Removing Broken Springs
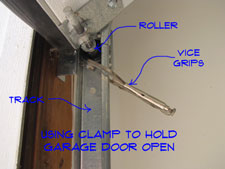 To start 'Removing Broken Garage Door Springs', raise the door as far up as you can and install vice grips or C clamps in the track. You don't want the door coming down while you are working on it. Try tugging on the door to make sure the clamps are tight. With door in the up position the tension in the spring is relaxed and it is safe to work on.
Before you start take a good look at how the cables are threaded and connected. In fact, do you have a digital camera? Take some pictures, you may thank yourself later. Replacing garage door springs is easier if you can look at how they were.
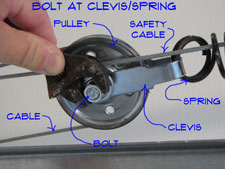 Next you will have to remove the safety cable. This cable is there so that the spring will not hurt anyone when it breaks. Remove the cable at the metal hanger near the end of the door track. There should be some type of eye bolt. The cable should have a clamp on it that can be loosened to give some slack in the cable. Pull the cable out of the spring and let it hang neatly off to the side until you are ready to re-install it. Remove the half of the spring that is connected to the eye bolt at the hanger.
The other half of the spring is connected to the pulley via a metal clevis. You will have to use wrenches to unbolt the clevis from the pulley. Hold the pulley in place and put some tape around it to secure it to the cable. Lower the cable down and let it hang in a safe place. By now you should have a new set of springs to install. Replacing garage door springs is pretty hard if you don't get the new ones.
Summary
In this series of articles we discussed all of the issues and steps that would be involved garage door spring replacement. This 'Summary' will give you a quick review of what was discussed. In addition, links are provided take you back to articles that you want review again or that you missed.
Hopefully you have been successful in getting your problem taken care of. Either you hired someone to take care of it or you replaced your extension springs yourself.
Water Damaged Ceiling Texture
Fixing water damaged ceiling texture is another common requirement. When the texture loosens from moisture you will need to replace it. Make sure that the underlying drywall is still in good condition. Prepare for a little mess.
Get a drop cloth and a garbage bag. With a scraper remove the loose texture. Texture that is tight should not scrape off easily.
One exception to that. Acoustic texture, the kind with the little balls will come of easily with a scraper even if it is not damaged. Once you have the bad material removed you can think about repairing the texture.
For a discussion on drywall texture repair, go to the article 'How to Texture Drywall'. This article will direct you in how to identify and repair various textures you may have in your home.
Replacing Water Damaged Drywall
In some cases, replacing water damaged drywall is the only option. You have examined the damaged area and it is clear that you need more than paint. It is best to remove the compromised drywall and replace it with new drywall.
See the article 'Water Stains on Drywall' for information on sealing a stain without removing the drywall.
Examining the Damaged Drywall
You need to determine how much drywall needs to be removed. Too much water will deteriorate the paper facing and weake the core of drywall. When this happens, the old drywall needs to be removed and new drywall installed.
Is the drywall mushy and the paper easily torn? Is the paper separating from the surface of the gypsum? Has it sagged and pulled away from the framing members? Are the fasteners rusty and popped through the paper? Is there mold on the drywall?
A yes answer to one or more of the questions in the previous paragraph will mean that the drywall needs to be replaced.
If the water stain appears to be only on the surface of the drywall and it has dried completely, you may be able to seal it and re-paint.
Fixing the Leak
There is no point in repairing the drywall if you have not stopped the leak that is damaging the drywall. Water intrusion that ruins drywall can come from a number of sources. A leaking roof is certainly a candidate. Plumbing leaks are also common culprits.
See the articles 'Troubleshooting Plumbing Problems' and 'Fixing Leaking Pipes' for information and instructions on what to do to get rid of the water issue.
Removing the Bad Drywall
Drywall is fastened to the wood framing with either screws or nails and sometimes glue. To remove it, you need to locate the framing members. If you don't you will have to add additional supports to fasten the drywall to.
Locating Framing Members
Once you have determined how much drywall needs to be removed, you want to lay this out on the wall surface. The make the installation of the new drywall simpler, you want to use a straight edge to mark out the area to be cut out. Ideally, it will be a square or a rectangle. You can use a stud finder to locate the stud framing.
Try to lay out the cut out area so that the edges that are paralell to the stud framing are centered on thed studs. It is harder to cut out the drywall at these locations, but is saves having to install extra framing members.
Cutting Perpendicular to the Studs
You can use a key hold saw to cut out the drywall that is perpendicular to the stud framing. You will have to stop at each stud or joist and skip over it. You should be able to get the majority of the cut done with the keyhold saw. You will need to finish off the cut over the framing with a utility knife.
Cutting Drywall Paralell With the Framing
You will need to use a utility knife to cut the drywall over the framing members. Ideally, you have located the center of the framing and drawn a line down the center. Initially, you will score this line with a utility knife. After you have scored the paper, you will run the utility knife over the cut repeatedly, applying more pressure each time until you cut completely through the drywall.
Replacing the Damaged Drywall
Installing new drywall involves cutting the sheets to the correct size and then fastening it in place. There are various measurements that need to be taken and laid out on the drywall panel. After that, the drywall needs to be cut correctly. Once the sheet is cut, it can be installed at the patch.
The article 'How To Cut Drywall' has instructions on all of the steps associated with installing new drywall patches.
Finishing the New Drywall Patch
After you have installed the new drywall where you tore out the old damaged drywall, you will need to tape and finish it. This situation is similar to any other drywall repair project, you have at most five steps to complete the finishing. (1) Applying the drywall tape. (2) Installing a first coat of drywall compound. (3) After a light sanding, you will apply a second coat of compound. (4) After another light sanding, you will want to skim the drywall with a light coat of mud to smooth out the surface. (5) The last step is to sand the drywall to prepare it for a coat of paint.
For a complete discussion on the steps involved with a drywall finishing project, see the article, 'Taping and Mudding Drywall'
Water Stains on Drywall
 Water stains on drywall when they are on a wall or ceiling can be pretty unsightly. Finding a plant to put in front of it may work for awhile. Not much you can do to mask a water stain on your ceiling.
Not sure if this is your problem? See the articles 'How To Fix Drywall' and 'Patching and Repairing Drywall' for more information and a complete listing of all the drywall topics.
As long as the drywall is still in good shape and the water leak has been stopped you can just repaint the area. You need to seal the stain with a good quality stain blocker such as Kilz or Zinsser. Once the stain blocker has dried you can paint the area with normal paint.
See how easy it is to repair water damaged drywall when it is just a water stain. Painting can take care of the problem. Just use the right paint. Time to move on to your next project. Can't find your to do list, well how about taking it easy in front of the television.
Stains are a common problem in any home. This website only touches on them occasionally. Do you have other stains you need to deal with? We found a great website that has a lot of good information on stains. Follow this link Stain Guide, for some helpful tips.


