Search
Repair Topics
Water Damaged Drywall
 Something has leaked and now you need to repair water damaged drywall. What went wrong? Did the toilet overflow? Is your roof leaking? Before you worry about the drywall, you need to figure out what happened and fix that problem.
Not sure if this is your problem? See the articles 'How To Patch Drywall' and 'Drywall Repair' for a listing of related topics along with solutions for problems.
Locating Leaks
Work backwards from the leak. What is above it? Remember that water runs down hill, so the damaged drywall is below the problem. Do you have a bathroom above the spot. You have a lot of water that runs through a bathroom. Is something clogged? Is something leaking?
Once you have dealt with the leak you can attend to your drywall problem. To repair water damaged drywall may not be that hard. Sometimes it is just a stain. Don't make the mistake of thinking that a coat of paint will solve it. Actually, paint may solve the problem, but it needs to be the right kind of paint. Drywall that has been exposed to repeated or severe water intrusion will most likely need to be replaced. Are you a strong person? You can deal with this. It's only drywall, how hard could it be?
Water Damaged Drywall - Information
What Can You Save?
A contractor will charge you for the amount of work involved to repair water damaged drywall. Best case you could have someone fix it in a single visit, around $50 to $75. Multiple visits will cost more spending $200 to $300 would not be unheard of. Could be more, drywall is considered a labor intensive trade.
How Hard Could It Be?
To repair water damaged drywall may require replacing drywall and taping. Both of these activities require some work. Hopefully, you will only have to paint with the right kind of paint.
Check the Simple Things!
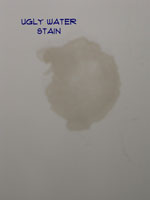
Where the drywall is still solid and dry. It is possible that you just need to repaint the stain with a good quality stain blocking paint. Don't use regular paint, water stains will bleed through.
What Can Go Wrong?
To repair water damaged drywall you may run into mold. Take precautions before you attempt to remove moldy drywall. Check out this government website before you mess with mold. A Brief Guide to Mold, Moisture, and Your Home, it will give you some insight and safety tips. Another good article is Mold, on the CDC website. Drywall patches that are poorly done can look just as bad as the problem you started with. Drywall is also messy, the white dust and drywall compound has an amazing ability to get everywhere. Use drop cloths and plastic to contain the damage path.
Repair Water Damaged Drywall – The Steps Involved
Drywall is a layer of gypsum sandwiched between two sheets of paper. Too much water can cause the core of the drywall to break down and the paper to separate from the core. Remember that there is no point in fixing the drywall until you have repaired the water leak.
Fixing 'Water Stains on Drywall' explains what to do when a leak stains the dryall. You will learn whether or not it is possible to paint over the spot.
When the paper and core of the drywall become compromised, you are left with no other choice besides replacement. The article 'Replacing Water Damaged Drywall' gives you pointers and led you to the right information.
When the water damage occurs on a ceiling you may have texture involved. Fixing 'Water Damaged Ceiling Texture' is covered in this article.
Summary
Remember the steps? Follow them in order. Fix the leak first and then repair the water damaged drywall. You could have a fairly simple problem or you could have a bigger job to do. This depends on the severity of the water damage and how quickly it was fixed. We hope this project was not too difficult and that is was successful. Move on to other projects, or just get some rest.
How To Plane a Door
 Most interior doors are made of wood or composite material. Planing wooden doors is one option for fixing a door that sticks. For minor adjustments you can sand the edge of the door.
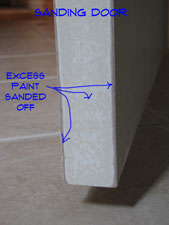
You can usually tell from the scuff marks on the edge of the door where it is sticking at. Try sanding the spots until the door closes without too much friction. If you sand through to bare wood you will need to touch up the paint or varnish. It may take a little elbow grease to sand off enough material to matter.
For related information see, 'Troubleshooting Door Problems', 'How To Adjust Interior Doors' and 'Adjusting Exterior Doors'.
I do not recommend trying to plane the door unless you have some experience working with wood planes and doors. One reason is that unless the door is solid wood, it is probably made of a composite material. Masonite, plastic and mdf do not plane well at all. The other reason is that prehung doors should not need to be planed, the doors are correctly sized for the openings. It is more likely that it is sagging and needs to be adjusted.
If after adjusting and sanding, the door still sticks you can try running a couple of square drive trim screws (2 1/4” Screws should be long enough) through the jamb and into the framing. Do this at the location where the door is sticking. You may be able to draw the jamb in enough to relieve the pressure. Hopefully you have been able to get the door working freely for this repair on a prehung interior door.
Planing a door along with sanding may be needed if the door swells and will not close. However, this should be done cautiously, since taking too much off the edge of the door can leave gaps when the humidity is lower.
You can usually tell from the scuff marks on the edge of the door where it is sticking at. Try sanding the spots until the door closes without too much friction. If you sand through to bare wood you will need to touch up the paint or varnish. It may take a little elbow grease to sand off enough material to matter.
Do not try planing the door unless you have some experience working with wood planes and doors. It is easy to damage the door by taking off too much material. Make sure the door is not out of adjustment first. See the article 'Adjusting Exterior Doors' for more information.
If after adjusting and sanding, the door still sticks you can try running a couple of square drive trim screws (2 1/4” Screws should be long enough) through the jamb and into the framing. Do this at the location where the door is sticking. You may be able to draw the jamb in enough to relieve the pressure.
How To Fix a Door Knob
 A strike plate that is mis-aligned can cause the door not to lock or close properly. Adjusting it can help.
Not your problem? See 'Door Repair' for a complete listing of door topics. Door locks are discussed in depth in the article 'Door Lock Repair'. Use this link to get to that series of articles.
Fixing door locks and strikes are the main hardware issues for an interior door. Door locks need to align properly with the strike plates on the frame. Even a minor deviation can cause the door not to work.
The strike plates on the lock set can cause the door to bind. There are three ways that the strike plate can cause problems. (1) A door that is sagging will not allow the lock to properly align with the strike plate. When this is your problem you need to adjust the door. See the article 'Adjusting Interior Doors', for more information.
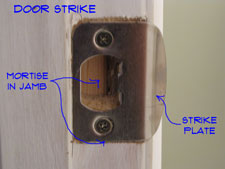
(2) The strike plate needs to be the proper distance from the door stop. A strike plate that is not close enough to the stop will leave the door loose in the opening. On the other hand, when the strike plate is too close the lock won't catch and the door won't stay closed. (3) The third problem is when the strike plate is binding against the door itself. This happens when the plate is not recessed into the frame.
Based on the above information, determine whether your door is too loose or if the latch isn't catching. When you have determined which way the strike plate needs to go you can move it. Measure the distance from the face of the door to the flat portion of the door lock tongue. See if the distance is different between the door stop and the flat section of the strike plate.
You can remove the strike plate and use a chisel to remove some wood from the mortise. The plate should be flush with the jamb and not protrude out. Strike plates should not be fastened on top of the jamb. They should be recessed in. Use a pencil to draw an outline around the strike plate. Remove it and use a chisel to cut out the wood to recess it.
Adjusting Interior Doors
 Adjusting interior doors is something that need to be done periodically. The weight of the door pulls on the hinges and causes them to get out of alignment over time. Fortunately, adjusting the door is not too hard and only requires a few tools.
Not sure if this is your problem? See the article, 'Troubleshooting Door Problems' for a complete listing of all the door topics.
Inspecting a Door
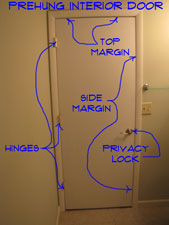
The first thing to do is look at the door from the inside when it is closed. There should be an even gap across the top and down the latch side. This gap occurs between the door and the frame or jamb. It should be about an eighth of an inch and be consistent.
If the door is tight against the frame at the top and there is a gap at the bottom, the door is sagging. If the door is hitting the floor, it will still be indicated in the margin along the latch side. Is the gap wider at the bottom and narrower at the top? Yes, then the door is sagging.
Tightening a Top Hinge
Open the door back up and remove the two inner screws for the top hinge. How long are they? An inch or less? This means that the hinge is only being supported by the door jamb itself, not the framing lumber for the wall. Are the screws long, say 2 ½ to 3 inches. That's good, all you will need to do is tighten them up. This prehung interior door repair could be that easy.
More is not better in this situation. If you over tighten, the door will bind in another direction, meaning you will continue to need a prehung interior door repair. Tighten until the margins are even and the door closes easily and then stop. With the long screws in place you may have to snug them a little from time to time. Five minutes now that you know how. Door closes, Great! Go to the next project on your list.
If you have long screws, make sure the heads are not stripped. For short screws you need to obtain some 3” number 8 screws. Square or Torx drive are better, but phillips head will work. Install the long screws, angling them slightly toward the center of the jamb. Snug them up and then check the margins again. Still sagging? Tighten them a quarter turn at a time until the margins are even and the door closes properly.
Summary
The top hinge is the key to most door problems. Getting the door adjusted properly will solve many of the issues that you have.
Interior Door Problems
Is the door hard to close or open. Try to determine where the friction is occurring. There are two spots that take the prize most of the time: (1) The upper corner on the latch side of the door (the side with the door knob). (2) The bottom of the door, again on the latch side. Both of these conditions indicate that the door is sagging. Over time the weight of the door pulls on the top hinge and loosens it up. See Step Two below for instructions on tightening the top hinge and checking the door for alignment. This is a very common prehung interior door repair problem.
Is the door hard to move even when it is not going into the frame? Are the hinges squeaking or making noise? The hinges may be binding up. See Step Three for instructions on lubricating or replacing hinges.
Do you think the door is swelling? This is only going to be true if it is an all wood door and it is not sealed very well. Check the margins first before you start sanding or planing a door. See Step Five for instructions on sanding or planing a wood door.