Search
Repair Topics
Sink Drain Plumbing Parts
 There are a lot of ways that sink drain plumbing parts can fit together. Different sinks and configurations will require different parts.
Not your problem? See 'Home Plumbing Repair' for a complete listing of all plumbing topics or 'Fixing Plumbing Drains' for a listing of drain related articles.
If you have the dreaded clogged sink see 'How To Unclog a Drain'.
It is impossible to cover every possible situation. Instead we will try to discuss the various parts, their purpose and how they fit together.
There are many variations of sink drain parts. We will try to address the common ones.
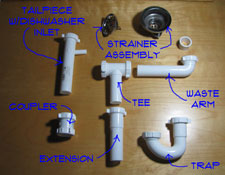
P Trap - This is a two piece fitting that makes the trap. Water stays in the bottom of the trap to keep sewer gases from getting into the house.
S Trap - Similar to the P Trap the S Trap is used when the drain is in the floor instead of the wall.
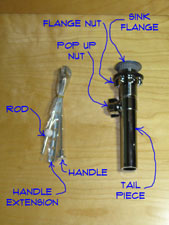
Tailpiece - This is the piece that is connected to the strainer on a kitchen sink. For a bathroom sink the tailpiece and pop up assembly are all one piece.
Tee - Tees are used for double sinks, usually in the kitchen.
Waste Arm - The waste arm connects the tailpiece to the tee on a kitchen sink. You will usually have two of them.
Elbow - Used sometimes on odd configurations. Most of the time this piece is not necessary.
 Extension Tube - Used to extend the tailpiece or other pieces that are too short.
Coupler - Used to connect two pieces of drain pipe together. Usually not needed but useful if you cut something too short.
Sink Strainer - The hole in the bottom of a kitchen sink is filled with a sink strainer. This piece seals the opening and directs the water into the drain pipes.
Pop Up Assembly - This assembly is used for a bathroom sink.
Before you disturb anything you want to take a picture of your configuration or make a sketch. Take some measurements, since many of the items come in multiple sizes. When you go to purchase parts you will want to take your picture or sketch. Try to identify each of the parts you have so that you can get the right ones.
Plastic fittings are definitely easier to work with. However, you do not want to mix them. For homes with chrome or brass fittings you want to use metal replacement parts. Unless you are replacing everything and then you can switch to plastic. Already have plastic? Great, no problem at all.
Sink Drain Plumbing
 In recent decades, sink drain plumbing is done with plastic pipe and fittings. This has mostly replace the old chrome plated brass pipe that was popular for a long time. Chrome plated brass is still available, but it costs more and is harder to install.
For related information see the articles 'Troubleshooting Drain Problems' and 'Repairing a Clogged Kitchen Sink'.
The drains take away the excess water when you run the sink. A lot of times the water is dirty and the drain takes it to the sewer. The sink drain also provides drainage for the dishwasher and garbage disposal. Any time you have water involved you can have leaks. When you have drains, you have a potential for clogs.
Years ago all sink drains were made of brass sometimes with a chrome coating. The metal pipes will corrode over time and need to be replaced. You can still buy the brass fittings, but they cost more than the plastic ones do.
Read on and find out if this is the kind of repair that you want to tackle. The evaluations will help you determine if it is worth your time. After you consider the information decide if you want to repair your sink drain plumbing.
Repairing Sink Drain Plumbing - Information
What Can You Save?
An experienced plumber can replace some or all the parts on your sink drain plumbing in a half an hour. It may take you a little longer. Allow $50 to $75 for the service call and $25 to $75 for parts. The higher figure would be for the chrome fittings.
How Hard Could It Be?
Working on sink drain plumbing is not that hard and requires a minimum of tools.
Check the Simple Things!
Leaks can often be taken care of by tightening one of the nuts. Try to determine which fitting is leaking and tighten it, gently, but firmly. See below for more info.
What Can Go Wrong?
Sink drains can be a little messy. The trap will have some dirty water in it. For a clogged sink you will have more dirty water. Take precautions for dealing with the water. Not having the right parts can also be a problem. Finding parts late at night may not be easy. Try to anticipate what you will need ahead of time a few extra nuts and washers is a good idea.
Troubleshooting Sink Drain Plumbing Problems
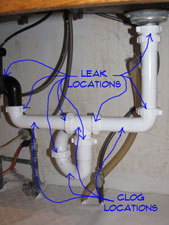
Troubleshooting sink drain problems is a process of elimination, several things can be wrong. The first would be leaks. A lot of time tightening the fittings is all that is needed.
For old chrome or brass pipes they may have corroded and started leaking. In that case you will have to replace them.
Tightening up the fittings can eliminate most leaks. It is easy, just use a pair of adjustable pliers. Hold the fitting with one hand and use the pliers on the nut. Don't over tighten. You want them snug not stripped.
Another reason would be a clogged sink. Getting rid of a clog might involve taking some of the drain pipes apart. Many times you will find the clog in the drains. Other times the line will need to be snaked to fix it. You will need to remove one or more fittings to get access to the drain line.
Modifications and home improvements can also cause you to disturb the sink drain plumbing. A new disposal or a new sink would be a great addition to the kitchen. You will probably need to make adjustments when you replace or revise the fixtures.
Knowing the names of the parts and what they look like is helpful. The article 'Sink Drain Parts', provided you with some pictures and a brief description of the various components you may need to use.
Most of the time, drain pipes will need to cut to fit. There are a few tricks and the article 'Cutting Sink Drain Pipes', showed you what they are.
Finally, the article 'Assembling Sink Drain Pipes' discussed putting the plumbing pipes together. Tightening them correctly is important so that you do not get leaks.
Summary
You have found out by now that sink drain plumbing is not that difficult. The hardest part is getting the right parts. If you take your time and cut everything the right length things will go smoothly. Sink drain plumbing can be rewarding.
Perhaps not as rewarding as painting or sculpting, but close. Well maybe not close, I've heard of painters that get really get into their work, maybe close. Now that you are done with this project you can decide what you want to do next on your list.
Fixing a Screen Door Hinge
 Can you fix a screen door hinge? Most of the time the answer would be yes.
Not sure if you are in the right place? See 'Troubleshooting Door Problems' for more information.
The first thing to do would be to define what you mean by a 'screen door'. A screen door used to consist of a wooden frame with screening in the middle. This was to keep the bugs out when you opened the regular door on a hot summer day. Screen doors have evolved and become more complex
Now a screen door may include glass or plexiglas and be an all weather door. Via a sliding mechanism you still may be able to have a screen when you want it, but not always. Screen doors or 'Storm Doors' as they are called are also decorative. They add both beauty and protection to a home.
You can still get a plain old screen door with a wooden frame. Yes they still keep the bugs out on hot summer days. They don't come in decorator colors and they don't have glass to keep the wind out. The hinges for the simple wooden ones are easy to replace. The same is not true for many storm doors.
Fixing a Screen Door Hings - The Issues
What Can You Save? - Replacing hinges on a screen door is not too hard, provided that you can find the right size. Allow around $75 for someone to come out and do this. This is a good opportunity for you to be sold on a new storm door. When this happens, you could be looking at $250 of $400.
How Hard Could It Be? - Changing screen door hinges when you have ones that match is fairly easy. These repairs will have a Difficulty Level of: Simple. These repairs require a Skill Level of: Handyman. For and explanation of the terms in this section, see 'How to Use This Site'.
Check the Simple Things! - Try lubricating the hinges if they are just sticking or squeaking. A little oil can work wonders sometimes. See the article 'Fixing Squeaky Door Hinges', for more information.
What Can Go Wrong? - Don't take the door off unless you are sure you can find replacements for the hinges. Best thing to do is take off one hinge and try to find a set that matches. There is an aluminum rail that is mounted on the door frame. When this loosens up, it may seem like the hinges that are causing you trouble.
Lubricating Screen Door Hinges
 Lubricating screen door hinges can be quick and easy. Follow the instructions below.
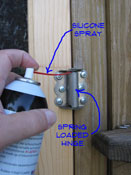
The first thing you need to get, to lubricate a screen door hinge, is some silicone spray. You can get a can for less than five dollars at a home supply store. You want to get the kind of can that has the red tube taped to the side. Another important tool will be a rag.
Keep the rag handy during this operation. Quickly wipe up any excess oil, to avoid damage or stains to other surfaces. After you apply the lubricant, you want to repeat the process with the other hinges. Remember, take pins out one at time. You don't want the door to fall down. After you have lubricated all the hinges, open and close the door several times. The door should start to free up and quiet down.
For stubborn or long neglected doors you may need to repeat the process. Carefully apply additional oil until the door works smoothly and quietly.
Purchasing Screen Door Hinges
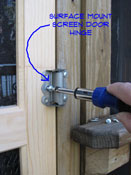
The old fashioned wooden screen doors will have spring loaded hinges. These hinges are normally surface mounted. For this style, size is not a critical issue.
It is still a good idea to take an old hinge with you when you go shopping. Color and hole alignment may matter. Replacing the hinges with the same size and style is the easiest.
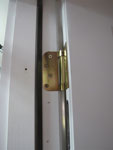
Hinges for storm doors may be a little more of a challenge. They are usually fitted to the frame. The size will matter when you try to replace them. Again, the best course of action would be to take an old hinge with you to the hardware store. Remove the middle hinge for this step. The door will still be supported by the top and bottom hinge.
Storm door hinges will be made of either steel or aluminum. Hopefully, your home supply or hardware store will have a selection and you can match them up. The next step, would be to look online.
Before you do this you want to measure the hinge. Screen door hinges are measured by the height and the width across both faces of the hinge. You take this measurement when the hinge is lying flat. See the article 'Door Hinge Sizes' for more information on measuring hinges.
Replacing Screen Door Hinges
 Replacing screen door hinges will only take a few minutes per hinge, as long as you have the right ones.
A screwdriver or a battery drill is all you need to replace most hinges. A traditional 'screen door' will have surface mounted hinges that will not require mortising.
Remove one hinge at a time and replace it with the new one. Most screen doors will have three hinges. You always want at least two hinges in place at any given time. If you only have two hinges or you have to take off more than one at a time, you will need to take the door off.
Make sure all the screws are snug before you move onto the next hinge. Repeat this process for all three hinges.
After you have replaced all the hinges, you want to try the door. Make sure it is closing properly. That's about all there is to it. When the door won't close, check to make sure you have everything tight. A screw head that is sticking up will bind the hinge and make the door not operate correctly.
Summary
How did things go with your screen door hinges? Were you able to lubricate them get them working again. That is good news. Oiling hinges is not that hard at all. Or were the hinges in too bad of shape? Then you probably needed to replace them. The trick to replacing them is finding the right size replacement hinges. After you found the hinges, replacing them only should have taken a few minutes.
Hopefully, you are all done with your screen door hinges. Now you can think about other projects that you have around the house. Check out all of the home repair articles for more help.
Fixing a Rusty Hinge
 What can you do with a rusty hinge? This is a real problem for door hinges. Your door may not open or open with difficulty. The door will be noisy when it operates.
Rust is usually found on hinges that are old and perhaps of poor quality material. What are the options? Is it something you can take care of? Salvaging the hinge is possible, replacing it is another option. Both of options are within reach, for a homeowner.
Not sure if this is your problem? See the article 'How To Fix a Door' for a complete listing of all the door topics.
Hinges in days gone by were made of iron and low grade steel. Rust was a common problem. Oil or grease would be the common solution for battling the rust. The hinges would still disintegrate over time and eventually quit working. Since then better methods and better materials have changed hinges. Quality door hinges are made of brass or metal alloys that don't rust. Poor quality hinges may only have a protective coating on them the breaks down over time, then rust can appear.
This leaves you with two basic options. You can try to lubricate a rusty hinge and get it working again. This does not help much with the appearance. The other option would be to replace the hinge with a new one. This will help the door to work smoothly and the door will look nicer.
Fixing a Rusty Hinge - Information
What Can You Save?
There is a range of cost here for a normal door. Lubricating and freeing up the hinges or replacing them with a set that is the same size could run from $50 to $100. Taking an older door down and modifying it for a new set of hinges could run from $100 to $200.
How Hard Could It Be?
Fixing rusty hinges could involve some work if the door is old and the hinge style is no longer available. Lubricating hinges to get the working is not hard.
Check the Simple Things!
Lubrication is the quick solution for a rusted hinge. You may need to start with penetrating oil and then move up to silicone spray or white lithium grease.
What Can Go Wrong?
Old hinges may be of a style and size that is no longer available or only available from specialty hardware sources. Fitting newer hinges onto an old door can involve some work. Lubricating a stiff rusty hinge can involve a lot of oil. Oil makes a mess, so make sure you have rags handy to clean up the excess.
Troubleshooting a Rusty Hinge
 Troubleshooting rusty door hinges is the first step you should take in deciding what to do with a tight squeaking door. First determine if the hinge is still serviceable.
When you have a rusted hinge, you first need to determine how badly the metal is damaged. Surface rust will make the hinge look bad, but it should still work. Deep rust may have deteriorated the metal to the point where it is ready to break. It may be broken already. You don't want the hinge to break and the door fall off and hurt someone.
Visually inspect the hinge and try to determine the level of rust. Does the door work, can you open it? Do the hinges appear to be functional? Do large flakes of rust fall off when you move the door? These are some question you might consider when checking the hinges.
For surface rust you are safe to lubricate the hinge and start using the door. Lubrication will not fix the appearance issues. Some soap and a scrub brush or steel wool could help with the appearance. See the article 'Lubricating Rusty Hinges' for more information. Replacing the hinges is still a consideration if they look too bad.
WARNING!! Get Help When You Remove a Door, They Are HEAVY!!! WARNING!!!
Lubricating Rusty Hinges
See 'How To Lubricate a Door Hinge'
Cleaning Up Door Hinges
Cleaning up door hinges is the last step in fixing your squeaky hinges. The oil can continue to ooze out for a while, so cleaning up is a must.
Keeping a rag handy while you are oiling the door hinges will save the amount of cleaning up the door hinges you have to do. Careful use of the oil or grease is also important. Putting too much on the pin will cause it to ooze out and run down the door.
After you have move the door back and forth several times, you can check for any excess lubricant. Use the rag to wipe any residue off. It is a good idea to do a couple of checks over the next few days. Wipe off any excess lubricant the works out of the cracks in the hinge. Once the mess is cleaned up, you are done with this squeaky door hinge project.
Summary
How did it go with your rusty hinge? Were you able lubricate them and clean them up. That is good news. Were they too far gone or did they look too bad for this procedure? Did you decide to replace them? Hopefully, you found hinges to match and the replacement was not difficult.
Worst case you had to fit new hinges to an old door. This can be done, although it involves using a chisel and some lay out. Now that your rusty hinge issues are behind you, what are you going to do? You probably have other home repair projects on your list. Keep at it, there is an afternoon off somewhere on the horizon.
Garage Door Torsion Spring Replacement
 Most homeowners should not attempt to adjust or replace 'Garage Door Torsion Springs'. The problem is that they have to be worked on when the door is down and the springs are under tension. When you release the set screw you have to have a rod in place and be holding it to control the force of the spring. Replacing garage door springs of this type is not recommended for the average homeowner.
WARNING!! Torsion Springs can be VERY DANGEROUS, Precautions and thorough knowledge are REQUIRED!!! Do not attempt this repair without the proper skills.
There are those die hard do it yourself pros that insist on doing everything themselves. Are you one of those? Well then you should check further online for instructions on replacing garage door springs. Look for torsion springs. Clopay a manufacturer of residential garage doors has some instructions that may apply to your situation , Follow this link to check it out. There is another article that gives you and in depth discussion of this type of spring. The article provides installation instructions for springs and adjustment information, follow this link, to review the article.
I have been in construction most of my life and I personally know a few garage door installers. I have worked on garage door torsion springs and I must confess that it made me nervous. I will not relate some of the horror stories, however, I will say that people have been seriously hurt, messing around with this type of spring.
Hiring a Serviceman for Garage Door Torsion Springs
Before you call a garage door serviceman, write down exactly what the door is doing. Verify by examining them that the springs are broken. Springs either work or the don't, there is not much in between. Write down the width and height of your door and the type of door you have. Ask for a quote over the phone for a cost on replacing both springs. Make sure you specify both. Sometimes they will try to quote you for one spring and want to charge you double when they show up. Replacing garage door springs gets expensive when your taken advantage of.
Call at least three places and try to make sure they are actually different places. Get quotes from all three. If they won't quote it over the phone, call someone else. A door that works, but does not close all the way does not need to be replaced. Make up your mind that you are not buying a new door. You have established that one of the springs is broken. You need to replace them both. You should be able to get them replaced for $150 to $200 unless you have an unusually large door.
Torsion springs have cycle ratings. The minimum is 10,000 with the highest being 100,000. Ask about the cycles and get the longer lasting ones if you can. You will need to weigh the cost of better quality springs and decide if you want to spend the extra money. It should not be a lot more. The labor is the same so it is just the cost of the springs. You don't want to be replacing garage door springs any time soon.