Search
Repair Topics
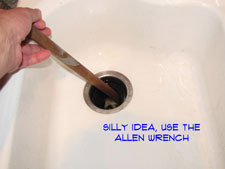
Garbage Disposal Allen Wrench
 Using a garbage disposal allen wrench when you have a stuck garbage disposal is the best course of action.This method applies positive force at the right location to free up the impeller. Better yet, you don't have to take anything apart and most of the time it will take less than five minutes to get it working.
Most garbage disposals use a standard 1/4" allen wrench. The wrench that came with your disposal is probably shaped like a lazy 'Z'. If you can find that wrench, so much the better. The angle helps you keep your hand down where you won't hurt yourself if the wrench slips.
Not sure if this is your problem? See the article 'How To Fix Your Garbage Disposal' for all of the garbage disposal repair topics.
Purchasing a Garbage Disposal Allen Wrench
It would not be a suprise nor is there any shame in the fact that your garbage disposal allen wrench is lost. There are numerous reasons why you might not have it. It didn't come with the house, its in the basement somewhere or when my toolbox came back from by brother in law, it was missing.
No matter, you can purchase a complete set of allen wrenches for less than ten dollars. It will likely be a quarter inch allen wrench and you may have one of those. Worst case you have to go to the hardware store and buy a new set of allen wrenches.
Locating the Garbage Disposal Flywheel Lug
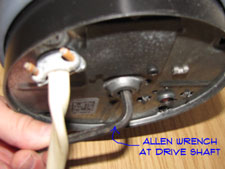
To you your garbage disposal wrench you need to locate the drive shaft lug that it fits into. You will have to clear out the cabinet below your sink for this operation. You are going to need to see the underside of your disposal.
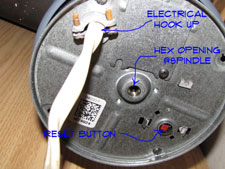
On the bottom of your garbage disposal you will find a hex shaped opening in the center of the housing. this hex opening is attached to the drive shaft. Before you start working on the disposal you want to turn off the power. Unplug the disposal or shut the breaker off to make sure that no one inadvertently turns the switch on.
Loosening a Stuck Garbage Disposal
 Put the garbage disposal allen wrench into the socket and try to free up the unit. You may need to worry it back and forth several times to free up the jam. Use the pliers on the allen wrench if you need a little more torque. Keep working with it until the spindle turns freely.
If possible you want to remove the object from the disposal before you turn it on. Get a flash light and see if you can figure out where it is. Use tongs, pliers or a magnet to remove the object. No fingers or hands in the disposal, please.
With the object removed you can turn the power back on. Try the disposal and make sure it is running freely. Working? Great you have successfully dealt with a jammed garbage disposal. If you keep a journal you may want to make an entry.
WARNING!! Keep Your Fingers Out of the Disposal!!! Turn the Power Off Before Working On It!!! WARNING!!!
Summary
The hex shaped opening in the bottom of a garbage disposal is a great way to get the disposal unjammed. You should have gotten a wrench with your disposal. If not, no worries, you can get a replacement allen wrench that will work.
Fixing a Stuck Garbage Disposal
 A stuck garbage disposal is evident by the loud electrical sound that it makes when you try to turn it on. With the motor unable to turn the disposal it strains to get it moving. Turn it off quickly, you do not want to burn up the motor. Even with the safety switch, this is not good for the motor.
Solving this problem should not be too difficult and will not take too long. Unless you have one of those rare situations where a metal item is lodged securely and cannot be removed. This is the exception, not the rule.
Usually, it is a couple of minutes with an allen wrench. Take a look at the information below and see if you feel confident trying to perform this repair. Most to the time this is something a homeowner can take care of.
Fixing a Stuck Garbage Disposal - Information
What Can You Save? - The serviceman will want to stand around and talk for a few minutes. This keeps you from realizing that it only takes him couple of minutes to free up a jammed garbage disposal. You will have to pay for a service call, $50 to $75. Rarely the disposal will be beyond repair and a new unit could run from $150 to 200 or more for a high end unit.
How Hard Could It Be? - Most of the time fixing a jammed garbage disposal is not too difficult. These repairs will have a Difficulty Level of: Simple. These repairs require a Skill Level of: Job Jar Specialist. For and explanation of the terms in this section, see 'How to Use This Site'.
Check the Simple Things! - As a rule this repair is fairly simple. It is possible to pop the breakers, so check them if the disposal won't come back on.
What Can Go Wrong? - You can burn up the motor by repeatedly trying to turn on the switch. The limit switch will trip when the motor gets hot enough. However, you can damage the motor by repeated attempts.
Using the Garbage Disposal Tool
Using a garbage disposal wrench is not difficult. It is the best method for freeing up a jammed disposal.
On the bottom of your garbage disposal you will find a hex shaped opening in the center of the housing. this hex opening is attached to the drive shaft. You should have gotten a wrench with your unit that fits here.
You know where it is, great, get it. Don't know where it is, bummer. It should take a standard allen wrench. Find one that fits, usually, this will be a 1/4" allen wrench.
Before you start working on the disposal you want to turn off the power. Unplug the disposal or shut the breaker off to make sure that no one inadvertently turns the switch on.
Put the allen wrench into the socket and try to free up the unit. You may need to worry it back and forth several times to free up the jam. Use the pliers on the allen wrench if you need a little more torque. Keep working with it until the spindle turns freely.
If possible you want to remove the object from the disposal before you turn it on. Get a flash light and see if you can figure out where it is. Use tongs, pliers or a magnet to remove the object. No fingers or hands in the disposal, please.
With the object removed you can turn the power back on. Try the disposal and make sure it is running freely. Working? Great you have successfully dealt with a jammed garbage disposal. If you keep a journal you may want to make an entry.
Removing Stuck Objects
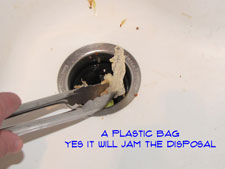 Removing objects stuck in a disposal will need to be done even after you get it freed up. Disposals will not grind up certain things, so removing them is the best course.
Coins and rings are a couple of things that can jam a garbage disposal. They get wedged between the turntable and the side of the housing and can be difficult to dislodge. Try to locate the object if you can.
Prying a Jammed Garbage Disposal
 Prying a jammed disposal with a broom handle or another similar object is not a good idea. See the article 'Using a Garbage Disposal Wrench' for the best method on freeing up a jam.
At this point, you may be faced with a tough decision. Assuming you cant' free up the motor and you cannot find an object that can be removed, you may be faced with replacing your disposal.
Try one more time with the allen wrench to worry it loose. Still stuck? I feel your pain. A new disposal will run between $75 and $200. The difference is for power, features and whatever else they use to get you to spend more. It will take an hour or so to replace.
Summary
Hopefully you have been able to unstick your stuck disposal. Most of the time you can use the special wrench that came with the disposal or use an allen key of the same size. Working the disposal back and forth with the wrench will fix the problem most of the time.
Ninety percent of the time the allen wrench will take care of the jammed garbage disposal in less than ten minutes. You may have been unfortunate enough to have a more serious problem. Just remember, if it was hard for you it would have been hard for a repairman. Worst case you had to purchase a new garbage disposal.
Hopefully, one way or another you were successful. Now that you are done with your jammed garbage disposal you can consider your next course of action. Climbing the worlds seven tallest peaks is worth a look.
Lubricating Bifold Closet Door Hardware
 Lubricating bifold doors is the solution when things are sticking or making noise. Just like other door hardware the hinges can start to squeak. A little oil can do a lot of good on a troublesome door.
The hinges, rollers and pivot pins are the moving parts. Use a good quality silicone lubricant. Keep a rag handy and don't over do it. Work the door panels back and forth until the move freely and don't make noise. Watch for drips and clean them up with the rag. Lubricating bifold doors move is not rocket science and you should be able to focus on the spots that are causing problems.
You may need to work the door back and forth a few times after you oil it. Keep a rag handy for the oil that oozes out. While you are at it, check all the moving parts on the door. Add some oil gingerly and you won't have to do this again for a while. That's all there is to lubricating bifold doors.
Replacing Bifold Closet Door Hardware
 Replacing bifold door hardware is not difficult. You can purchase both individual parts and complete kits for bifold hardware. Try to isolate which part is bad and find a matching component.
Before you assume that you need to install new hardware, you should see if the door can be repaired. See the articles 'Repairing Bifold Doors' and 'Adjusting Bifold Doors' for information on getting an existing door working properly.
How the Hardware is Installed
The pins and rollers are press fit into the holes in the door panels. The tracks and base clips are screw attached to the door frame and floor. There are also hinges and alignment clips, these are screw attached.
New Bifold Hardware Cost
Replacing bifold door hardware begins with a new kit. You can get a complete hardware replacement kit for between $15 and $30, depends on the size of the door. Individual parts can be as little as a couple of dollars. Before you buy anything, try lubricating the parts. Step Five talks about this. Although it's a simple concept, if it moves, oil it.
Installing the New Hardware
When you purchase parts, you will probably get some instructions. I hate to say this, but take a look at them and follow the steps. I consider myself fairly handy. I wish I could get an accurate count on how many times I have tried to install something, messed it up and humbly had to go back and check the instructions. Save time, take a look at them. The parts for a bifold are pretty straightforward, so I am not spending a lot of time on them. After you have installed the hardware, you can pat yourself on the back. You have completed an interior bifold door repair. Well Done!
Adjusting Bifold Door Height and Margins
 Adjusting bifold door height is accomplished by using the second adjustment feature of the bottom pivot pin. Two reasons that I can think of that would require you to adjust the height of the door.
Not sure if this is your problem? See the articles 'Troubleshooting Bifold Doors' and 'Solving Closet Door Problems' for a listing of all of the closet door topics.
Adjusting the Bifold Door Height
(1) You have a four panel dour and the margins are all parallel, but the two sets of panels don't line up. You can adjust the height until they do.
(2) The rollers are popping out of the track when you use the door. Raise the door until the rollers stay in place.
The bottom pin can adjust the height due to the fact that it is threaded. Just get a wrench and turn it turn clockwise to lower the door and counterclockwise to raise it. The design of the floor bracket should allow it to turn in place without disturbing the other alignment you may have done. Every thing working? Good job, you have been successful at adjusting bifold door height on your door.
Adjusting the Bifold Door Margins

Adjusting bifold doors is part of the installation. There is a clip in the track that the top pivot fits into. This clip has a set screw that holds it in place. Assuming that the opening is square and plumb you want the margins around the door to be even. You loosen the set screw and move the door closer to the frame or father away. Is the door binding on the frame when you try and open it? It is too close to the frame and needs to be moved away. Is the door binding against the other door or the far side of the frame? In that case you want to move the pin closer to the frame.
The safest thing to do is take the door out when you adjust the clip. Lift the door up and tilt the bottom out of the opening. The problem with this is that you have to keep putting the door in and out to check the adjustments. With the door open you can hold onto the door (better yet, have someone else hold it), and loosen the set screw with the door in place. Adjust as needed and tighten the screw.
Depending on where the door is binding, you may have to also adjust the bottom pin. The idea is to have the door far enough away from the frame so that it opens without friction. The door should not be so far away that it binds with the other door or the far side of the frame. A quarter of an inch of gap is about right, although it could be wider.
A properly aligned door should have a consistent margin along the top, sides and if it is a four panel door, down the center. For a four panel door the tops of the two doors should be even with each other and the center gap should be even. It takes a little practice to get the sense of how the movement of the pins affects the overall alignment of the door. Be patient, once you get the idea you'll always have that understanding.
The bottom pivot pin works similarly to the top one. The difference is that this pin is set in a toothed clip. To adjust the margin on the door you pick the door up and move it toward or farther away from the frame. The same adjustment principles apply with both pivot pins. Remember also, that moving the pin in or out also affects the top margin. I know, sometimes it can be aggravating. Use a pry bar to lift the door and try to move it one notch at a time until you get it right. The notch system is a little less sensitive than sliding the top clip. You may need to make a minor adjustment on the top, once you have the bottom pin the way you like it.
Okay, I know, you're probably wondering why I didn't tell you to work on the bottom pin first. If it is clear that you will have to move both pins, then this is a good idea. Unfortunately, it is usually not that clear and sometimes you go back and forth between the two of them, or four if it is a four panel door. Right, wrong or indifferent, I always start with the top pin. So that's how I wrote the article.
Keep making adjustments until everything lines up and the doors operate freely. Adjusting bifold doors takes time, but it is worth effort to have a door that operates smoothly.
Summary
Adjusting a bifold door involves some trial and error. However, after a few minutes, you should be able to get the door working again. If you have not done so already, you want to lubricate the hardware to keep things running smoothly. See the article, 'Lubricating Bifold Doors' for instructions.
Is the door too far gone or damaged? You may need to consider replacing it. See the article 'Replacing a Bifold Door' for more information.