Repair Topics
How To Install an Outlet
Installing electrical outlets, there could be several reasons why you would need to do that. Before you replace it though, make sure it is not something simpler. Is this something you can do? Is is something you want to do? In most cases yes, just be careful, electricity can be dangerous. A couple of simple tests will tell you where you are at with your outlets.
For the last few decades you will notice that the vertical slots are different sizes and all plugs that are made now have two sizes on the prongs. This is done to orient the polarity of the outlet. Devices with switches could be damaged by outlets that have the polarity reversed.
Not sure if this is your problem? See the articles, 'Troubleshooting Electrical Problems', 'Electrical Wiring Repairs' and 'Basic House Wiring' for more information and a listing of all the electrical subjects.
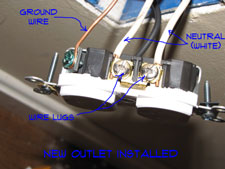
Before you begin an electric outlet installation, make sure the power is off. Turn off the breaker and put a piece of tape over it. Double check for power with a tester. Newer plugs all have three wires attached to them. A Hot (Black), Neutral (White) and a Ground (Bare or Green).
Removing an Old Outlet
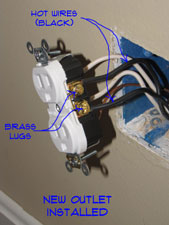
Unhook the wires from the old receptacle, noting the orientation. Attach the ground wire to the green ground lug. Then attach the neutral to the silver side of the outlet. Lastly, attach the hot wire to the brass side of the outlet. This coding system is fairly universal. Depending on the light you have, you may have to look close to tell between the silver and brass lugs.
Using Push In Connections
 Some outlets may allow you to push the hot and neutral wires into the back of the outlet. There are round holes there. You strip the wire the proper distance, keeping it straight and simply push the wire in until the insulation touches the back of the receptacle.There should be a strip gauge on the side of the receptacle that tells you how far back to strip the insulation.
Even when you use the push in connection, you still want to tighten the lugs. These push connections are sometimes only good for one size wire, such as 14 gauge.
Using The Wire Lugs on an Outlet
Many homes use #12 wire for the outlets. This wire is rated tor up to 20 amps and can accommodate hight wattage items in kitchens and other locations.
The draw back to #12 wire is that unless you have an outlet rated for 20 amps, the push connectors will not work. They are made to work with #14 wire. This is assuming that you have purchased an inexpensive 15 amp receptacle.
You need to use a pair of wire strippers to bend the end of the wire to the correct shape to fit on the lugs. There is a hole above the handle that you can insert the wire into. Curl the strippers around 180 degrees to create a loop in the wire.
Loosen the lug as far as you can without removing it, before you try and put the loop in place. You may need to squeeze the loop a bit to get to fit onto the lug properly. Once you have the the wire curled around the lug, tighten the screw with a screwdriver.
Connecting Multiple Outlets
For outlets that had four wires attached you will need to reattach all of them. The extra two wires are to feed the next outlet in the circuit. This saves having to make additional connections inside of the box. It is a time saving feature that is very common.
Wrapping an Outlet.
As a safety precaution you want to wrap electrical tape around the lugs. This is especially needed if you have metal boxes. Use standard electrical tape and wrap it around the outlet two or three times. This helps protect the lugs from touching any other metal surface or wire inside of the box.
Finishing the Outlet Installation
The final step to install electrical outlets is to put it back together. Use the tester to make sure it is working. Attach the outlet back to the box and then install the cover plate. Got young children? Put the safety plugs back in. Congratulations! You can plug the lamp back in. It's time to move on to other electrical or home repairs.
This article covers a standard outlet that has the correct wiring inside of the box. For a GFCI outlet, see the article 'Installing GFCI Outlets'. If you are missing the ground wire, see the articles 'What Is a Grounded Outlet?' and 'How To Ground an Outlet' for more information and additional instructions.
How To Test an Outlet
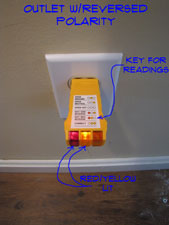 Outlet polarity issues, what on earth is that? What it means in layman's terms is that many devices are wired to have the power go through them in a certain direction. The larger and smaller prongs on the plugs keep them oriented correctly.
This works great as long as the outlets are wired correctly. Sometimes the white and the black wire are hooked up to a device backwards, thus an outlet polarity issue. This can cause switches to not work correctly and may damage motors. You can purchase a polarity tester for between $5 and $10. Check the outlets in your home to see if they are all wired correctly.
Find one that is backwards? Shut the power off and remove the switch plate. Double check with a tester to make sure the power is off . Unscrew the outlet from the box and pull it out to expose the wires. The black wire should be hooked to the brass side of the outlet. The white wire should go on the side of the silver screws.
Use a screwdriver and switch the wires. Turn the power back on and check the polarity again with the tester. Got it? Great! Turn the power back off and put the outlet back together. Time to move on to other things. No need to install electrical outlets this time.
Troubleshooting Outlet Problems
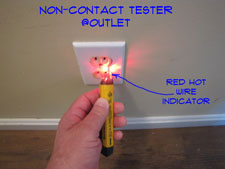 When you are troubleshooting outlet problems you first want to make sure it is not something simple. Checking the circuit breaker or fuse is a good first try. A loose plug is another simple problem.
Not sure if this is your problem? See the articles on 'Troubleshooting Wiring Problems' and 'Electrical Repair for Homeowners' for a listing of related electrical topics. For some related topics, see 'How To Install an Outlet', 'Installing a GFCI Outlet', 'How To Ground an Outlet' and 'How To Test an Outlet' for more information.
Follow these steps (1) Use a tester or a device that is working to see if you have power. If you have power, it is the device that needs attention.
(2) Check the device – Is the light bulb good? Is the light, appliance, tool or electronic device working? Try hooking it up to another outlet that you know is working.
(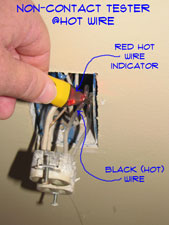 3) Check to see if a GFCI (Ground Fault Circuit Interrupter) is tripped. Many times the outlets that follow a GFCI in a circuit are also protected. See if the button has tripped on this or a nearby GFCI receptacles. Reset the GFCI and see if the outlet works.
(4) Check the breaker to see if it has tripped. Are you overloading the circuit? Try moving some items to different plugs and reset the breaker.
Did the tester indicate that you do not have power and you do not have a breaker or GFCI tripped? Turn the power off and carefully pull the receptacle out from the box. Double check with the tester to make sure the power is off.
Remove the cover plate and unscrew the outlet from the box. Turn the power back on and use the tester to see if you have power to the black wire attached to the outlet.
WARNING!! Make Sure the Power is OFF!!! BEFORE You Work on Electrical Devices!!!
You have power in the box, but the outlet does not work. Turn the power back off and see if the wires connected to the outlet are loose or corroded. Tighten or clean them and try again. Got it working? Yes, well that's good, your work here is done. Still not working? You will want to replace the outlet with a new one. Shut the power off and obtain a new outlet.
Go to the article 'Installing Electrical Outlets' for instructions on how to install electrical outlets. No power at all to the outlet box? You have a more serious electrical problem that is beyond the scope of this article. Check out the article 'Basic House Wiring' for more information. You may need to call an electrician to trace down and repair the problem.
Summary
Electrical outlets are fairly simple devices that normally work fine. However, the devices themselves are inexpensive and the quality is not always the best. The installation can also be a factor. Fixing them is not that hard.
How To Snake a Toilet
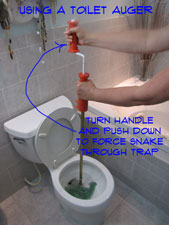
 A toilet auger is a useful tool when you have a clogged toilet. You may want to try 'Using a Toilet Plunger' before you attempt to use an auger, it is a little easier.
Not sure what your problem is? See the article 'How to Fix a Toilet' to troubleshoot your problem.
When you hear those fateful words, 'the toilet is clogged again', it gives you less than good feeling. You try and brace yourself for a dirty situation. What do you do?
There are two tools that can take care of a clogged toilet efficiently. One is a toilet auger. With one of these you can get rid of most clogs in five minutes or less. The other commonly used tool is a plunger. The auger will generally be needed for tougher clogs, although it can be used any time the toilet refuses to flush.
This article will help you with the when and how of using this tool. You don't need to dread it when the toilet clogs up. Instead, you can be the hero that is able to fix it quickly and efficiently. This article will give you the information you need.
Using a Toilet Auger - Information
What Can You Save?
A service call for a plumber will likely be around $75. You will be dismayed when he unclogs your toilet in less than five minutes with a tool that costs around $20.
How Hard Could It Be?
Using a toilet auger is not hard or complicated. It can be a little messy.
- Difficulty Level of: Easy
- Skill Level of: Handyman
Check the Simple Things!
Using a plunger is about the simplest thing for a toilet clog. Plungers will work most of the time, although it may take repeated tries.
What Can Go Wrong?
Dirty water is the big problem with working on a toilet. You can't tell that the toilet is clogged until you flush it. Many times, the mistake of flushing it a second time is made. This means a bowl full of very dirty water. Clear out the area before you work on the toilet. Have some rags handy to quickly deal with any mess.
Purchasing a Toilet Auger
A toilet auger is a manual snake that is just long enough to get through the piping in your toilet. It will dislodge objects that are caught in the trap. You can buy a toilet auger for twenty five or thirty dollars and it will last for years.
Purchasing a toilet auger is not too difficult. Big box home supply stores have them in stock.
This tool is less common than a plunger. It is essentially a snake that is designed to go through the trap on a toilet. It has a long handle with a twist crank at the top. This allows you to turn the auger while pushing it down through the trap.
Home supply stores have toilet augers for sale. One will cost between $15 and $75. The more expensive ones will have a heavier snake that will not kink as easy. This tool is somewhat distinctive, in that it looks a lot like a 'J' and stands about three feet high.
Using a Manual Toilet Snake
Toilets have a trap in them that create some sharp bends in the pipe. This is where the clogs generally occur. The metal snake in the toilet auger is just long enough to get through the trap and to the base of the toilet.
Pull the handle all the way up and position the auger in the trap opening Push down while turning the handle. When the handle gets to the bottom it is all the way through the toilet. Similar to the plunger you may need to try a few times. When it gets caught try to force it through, this is probably the culprit. Don't hurt yourself, but use a little elbow grease.
The toilet auger does do a dirty job so cleaning it off is a concern. Once the toilet is unplugged you can flush it a time or two with the snake still inside the toilet. The water will help rinse off the snake. The remainder of cleaning can be done outside with a garden hose.
Using a toilet auger is not too difficult, but it does require some arm strength. The crank has to be turned manually and pushed through the trap.
Remove everything from the area that could be damaged by dirty water. Some water will probably splash, move anything you don't want ruined. Have a mop and rags nearby, just in case.
If the water level is up near the rim, you may need to get a small pail and bail some of the water out. A plunger will displace water when it is used. In addition plunging will agitate the water. A high water level will cause splashing and spillover.
Again the toilet auger is a manual snake that is just long enough to get through the piping in your toilet. It will dislodge objects that are caught in the trap. It is not electric and therefore requires some arm strength to operate it. The idea is to turn it and force it through the trap at the same time.
Pull the handle all the way up and position the auger in the trap opening. The bottom of the auger is turned to help get it started. Make sure the end of the metal snake is turned toward the back of the toilet. Push down while turning the handle. When the handle gets to the bottom it is all the way through the toilet.
Some toilet clogs may resist your efforts. It may require more than one try to free up the clog. Don't despair, pull the handle back and try it again. It may feel like you have hit a wall and can't get the snake to go through. When it gets caught try to force it through, this is probably the culprit or the top of the trap. Don't hurt yourself, but use a little elbow grease. You need to get the snake all the way through the toilet, or extended the full length to make sure the clog is gone.
A toilet auger is a manual snake that is just long enough to get through the piping in your toilet. It will dislodge objects that are caught in the trap. You can buy a toilet auger for twenty five or thirty dollars and it will last for years.
Toilets have a trap in them that create some sharp bends in the pipe. This is where the clogs generally occur. The metal snake in the toilet auger is just long enough to get through the trap and to the base of the toilet.
Pull the handle all the way up and position the auger in the trap opening Push down while turning the handle. When the handle gets to the bottom it is all the way through the toilet. Similar to the plunger you may need to try a few times. When it gets caught try to force it through, this is probably the culprit. Don't hurt yourself, but use a little elbow grease.
Unclogging a toilet with an auger is done when there is something caught in the trap. A toilet auger is a little harder to use than a plunger and most homeowners do not have one.
A toilet auger is a manual snake that is just long enough to get through the piping in your toilet. It will dislodge objects that are caught in the trap. It has a hand crank on it to turn the snake. This tool is especially useful for dislodging obstructions that are caught in the trap, such as a toothbrush or a children's toy.
To use the toilet auger make sure that the snake is in the retracted position. Place the end of the auger in the bottom of the toilet basin, witht the snake pointed toward the back of the toilet. Hold the auger steady with one hand.
Push down while turning the handle.You will likely get some resistance when the auger hits the obstruction and when it tries to make the turn in the trap. This is normal, keep turning the auger until it works its way through.
When the handle gets to the bottom it is all the way through the toilet. Similar to the plunger you may need to try a few times.
Summary
You may want to do some maintenance on your toilet at this time. See the articles 'Adjusting Toilet Tank Water Levels' and 'Checking the Toilet Flapper' for more information.
How To Unclog a Toilet With a Plunger
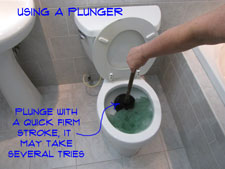 Without a doubt a 'Plunger' can solve clogged toilet problems most of the time. The best part is that you can save the cost of a plumber coming at maybe a hundrfed bucks or more in less than five minutes.
There are two tools that can take care of a clogged toilet efficiently. One is a toilet plunger. We mentioned this at the outset, most of the time, ( I mean in the high 90% range, this is the right tool), to deal with a clogged toilet. For a really tough obstruction that is caught in the trap, a toilet auger is the second choice.
How Does a Toilet Plunger Work
Plungers work on a simple concept, pressure. The plunger generates pressure on the clog to force it through the trap. This is usually successful, since it is too much volume that clogs toilets in most instances.
This can be very effective, since it is too much volume that clogs toilets in most instances.
Purchasing a Plunger
A toilet plunger is a very simple device. It is a long handle connected to a rubber bulb. The rubber end is designed to compress. When properly seated in the toilet, quickly compressing the plunger generates pressure that forces the clog through the toilet.
You will also find some newer styles that look almost like an accordion. These are designed to generate even more pressure.
Toilet plungers are readily available at home supply and hardware stores. Even department stores will have them for sale. A plunger for a toilet will have an added flange at the bottom that helps to concentrate the pressure. This differs from a sink plunger that has no added flange. Look for one with a bell that is about six inches and diameter and five inches high. One will cost between $5 and $15.
Plunging a Toilet
Remove everything from the area that could be damaged by dirty water. Some water will probably splash, move anything you don't want ruined. Have a mop and rags nearby, just in case.
For the plunger to do its job, it needs to be firmly against the bowl to create a seal. This will generate the maximum pressure. At the risk of sounding repetitive, make sure the plunger is seating firmly against the bottom of the toilet bowl.
Try to push the plunger down quickly and straight. You are likely to get some splashing, be prepared for that. It will often take two or three tries before the clog breaks free. Don't get discouraged, even a dozen tries only takes a few minutes.
If the water level is up near the rim, you may need to get a small pail and bail some of the water out. A plunger will displace water when it is used. In addition plunging will agitate the water. A high water level will cause splashing and spillover.
 When you use the plunger repeatedly, you may notice the water going down little by little. This is not a bad thing, although it is more satisfying when it goes down in a big whoosh! When the water level gets low enough, you can try flushing the toilet again. You should get the whoosh, this time. If not, try the plunger again.
The plunger does a dirty job and it goes through some less than desirable water. After the clog is cleared flush the toilet two or three more times. Use the fresh water to rinse off the plunger. You can use a toilet brush and some toilet cleaner to further disinfect it.
When toilet clogs are a regular event you may want to keep the plunger close by. Some homeowners have opted to keep it behind the toilet. A nearby closet would be another choice.
It is a good idea to disinfect the rest of the area around the toilet. You likely had some splashing of the dirty water. Some kind of a bleach based cleaning product will kill all the germs and bacteria.
Summary
The 'Introduction' to this series on 'Using a Toilet Plunger' talked about the potential cost you might be facing for fixing your garbage disposal. In addition, the simple solutions and the potential problems were discussed.
In 'Step One', we discussed where to go to purchase a plunger and what kind to get.
'Plunging a Toilet' is the article that told you what to do, what you should get out of the way and how to clean up afterwards.
Were you able to successfully use a toilet plunger to solve your problem? This tool is a champ when it comes to unclogging toilets. Did you have to go out and buy one? It is still cheaper than having a plumber come out. Now that you have it, you will be able to quickly deal with problems in the future.
Now that you are done with this project, what are you going to do next? For a homeowner, there is always a list of repairs that you can tackle. Since this one went so well, you can take a look at your list and try something else.


