Search
Repair Topics
How To Remove a Toilet
Do you really need to know how to remove a toilet? Are you sure that your problem will be solved by removing the toilet? When you are replacing the toilet there is no other option. The old one has to go first. Repairs on the toilet flange are another reason that you might have to remove the toilet.
Not sure if this is your problem? See the article 'Troubleshooting Toilet Problems' for a complete listing of the toilet repair topics.
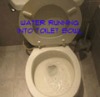
A toilet that is leaking around the base could be a sign of a bad wax ring. You will see water seeping around the base of the toilet when it is flushed. A loose toilet will need to have the flange bolts tightened. When they are too old, you may not be able to tighten them. A hopelessly clogged toilet might be another reason for taking up a toilet.
See the article 'How To Install a Toilet', for additional information on this subject. The article 'Toilet Flange Repair', for information on the tee bolts and the wax ring. The article 'Fixing a Clogged Toilet', discusses how to get a toilet unclogged. This can usually be done without removing the toilet.
How To Remove a Toilet - The Issues Involved
What Can You Save? - Removing a toilet is a big job even for a plumber. It will likely take one half hour to an hour to drain down the toilet and remove it. It could run from $100 to $250, depending on what else needs to be done.
How Hard Could It Be? - This is not an easy repair. The toilet has to be drained down, unhooked from the water supply, unbolted and lifted off of the seal, requiring some help. These repairs will have a Difficulty Level of: A Bit of Work. These repairs require a Skill Level of: Handyman. For and explanation of the terms in this section, see 'How to Use This Site'.
Check the Simple Things! - If you have gotten to this article you likely have a problem that cannot otherwise be fixed. You need a new wax ring or tee bolts or you are replacing the toilet. Did you check to see if you could fix the toilet first? The article 'How To Fix a Toilet' has information on the various things that can be repaired on a toilet.
What Can Go Wrong? - It is important to take steps to prevent damage to other surfaces during this project. The toilet uses water to operate. Take steps to drain the toilet tank down and flush the water out of the bowl. Anything that can be damaged by water should be removed from the area before the repair is attempted. The area around the flange will be dirty, wear rubber gloves as a precaution. Being without a toilet is not good, allow enough time to complete the repair in one session. Your whole family will thank you.
Preparation
Preparing for your toilet removal will help the job to go quickly with a minumum of mess. Yes, removing a toilet can be a messy job. The toilet is filled with water and the toilet is sealed to the plumbing with a wax ring. This creates the potential for a mess.
Tools
You are going to need and adjustable wrench, and adjustable pliers for removing bolts and plumbing fittings. You are likely to need a hacks to cut the tee bolts. The type that has the blade protruding out the end is best, since the nuts are clost to the base.
You will also need a scraper for removing the wax ring. The wax ring will stick to either the floor flange or the base of the toilet or both of them. The scraper will help you to remove the residue.
You will need to put a temporary stopper in the waste pipe underneath the toilet. There is no trap on the pipe and you will get sewer gas into the house when it is open. You can use a rag, one that you can throw away. Or you can get a test stopper at a home supply store that sells plumbing materials. The pipe will likely be 3" of 4" in diameter. If you can see the pipe in your basement, you can determine the size.
Toilet Replacement Parts
Unless your toilet is fairly new, there is a good chance that you will need to replace the tee bolts. Most of the time they are rusted or frozen and cannot be re-used. In fact, you may have to cut them off with a hack saw to remove the toilet.
Purchase a new set of tee bolts, including nuts and washers. Your are also going to need an extra set of nuts and washers. We will explain the reason for this in the article 'Replacing Toilet Flange Parts'.
The other item that will need to be replaced is the wax ring. You will ruin the wax ring when the toilet is removed. Obtain a 'no-seep' style wax ring at a home supply store, it should be less than $5.
Materials for Placing the Toilet
When you remove the toilet, you are going to need somplace to set it. A large piece of carboard at least 2' x 3' will protect the floor from being scraped when the toilet is being moved. If you need to protect the floor from water, you will want a piece of plastic under the cardboard.
It is best to set the toilet on wooden blocks. This will keep any residue from the wax ring from causing the toilet to be unsteady and tip over. Two pieces fo 2" x 4" x 16" wood blocks will work well.
Clean Up Supplies
The toilet does a dirty job, therefore you are going to want to wear rubber gloves when cleaning up and disposing of the old parts.
You are going to want a trash bag to throw away the old parts, especially the wax ring. You will need rags and a mop to deal with any residual water that may be left in the toilet. Even after you completely drain the toilet there will be some water left.
The wax ring residue can be difficult to completely remove. A rag that can be thrown away and mineral spirits can be used to clean the the wax off the floor and toilet.
Toilet Removal Checklist
- Adjustable Wrench
- Adjustable Pliers
- Mini Hacksaw
- Plastic or Metal Scraper
- Flat Blade Screwdriver
- 3" or 4" Test Stopper or a Throw Away Rag
- Tee Bolts With Extra Set of Nuts and Washers
- Wax Ring
- Large Piece of Cardboard
- Piece of Plastic or Large Plastic Trash Bag
- (2) 2" x 4" x 16" Boards
- Rags, Mop and Pail
- Plastic Trash Bag
- Mineral Spirits
Draining the Toilet
Draining the toilet properly before beginning to work on it will save a lot of aggravation. Toilets use water to operate, failing to get rid of the water will result in a big mess to clean up. To drain your toilet you want to follow the steps listed below.
Step One - Shut off the water supply to the toilet. There should be a water shut off valve on the wall or floor below the toilet tank.
Step Two - Flush the toilet. This will drain most of the water out of the tank. Additionally, most of the water will siphon out of the toilet bowl to.
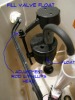
Step Three - At this point you will still have some water left in the tank and some water in the toilet bowl. To drain the tank completely, you will need to loosen the large nut on the bottom of the tank that holds the toilet fill valve in place. It is the larger nut closest to the tank. The lower nut is for the water supply line. Use adjustable pliers or a large adjustable wrench for this nut, it will be plastic or possibly brass. Place a small pail under the connection to catch the water that drains out of the tank. Loosen the nut until the water starts to drain out around the rubber seal. This should drain most of the rest of the water out of the tank. The remaining water can be soaked up with a rag. Re-tighten the nut after you are finished.
Step Four - Use a plunger to force the remaining water in the toilet basin out. Get as much out with the plunger as you can. You can ladle the remainder out with a small paper cup or use a rag to soak it up. Remember to wear gloves for this part of the exercise.
Step Five - Leave the water supply shut off. You should remove the water supply line from the tank. Loosen the nut that is just below the nut that holds the toilet fill valve in place. It is the nut that connects the water supply line to the tank. You can use adjustable pliers for this task, the nut is plastic on most newer toilets, chrome or brass on older ones. Remove the nut completely, so that the supply line is free from the tank.
At this point, your toilet should be fairly dry and is ready to be removed. Check the tank and the bowl one last time to make sure that all of the water is gone.
Unbolting and Lifting the Toilet
Unbolting the toilet and lifting it off the toilet flange is the next step. You have two potential problems at this point. One is that the toilet bolts may be corroded or frozen and won't turn. The tee bolts and sometimes the nuts are made of brass. They strip easily. The other problem will be lifting the toilet. One person can lift it, but if you are not familiar with doing it, it is best to have some help.
Removing Toilet Tee Bolt Nuts
Frozen tee bolts will likely just spin and not loosen. This is due to the design of the tee bolts. The toilet flange usually does not hold the tee bolt in place. Instead it is pressure against the toilet flange that allows you to tighten it. This makes loosening the bolts problematic.
Try to loosen the nuts using an adjustable wrench or an open ended wrench. If they start to loosen you are doing well. Once the pressure is released you will need to pry up on the nut underneath the washer, you can use a flat blade screwdriver or metal scraper to do this. Remove the nut completely. Repeat this process for the other side
Stripped, corroded and frozen nuts will be a little more difficult. If the tee bolt is corroded it may just twist and break when you turn the nut. This is provided the nut does not strip. Go ahead and turn it until it breaks if you can.
If it is stripped or spinning, you are going to have to cut it off with a hack saw. A mini hack saw, the kind that allows the blade to protrude beyond the frame, is the best. Saw through the bolt at the base of the nut. This will keep you from damaging the toilet. Saw through both bolts and remove the nuts and washers. Don't worry, you should have planned on replacing the tee bolts. You will be able to remove the remainder of the bolt, once the toilet is removed.
Lifting a Toilet
Toilets are an awkward thing to lift and there have been a lot of hurt backs as a result. You have a couple of options here, you can get some help, you can call a plumber or you can rent or buy a toilet jack.
Lifting a toilet by yourself is the least desirable option. Toilets have a funny center of gravity and the tend to tip when carried. The other problem is that you need to straddle the toilet to lift it, making walking with it very difficult. Not convinced? Plant your feet on either side of the toilet. You want to grasp the toilet on both sides on the rim of the base, just behind the toilet bowl and just in front of the tank.
You may have to rock the toilet to break the seal. Once the seal is broken, you want to lift the toilet straight up off the bolts. Now is the tough part, how do you get it where you want it. Practiced plumbers have a sort of crab style walk that they do, you will have to try to carefully turn and step while keeping the toilet off the floor.
Lifting a toilet with someone else is similar. Position one person on each side of the toilet, and grasp it at the same location. Work the toilet free and lift straight up. Two people should be able to maneuver the toilet easier than one. Take it to the desired location and set it down.
Using a Toilet Jack to Lift a Toilet
Yes, there is such a thing as a toilet jack. It is not something that the average homeowner would have, unless you are a plumber. As the name implies the jack lifts the toilet for you. It has casters on it so you can move the toilet where you want to.
To purchase a toilet jack you could be looking at a few hundred dollars. Some rental supply companies have them and you can rent one for the period of time that you need. The jack makes the job a lot easier and safer. You can eliminate the chance that you will have an accident or hurt yourself. You will have to check locally for availability or look online if you are interested in purchasing a toilet jack.
Replacing Toilet Flange Hardware
Whenever you remove a toilet, you should replace the toilet flange parts. The two replacable parts are the tee bolts and the wax ring. Replacing the tee bolts and nuts can be optional for a newer or recently reset toilet. However, replacing the wax ring is not optional. You should replace it every time you remove the toilet.
Replacing Toilet Tee Bolts
You should probably replace them even if you were able to get the nuts off without ruining them. The tee bolts and nuts have a tendency to corrode over time. New tee bolts with double nuts will help to insure that you will get them free the next time. The tee bolts and nuts only cost a couple of dollars and are well worth the investment.
This topic is covered in the article 'Replacing Toilet Flange Bolts'. You will find instructions on how to replace the tee bolts.
Replacing the Wax Ring
Another task you will face while learning how to remove a toilet is replacing the wax ring. This topic is covered in the article 'How To Replace a Toilet Wax Ring'. It is always suggested that you replace the wax ring when you replace the toilet. A wax ring that does not seat properly will cause the toilet to leak.
Replacing the wax ring can be a very messy job. Be prepared for a rather nasty item. A wax ring is an inexpensive item, so don't let the cost stop you. Have a plastic bag ready to dispose of the old one. This is a dirty aspect of learning how to remove a toilet.
Replacing the Toilet
Once you have learned how to remove a toilet, the next step is putting it back in place. With the wax ring in place and new tee bolts installed you are ready to set the toilet. There are several specific steps that you will want to pay attention to. It is a good idea to review the series of articles on 'How To Install a Toilet'. These articles provide complete information.
Help is a good idea for this step, although one person can do it.Have someone guide the toilet onto the tee bolts and lower the toilet down level and square onto the floor. Keep the tank parallel with the wall and you will be square. Press the toilet down firmly into place to get the wax ring to seat.
Adjust the toilet slightly and install the second set of nuts and washers. Snug the toilet down to the floor. Use a hack saw to saw off the excess bolt and replace the caps. Connect the water supply and turn on the water. Wait a day or two to make sure that the toilet is not leaking. Satisfied? Caulk the base to the floor with a good quality tub and tile silicone caulk. You have successfully completed your own toilet flange repair.
Summary
All done, Good Job! This was a little bit bigger job and you were successful. Take a breath and relax.
Hopefully you have been able to learn how to remove a toilet and completed the task. The toilet should be working fine now and you should not have to deal with this problem for some time. You may have other toilets in the house that will need attention at some point.
How To Install a Toilet
Is it hard to learn how to install a toilet? The answer to that question is no. A couple of hours should be all it will take. The hard part will be picking out a new Toilet. Are you sure that you need a new toilet? Can you fix the one you have? Check out the article 'How to Repair a Toilet' for troubleshooting and repair tips. Many times even an old toilet can be kept working
For those that are set on a new toilet you will have some decisions to make. Toilets are both functional and decorative at the same time. For styling you will be faced with one piece or two piece models. Elongated bowls and color are other style concerns.
There are two choices for the actual flushing of the toilet. Gravity or Pressure Assist. There are pros and cons to both types. Of course there is always the money issue and the price goes up for fancy features.
Using Common Sense Header
What Can You Save?
A new toilet can run anywhere from $100 to 1,200. Even more for high end decorator styles. One piece models in decorator colors will be the most expensive. The big box home supply stores have decent two piece models that run between $100 and $300. To have a toilet installed will be another $100 to $275. It would certainly be worth learning how to install a toilet.
How Hard Could It Be?
Learning how to install a toilet is not that difficult, but there is a little work involved.
For and explanation of the terms in this section, see 'How to Use This Site'.
Check the Simple Things!
Learning how to install a toilet is not that simple. Make sure your toilet cannot be repaired before you proceed. The article How to Repair a Toilet has information on several simple fixes. Depending on your problem you might be able to get it working for a few dollars.
What Can Go Wrong?
Your toilet uses water to flush away unwanted material. Water, sometimes dirty water can make quite a mess. Prepare for the water and have rags, a mop and a pail handy. Be careful to drain down the toilet and remove as much water as possible. Not finishing the job will leave the toilet not working. This will not be popular with the family, especially if it is your only toilet. Allow enough time to complete the task before the parts store closes.
Purchasing a New Toilet
You have gotten this far so you must have decided on getting a new toilet. There are three issues here to consider, style, functionality and price. Without going into a long discussion on toilet features, we will try to cover a few things to watch for. All new toilets are water saver models and are required to flush with a maximum of 1.6 gallons of water. Some toilets can flush with as little as .8 gallons. If you are replacing an older toilet you may get the added benefit of a savings on your water bill.
The first style choice is one piece or two piece. One piece toilets look a little classier, but they are usually more expensive. The height of the seat is also a factor. For older or handicapped individuals a higher bowl is desirable. One more option with the bowl. Standard or elongated. Wow, this is going to be a little tougher than you thought.
The functionality is another factor to consider. The two choices are 'Gravity' and 'Pressure Assist'. The key thing to remember is that a water saving toilet does not really save water if you have to flush it two or three times to get rid of everything.
Price is always a concern in any matter. Cheap toilets will likely be disappointing in looks and performance. In 2009 Consumer Reports rated twenty-five water saver toilets. Some of the expensive ones did poorly. The best performers on their list were the models with elongated and higher bowls. The top four rated toilets are as follows: (1) American Standard Champion 4 (2002.014); (2) Kohler The Complete Solution Cimarron (K-11456); (3) Kohler Highline Comfort Height (K-3493); (4) Gerber Avalanche (21-817). These toilets range in price from $300 to $400.
Removing the Old Toilet
Time to remove the toilet. Turn off the water supply to the toilet. You may have to use a hack saw to cut off the bolts if they are stripped. Use one that allows the blade to protrude out one end. With the water off, flush the toilet and hold the flapper open so that as much water as possible drains out of the tank. Place a small pail under the water inlet to the tank and loosen the nut the holds the supply line on with a pair of pliers. With the supply line off, loosen the plastic or brass nut that holds the fill valve in place. Just loosen it enough to let the balance of the water drain into the pail.
Use a plunger to get as much water out of the bowl as possible. If you keep the toilet level when you remove it, a little water won't matter. Move the toilet from side to side, rocking it to break the seal. Place a piece of cardboard on the floor nearby. Standing above the toilet and straddling it, lift it straight up off the bolts and set it on the cardboard. (No one with back problems, please, use good judgment) One person can do this, but two are better. Rest for a minute, that was hard.
Installing the Tee Bolts
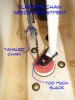
At this point you should replace the tee bolts even if they look OK. Buy and extra set of nuts and washers. Install a nut and washer on the flange before you set the new toilet bowl. This holds the bolts in place and eliminates the stripping problem. The second set of nuts will go on the toilet. Use a wrench to snug the bolts down at three o'clock and nine o'clock with you facing the toilet. Check the picture for the right placement. Once the toilet is off replacing the tee bolts is an easy job.
At the supply store they may tell you that you don't need extra nuts. As mentioned above, when everything is new this is true. If you are certain you won't have to work on this particular toilet again, you can skip the extra nuts. I have found that having the tee bolts secure makes setting the toilet much easier. We are talking about less than a dollar for two extra nuts and washers.
Setting the Bowl
You should look at the instructions for the toilet you purchased. There are variations on how things go together. There should be a helpful diagram. I know, I hate instructions to, if you got some that are in eight languages you may get an education or learn a new dialect. The first thing you will need to do before you proceed with setting the bowl is replacing the was ring.
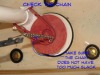
Before you can replace the wax ring you need to get rid of the old one. Have a trash bag ready and use a scraper to clean the wax off of the flange. Tilt the toilet up and see if there is any residue from the old ring on the bottom of the toilet. Scrape it off as required. This is the part that makes a toilet flange repair a less than desirable job. The old wax ring is going to be a kinda of nasty. The picture gives you the idea. Just get rid of it as fast as you can. Admit it, it's one of the nastiest things you've ever seen. You might want to consider wearing gloves.
Press the new wax ring onto the bottom of the toilet around the opening. Set the toilet up on a couple of wood blocks until you set it in place. For most installations a single wax ring with a flange on it will work fine. If multiple floors have been installed and the flange seems to be sunken below the floor, you may need to add an extra ring without a flange.
With the wax ring in place and new tee bolts installed you are ready to set the toilet bowl. Help is a good idea for this step, although one person can do it. Have someone guide the toilet bowl onto the tee bolts and lower the toilet down level and square onto the floor. Keep the perpendicular with the wall and you will be square. The holes in the toilet are oversized which gives a little room for adjustment. Press the toilet down firmly into place to get the wax ring to seat.
Adjust the toilet as needed and install the second set of nuts and washers. Snug the toilet down to the floor. Use a hack saw to saw off the excess on the bolts and install the caps. I think you were warned that learning how to install a toilet involves some work.
Installing the Tank
There should be a main seal between the tank and the bowl. Check the instructions that came with the toilet to verify the exact placement. Place the main seal in its proper location on the bottom of the tank. If the tank bolts are not in the tank you will need to put them in. They also have washers and seals. Check the instructions for the placement.
Put the tank on the toilet base and align the bolts with the holes in the base. The toilet should come with wing nuts that are metal or plastic. There are probably washers that go on first. Put the wing nuts on and snug them up finger tight. Hold the wing nuts and use the screwdriver to tighten the bolts. You may get one of those throw away wrenches for this step. Tighten them down evenly, switching back and forth between bolts. Do not over tighten. Make sure the tank is secure and straight. Adjust the bots if the tank is crooked.
The Finishing Touches
One of the last things you need to do on your how to install a toilet project is to hook up the water. Unless your new toilet is dramatically different in size, your old supply line should work. You may want to replace it if it was a rigid one and it is old. Flexible ones with factory installed fittings are a lot easier to work with (See the Parts List).
Install the supply line using a pair of adjustable pliers. The bigger fitting goes on the toilet. Snug up the fittings and turn the water on. See the article 'Repairing a Toilet Water Supply Line' for more information. Is the valve bad? You may want to think about replacing it with a new one. See the article 'Repairing Water Shut Off Valves' to find out what your options are and how much work it is.
At this point you want to check for leaks. Check the fittings on the supply line first. Tighten as needed. Let the tank fill and flush the toilet a few times. Check the connection between the tank and the bowl for leaks. Tighten the bolts inside the tank as needed. Another possibility is around the base. Flush the toilet several times to make sure you don't have a leak at the wax ring. It is unusual, but it happens. Tighten the bolts as needed or replace the wax ring in an extreme situation.
No leaks? Great, now you just have to finish up. Put the top on the tank and clean things up. The final step is caulking around the base. This helps to stabilize the base and seal out water. Nothing worse than having water get under the toilet and start to smell. Use a good quality tub and tile caulk. It should be a silicone caulk to keep the water out. If you hate caulk as much as me you will want to get one of those caulking kits that have the tools for the beads. You have to use mineral spirits or lacquer thinner to clean up silicone caulk. Make sure the area is ventilated and no flames are present.
Caulking done and all cleaned up? That's all there is to it. Get the family in there and get a few compliments. A job well done. You have successfully completed your 'How to Install a Toilet' course. Well done!
How To Install a Toilet Summary
So did you find out everything you need to know about how to install a toilet? It is a big job, you should be proud after you successfully tackle it. Set aside the shopping and you were probably able to do it in less than two hours. Most of the parts are already installed in the tank when you open the box.
Removing the old toilet is a little bit of work. Setting the bowl and getting the tank in place was a some work also. After that it is all down hill. A cleaner better flushing toilet is the reward for learning how to install a toilet. We hope this project was a success for you.
Fixing a Toilet and Toilet Troubleshooting
 Fixing a toilet does not need to be hard. The trick is to know what to look for. The first thing you want to do is some 'Toilet Troubleshooting'. Use this article to determine what your problem is. Then follow the related link to get instructions on what to do. The following is a list of common toilet problems thay you may be experiencing.
Toilet repairs are linked to two main problems. The first is a Toilet Clog. For information of fixing nasty clogged toilets, see the article
'How To Unclog a Toilet'. The other common toilet problem is 'Fixing a Running Toilet'.
Another common problem that deserves honorable mention is leaks. Go to the series of articles on 'How To Fix a Leaking Toilet' for more information. The article Follow these links if this is your problem.
For other Toilet problems, see the 'Troubleshooting Section' below.
How a Toilet Works
The basic priciple of a toilet is to allow a quantity of water to rush into the bowl and create a siphon effect. The design of the water inlets allow the water to both rinse the bowl and drain away the waste matter. For the last few decades toilets are only allowed to use 1.6 gallons of water per flush. At first this minimal quantity of water caused a lot of clogging issues.
Newer toilets have improved designs and flush pretty well with the reduced quantity of water. Older toilets still require more water
Toilets use water so there is always a potential for problems. Leaks are common with toilets. The way the toilet fills and flushes can also cause problems. Parts can wear out and require replacement.
The parts to fix a toilet are readily available. Home supply and hardware stores have them readily available. The parts are not expensive most of the time.
Fixing a Toilet - The Issues Involved
For a minor repair, $50 to $100 for a service call, plus parts. Replacing a standard toilet could be $300 to $500. In most cases the parts to repair a toilet would be less than $25. Savings = $50 to $500. You can easily see that it may be worth your while to learn how to repair a toilet.
Fixing a toilet yourself may not be worth it if you damage something worth more than the toilet repair would cost. The toilet uses water to operate. If it clogs up, the water can be, well, let's just say, less than desirable. Anything that can be damaged by water should be removed from the area before the repair is attempted. Plunging a clogged toilet can splash dirty water around the area, old clothes and some protection for the walls might be a good idea.
Getting the toilet partially repaired before it gets too late or the parts store closes can leave the toilet not operating. One trick is that a toilet can be flushed by dumping a couple of gallons of water quickly into it from a pail. This emulates the normal function of the tank.
Toilet Troubleshooting - Locating Your Problem
Different toilet problems will have different symptoms. The symptoms are listed below with a description and the location of a resource to help you fix it.
Toilet Will Not Flush
This problem had obvious symptoms, the water will not go down and there is usually a mess in the bowl. This is the result of a blockage, commonly called a toilet clog. Do Not flush the toilet again until you have done something to remove the clog. The toilet can overflow and it will make a bad situation worse.
 See the article 'Fixing a Toilet Clog' for complete directions on how to solve this problem. Two common tools for dealing with toilets that won't flush are a plunger and a toilet auger. See the articles, 'Plunging a Toilet' and 'Using a Toilet Auger' for information on using these tools.
Toilet Flushes Slowly
 The water goes down, but it takes a long time. Sometimes, not all of the material in the bowl is flushed down. When this problem is not fixed it can lead to a completely clogged toilet.
There are a few reasons this can happen. One, the water level in the tank is not adjusted correctly. Two, the water inlet holes in the bowl are partially clogged, thus slowing down the release of water from the tank. Three, the toilet is partially clogged and only allowing the water to drain out slowly.
See the article 'Slow Flushing Toilet' for a complete explanation on how to solve these problems.
Toilet is Overflowing
 This is usually the result of t blocked or clogged toilet. When the toilet is clogged, Do Not Flush It, it will overflow. The water will continue to rise and overflow in the tank while the tank is filling.
See the article 'How To Fix an Overflowing Toilet' for more Information.
The Toilet Runs Constantly
 Even after the tank has filled the water continues to run and will not shut off. This problem is generally related to the toilet fill valve. The fill valve has a float on it the tells the valve when to shut off. A defective valve or a float that is out of adjustment will cause the water to run continuously. This is irritating and expensive.
Adjustment of the float and replacement of the fill valve are the two likely choices for this problem. See the articles 'Repairing a Running Toilet' for a discussion on fixing tank related water problems. If you are sure it is the fill valve you can go to the article 'Repairing a Toilet Fill Valve'.
Toilet Tank Will Not Refill
 When you flush the toilet the water tank does not refill. The only way to flush the toilet the next time will be using a pail of water.
A faulty toilet fill valve can stick shut. When this happens, it does not open the valve even when the float is down. The toilet fill valve will need to be replaced. Go to the article 'Replacing a Toilet Fill Valve' for instructions on fixing a toilet with this problem.
Water Trickles Into the Bowl
 You will usually notice this at night when it is quiet. The water will trickle for a while and then the float will engage refilling the tank. This cycle will repeat itself over and over again.
Besides the obvious irritation that this problem causes it is also costly. The wasted water can add up to hundreds and thousands of gallons over time.
Fixing a toilet with this problem will involve the toilet flapper. A leaking toilet flapper allows the water in the tank to trickle into the toilet bowl. On rare occasions it can be the toilet flush valve. Start with the flapper, since it is the easiest to repair. See the article 'How To Replace a Toilet Flapper' for more information. The article 'Fixing a Toilet Flush Valve', covers the possibility of a bad valve.
Toilet Tank Refills Unexpectedly
This is another problem that is more noticeable when it is quiet. The toilet tank will start filling when no one is using it.
This is likely the toilet flapper allowing water to run slowly into the toilet bowl. When the water level in the tank gets low enough, the tank will refill and the process starts again.
Replacing the toilet flapper is the likely solution. For information, go to the article 'How To Replace a Toilet Flapper'.
The Toilet Flapper Closes Too Soon
When you flush the toilet, some of the water is released into the bowl. But before it flushes the flapper closes quickly and most of the
 water remains in the tank. This problem keeps the toilet from flushing and may cause it to clog.
Fixing a toilet with this problem requires some adjustments inside the toilet tank. For instructions on what to do, see the article 'Adjusting a Toilet Flapper'.
Water Keeps Running Into the Toilet Bowl
 When you flush the toilet it works fine. However, the tank does not refill. The water keeps running and running into the bowl.
This condition happens when the toilet flapper does not close after the tank has emptied during the flush. One common solution is to jiggle the handle until the flapper closes.
To fix this toilet problem properly, some adjustments are needed inside of the toilet tank. The article 'Adjusting a Toilet Flapper' covers this topic.
Water Is Leaking at the Base of the Tank by the Water Supply Line
 There is a hole in the bottom of the toilet tank for the toilet fill valve. It is usually on the left as you face the toilet. The toilet fill valve controls the amount of water that is stored inside of the tank.
The toilet fill valve is held in place by a large nut and it has a rubber seal to stop the water from leaking out of the toilet tank. When the nut is loose or the seal is bad, there can be a leak at this location.
For instructions on how to tighten or replace the toilet fill valve, see the article 'Toilet Fill Valve Leaking'.
Water is Leaking at the Base of the Tank, Where It Connects to the Toilet Bowl
 This problem only applies to two piece toilets. However, most toilets are the two piece design. The two pieces consist of a toilet bowl, which is the base unit that sits on the floor and a toilet tank.
There is a large rubber gasket between the toilet tank and the toilet bowl. The gasket and the toilet tank are held in place by bolts. It is possible for the gasket to be leaking or it could be the bolts. Some toilets use bolts that have a rubber washer around them. When the washers go bad or the gasket fails it you can have a leak.
The article 'Fixing a Leaking Toilet Tank' has guidelines for tightening the toilet tank bolts and replacing the seals if needed.
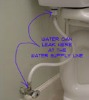
The Water Supply Line is Leaking
Your toilet needs water to operate. The water is provided by a supply line that runs between the shut off valve and the toilet. There are actually four different spots that could be leaking on the supply line.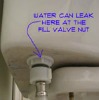
(1) The connection where the valve is attached to the water supply. (2) The connection where the supply line is connected to the water shut off valve. (3) The valve stem seal on the water shut off valve. (3) The connection where the supply line connects to the toilet fill valve.
See the article 'Toilet Supply Line Leaking' for information on how to locate these leaks (pictures included). There are also instructions on how to tighten or repair the problem.
Water Is Leaking From Under the Bottom of the Toilet
Just because you have water on the floor, does not mean that the toilet is leaking at the base. Make sure that you do not have another type of leak before you pursue this problem.
A toilet leaking at the base will only occur when the toilet is flushed. That means, well, that the toilet is leaking dirty water from when the toilet is used.
The toilet is connected to the floor with bolts that hold it in place. There is a wax seal between the bottom of the toilet and the toilet flange. When the toilet loosens over time the seal can be broken, causing the toilet to leak.
There are two possible fixes. One is tightening the tee bolts that hold the toilet to the floor. The second is replacing the wax ring. The article 'Toilet Leaking at the Base' has more information and instructions on how to fix this problem.
Water Beads Up on the Toilet Tank and Leaks Onto the Floor
This is not really a leak at all. This problem comes from condensation on the toilet tank. There are some things that can help. See the article 'Fixing a Leaking Toilet Tank' for some suggestions.
How to Fix a Toilet Summary
Knowing how to fix a toilet will help you with a re-occurring problem that will require attention from time to time. Bookmark this page and refer to it when necessary. It can help you in the future when you need to know how to repair a toilet. There are a few tools to keep on hand, those items combined with a little patience will save you hundreds perhaps thousands of dollars over the years.
Use this website to build your knowledge and confidence. Is repairing your toilet yourself using common sense, in most cases it is. Calling a repairman, many times is not using common sense.
How to Cut Drywall
 Why do you need to learn how to cut drywall? Drywall is a common product in most homes. From time to time repairs need to be made or drywall needs to be removed to repair other things. Another scenario might be making a home improvement. Finishing a basement or adding a closet will involve cutting drywall.
Depending on the situation and the type of drywall the way you cut it can vary. This article discusses the ways you can cut drywall with the tools you have at your disposal.
For related drywall repair topics see the articles 'How To Fix Drywall', 'Patching Drywall', 'Repairing Large Holes in Drywall' and 'Taping and Mudding Drywall'.
I do mention some special tools for completeness, but most homeowners will not possess them or have access to them. You do not need special tooling to cut drywall. They just make it faster when you do it all the time. The right tool for the cut you are making is also discussed.
How to Cut Drywall - Information
This article on how to cut drywall is informational. It is intended to provide basic how to skills to get a job done. We do not classify this information as a repair. We provide you with information about materials and techniques. The information below gives you a summary of the various things involved.
Types of Drywall
Learning how to cut drywall depends a little on the type being cut. It is possible for you to have four or more different kinds of drywall in your home. Most of these types cut in a similar way. This is with the exception of cement board which is not really drywall at all. This material is used in bathrooms because it does not rot. Knowing the types will help you when you learn how to cut drywall.
The following is a list of common types of drywall found in residential construction:
- 1/2" Regular Drywall - This is probably the most common type you will find. It is used on most of the walls and ceilings. It is made of a gypsum core sandwiched between two layers of heavy papers. This type is the easiest of all to cut.
Tools Needed: Utility Knife; Keyhole Saw; Tape Measure;
Optional Tools:Tee Square; Router
- 5/8" Firecode Drywall - This drywall is thicker than the half inch material. It also has a special gypsum core that resists heat and provides fire protection. The heavier fibrous core is harder to cut but still possible.
Tools Needed: Utility Knife; Keyhole Saw; Tape Measure
Optional Tools:Tee Square; Router
- Moisture Resistant Drywall - As the name implies this drywall is used for areas like bathrooms that have higher humidity. Sometimes called green board (it comes in different colors now depending on the manufacturer), it is in between regular and firecode for difficulty.
Tools Needed: Utility Knife; Keyhole Saw; Tape Measure
Optional Tools: Tee Square; Router; Circle Scribe
- Glass Mat Drywall - This drywall is a variation of moisture resistant drywall. With the prevalence of mold issues, glass mat drywall was developed to eliminate mold growth on the drywall. The facing is made of fiberglass instead of paper. Mold will not grow without organic material present. You may find some of this drywall in a newer home.
Tools Needed: Utility Knife; Keyhole Saw; Tape Measure
Optionals Tools: Tee Square; Router; Circle Scribe
- Cement Board - A further step in moisture resistance. This is not drywall at all (drywall is made of gypsum, cement board has no gypsum in it).It is made by sandwiching a special cement core between two layers of fiberglass mat. This material is used behind ceramic tile and marble for high moisture areas. This material is the hardest of all to cut.
Tools Needed: Tape Measure; Diamond Circular Saw Blade; Circular Saw
Optional Tools: Tee Square; Router; Carbide Router Bits
The types of drywall listed above may be found in your home. Many homes only have one or two kinds. Don't be shocked if you find something you are not familiar with. The cutting methods below will tell you which methods are appropriate. In addition we will discuss which tools to use for each cut. Learning how to cut drywall is not that difficult when you know a few tricks.
Using a Utility Knife to Cut Sheetrock
Using a utility knife to cut drywall is the your first choice. The drywall has a paper facing on it, that the utility knife is well suited to cut.
The first thing you will need to do when you cut drywall is to size the piece. A tape measure and utility knife are the tools for this. For a patch where you are fitting into a cut out you want to size the piece 1/8" to 1/4" smaller than the hole you are filling. Get your measurements for the piece first. If you want use that old carpenter rule, measure twice, cut once.
To begin your cut you score the paper on the face side of the drywall. For a piece that is close to four feet wide you want to cut clear across the four foot dimension of the drywall. After you have done that you break the piece back and cut the paper on the back side. Repeat this step to size the piece the other way.
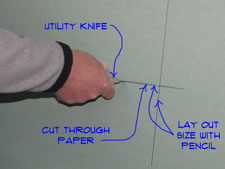
Keeping cuts straight when using a utility knife to cut drywall can be challenging. How do you do it? Great question. There are a couple of ways to do that. You can draw a line on the face layer with a straight edge and a pencil. Then you carefully follow the line with the utility knife. The next option would be to mark the sheet and then use a metal straight edge or a tee square to guide the blade. See the article 'Using a Drywall Tee Square'.
Another very effective method is the one used by professional drywall hangers. You hold the end of the utility knife against the end of the tape measure and hold it in place with your thumb and forefinger. Then you pinch the tape measure at the correct dimension with your other thumb and forefinger. You run you finger along the edge of the drywall and score the board at the same time. You need to keep the tape more or less perpendicular to the side you are measuring from.
This method requires some practice and may not be practical to learn if you only have one or two pieces to cut. Want to try it? Use some scrap pieces to develop your skills.
When you are cutting a small piece out of a larger sheet you will need to use the keyhole saw (discussed below). Cut the drywall with the keyhole saw in one direction and score it and break it in the other one.
Cutting Holes With a Keyhole Saw
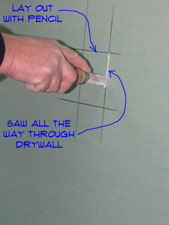
Using a drywall keyhole saw for cutting out boxes and openings is common. A keyhole saw as the name implies cuts drywall by sawing it. It has a sharp point that can be bored through the drywall to start a hole. Once the saw is through the drywall you saw along the line. At times you can use a keyhole saw to cut in from the edge of a sheet.
Another thing a keyhole saw is good for is cutting out an opening. Electrical boxes or light fixtures are a good example. You need to measure from the edges that the drywall piece will abut to.
Lay out the opening on the new piece of drywall. With the lines in place you can cut out the opening using a drywall keyhole saw. Use the point to bore into the drywall. Saw the opening out from there.
Some pieces of drywall may need several things cut out of them. Bathrooms and kitchens are examples of this. Using a drywall keyhole saw is a must at these locations.
Using a Drywall Tee Square
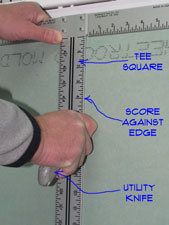
When available, using a drywall tee square to cut drywall is a time saver. A tee square as the name implies looks like a tee. It is designed to provide a guide for cutting long sheets of drywall to the desired lengths.
The long leg on the tee square is four feet long. The tee at the top aligns with the long edge of the drywall. The self squaring feature gives you a good edge to cut the drywall along.
Use your knife or a pencil to mark the desired length of the piece you need. Position the tee square at the mark. Use hands, knees and feet to hold the tee square in place while you run the utility knife along it. Snap the drywall and score the back to complete the cut.
Using a drywall tee square as a straight edge to make smaller cuts also makes sense. A tee square is not a big investment, around $20. Weigh the cost against how often you will likely use it. Are you in this home repair thing for the long haul? It might be worth the investment.
Cutting Electrical Outlets With a Router
Cutting drywall with a router can save time and improve the quality of the installation. One note of caution, they generate a lot of dust and can require a lot of clean up.
Drywall routers are not quite the same as a router you may have in your wood shop. They are similar to a laminate router that is a specialized tool. Standard drywall router bits require an eighth inch shank. Heavy duty bits may be a quarter inch shank. The point is that a standard router is not set up to act as a drywall router.
When you get down to the nitty gritty, a standard router might be converted to a drywall configuration. That is beyond the scope of this article. It is possible but not practical. Instead of cutting drywall with a router, I recommend using more conventional cutting techniques for simple repairs.
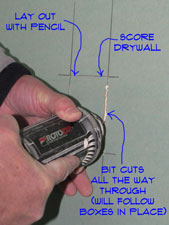
Drywall routers will cut around an opening when the drywall is in place. When you use a router to cut an opening you first mark and approximate center of the opening on the drywall. Then you tack the sheet in place. Push the router through the drywall at the mark. Move laterally to the edge of the opening. For an electrical box or light fixture, you jump to the outside of the rim and follow the edge counterclockwise. For a plain cut out you follow the inside of the opening with the router. Make sure you push the wires back into the box before routing the drywall.
You can also use the router to cut out opening on a sheet before you put it in place. This takes some practice as the router cuts the board easily and does better when it has something to follow. Some drywall hangers score the drywall and the router will track in the groove.
Most homeowners do not have a drywall router and it is probably not worth purchasing one for a small project. Got a tool fetish, you can own one of these high powered babies for around $75. With a little creativity you can even manage to justify it to your spouse.
How To Cut Cement Board
Learning how to cut cement board is important if you have a bathroom remodeling project. Can you cut cement board with a utility knife? That is a $64,000 question. The answer is yes, but it is not fun. As mentioned above cement board is two fiberglass mats with a cement core.
You and use a utility knife to score the fiberglass. You have to score it several times and the blade will have a tendency to jump out of the groove.
With the fiberglass mat scored the cement board will break similar to drywall. The problem is that it does not break cleanly or pretty for that matter. Sometimes hunks will break free that are not anywhere near the line that you scored.
A much better choice is a diamond circular saw blade. Cut the cement board the same way you would cut plywood. Do it outside or in the garage. Cutting it dry with a diamond blade will generate a lot of dust. Wear a mask.
Summary
For related drywall repair topics see the articles 'How To Fix Drywall', 'Patching Drywall', 'Repairing Large Holes in Drywall' and 'Taping and Mudding Drywall'.
Cutting drywall for you home repair projects should not be a big problem. A few tools and a couple of tricks and you are in business. Not really rocket science and since you are taping over it, it is forgiving. Are you glad that you learned how to cut drywall?
Maybe 'glad' isn't the right word. How about satisfied? Is that a better word? All right let's concede that it would not be your first choice for a fulfilling experience. You do have to admit, however, that it did save you a few bucks.
Water Heater Sediment
 Hot water heater sediment can be a problem for more than one reason. Sediment inside of your tank will reduce the amount of hot water you have. It will also cost you more to heat your water, since you are heating sediment also.
Not sure if you have a problem with sediment? See the articles, 'Gas Water Heater Troubleshooting' and 'Electric Water Heater Troubleshooting' for a complete listing of all the water heater topics.
Causes of Sediment
Water has minerals and suspended particles in it. When water is still, the minerals and particles will settle out and gravity will cause them to fall to the bottom of whatever is containing the water.
Your hot water tank is a superb example. It is filled with water and for long periods of time it sits idle.
While it is setting still, various minerals will settle to the bottom of your tank. In time this sediment can harden and become a problem.
Problems With Sediment
How much of a problem? Well, have you heard the term 'sedimentary rock'? You get the idea, your water heater can get filled up with a hardened mass of material at the bottom.
There are differing opinions on whether this is harmful or not. Some contend that minerals in water are good for you and that there is no danger in drinking water that contains them. Others contend that the concentration of minerals or other undesirable chemicals is bad for you. That is why you will often read that you should not drink water that comes from your hot water tank.
We are not discussing the safety or dangers of hot water heater sediment. Instead, we are discussing whether or not it has 'unfavorable' or 'troublesome' effects on you water heater. Put simply, hot water heater sediment, can cause problems.
Sediment Issues
Below, we have listed a few hot water heater sediment problems. The severity of these issues will depend on the age of the water heater and the level of build up.
Displacement
Hot water displacement would be the first thing that comes to mind. Do you have a 40 gallon hot water tank? The equivalent of ten gallons of sediment will mean 25% less hot water. How many teenagers do you have? It is clear that sediment will lower the efficiency of the hot water tank.
Lowered Efficiency
Hot water heater sediment will also affect the heating of the water. Gas hot water tanks heat the water via a flame at the bottom of the tank. What happens when the bottom of the tank is filled with sediment? You have to heat the sediment first. We mentioned minerals. Some minerals do not like being heated all that much. The sediment may react or make noises when heated.
The other issue is that you have to heat the sediment first. Wasn't the goal to heat the water? Do the math, how much does it cost to heat a big pile of sediment, every time you need hot water. If you are here reading an article on this website, I have to believe you are somewhat concerned about cost. Why waste money?
Damage to Heating Elements
Hot water heater sediment is more of a problem on electric hot water heaters. Electric water heaters have an element near the bottom of the water tank. When the sediment builds up high enough, it will burn out the lower element. When the lower element fails you will have a lot less hot water. Not to mention the cost to replace the element.
I don't have the time or inclination to argue or debate this subject. Let's just both agree that eliminating hot water heater sediment is in your best interest.
Removing Sediment
Removing hot water heater sediment can be a periodic maintenance task. As discussed in the previous article, 'Water Heater Sediment Problems', getting rid of sediment can save money and prevent damage.
Is your hot water tank fairly new? I mean a few years old. Flushing the tank out periodically will take care of the problem. Do you have very hard water? You will need to do it more often. I have heard of horror stories where sediment can burn out a lower heating element in as little as six months.
Flushing the sediment out of your hot water tank on a regular basis will be the solution. For instructions, go to 'Flushing a Hot Water Tank' for directions on what to do. It is not that big of a job and doing it regularly will prolong the life of your hot water tank. Even better, it will save you money.
Old hot water tanks with serious sediment build up could be a big job. Hot water tanks do not have that many openings. Electric ones have a few extra ways to get in.
Build up of this kind is due to a lack of maintenance over a long period of time. You can find other articles online that will help you with this problem. Breaking up deeply entrenched and hardened sediment can be a big jog. Replacing the hot water heater at this point might be the course of wisdom. Your water heater probably has other issues, if it is this old.