Search
Repair Topics
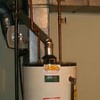
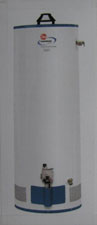
Gas Hot Water Heater Troubleshooting
This article on gas hot water heater troubleshooting will help you to locate your problem and get it repaired quickly. See below for guidelines on what to look for and information on how to fix it. Don't have a gas water heater? See 'Fixing Electric Water Heaters'. Not sure which kind you have, see 'Identifying Water Heater Types', for a description of each type.

There are two key topics associated with 'Gas Hot Water Heaters'. (1) 'Water Heater Pilot Light Issues' - If the pilot light goes out, the water heater won't work. (2) 'Problems With a Gas Water Heater Thermocouple' - A bigger problem than just lighting the pilot.
Some common problems for all types of Hot Water Heaters are, pressure relief valves, leaks, sediment, drain valves, anode rods and dip tubes. A general troubleshooting discussion is provide in the article, 'Identifying and Repairing Water Heater Problems'.
The danger with a gas hot water heater is the gas itself. If for some reason gas is allowed to escape without being ignited, you can get an explosive situation. Gas has an odor to it that you are probably familiar with. The odor is added as a safety feature. 'I smell gas', something you hear or say from time to time is not from smelling the gas at all. Natural gas is odorless. A chemical is added to alert people to a gas build up.
Natural gas can explode. Caution needs to be exercised to make sure the gas is shut off and only turned on when the pilot is lit. Some repairs that result from gas hot water heater troubleshooting are fairly simple. Others may require some work.
Gas Hot Water Heater Repairs & Replacement - Costs Involved
We are in the whitewater of cost potential here. A new hot water heating unit can run anywhere from $350 to $3,500. Installation costs can run from $200 to $1,600. This is all for a new system. Yes, you may only need a $20 part. Add that to a service call and you should be looking at $100, more or less. Although repair bills of several hundred dollars are not unheard of. Just keep in mind that with the potential above you might get some serious selling when you try to get someone to fix your hot water heater.
Natural Gas Safety Concerns
Remember there is a potential danger with the gas. Natural and propane gas can explode. Never attempt a repair unless you have turned the gas off and are thoroughly familiar with safe working practices.
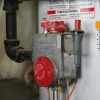
WARNING!! Natural Gas Can Explode! Make Sure the Gas Is OFF!!! The Hot Water Can Be VERY HOT!!! WARNING!!!
A gas leak is an entirely different problem than a broken water heater. If you smell gas, take immediate safety precautions, which include leaving the premises and calling the gas company. See the article 'Natural Gas Safety Tips' for more information.
Gas Hot Water Heater Troubleshooting Information
Take a look at the possible problems below. Try to find a match for your situation. Follow the links to get to the right information. Read through that information before you proceed. Many problems can have more than one cause.
 No Hot Water
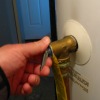
Check the pilot light. Is it on? The thermocouple provides a safety feature for a gas hot water tank. When the pilot is not on, the valve will not allow any gas to be delivered. See the article 'Hot Water Heater Pilot Light', for the information on what to do .
Did you check to see if the gas is on? Go to the article 'Hot Water Heater Gas Valve', for direction on issues with the gas valve.
 Not Enough Hot Water
This gas hot water heater troubleshooting exercise starts with the thermostat. Go to 'Gas Hot Water Heater Thermostats' for a discussion.
A clogged flue or vent could be the problem. See 'Venting a Gas Water Heater' for information on keeping your vent clear. A defective thermostat is also possible.
The thermostat is part of the gas valve. See 'Water Heater Gas Valve Problems' for the issues surrounding this device.
The dip tube is another possibility. The article 'Hot Water Heater Dip Tube' addresses this problem.
 Pilot Will Not Light
You need to follow the correct procedure to light the pilot. See 'Problems with Gas Water Heater Pilot Lights' for instructions.
Gas hot water heater troubleshooting usually leads you to the thermocouple. Go to the article 'Gas Water Heater Thermocouple Issues' for information on this common repair.
The other less common problem would be the gas valve. A bad gas valve will not allow any gas to go to the burner or pilot light. See 'Fixing Hot Water Heater Gas Valves' for the issues surrounding this device.
 Pilot Will Not Stay Lit
The thermocouple is usually the problem when this happens. Go to the article 'Gas Water Heater Thermocouple Issues' for information on this common repair. The other less common problem would be the gas valve.
A bad gas valve will not allow any gas to go to the burner or pilot light. If the pilot light lights and then shuts off it is not the gas valve. If it won't light at all, see the article, 'Fixing Hot Water Heater Gas Valves' for the issues surrounding this device.
A clogged or partially clogged vent can also cause this problem. See 'Gas Water Heater Vents'for information on keeping your vent clear.
 Water Too Hot
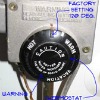
The first thing to check is the thermostat. Go to 'Gas Hot Water Heater Thermostats' for a discussion. If it is set too high, it may just need an adjustment.
The thermostat needs to be set to a safe temperature. Scalding and severe burns can occur in a matter of seconds when the water temperature is too high. Most manufacturers reccommend a setting of 120 degrees. See the article 'Proper Water Heater Temperature Settings' for safe guidelines on hot water settings.
A defective thermostat is also possible. The thermostat is part of thegas valve. See 'Hot Water Heater Gas Valve' for information on what can be done.
 Main Burner Will Not Stay Lit
Again the thermocouple could be at fault. If the thermocouple is faulty, it will not send the correct signal to the gas valve to allow gas to continue flowing. Go to the article on 'Gas Water Heater Thermocouples' for information on this common repair. The other less common problem would be the gas valve.
A bad gas valve will not allow any gas to go to the burner or pilot light. See the article on 'Hot Water Heater Gas Valves' for the issues surrounding this device.
A clogged or partially clogged vent can cause this problem. See 'Venting a Gas Water Heater' for information on keeping your vent clear.
 Black or Rusty Colored Water
This is caused by a dissolved anode. The anode rod has metal in it that is supposed to oxidize in place of the steel in your tank. This prevents your tank from leaking. When the metal is gone the steel core and your tank start to rust, thus discoloring the water. See 'Hot Water Heater Anode Rods' for information on the anode rod.
Sediment in the tank can also discolor the water. Over time the minerals in the water will build up inside the tank and some of them can oxidize, thus causing a dark color and odor. See the article 'Water Heater Sediment' and 'Flushing a Hot Water Tank' for more information.
 Slow Recovery Time
A clogged or partially clogged vent can cause this problem. See 'Venting a Gas Water Heater' for information on keeping your vent clear. If the vent is clogged or partially clogged the burner may not be working efficiently.
Another problem is the size of the hot water tank. Do you have more people in the house, perhaps visiting? The water heater may be too small for the demand. See the article 'Water Heater Sizes for Households'.
You may be tempted to turn up the temperature on you water tank, however, this can be dangerous. See the article 'Water Heater Temperature Settings' for instructions.
 Pressure Relief Valve Leaking
The pressure relief valve very rarely leaks in the true sense of the word. It does however vent water which can seem like a leak. The water will vent for two reasons, one is that the pressure in the tank is too high, this should be addressed as soon as possible. Issues with this item are found in the article, 'Checking Pressure Relief Valves'.
The other reason would be a defective valve that vents even when there is not a problem. When the valve goes bad, it will have fail to the open posistion. This type of valve has a useful lifespan that is shorter than other types of valves. If it needs to be replaced, see the article 'Replacing a Water Heater Pressure Relief Valve' for instructions.
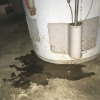 Hot Water Tank is Leaking
Depending on the location of the leak, this might be a big problem. There are four possible spots that the water heater can leak, the water lines, the pressure relief valve, the drain valve and the tank itself. Go to the article 'Repairing a Leaking Hot Water Heater' to track down your problem.
WARNING!! Natural Gas Can BE Dangerous!!! The Water In Your Tank Can Be VERY HOT!!! WARNING!!!
Water on the floor around the water heater may be caused by leaks in the pipes connected to the water heater or by the pressure relief valve. See the article 'Checking a Water Heater Pressure Relief Valve' and 'Checking for Plumbing Pipe Leaks' for more information.
Gas Hot Water Heater Troubleshooting - Article Topics
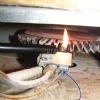
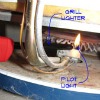
 Gas Hot Water Heater Pilot Light
Gas hot water heater troubleshooting always seems to start with the pilot light. Most gas hot water heaters us a pilot light to ignite the burner. There are some more expensive models that use electronic ignition.
When the pilot light is out or won't stay on, you will not have hot water.
Follow the above link to get to an article that discusses the issues related to the pilot light. Find out if this is the type of repair you can do yourself?
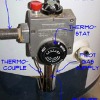 Gas Water Heater Thermocouple
The thermocouple is a sensor that tells the gas valve when to allow gas to flow to the burner. Gas hot water heater troubleshooting often involves the thermocouple.
When they go bad the will not allow the gas valve to release any gas. No gas, no hot water.
Follow the above link to get to an article that discusses the hot water heater thermocouple. This is a common do it yourself repair that you will probably be willing to attempt.
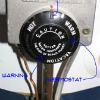 Gas Water Heater Thermostat
The main concern with the thermostat is getting the temperature set right. Water that is too hot can be dangerous. Learn what the proper settings are.
The gas valves and thermostats are slightly different on various models of hot water heaters. There is a procedure that needs to be followed when making changes. Often, this is printed on the side of the water heater.
The thermostat is part of the gas valve. There is not a lot that can be done to fix one that is bad, short of replacing the gas valve.
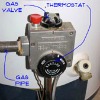
 Hot Water Heater Gas Valve
The gas valve controls the gas that goes both to the pilot light and the main burner. It uses the thermocouple to determine when it is safe to release the gas. It also uses an integral thermostat to know when more heat is needed. Explosions can result from natural gas that is not burned. Therefore the water heater gas valve has safety devices built in.
Gas valves are a fairly expensive part and are quite a bit of work to change. Is yours really bad? Find out by following the above link. Make sure you have finished your gas hot water heater troubleshooting exercise before you assume it is the gas valve.
Obstructions in the vent pipe can restrict the air flow to your water heater. This will cause the burner to operate poorly. It could mean a reduced amount of hot water. Badly clogged vents will result in dangerous gases building up in the home.
There are two types of vents for gas hot water heaters. For standard efficiency models there is a 'Hot' vent that is connected to a chimney. High efficiency models will have a plastic vent that may go horizontally out of of the house. Either type can become clogged.
Additionally, the chimney that the vent is attached to, can be clogged.
 Installing a Gas Hot Water Heater
When all else fails you may be faced with replacing your hot water heater. At this point you will have to decide if you are up to the task of replacing the water heater yourself.
The first hurdle will be deciding what type of water heater to purchase.
If you can get some help, you may want to consider it. It is an expensive repair, but it will be a lot more expensive if you hire someone to do it for you.
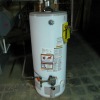
Problems Common to All Water Heaters
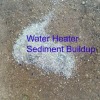 Dealing With Hot Water Heater Sediment
Sediment can build up in the bottom of your hot water heater over time. This can affect the amount of hot water you have and potentially damage other components. Minerals in the water, even city water can build up over the life of the water heater.
These deposits can significantly lower the amount of available hot water. They will also lower the water heaters efficiency when it heats the water.
There are steps you can take to remove the sediment. Learn what they are by following this link.
Learn what you need to do to get rid of the sediment inside your hot water tank. It can be a little messy, but it will get you hot water tank working the way it is supposed to. A garden hose and a pair of pliers is all you need. Click on the link above to get to the information.
Repairing a Leaking Hot Water Heater
How serious is it when a hot water heater is leaking? That depends a lot on where it is leaking and how much. Some things can be tightened to stop the leaks. A tank that is leaking is not good news.
Find out if you need to look through your papers for the warranty. See if this is something you can fix. Click this link to get the good or not so good news.
 Repairing a Water Heater Dip Tube
What's a dip tube anyway? Believe it or not, it is an important feature of your hot water tank. Cold water that enters the tank needs to be pushed to the bottom of the tank, otherwise it will cool the hot water that is already in the tank.
Find out what can go wrong with this part and what you need to do to fix it. Just take my word for it, it is important.
The amount of hot water you have will be affected by it, when it is broken. Follow this link for information.
 Repairing a Water Heater Pressure Relief Valve
The name tells you everything. When pressure builds up inside your hot water tank, this valve releases. This is a safety feature. A defective valve will release when the pressure is still within safe limits. How to you know when it is bad? How hard is it to fix?
Click on the link above to find answers to these questions. Can you replace this valve if you need to? How hard is it? More questions that this article answers.
Gas Hot Water Heater Troubleshooting Summary
There are several possible problems you can be having with your gas hot water tank. Sorry, but there are more issues than one article can cover. We have tried to point you in the right direction for finding the answer to your problem. Some of the answers to your problem may be more than you want to tackle. On the other hand, some repairs are not that hard.
You be the judge. Gas hot water heater troubleshooting involves some problems that are fairly simple. Hopefully, even if you wind up calling a technician, you will be able to discuss the problem with him intelligently. Asking the right question will often save you money.
Gas Hot Water Heater Installation
 A gas hot water heater installation is needed when your old water heater has gone to a better place. Are you sure your water heater needs to be replaced? Have you checked on possibly fixing it? Water heaters can last ten to fifteen years. Is yours older than that? Installing a new gas water heater is a big job for a homeowner. Yes it can be done in a day if things go well.
Before you decide on a new gas hot water heater installation you want to make sure you can't repair the one you have. See the article Gas Hot Water Heater Troubleshooting for things you can check on.
This article covers the installation of a standard, normal draft gas hot water heater. These are the lowest cost to purchase and the easiest to install. On demand, high efficiency or induced draft units are not covered in this article. Feel like you are in the right place? Then read on.
Using Common Sense Header
What Can You Save?
A standard 40 gallon gas hot water heater installation should run between $800 and $1,000. Size matters and so does the age of your current installation. An installer may tell you need other parts and this will drive the cost up. Sometimes another $200 to $500 of up selling can take place.
How Hard Could It Be?
A gas hot water heater installation is a fairly difficult job and will take most of a day if all goes well.
For and explanation of the terms in this section, see How to Use This Site.
Check the Simple Things!
There is nothing simple about installing a new water heater. Check out the article Gas Hot Water Heater Troubleshooting, to make sure the water heater is really a goner.
What Can Go Wrong?
 A gas hot water heater installation is a big job. It involves natural gas and gas can explode. Make sure the gas is off and the area is well ventilated. The water in your tank will be hot if the heater is working. Cool it down before you try and drain it. Size does matter, and getting a water heater that is a different size that the one you had will require that the hook ups be modified. Not getting the job done will leave you without hot water. Not a savory thought.
Selecting a New Hot Water Heater
Gas hot water heaters come in different sizes. Getting one with that is the same height will make a huge differences on how hard the hook ups are going to be. There are some key dimensions. One is the height of the top of the water tank from the floor. The second would be the height of the gas supply line from the floor. It is not the end of the world if you can't find an exact match. It just means that you will have to modify the piping. Another consideration would be the vent pipe. Most water heaters have 3" vent pipe. You cannot reduce the vent pipe so getting a new heater with a larger vent is a problem.
The next concern is the cost. Gas hot water heaters can range in cost from around $300 on up to $2,000 for a high efficiency model. In this article we will make the assumption that you are going for a less expensive standard model. These should be in the $300 to $600 range.
Watch where you buy your hot water tank. Some online vendors and specialty stores have disclaimers that void the warranty if you install the hot water heater yourself. The home supply stores that cater to do it yourself customers, have warranties without this disclaimer. Obviously they exclude improper installation and incorrect usage.
Water heaters are a big item and will not fit in the trunk of a car. In addition they are glass lined and should be handled with caution.
Some ancillary items that you might need would be: (1) Dielectric unions or nipples. Some water tanks come with these installed. You will have to check with your building department to find out if these are required. (2) Pressure relief valve. Some new water heaters have them pre-installed, others do not. A drip pan, these are suggested and required in some places. A stand if the water heater is going in the garage. The bottom of the water heater needs to be 18" off the ground in a garage. You may also need misc. fittings to make the connections.
WARNING!! Natural Gas Can Explode! Make Sure the Gas Is OFF!!! The Hot Water Can Be VERY HOT!!! WARNING!!!
Removing the Old Water Heater.
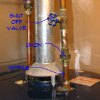
Removing your old hot water heater is part of a gas hot water heater installation. The first thing you want to do is turn off the gas to the water heater. You should have a shut off valve in the gas line near the connection to the gas valve. You turn the valve ninety degrees until it is perpendicular to the gas line. Next run some hot water in a sink nearby until the water cools down (if the water heater is not working you can skip this step).Shut off the cold water inlet valve and leave the hot water faucet open in sink nearby. Hook a garden hose up to the drain valve near the bottom of the tank. Run the hose to a floor drain or outside and open the valve. After it has drained down a little way, you can open the pressure relief valve and shut off the faucet.
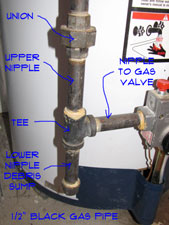
At this point you can unhook the gas line. You should have a union below the shut off valve. Use pipe wrenches to loosen it. You want to hang onto the nipples and fittings that are connected to the hot water tank. Remove and save everything up to the gas valve.
Next would be the water lines. The cold water inlet and the hot water outlet. Again you should have unions not to far above the tank. Loosen the unions with two pipe wrenches. Unhook the first section of vent pipe from the fume hood and the first fitting. Save this piece also. At this point the tank should be free.
You should remove the fittings and nipples at the top of the tank as long as they are in good condition. One more item you will want to salvage is the drain tube that extends down from the pressure relief valve.
This is where you need the helper. Get some help to remove the old tank. Disposing of it might be a chore in itself. For now you want to get it out of the way.
Placing the New Water Tank
The next step in a gas hot water heater installation is unpacking the new unit. It is best to do this out away from the area it is being installed. There should be some instructions that come with it. Read through the instructions and look for any special items that need to be attended to. Be aware of any temporary plugs or shipping braces that need to be removed.
Are you installing a drip pan. Put in place before you try to set the water tank. Using some help again carry the new water tank into the location and set it in position. Turn the tank so that it is oriented the same as the old one. The hot and cold water lines and the gas line all need to line up.
At this point you find out how much trouble you are going to have with the fittings. Try dry fitting the gas line parts from the old water tank. Do they line up? Yes, great, this is good news. No, Take some measurements. Remember to allow 3/8" to 1/2" of additional length for each threaded end. You might want to make a sketch of what you will need.
Now check out the water line nipples. Are adjustments needed. For a tank that has dielectric nipples installed you will need a coupler and possibly a reducer. The nipple length may be off. Measure from the inlet and outlet on the water tank up to the bottom of the union. Make yourself a little sketch with the dimensions. You may have flexible connections here. Some building departments allow it. If you do that is a lot easier.
Mark your sketch with the fitting types, male, female and union and to what point on the fitting you are measuring to. Oh, almost forgot, size of pipe, either 1/2" or 3/4" or a combination of the two. I know this is a little tedious, but it is a necessary step in a gas hot water heater installation.
Last you want to put the new fume hood in place on top of the tank. How does your vent pipe line up. Is the old piece long enough and the right size? Yes? Good news. No, then you will have to get another piece of vent pipe.
Are you ready for a trip to the supply house? Take your sketches with you and go to a home supply store that does pipe threading and has a plumbing department. Ask for help and explain your situation. They should be able to cut and thread the pipe for a nominal sum. In addition they can get you the right fittings to make the connections. Get some suitable joint compound while you are there.
Installing the Gas Line
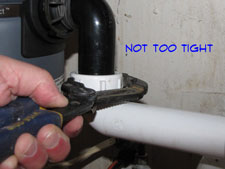
With the right fittings in hand this step of your gas hot water heater installation should not be hard at all. You use pipe wrenches to tighten gas line. You want to use a joint compound on the threads that is suitable for gas connections. Start with the nipple going into the gas valve. Remove the plastic cap first. Tighten the fitting snug. Put the tee on next and then the upper and lower nipples. The lower nipple should have a cap on it. The upper nipple goes into the union.Make sure all the connections are tight and then tighten the union. Turn the knob on the gas valve to off. You can turn the gas on at this point. Use soapy water to check for leaks. Never use an open flame to check for gas leaks. Find a leak, you know the drill, take it apart and tighten it.
Hooking up the Water Lines
Water line hook up in a gas hot water heater installation is e lot easier when you have the right fittings. Again you should use pipe joint compound on the threaded connections. Be sure to remove the plastic caps. Work from the water tank up toward the unions when tightening things. Make sure the connections are tight. Hook up the unions and that should be it.
Then last item would be the pressure relief valve. Again use some pipe joint compound on the threaded connections. Tighten the relief valve with the outlet turned down. Install the outlet tube that you took off the old unit.
Hooking Up the Vent
Did you listen and get a water heater with the same size vent? Good, your gas hot water heater installation is a lot simpler! You will have to replace all the vent pipe up to the chimney if you got one with a larger diameter.
Install the fume hood on then top of the tank. The fume hood should set level and the legs should be straight. There should be some holes for the legs. Get the legs in place and hold down on the fume hood. You want to run some sheet metal screws down into the holes next to the tabs on the legs.
Cut your vent pipe to length, remembering the parts that slip over. Screw the vent pipe into place using sheet metal screws.
Starting it Up
You have to fill the hot water tank before you can turn on the burner. Open a hot water faucet nearby and turn on the water. Let the tank fill until all of the air is bled out of the tank.
Check for leaks and tighten anything that is leaking. Read the instructions for lighting the pilot. Every water heater varies slightly on this procedure. With the pilot lit you should be able to turn the gas valve to on and the heating process will begin. A hot shower is not too far in the future.
Gas Hot Water Heater Installation Summary
Now that was a big job. You might be a little tired, but you likely saved $300 to $500 doing the work yourself. Was it worth it? You will have to be the judge of that. I have heard horror stories of homeowners that were sold hundreds of dollars of additional parts when the plumber came out to actually install the heater. You may have saved even more.
With this experience under your belt you are ready to tackle just about any home repair project. What will you do now? For today a little rest is in order. Tomorrow, who knows.
Garbage Disposal Repairs
 Can you make your own garbage disposal repairs? Without the disposal you wind up throwing food waste in the trash. This often results in some foul smells. The odors can have far reaching impact on your ability to enjoy life. How much nicer it is when we can grind it up and have the run down the drain.
A garbage disposal is both a mechanical and an electrical device. Therefore, you can have problems with both aspects. With garbage disposals, power and quality are issues. Poor quality units may not grind things up fine enough and can get clogged up easier.
Don't despair, garbage disposal repairs are within your grasp. You won't even have to sign up for night classes. In fact you will find some the repairs pretty easy to do.
Garbage Disposal Repair - Information
What Can You Save?
Assuming that the garbage disposal is not broken you will be faced with a service call, $50 to $75. If the serviceman tells you that your unit is at death's door and just happens to have a new one in his truck, you could be looking at a couple of hundred dollars.
How Hard Could It Be?
Replacing the disposal with a new unit would be the hardest job. Most other garbage disposal repairs are possible for the average home owner.
Check the Simple Things!
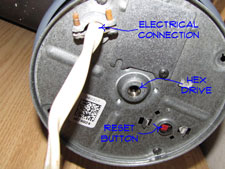
The garbage disposal is plugged in. Check the GFCI and the breaker first. Make sure it has power. There is also a reset button on the bottom. It will kick off when the unit jams. Wait a half an hour and try the reset, assuming you have the jam freed up (see below).
What Can Go Wrong?
A thoroughly clogged garbage disposal can mean a sink full of dirty water. Take precautions for dealing with the water. Rags and pails are a must. Never stick your hand in the unit. Make sure the power is off before working on it. You can get hurt from this device. Getting the unit or drain dismantled and not getting it together will render the sink unusable. Not a great way to please the family.
Electrical Problems
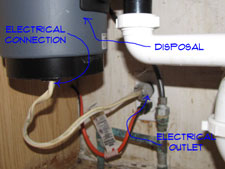
Dealing with garbage disposal electrical problems are usually related to a jammed garbage disposal. There is generally a loud electrical noise, like a motor binding when this is the case.
Did the garbage disposal jam? Now it won't do anything? It is likely that the safety feature on the motor tripped the reset. There is a button on the unit, usually on the bottomed that will need to be pushed. You will usually have to wait several minutes to a half an hour before the button will hold.
You need to free up the jam before you try to run the unit again, see the link below for instructions. After freeing up the jam, you can push the reset button. Let the unit cool off first.
WARNING!! Make Sure the Power is OFF!!! BEFORE You Work on Electrical Devices!!!
 Garbage disposal electrical problems may also include tripped breakers and GFCI protection.
If you have lost power for no apparent reason you will want to check the GFCI at the plug for the unit or one nearby (plugs that follow a GFCI receptacle are also protected). Has it tripped? Reset it and try the garbage disposal again. Still no power, check the breaker, reset it as needed.
Still won't work? Try plugging something else into the receptacle or checking it with a tester. With the unit cool and power to the receptacle it should run. If not it may need replacing, see the article below on replacing a garbage disposal for more information. Hopefully your garbage disposal repairs were fairly simple and you can move on to more fulfilling pursuits.
Stuck Objects
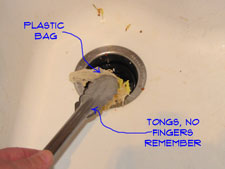
Removing objects from a disposal may be needed when the disposal can't grind them up. As a rule you're careful. Once in a while something gets in the disposal that it can't handle.
Silverware, coins or other metal objects are quite popular. The noise usually sets off the alarm and you know you got a problem. Other things like plastic bags and bones may not be as loud but are just as annoying.
Unless the handle of a fork is obviously sticking up out of the opening you want to make sure the power is off. Always shut the power off before attempting any garbage disposal repairs.
With the power off try to take the rubber strainer out. Take a look and see if you can identify the object. You may need a flashlight.
With tongs or a pair of pliers get a hold of the object and remove it. Check again and make sure you got it all. Satisfied everything is clear? Put the stainer back in and turn the power on. Try it and see if it runs quietly again. Yes? Great, you have completed your garbage disposal repairs, at least for now.
WARNING!! Never Put Your Fingers Inside the Garbage Disposal!!!
Jammed Garbage Disposal
Fixing a jammed garbage disposal is a common problem. Most of the time it is not too difficult to correct.
When you turn the switch on to get that loud electrical sound and no action from the disposal? Shut the switch off quickly, you don't want to burn up the motor. Something has gotten into the unit that it cannot handle. Now it has jammed.
For complete coverage of this topic, see the article 'Fixing a Jammed Garbage Disposal'. This series of articles discusses the methods that can be used to free up a jammed disposal. It also covers the tools you will need, one of them should have come with your disposal.
Dealing with garbage disposal repairs of this kind are just one click away. Follow the above link to read more information on this subject.
Summary
Whatever you faced, we hope that is over now. Your garbage disposal repairs are complete and new horizons have opened up to you. At the very minimum you are free to move onto other repair projects in your home.
Smelly Garbage Disposal
 Do you have a 'Stinky Garbage Disposal? Don't feel bad, it is a common problem. What is better is that you can fix the problem without too much trouble.
The kitchen is where the food is prepared and having foul odors is the last thing we want. There are things that can be done to prevent odors and smells, most of them very simple. There are other things that can be done once odors have developed.
Why we get garbage disposal odor is not much of a mystery. The garbage disposal performs a less than glamorous task. Grinding up unwanted food and kitchen waste. It is effective at getting rid of these items, but there is a dark side.
When food rots, it smells. Food that gets left over inside of the disposal is going to rot and eventually smell. Proper usage and periodic maintenance will likely eliminate the problems. You don't have to live with foul smells.
A Stinky Garbage Disposal - The Issues
What Can You Save? - This is not something that you would normally call someone for. If you did, it would likely be a service call, between $50 and $75. The odor can be a bother, fortunately there are easy ways to take care of it.
How Hard Could It Be? - dealing with a stinky garbage disposal is not a hard job at all. These repairs will have a Difficulty Level of: Simple. These repairs require a Skill Level of: Total Novice. For and explanation of the terms in this section, see 'How to Use This Site'.
Check the Simple Things! - This is already a fairly simple problem. See the information below for the best practices in dealing with this unwanted odors. For other garbage disposal issues, see 'Repairing a Garbage Disposal', for more information.
What Can Go Wrong? - Not dealing with this problem in a timely way can lead to deeply entrenched odors. When this happens they will be harder to get rid of. Nothing worse than going to prepare a meal and you have a bad smell in the kitchen.
Causes of Garbage Disposal Odor
 The cause of garbage disposal odor should not be a mystery. The purpose of a disposal gives it away.
Rotting food smells and bad smells from the disposal mean rotten food. The garbage disposal grinds up food waste. Odors come from food waste that has not been washed down the drain.
It may seem like good economic sense to shut off the water as soon as the food is ground up. However, this may leave food on the sides of the disposal that later begin to rot.
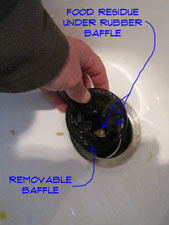
The rubber baffle is another place that food waste can collect, especially the under side of it. The water does not rinse it and the grinding action of the disposal throws bits of food up onto it that stick to the baffle.
In addition, the garbage disposal has other nooks and crannies that food can stick to. When these bits and pieces of food start to rot, you get odor.
The amount of food and the length of time will affect how much odor. Make it a practice to run water after the food is ground up. See the section below on proper garbage disposal maintenance.
Commercial Cleaners
If a 'commercial garbage disposal cleaner' does not appeal to you, there are other options. One would be to clean the garbage disposal manually with old fashioned soap and water.
This an effective but low tech method. Before you begin make sure that power to the disposal is off. Don't just trust the switch, unplug it or shut the breaker off.
You will need a stiff brush with a long handle and a smaller brush to clean the rubber baffle. An old tooth brush will work for the smaller brush. Mix some dish detergent with warm water and scrub the inside of the disposal thoroughly with the long handled brush. Make sure the sides of the disposal are cleaned thoroughly. Try to get the brush up under the rim and scrub that area as well.
Many garbage disposals have a fixed baffle that cannot be removed. Flip back the rubber and scrub the underside with the small brush. Continue pulling up the baffle until you have the entire underside cleaned.
Scrub the grinding cutters and bottom plate with the long handled brush. Try to move it around and get the perimeter completely cleaned. The cutters move around so make sure they are clean. This method requires a little elbow grease to accomplish. You have the satisfaction of knowing you are doing a thorough job.
After you are done with the brush, plug the disposal back in. Run first warm water and then cold water through it with the disposal running. Repeat the process if you are still getting odor.
Scrubbing a Garbage Disposal
If a 'commercial garbage disposal cleaner' does not appeal to you, there are other options. One would be to clean the garbage disposal manually with old fashioned soap and water.
This an effective but low tech method. Before you begin make sure that power to the disposal is off. Don't just trust the switch, unplug it or shut the breaker off.
You will need a stiff brush with a long handle and a smaller brush to clean the rubber baffle. An old tooth brush will work for the smaller brush. Mix some dish detergent with warm water and scrub the inside of the disposal thoroughly with the long handled brush. Make sure the sides of the disposal are cleaned thoroughly. Try to get the brush up under the rim and scrub that area as well.
Many garbage disposals have a fixed baffle that cannot be removed. Flip back the rubber and scrub the underside with the small brush. Continue pulling up the baffle until you have the entire underside cleaned.
Scrub the grinding cutters and bottom plate with the long handled brush. Try to move it around and get the perimeter completely cleaned. The cutters move around so make sure they are clean. This method requires a little elbow grease to accomplish. You have the satisfaction of knowing you are doing a thorough job.
After you are done with the brush, plug the disposal back in. Run first warm water and then cold water through it with the disposal running. Repeat the process if you are still getting odor.
Home Remedies for a Stinky Garbage Disposal
 This article covers a couple of home remedies for removing garbage disposal odors, stink and smells. Neither of these costs much and will work if the odors are not too severe.
Do not use bleach or bleach based products to get rid of odor. Your disposal has several rubber seals that may be damaged by the bleach.
Bleach can also react with other chemicals and create dangerous fumes. Other methods are just as effective and not as dangerous.
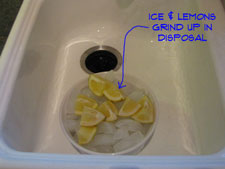
Lemons and Ice
One popular method for eliminating odor is to cut a lemon into quarters and put them in the disposal along with a couple of big handfuls of ice. Grind up the ice and lemons for several seconds and then let set.
Run the disposal with warm water to finish grinding up the lemons and ice. Run plenty of water down the disposal. Repeat this process as needed or every few weeks to keep your disposal lemony fresh. This will prevent you from having a stinky garbage disposal in the future.
Oxy Clean
 Another thing to try, would be using a oxygen based cleaner like Oxy Clean. This cleaner is fairly safe and bio degradable.
With a little water it will produce a foam that will also kill odors. Another suggestion is to dump excess water with Oxy Clean in it down your disposal. Make this a habit and your odor problems will be reduced.
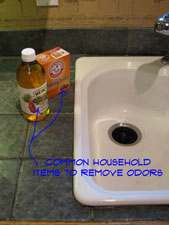
Baking Soda and Vinegar
One other home remedy is to use a liberal amount of baking soda and a cup of vinegar. This is natural odor killing solution. Allow it to foam up and stand in your garbage disposal for 15 - 30 minutes. Rinse thoroughly while running the disposal. Repeat this process as needed until the odor is gone.
Using Commercial Cleaners
There are several commercial garbage disposal cleaners available. They all claim to solve all your odor and cleaning problems.
Garbage Disposal Maintenance
Garbage disposal maintenance does not need to sound ominous. Caution with certain material and a lot of water are mostly all that is needed.
I had a disposal that would clog every time you put a lot of raw vegetable material in it. The fibers would bind up into a tight ball inside the drain. The obvious solution would be to throw material like that away. Or to grind it up slowly with a lot of water.
Run plenty of water down your disposal. This will help to wash away food particles that can later decay. Let the water run after all of the food has been ground up. You can also pull the rubber strainer out and rinse the disposal out with the spray attachment on your faucet.
Plenty of water and some occasional disinfectant and your disposal will always smell sweet.
Stinky Garbage Disposal – Summary
In this article we covered the main cause fro a stinky garbage disposal, decaying food. We also talked about some things you can do without spending a lot of money to rid yourself of the smell.
We covered some methods for removing the smell and provided a link to an article on giving your disposal a professional cleaning. Lastly, we talked about some preventative maintenance and good practices that you can do on a regular basis.
How To Fix a Clogged Garbage Disposal
 What could be worse than a garbage disposal clog. The idea behind a kitchen sink is to keep the dishes clean. A clogged sink works against that. The other part of the problem is that you probably put a lot of food waste in it before you knew it was clogged. Could be a little messy. You have the skills to fix it, don't despair.
For related information see the articles 'Troubleshooting Garbage Disposal Problems' and 'Sink Drain Plumbing Problems'.
What can you do to solve this problem? Take a look at the evaluations and the steps below for guidance. See if this is something you want to try and fix yourself. In the last step there are some guidelines for avoiding a clog in the future.
Before you proceed you will need to determine where and what your problem is. Is the disposal jammed? Is it the disposal drain or the sink drain that is clogged? The information below has everything you need to take care of a garbage disposal clog.
Fixing a Garbage Disposal Clog - Information
What Can You Save?
Unclogging a garbage disposal should be a service call. Around $50 to $75. Of course if the technician just finished his up selling course he may try to convince of the wisdom in replacing the unit. Could be upwards of two hundred dollars if he is successful.
How Hard Could It Be?
Most of the time you have to take the drain apart to get the clog out. This is a little more challenging than just using a plunger.
Check the Simple Things!
Is the unit running? Or is the power off? Check the plug, GFCI and breaker in that order. A jammed unit may not drain. Make sure the unit is turning freely before you tear the drain apart.
What Can Go Wrong?
A sink full of dirty water could wind up all over the floor. Have a pail ready if you take the drain apart. Taking apart the drain will render the sink unusable, so make sure you are in a position to get it back together.
Troubleshooting Disposal Clogs
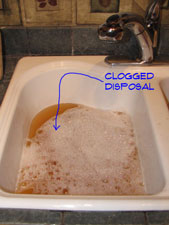
You begin troubleshooting disposal clogs by a process of elimination. There is just a short section between your disposal and the sink drain. Yes certain types of food waste can clog this location. See below for narrowing down your problem.
You can get a garbage disposal clog in two ways. One you get a clog in the unit itself. This is usually taken care of when you turn the unit on. Try that first, run the disposal and see if the water goes down. Yes, boy that was easy. No? I know you probably already thought of running the unit. It just runs and the water doesn't go anywhere. You definitely have a clog.
Is the garbage disposal jammed? Are you getting that loud electrical sound when you turn the switch on? Yes, well you have a different problem. Go to the article 'Fixing a Jammed Garbage Disposal', to find out about this problem. Once you free up the motor the water will likely drain down.
The next question you have to answer is whether the water is backed up in both sinks? Yes, this means that the sink drain is clogged and not the garbage disposal. Go to the article 'Fixing a Clogged Sink Drain', for the correct information. The problem is similar, but at a different location in the drain.
Is it only the sink that has the disposal attached? Yes, then the problem is probably between the disposal outlet and the tee in the drain where the two sink drains connect together. Your garbage disposal has clogged the drain. See the information below for the instructions on dealing with this problem.
WARNING!! Keep Your Fingers Out of the Disposal!!! Turn the Power Off Before Working On It!!! WARNING!!!
Plunging a Garbage Disposal
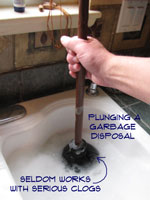
Plunging a garbage disposal is usually not a good idea. For a clog in the drain that won't go away when the unit is turned on, you cannot generate enough pressure.
Plungers work by creating pressure against the clog. Since the disposal has blades and a turntable in the way it tends to diffuse the pressure created by the plunger. Either that or garbage disposal clogs are harder to free up than other clogs. The plunger is certainly worth a try, since it is easier than the alternative.
A word of caution here. It is possible to blow the fittings on the drain apart with a plunger. If that happens you will have a mess on your hands. Clean the area out under the sink and have a pail in place under the drain. Keep some rags handy for any splashing that may occur.
Make sure you have enough water in the sink to cover the base of the plunger. Make sure the plunger is seated and then push down quickly and firmly. Give it a several good tries to see if you can break the clog free. It worked? Great, you have taken care of your garbage disposal clog. No? Bummer, go to Step Three for further instructions.
Checking the Disposal Drain
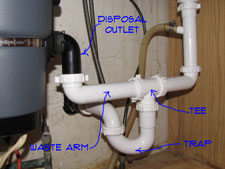
Checking a disposal drain is the first place to look for a clog. There is a tailpiece that is attached to the disposal and a waste arm that connects it to the sink drain. This short section of pipe is where the problem will be.
Before you do anything you will need to examine your sink drain. Is it white or black plastic? Yes, that is good news from a repair point of view. The plastic is easier to work with. Is it brass or chrome metal? Yes, not so good.
For a sink drain that is metal you will need to examine it to see how bad of shape it is in. Does is look corroded? Does it look like it will fall apart when you touch it? Yes? You probably need to think about replacing some or all of the drain parts. Don't get too upset, they are not that expensive.
Make a list of what you think you need. If you go to a home supply store you may find kits that deal with your situation. A word of caution. The kits always seem to be short a nut and washer. Buy a couple extra ones at the same time. For a drain that is not exposed to view plastic is the way to go.
 For more information on working with sink drains you want to see the article 'Sink Drain Plumbing'. This article will give you tips and tricks for cutting, tightening and checking your drains.
Make sure the power is turned off to the disposal before you work on it. With a pair of adjustable pliers you want to loosen the nuts on the tailpiece for the disposal.
The tailpiece may be attached to the disposal via a plate that has screws holding it in place. Loosen the screws. make sure you have a pail under the drain to catch the water. Loosen the fittings enough to let the water drain out. Let it drain completely before proceeding.
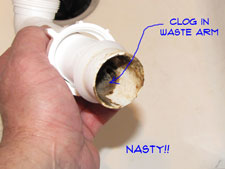
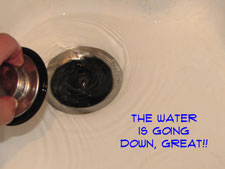
 After the water has drained out you should be able to remove the tail piece and the pipe that leads to the tee. Do you see the clog? Take a stick and clean out the clog. Into the trash is a likely choice. With the clog removed you can put the drain back together. Install the existing or new pieces as required. Tighten the fittings snugly and then try the disposal. Run water down it gingerly until you are sure it is draining correctly.
The disposal is running and the water is going down? Great, you are done fixing this garbage disposal clog. Checking a disposal drain did not turn out to be that difficult.
Maintenance
Garbage disposal maintenance does not need to sound ominous. Caution with certain material and a lot of water are mostly all that is needed.
I had a disposal that would clog every time you put a lot of raw vegetable material in it. The fibers would bind up into a tight ball inside the drain. The obvious solution would be to throw material like that away. Or to grind it up slowly with a lot of water.
Any material that you know will give your disposal trouble should be fed in slowly with a lot of water. The more water the better. Let the water run for several seconds after the disposal is done grinding. This will help to flush out the pipes after each use.
Newer heavy duty units have two stage grinding capabilities and are less prone to clogging. They grind the food up finer, so that it flushes through drain better. Replacing you garbage disposal is an option but usually not a necessity.
Summary
Hopefully you were able to take care of your problem in a half an hour or so. Maybe you had to buy a few parts. Not too expensive I hope. You may have been among the fortunate few that succeeded with a plunger. I never could get a plunger to work. I just gave up after a while.Worst case is that you took a look at your disposal and decided that it was beyond hope. Even replacing a garbage disposal is not that hard. With your garbage disposal clog gone you can now move on to other rewarding pursuits.