Search
Repair Topics
Spackle Dry Time
Why does the spackle dry time matter? The main reason is that you can't paint until the spackling is dry and sanded. You will likely need more than one application of spackling, so the drying time becomes more of an issue.
Got a drywall repair you are working on? See the articles 'How To Spackle a Wall' and 'How To Patch Drywall' for complete instructions on what to do.
Factors That Affect Spackle Dry Time
How quickly spackle dries is affected by multiple factors. One is the compound itself. Different spackling pastes and drywall compounds dry at different rates. The 'Fast Dry' of 'Fast Setting' types have chemicals added that allow them to dry quickly.
The Second issue is the size and depth of the hole or ding that is being filled. The bigger and deeper the patch, the longer it will take to dry. In fact, large deep patches that have a lot of compound in them may take days to dry under certain conditions. This type of patching is way beyond the limitations of spackling.
A third factor is the humidity that is in the air. The more humid it is, the longer it will take for the spackling to dry. Spackling paste or compound is mixed with water, the water needs to evaporate for the spackling to dry, simple right?
Fast Drying Spackling
What is fast drying spackling? There are two types of spackling that will dry faster than thier normal dry cousins. Both types use chemical reactions to improve the drying time.
The first type is a dry powder that is a 'knock off' of the quick setting drywall compounds noted below. This type is sold in a powder form and needs to be mixed with water before it is applied. It is the water that causes the chemical reactions that helps the drying time. Once it is mixed the reaction starts and you have a limited working time before it hardens completely.
These products are an excellent choice for patches. They tend to dry harder and faster than most other products. However, the tradeoff is that they are a little harder to work with, requiring mixing and immediate clean up.
The second type is a ready mixed spackling that starts the drying process once it is exposed to air. These types may other additives that might affect the overall finish. This type of spackling does not dry as quickly as a dry mixed setting type compound. The other drawback can be the use of materials such as vinyl that are somewhat foriegn to gypsum products or drywall. Spackling that has a 'vinyl' composition or other plastic type chemicals may not blend with the existing surface as well as traditional gypsum based products.
Spackling That Changes Color
This is not intended to be a plug for a particular product, but it is pretty cool. Dap has a product called DryDex Spackling, and it changes color as it dries. This can be helpful if you are unsure of how to tell when the spackling is dry.
When it is applied, it is pink in color. As it dries the pink begins to fade and it turns white. It is something of a gimmick, but still it takes the mystery out of drying.
The truth be known, most spackling and drywall compounds have the same ability that is naturally built into the material. Wet gypsum products are a varying shade of gray. The wetter the compound is, the darker gray it will appear. As it dries, the gray color will become lighter and lighter until it is a flat white color.
For professionals, or those used to working with drywall compound, the color thing is not that significant. For a novice that is not used to working with drywall compounds, the 'pink' color my take the mystery out of the drying process. Of course, you will have to pay extra to get the pink technology.
Fast Setting Drywall Compound
Setting type drywall compounds have chemicals in them that help them to dry. Using this type of product will dramatically reduce the amount of time it takes for the compound to dry.
This type of material comes in a powder form and has to be mixed. When water is added to the powder it starts the chemical reaction the dries the material out. The drying time can be further accelerated by using warm water.
Do not mix large batches of this type of compound. It will turn rock hard in the container once the chemical process as reached climax. It is also a good idea to clean tools and containers as soon as your done. The material can dry hard and be difficult to clean later.
Helping Spackling to Dry
If you are in a hurry or it seems like the spackle is taking forever to dry, you may want to help it out. Spackling and drywall compound are made of gypsum, mixed with water. Humidity and air movement will affect how quickly the compound will dry. The following are some tips for getting the spackling to dry faster.
Air Conditioning - When it is humid outside it will be humid on the inside unless you are running your air conditioning. Air conditioners remove moisture from the air. Dryer air will help the wet spacklng dry faster.
Portable Fans - Circulating the air around the patches will also help them to dry. The moving air will help the moisture to dissipate allowing for more evaporation. Run a fan in the room you are working on as close to the patches as possible.
Hair Dryers - Do you have one spot or a couple of spots that are deep and won't dry? A hair dryer is the big artillary when it comes to getting spackling to dry. The hot air will dry the material faster than anything else. The drawback is that you have to stand there with the hair dryer blowing on the patch until the problem is solved.
Temperature - If you have the heat turned down while you are working on the area, you may want to consider turning it back up. Cool walls and air are not condusive to rapid drying of spackling.
Got a drywall repair you are working on? See the articles 'How To Spackle a Wall' and 'How To Patch Drywall' for complete instructions on what to do.
Sanding Spackle
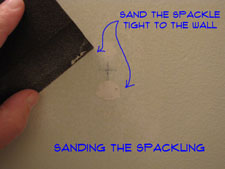 Sanding spackle needs to be done when the spackling compound has dried completely. You should also sand lightly between coats. Sanding does not take very long, usually only a couple of minutes.
When the spackling paste is dry you can lightly sand it with a sanding sponge or sandpaper. Sand it flat with the wall surface around it.
For related information you want to see the articles on "How To Use Spackling', 'How To Repair Drywall' and 'Patching Drywall'.
Sanding Materials
Sanding Sponges
Sanding sponges are a convenient way to do light sanding especially on drwall and drywall products like spackling. They are made of synthetic material and have a grit formed into the surface. They come in a variety of sizes, with most of them fitting into the palm of your hand.
The other nice feature is that the sponge is formed into the shape of a block, so the surface of the sanding area stays flat. Sanding sponges are sold at the same place that you buy your paint and spackling.
Sand Paper
You can use standard sandpaper to sand spackling, although there are some cautions. The first would be the grit. If the grit is too coarse it will leave scratches on the spackling patch and the surface around it. The scratches can show through the paint and mar the appearance of your wall. If the sandpaper is too fine, you will work a lot harder to get the surface smooth. In fact you may not get the spackling flush with the surface around it.
For sanding drywall or spackling patches, you want to stay with a grit between 100 - 150. This grit range is fairly common and you may already have some sandpaper that matches.
The other concern with sand paper is grooving the surface. When you press down on the sandpaper with your fingers you create pressure points that will sand more away in some spots than others. This can leave you with depressions or grooves on the surface of your wall.
If you are going to use sandpaper it is a good idea to use a sanding block. The block or holder will keep the sanpaper flat against the surface of the wall or ceiling.
Sanding Screen
Sanding screen is typically used for sanding new drywall before it is painted. You can used it to sand patches and spackling. It is designed to fit on a drywall pole sander. This is a special type of sanding block that has a swivel head on it.
The grit range for sanding screen is 80 - 220. Use screen that is in the 100 - 150 range for sanding finished walls that have been repaired.
Sanding Blocks
Sanding blocks come in all shapes and sizes. There are some special ones that are designed specifically for drywall sadning. They take a special precut sheet of sandpaper or sanding screen. For small spackling repairs you probably do not need something this big.
A typical hand sanding block will accept a quarter sheet of sandpaper. These will do fine for sanding small spots where repairs have been made.
Orbital and Electric Sanders
It is not a good idea to use a power sander to sand spackling. You will likely do more harm than good. Spackling paste and putty is a fairly soft material and so is the wall surface around the patch. The power sander can easily dig in too deep and thus ruin the patch, requiring further repair.
Proper Sanding Technique
The main thing to keep in mind when you are sanding walls and ceilings is that you want a flat, smooth surface. Light will catch both indentations and protrusions, however slight they might be. When you patch the wall, you want the patch to be flush with the surface around it, not indented, not raised up, flush.
Try not to rough up the surronding area too much. Cutting grooves or scraching up the surface may show when you apply the paint. Remember, your walls are likely made of drywall. Drywall is a gypsum core sandwiched between two sheets of paper. Scuffing up the paper and raising the paper fibers is not desirable. If this happens, you will have to apply more drywall compound to tighten up the paper fibers.
Lightly sand the spackling with a flat sanding block or sponge. Ideally, at first, you will only sand the build up of spackling. When you get the spackling down close to the surface you want to go lightly, until the patch is blended into the area around it.
Run your fingers over the surface to check for any bumbs or depressions. If you feel raised spots, continue to sand them until they are flat. For indentations, you will need to apply more drywall compound or spackling and let it dry.
Wet Sanding
A slight variation to the above would be if you are trying not to create any dust. Wet sanding can allow you to smooth out the patches and repairs without making a mess. The use of the word 'sanding' is something of a deception. You don't really 'sand' the surface, instead, you dissolve the compound and smooth it out.
The same principles apply to wet sanding that apply to dry sanding. You want to keep the surface flat and blend the patch into the adjacent surface. To do this you use a damp rag wrapped around a sanding block or a sanding sponge. Another alternative would be stiff flat sponge.
You will need to rinse the rag or sponge out often, since you are dissolving the compound with it. Use clean water to do this, rinse the rag or sponge until the water is clear.
Dealing With the Spackling Dust
Dust in another thing to consider when you are using spackling paste or any other type of drywall compound. Sanding these materials will create dust, fine white dust that has a tendency to get everywhere. If you are just doing a few small spots, it is probably not a big concern.
There are four possible options for dealing with the dust, they are listed below along with links to articles that offer more explanation.
For a complete discussion on sanding drywall and drywall patches, see the article 'How To Sand Drywall' for more information.
Spackle Tools
Knowing which spackle tools to use is helpful when you are getting ready for a painting job. Spackling is applied to dents, dings and holes in your walls that need to be painted. Applying spackling with the right tools only takes a few minutes.
For related articles see 'How To Spackle Drywall', 'Patching and Repairing Drywall' and 'Taping and Mudding Drywall'.
Putty Knives
A putty knife or spackling knife is a flexible flat blade with a handle on it. It is uses for spreading the spackling onto the wall or ceiling in a thin layer. These knives are typically from 1" to 3" wide. They can be made from either plastic or metal.
For small holes and dings in walls and ceilings a 2" or 3" putty knife will do the job. The plastic ones are inexpensive and work great for small or infrequent projects.
Trowels
Drywall knives or trowels are wider than putty knives and are needed for wider joints. These knives are more expensive and are only needed when you have bigger patches to deal with. See 'How To Patch Drywall' for more information.
Sanding Sponges
Sanding sponges are a great innovation for the home repair culture. The are fairly inexpensive, versatile and very effective for a wide variety of home repair projects. When is comes to spackling and drywall repairs they are perfect.
A sanding sponge is a spin off from a concept that has been around for a long time. Sanpaper works very well for sanding a variety of surfaces. One drawback to sandpaper is the need to keep it flat on flat surfaces. Attaching the sanpaper to a block was the solution. The sanding sponge, takes this concept another step.
Using synthetic materials, a sanding sponge provides the shape of a sanding block along with a flat sanding surface. For semi soft surfaces this has turned out to be an excellent product.
Drywall compound, spackling compound and a variety of other surfaces respond well to the abrasion provided by sanding sponges. Gypsum is a fairly soft material, so it is well suited for sanding sponges.
For information on sanding sponges see the article, 'Using Drywall Sanding Sponges'.
Sanding Blocks
The idea of a sanding block has been around as long as we have had sandpaper. Sand paper is a versatile product that has many uses. The one drawback is that it is very flexible. When you sand spackling, you need to keep the sandpaper flat. A sanding block is the ideal choice.
There is a tendency when you sand with sheets of sand paper to put grooves in the surface. This creates and uneven surface.
Sanding Screen
Drywall sanding screen is a popular way to sand drywall and spackling. It comes in precut sheets that fit onto a speacial sanding block. For larger amounts of sanding, this is a better choice.
Another advantage is that you will get less grooving when you sand. This means a flatter smoother surface. For coplete information on purchasing and using sanding screen, see the article 'How To Use Drywall Sanding Screen'.
Vacuum Cleaner
Dust is a big problem when working with spackling and drywall. There are methods that can eliminate or reduce the amount of dust created. See the article 'Dustless and Wet Sanding Drywall' for more information.
A shop vac is useful for cleaning up the dust when you sand your spackling patches. For small quantities you can use the hose attachment on a regular vacuum cleaner.
A word of caution. Drywall or spackling dust is very fine and can clog the filter quickly on a vacuum cleaner. You may need to change or clean the filter if you vacuum up very much dust.
How To Spackle a Wall
 Do you know how to spackle a wall? If you are trying to get the bedroom painted and your son's truck has made some significant dents in the wall, it could be.
Spackling paste or putty works best for small holes, dents and dings that have not compromised the paper on the drywall or the drywall itself. Is the paper damaged? Is the core of the drywall damaged? Yes to either one. Go to the article on 'Drywall Patching', for instructions on using mud and tape to patch drywall.
Are the holes small, perhaps from picture hangers or nails? If you have dents are they less than a quarter of an inch deep? Then spackling should take care of the problem.
What is Spackle or Spackling?
Spackling paste, compound or putty is a common product that you will find at hardware and home stores. It is a gypsum based product that usually comes premixed and has a consistancy similar to drywall compound. It comes in small cans and is often found near the painting supplies.
There are some popular brands that have been around for years and are easily recognizable. Manufacturers in a effort to sell more products and increase the cost have come out with several options. Vinyl spackling 'Fast Drying Spackling, spackling that changes color as it dries. If you read the labels, just about everyone will offer some special features that make it better than the competition.
Spackling is used to fill small dents, dings and holes in your plaster or drywall surfaces. This is done prior to painting to rid the surface of blemishes. Spackling will often require more than one coat with some drying time in between. Prior to painting the spackling will need to be sanded.
For what it does, spackling is kind of expensive. You can pay $3 to $10 for a small can. When it is kept sealed it will last for a long time, so you do not need to purchase it every time you paint.
There are a few tools you will need to use when you are using spackling. Most of them you will already have on hand. See the article 'Using Spackle Tools' for more information.
How long does it take spackling to dry? This is an important question, especially when you are trying to get a painting project completed. See the article 'Spackle Dry Time' for more information on how long you will have to wait before you can paint.
How to Spackle Drywall – The Steps Involved
Step One - Preparing the Surface
Before you can apply a first coat of spackling, you need to prepare the surface. This is not a difficult job, but it is important.
The first thing you want to do is give the spackling paste a place to go. Especially when you are filling screw or nail holes you may find that there is a burr around the hole. Take the corner of your hammer and gently tap the paper down until you have an indentation. Not too hard. Check it with your finger, no lumps? Feels like a depression? Good.
Select a knife that is larger than the hole or dent you are trying to fix. For a one inch wide dent, use a three inch knife. You want the edges of the knife to be riding on  the smooth surface of the wall. There are no absolute rules here, as long as the knife is wider than the hole. It might be a lot wider.
Step Two - Applying a First Coat of Spackling
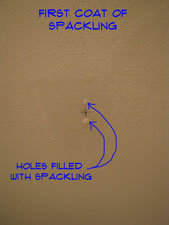 With your dent or hole properly detailed you want to put enough spackling paste on the knife to fill the hole. You want to pull the knife across the indentation, completely filling it with paste. For a nail or screw hole, try and work some of the paste deep into the hole. Drag the knife tight against the flat surface of the drywall. Do not build the paste up above the surface of the wall. One even stroke should do it once you have the hole filled with spackling.
How does it look? Do you see any voids? Give it another pass with a little more material if you see voids. The dent or hole should be filled and flat or even with the adjacent wall. Satisfied? Now this is important. Step Away From The Spackling. Walk away and do not touch it until it dries. Check the can for drying time, but remember the more compound you use, the longer it will take to dry.
Step Three - Applying the Second Coat of Spackling
Why would you need to apply a second coat of spackling? Even the best products will shrink, especially when they are filling a deep hole. When the spackling paste is dry you can lightly sand it with a sanding sponge or sandpaper. Sand it flat with the wall surface around it.
Apply another thin coat of spackling to the repair. Remember to keep it tight with the adjacent surface. Does it look good? Yes, then Step Back From The Spackling. Do not touch it, let it dry. It should not take as long this time.
When it is dry you can lightly sand it again. Remember the idea is to blend it into the surface around it. Don't sand grooves into it with your fingers. A flat sanding sponge is the best thing to use. For bigger dents and holes you may need to add a third coat. You don't want to see the patch after you paint. If you do, you'll still have a spot that needs repair.
Step Four - Finding Other Spackle Problems on Your Walls
Spackling multiple holes while you are at it, is just an efficient way to do it. Generally, you have some drying time and clean up with spackling. So why not make the best use of these steps and go through and hit all the locations you can find at once.
So if you have more than one spot that needs spackling. Do the first coat on all the spots at the same time and repeat the second and third coats for all the spots. Usually you can go around and hit all the spots in a room in a few minutes.
Let them dry and then hit them again. You will be much happier with the results if you take the time to properly prepare the walls. It's not rocket science but learning how to spackle drywall can be rewarding.
It is pretty aggravating when you finish painting the wall and you see dents and dings that you did not repair. The little bit of time it takes to spackle is well worth it.
Step Five - Sanding Spackling
After the spackling is completely dry, you want to sand it smooth. The idea is that you want it flush with the wall or ceiling surface and smooth to the touch. Sand lightly with a sanding sponge until the surface is ready for paint.
If you feel a depression, you need to apply another coat of spackling paste to fill it.
For more information on methods and best practices for 'Sanding Spackle', follow this link.
Alternatives to Spackling Paste
Spackling paste, putty or compound is sold in small cans that tend to be expensive. The formulas for the material are mostly gypsum and water. With that said, it is safe to say that spackle or spackling is not much different than drywall compound.
Can you use drywall compound in place of spackling? Yes you can. Drywall compound was used to finish all of the seams and joints in your home and it provides an excellent surface for painting. If you already have some on hand, there is nothing wrong with using it instead of spackling paste.
Drywall compound is cheaper than spackling and come in both ready mixed and dry forms. For patching walls, including spackling, there are fast set types they dry in as little as fifteen minutes.
How To Repair Drywall
 Knowing 'How To Repair Drywall' can save you time and money. The drywall you need to fix will likely fall into one of four categories, patching large and small holes in drywall,smoothing or fixing uneven drywall, repairing cracked drywall and installing new drywall in place of old damaged material. Although the materials are similar, the techniques vary a little
There are descriptions below for all of the problems you may be having with your drywall or sheetrock. There is even a section dealing with 'moldy drywall'. Also there are links to 'how to' articles that will give you tips and tricks on getting a professional finish.
Finding and Fixing Drywall Problems
Below you will find some common problems you are likely to have with your drywall. There is a brief description and a link that will lead you to additional drywall information.
You have dents, dings and small holes in your drywall, that you want to fix before you paint.
This is a common problem. Hanging pictures, bumping into the walls with furniture, children playing, can leave you with a lot of imperfactions in an otherwise good wall.
To solve this problem you need to do a small amount of preparation and then apply spackling. Keeping the surface smooth for painting it the key. See the article 'How To Spackle a Wall' for complete instructions and information on the best material to use.
There is a hole in your wall the size of a fifty cent piece.
A hole that is larger than diameter of a pencil is probably too big to fix with just spackling. The spackling may fill the hole, but when it dries it will crack and pull away from the edges, leaving a blemish on your wall.
Most of the time fixing smaller holes (1 1/2" in diameter or less) in drywall or sheetrock can be accomplished with just some drywall tape and compound. Its a bit more work than spackling, but not that hard. See the article 'How To Patch Small Holes in Drywall' for more information and instructions on fixing the hole.
A piece of furniture put a big hole in the wall when it was being moved.
You have a hole in your wall that a small animal could crawl through, this is not good. Big holes in a drywall wall or ceiling require some additional steps to fix. Tape alone will not bridge a large gap effectively.
Solving this problem will require that you cut out some of the drywall or sheetrock and install a replacement piece. This is not as hard as it sounds. The article 'How To Fix a Large Hole In Drywall' will provide you with all the steps and complete instructions.
There is a crack in the wall, possibly above a doorway or there is a crack in the ceiling.
Cracks are a common problem and they can be unsightly. They often occur at stress points in the structure, above doors, near stairways, ceilings that change direction to name a few. There are no rules when it comes to cracks, they can happen anywhere.
Just putting some spackling on the crack will not fix the problem. You need a flexible membrane to bridge the two opposing surface together. Often this can be drywall tape.
To learn the proper way to repair cracks in your drywall walls and ceilings, see the article 'How To Repair Drywall Cracks'.
I have an ugly water stain in my ceiling, what can I do?
It may have not even been a leak, maybe a bathtub or toilet overflowed and water got down and dripped onto the ceiling or wall. After it dries you are left with an ugly spot that can be problematic. Paint alone will usually not stop the problem.
If you do have a leak, you want to fix that first before you try and repair the drywall. The severity of the water damage and whether or not the drywall has gotten wet repeatedly will affect how hard it is to fix. It may be as simple as using the right sealer and repainting.
For complete instructions and the materials needed to deal with the problem, see the article 'Repairing Water Damaged Drywall'.
My wall is uneven, sometimes I see shadows when the light is right.
There can be several reasons for this problem. The contractor that did the drywall in your house may have done a poor job. More likely, the wall or ceiling was patched and they did not do a good job of blending in the patch. Whatever the reason, you can eliminate the uneven finish by skimming the wall with drywall compound.
Skimming involves a wide joint knife and a thin layer of drywall compound. The article 'Skim Coating Drywall' has instructions for accomplishing this task.
I have black mold on my drywall. Is this dangerous? What can I do?
Black mold has gotten a lot of attention in recent years and with good reason. It can be a serious health risk, especially for the young and the elderly.
Not all black mold is dangerous, but it takes testing to tell the difference. So assume the worse when dealing with mold. Mold is happens when you have two main ingredients, moisture and organic material. You will need to deal with both the mold and the source of the moisture to get rid of your problem.
The articles 'Is Black Mold Dangerous' and 'Drywall Mold Removal' will give you some guidelines and methods for eliminating the problem.
I have texture on my wall or ceiling and it needs to be patched, is this possible?
There are lots and lots of different textures that are used on drywall. Most of them fall into a handful of groups, each group having distinctive chareteristics. The materials uses and the individual installer can also affect the way a texture looks.
It is possible to patch them, but it may involve a bit of trial and error. The first thing you want to do is identify the type you have and then take steps to replicate it. See the article 'Texturing Drywall' for a complete discussion.
Drywall Repair Articles by Topic
Drywall Patching
 Drywall patching involves varying levels of work. At the easy end, you have minor dents and dings that only need a little spackling. The other end of the spectrum is a large hole in your wall or ceiling that needs a new piece of drywall. Taping and finishing will be involved. This job will take a few days and involve several steps.
How To Spackle a Wall
Spackling can take care of most small imperctions in your walls and ceilings. There is some minor preparation required to get a good job. Also, more than one application may be required.
Drywall Crack Repair
Of course cracks are unsightly and undesirable. Fixing them involves some drywall tape and compound. There is some preparation that is also required.
How To Patch Small Holes in Drywall
To patch small holes in drywall or sheetrock, you need some tape and compound. It will involve a few steps and some sanding. Done correctly, you will never know that the hole was there.
How To Fix a Large Hole In Drywall
Got a hole in your wall that the cat can crawl through? You are going to need more than tape and drywall mud to fix it. Installing a drywall patch is not that hard, but needed for larger holes in drywall.
Drywall Ceiling Repair
Drywall ceilings have some of their own issues. The size of the drywall may be different. You could have insulation above the drywall. Not to mention the fact that you have to get up on a ladder to get to it. Follow the link above for some tips on how to repair drywall when ceilings are involved.
Repairing Water Damaged Drywall
How do you repair water damaged drywall? Of course the first thing you need to do is correct the leak that caused the water damage. After that you need to determine what level of water damaged drywall you have. It may be as simple as using the right kind of paint or it may involve some drywall replacement. The article , gives you guidelines on how to repair drywall when something has leaked.
Drywall Mold Removal
Oh no! You see some mold. What do you do? Mold as a rule is a sign of a more serious problem. Why do you have mold? Where is the moisture coming from? You need to get rid of the mold, but at the same time you need to address the moisture problems that allowed it to grow. Take some time and review the article on, for information on how to repair drywall when mold is involved.
Is Black Mold Dangerous?
You should know the facts, this can be a serious condition. It is not an insumountable problem, just one that deserves a 'healthy respect'.
Plaster Wall Repairs
Plaster is similar to drywall, yet different. Plaster is made from gypsum, the same as drywall or sheetrock. The big difference is that drywall has a paper facing and plaster does not. The good news is that plaster can be repaired with the same products and tools that you use for drywall. Once the repair is painted, you will never know the difference. This article will provide the needed skills.