Repair Topics
Garage Door Weatherstripping
 Garage door weatherstripping keeps the cold and heat out of your garage. There are two types you might have to deal with:
Not sure if you are in the right place? See the article, 'Troubleshooting Garage Door Problems' for more information.
The garage door pulls away from the jamb as it opens. It needs something to snug up to when it closes. Additionally, the bottom of the garage door is resting a floor that may not be perfect. There is another seal along the bottom of the door that keeps the air out. In the middle of winter it can be very cold air.
Take a little time and fix up your garage door weatherstripping. It's not that hard and it will save you money.
Garage Door Weatherstripping - Information
What Can You Save?
This is not a difficult job for a service man. Completely replacing the weatherstripping for your garage door could involve $50 to $75 in material. Add to that another $50 to $75 in labor. In this case you will mostly just save the labor. You will need to buy the replacement material when you do it yourself.
How Hard Could It Be?
Working with garage door weatherstripping is not that difficult.
Check the Simple Things!
Weatherstripping is simple. For garage doors, it is not adjustable. When it goes bad, you just have to replace it.
What Can Go Wrong?
Not getting the job done could leave you with a door that leaks a lot more air than it did before. The door will still work, but your heating bills will go up.
Replacing Top and Side Weatherstripping
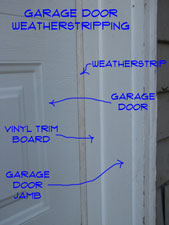 Replace top and side weatherstripping on a garage door when you notice gaps or air leaking in. Replacing the top and side weatherstripping keeps cold or hot air from blowing in around the edges of the door.
Even if the garage is not conditioned, it still makes sense to conserve as much heat or cooling as possible.
Pull out the nails and clean up the surface. Obtain a new piece of trim. Get vinyl, no painting. You will need to use a miter box to cut it to length.
Close the door and make sure the new piece fits snugly against the door. Mark it with a pencil. The old trim may have been a different size and using the old line may not work. Use galvanized finish nails or plated screws to install it. With the new piece of trim in place, check the operation of the garage door. Does it fit against the weatherstrip when it is closed? Yes, well, good, you're done.
Replacing the Bottom Garage Door Boot
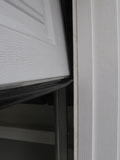 Replacing the bottom boot on your garage door is needed when you see light under your door. Cold or hot air blowing in below your door is also a sign of a defective weatherstripping boot.
Two situations here. You should have an aluminum track that the rubber boot slides in and out of. Common widths for garage doors are 8', 9', 10', 12', 16' and 18'. Measure your door to get the proper length.
Working on the boot is probably best done with the door up. Slide the old boot out and take a piece with you to obtain a replacement. Slide it in place and trim off the excess. It may take a little patience to slide the boot into place, take your time, it will be fine.
Older doors may have the rubber boot screwed directly into the door. If this is the case you will want to obtain a kit that has a track and new boot. Raise the door to work on the boot. Remove the old boot and clean up the bottom of the door.
Obtain a replacement kit for your width of door. Use the screws provided to fasten the track to the bottom of the door. Slide the new boot into place and trim it with a utility knife. That's all there is to it.
Summary
Repairing garage door weatherstripping usually means replacing it. Sorry, nothing lasts forever. Granite lasts a long time, still not forever. Your weatherstripping is not in the same league as granite, sorry. It is not too difficult and we hope you were successful.
The parts for this job are a little expensive, but well worth it when weighed against your heating bills. You may be thinking that you are not heating your garage. When it is attached to your house it is a transitional zone. That cold air matters.
Adjusting Garage Door to Weatherstripping
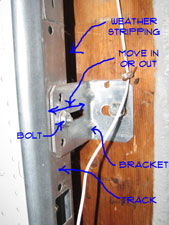 Adjusting a garage door to the weatherstripping will involve the garage door track. First, close the door and see how the door lines up with the weatherstripping on the outside. In the closed position, the garage door needs to be snug against the weatherstripping. When there are gaps, air will leak in around the door. If the track is too close to the jamb, the door will bind.
To adjust the door to the weatherstripping you want to loosen the nut on the bolt that holds the garage door track to the bracket. The bracket should have a slotted hole that allows the track to move.
You may need to loosen more than one bracket at a time, since the track will bind when you try and move it. Hold the door against the weatherstripping. Make sure the track is up against the back of the roller and tighten the bolt.
Repeat this process with all of the brackets on one side of the door. Check the door again to make sure there are no gaps. Repeat this process as needed on the other side of the door as needed.
Fixing Garage Door Track
The garage door track keeps and overhead garage door aligned properly. A poorly aligned track can cause the door to bind and not open correctly. This could be a serious problem. A loose track could allow the door to fall. On a positive note, it is not that hard to fix.
For related garage door topics, see the articles 'Adjusting Garage Doors' and 'Troubleshooting Garage Doors' for more information and a listing of all the garage door topics.
Garage door tracks are held in place by brackets that are attached to the door frame. The ends of the overhead portion of the track are suspended from the ceiling with steel channels. To work properly the tracks need to be parallel with one another. The garage door tracks also guide the door into the weatherstripping. Tracks that are too far away from the jamb can cause the door to have a gap at the weatherstrip.
Can you deal with garage door track issues? Most of the time the answer would be yes. Adjusting or replacing a section of track should not take long at all.
Garage Door Tracks - Information
What Can You Save?
Adjusting a garage door for a professional should take less than a half and hour. Probably around $75. The big problem is that you may be sold a new garage door. A new door could run between $600 and $1,500.
How Hard Could It Be?
Adjusting a garage door track is not too difficult.
Check the Simple Things!
Loose brackets are easy to deal with. Get some wrenches and tighten up the bolts.
What Can Go Wrong?
The door tracks keep the door in alignment as it goes up and down. Adjusting things the wrong way can make things worse. You could take a door that is closing poorly and turn it into one that is not closing at all. Do not loosen the overhead tracks with the door up. The door could fall.
How Garage Door Track Works
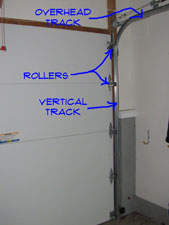
To understand how garage door tracks work you need to first look at the garage door rollers. The rollers have a long shaft that slides into the hinges. By design the rollers slide back and forth in the hinge. This means that you do not have to have the track perfectly aligned. Within reason, the roller will slide in and out to follow the track.
There are two ways that this can give you a problem. First, if the track is too close, the roller will bind against the hinge. A track that is too far away will cause the roller to pull out of the hinge. Ideally, the track will be positioned so that 1/2" to 3/4" of the shaft is visible. This will give the roller room to move in or out as needed.
With the door in the down position take a look at the margin on the track and rollers. Do you have a consistent margin? Is there a gap of around 1/2" to 3/4" between the roller and the hinge?
Rollers that are binding or close to falling out mean that the garage door track needs to be adjusted. See the article, 'Adjusting Garage Door Track to the Door'.
WARNING!! Do not loosen the tracks with the garage door in the up position!!! WARNING!!!
Replacing Garage Door Track
Garage door tracks are made of metal and can rust over time. Therefore, replacing garage door track may be needed. The track assembly comes in two pieces that are bolted together. Each door has two straight pieces and two pieces that have a curved segment on one end.
Before you remove a track on the side of the door you want to put something against the door to hold it in place. Make sure you unhook the garage door opener, so that no one can attempt to open it.
To replace an overhead section of track you want to close the door first. Unbolt the bad section of track and replace with a new one. Install the bolts in the same locations as the old ones.
Remove the bolts from the track and turn it off the rollers to remove it. Turn the new track into place and put the bolts back in place. Make sure the door is snugged up to the weatherstripping and tighten the bolts. Make sure everything is tight and check the alignment before attempting to open the door.
Summary
If you are working on the garage door track, you will also want to check the rollers and hinges to make sure they are in good order. See the articles 'Garage Door Rollers' and 'Garage Door Hinges' for instructions on what to do.
The garage door tracks are a simple yet, important part of your garage door. Most of the time, problems related to them are adjustment issues. With a couple of wrenches and a few minutes you should have been able to take care of any alignment problems.
For older doors you may need to replace a section of track. They are fairly standard and not that hard to replace. By now your garage door should be opening smoothly. Need something else to do? I'm sure you can find another project in your jar that needs attention.
Garage Door Spring Repair
 Garage door spring repairs will be needed when one of your garage door springs break. This will usually be with a dramatically loud noise.
There are two things that can be done with the springs. 'Adjusting Garage Door Springs' covers adjusting them. 'Replacing Garage Door Springs' explains when you need to replace them.
Yes, it will scare you if you are not expecting it. Garage doors can weigh as much as 300 lbs., making it almost impossible and dangerous to raise them. When a spring breaks you will be faced with the prospect of calling a garage door repairman or making your own garage door spring repair.
There are two types of garage door springs. Extension springs are the kind that are on each side of the door and are stretched alongside the overhead track. Torsion springs are mounted on the header above the door and use a round rod to connect to the sides of the door.
Of the two types, extension springs are easier to repair. Torsion springs can be dangerous and should not be worked on without a good knowledge of how they operate. In addition to that, the proper safety precautions must be observed.
Garage Door Spring Repair - Finding Help
Below you will find some common problems. There is a brief description and a link that will lead you to additional information. Our evaluation sections of the pages will help you to decide if you want to make the repair. The "What Can You Save?" and "How Hard Could It Be?" sections give you a quick overview of what is involved in this type of garage door repair. This will help you decide if it is using good judgment to make the repair yourself.
The "Check the Simple Things First" section will clue you in to easy fixes to check for. Many times something easy will eliminate a problem without the aggravation of an involved repair. In an effort to warn you about what you are in for, there is the "What Can Go Wrong" section. Forewarned is forearmed as they say. Knowing what to watch out for is always helpful.
Garage Door Spring Repair Topics
There are three issues with the garage door springs. The springs themselves, they either work or they are broken. The cabling that connects the spring's force to the garage door. The third item is adjustment. Only torsion springs can be adjusted.
It is usually pretty obvious when a spring is broken. The door won't work and the spring is in two pieces. Broken springs will need to be replaced. Springs should be replaced in sets. If one spring broke, the second is probably not far behind. Examine the springs carefully to determine whether or not they are broken. If you are certain you have a broken spring you want to review this article. This article will help you determine the type of spring you have and the steps needed to repair them.
You have examined the springs and they do not appear to be broken. Check the cables, it could be that one has come loose or is broken. Does the cabling look different on one side of the door? The cables may need to be repaired or replaced. For a detailed discussion on garage door cable issues, you want to review this article. This article will discuss the various issues with the cables and any possible adjustments on the springs.
Often, repair is not an option with a garage door spring. Garage door spring repair usually means 'spring replacement'. There are some ancillary items that can be repaired, such as cables. When a spring breaks you are stuck, the door cannot even be safely lifted.
This article has mostly directed you to other resources after explaining a few things. After reviewing the information we hope that you were able to make your garage door spring repair or that you were able to get a serviceman at a reasonable price.
Replacing Garage Door Rollers
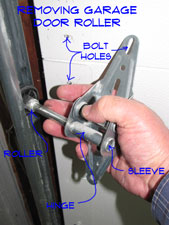 Replacing garage door rollers is the likely option when they are beyond lubrication. The rollers can seize up, making them unusable. Or they can get so noisy that it is torture to raise the door.
Do you have a different problem? See 'Overhead Garage Door Repair' for a complete listing of the garage door topics.
The rollers are available at most home supply stores and are fairly inexpensive. Take one of the old ones with you when you go shopping.
The roller rides in the track, but you do not want to take the track off to replace a roller. It is easier to take the hinge off that has the sleeve for the roller. With the hinge out of the way the roller comes out easily.
Use a wrench to take the bolts out of the hinge. Only take one hinge off at a time. Removing too many hinges will compromise the support for the door. You can also use a battery drill and a nut driver to remove the bolts from the hinge.
Slide the new roller into the sleeve in the hinge. Install the hinge and you are done. Use the same method to replace the bolts that you did to remove them. The bolts are just lagged into the metal or wood on the door, so, don't over tighten the bolts. Now that was easy. Like I said, not much to dealing with the door rollers.


