Search
Repair Topics
How To Adjust a Toilet Float
 Knowing how to adjust a toilet float will help to prevent toilet tank issues. It only takes a few minutes to adjust the float and the only tool you will likely need is a screwdriver.
For other toilet repair topics see 'How To Fix a Toilet' and 'Plumbing Repair' for all of the plumbing articles.
Too much water in your tank will cause it to run and waste water. Too little water will cause flushing issues and possibly clogs.
Troubleshooting Toilet Floats
When you hear water running in your tank, the first guess might be to adjust the float. If the water runs constantly, even slowly, this is probably the correct assumption.
However is the toilet is making a trickling sound and the toilet refills periodically, even when it is not being used, you could have another problem. It could be the toilet flapper. See the article 'Toilet Flapper Repair' for more information on this problem.
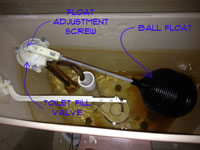
The first step to adjusting a toilet float is to determine what type of float device you have. The older toilets may still have a Ball cock type float device. This type usually has a screw nea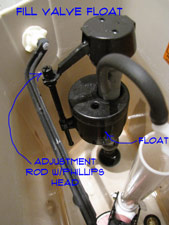 r the valve that is used to adjust the fill level.
If the water is running constantly it indicates the water level is too high and the excess water is running over the top of the tube for the flush valve. Lowering the water level to just below the top of the flush valve tube will solve the problem.
Another reason you would want to make adjustments to the float is when the water level is too low. When a tank had too little water, it will not flush properly. This will result in blocked and clogged toilets. To determine the proper water level for you tank, see the article 'Setting the Toilet Tank Water Level'.
Adjusting a Toilet Float
There are two common types of floats for conventional toilets. Older toilets will have a large plastic or brass ball that is connected to a horizontal rod. The rod is connected to the toilet fill valve.
The other style is a float that moves up and down along the vertical pipe of the toilet fill valve. A common brand name for this type of float is Fluidmaster.
Adjusting Ball Cock Type Floats
Turn the screw (likely counterclockwise) to lower the float. Continue to turn the screw until the water stops running and then go a half of a turn past. If the screw is stuck or you are afraid you'll break it, you can use two hands to bend the rod for the ball cock (the manufacturer probably won't recommend this, but it works).
Flush the toilet and see where the water stops when it refills. It should be just below the top of the fill tube for the flush valve.
Water is no longer running and the toilet flushes, problem solved. Congratulations!
Adjusting Fluidmaster Type Floats
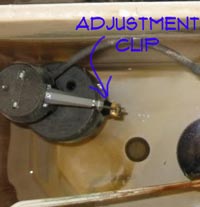
A fluid master type fill valve has an integral float that has an adjustment rod on the side of the assembly. You should be able to pinch the spring clip and adjust the float up or down. Move it down a half of an inch for a toilet that is running constantly. Let it go and see if the water stops running.
Still running, adjust it down again. When the water stops running, flush the toilet and see if the tank refills to the proper level. Refilled OK and the water stopped running? Yes, Congratulations, problem solved.
Some of these type of fill valves have a rod with a head on top that can be adjusted with a screwdriver. Follow the procedure above in a similar fashion for this type of float adjustment. That is all there is to fix a running toilet by adjusting the float.
What To Do When Adjusting the Toilet Float Doesn't Work
Toilet fill valves can go bad and no amount of adjustment will fix the problem. After adjusting the float you still cannot get the water level correct, the only recourse is to replace the toilet fill valve. See the article 'Toilet Fill Valve Repair' for instructions on how to solve this problem.
How To Stop a Running Toilet
 Can you fix a running toilet? There is nothing more irritating than trying to get to sleep at night and you can hear the toilet running. Not to mention the cost that is being added to your water bill.
Not sure if this is your problem? See the articles 'Troubleshooting Toilet Problems' and 'Fixing a Leaking Toilet' for a complete list of toilet repair topics.
We are glad to report that this is a solvable problem. In fact it may not require parts or any expense at all. Learn the tricks and techniques. You can definitely fix a running toilet yourself.
Most of the time repairs on your that involve water running in your toilet will be simple. Less often you will have to replace a part. This in not the end of the world, just a bit more work. Take a breath a see what you need to do, it won't be that hard.
It could be as simple as adjusting the float. Yes, really, a five minute adjustment could do it. Is it worth five minutes to maybe save a hundred bucks? Where I come from that is a pretty good wage.?
Fix a Running Toilet - Information
What Can You Save?
Having a repairman fix a running toilet will cost you $50 to $100 for a service call, plus parts, if required. It is unlikely that you need a new toilet if it is running constantly. Savings = $50 to $100. Repair a running toilet, it could be five minutes work, fifty dollars for five minutes. I'll work for that any day.
How Hard Could It Be?
In most cases it is easy to fix a running toilet.
Check the Simple Things!
Adjusting the float is simple, check the steps below. Check the chain on the flapper, it may be hanging up. Adjust if necessary.
What Can Go Wrong?
You may have heard horror stories about toilets and dirty water. The water that is running in your toilet is still clean water, thankfully. The toilet tank stores that water until it is needed. Anything that can be damaged by water should be removed from the area before the repair is attempted. Failing to drain the tank down can generate a lot of water on the floor and surrounding area. Getting the toilet partially repaired before it gets too late or the parts store closes can leave the toilet not operating. One trick is that a toilet can be flushed by dumping a couple of gallons of water quickly into it from a pail. This emulates the normal function of the tank.
How To Fix a Running Toilet
Proper Water Levels
The water level of a tank influences both the flushing and whether or not the tank runs constantly. The article 'Checking a Toilets Water Level' discusses the issues with this problem. Improper water levels can also cause the toilet not to flush correctly.
Adjusting the Toilet Float
To change the water level in a toilet tank, you will need to adjust the float. There are some different types and the methods for adjusting them vary. See the article 'Adjusting a Toilet Float' for the easiest fix for this type of problem. A constantly running tank is likely in need of adjustment.
Fill Valve Problems
You may have tried to adjust the float and the toilet is still running. 'Checking the Toilet Fill Valve' covered what to do when the fill valve has gone bad.
Checking the Toilet Flapper
The toilet flapper is another item that causes a toilet to run. The article 'Checking a Toilet Flapper' covered this issues with this part of your toilet.
Summary
Listening to water run in your bathroom is an irritating thing to put up with. Hopefully the information on this subject has helped you to fix a running toilet. The instructions above and the related articles should have helped you to solve your problem.
Admit it, it was not that hard. Actually most toilet repairs are straightforward. If you followed the steps and were successful, you are another homeowner that has been able to make their own home repair.
Door Threshold Replacement
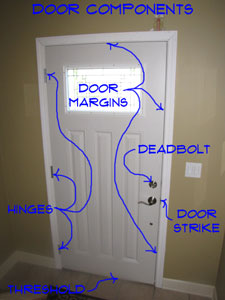
 Entry door hardware and the weatherstripping can cause a door not to close properly. The entry door hardware includes the door lock, the deadbolt, the hinges and the door strike. Alignment and failed parts can be responsible.
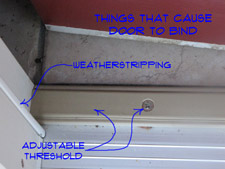
Is something that is attached to the door or the frame, causing it to bind? Requiring you to make an entry door repair. Try to determine what is responsible. Weatherstripping may be too tight. You want it to stop the air, not stop the door from closing. Adjust or replace items as needed if they are binding the door.
You want an entry door to fit snugly, but not so snug that it takes two men and a little boy to get the door closed. Set the weatherstripping so it stops the air and allows the door to open and close. See the article on Weatherstripping for Doors, for more information.
The strike plates on the lock set can cause the door to bind. You can remove the strike plate and use a chisel to remove some wood from the mortise. The plate should be flush with the jamb and not protrude out. Strike plates should not be fastened on top of the jamb. They should be recessed in. See the article on Door Lock Repair, for information on the proper installation of the strike plate.
Adjusting Entry Doors
 Adjusting entry doors is not that difficult. Most of the time the door is sagging and an adjustment to the top hinge will solve the problem.
Not sure if this is your problem? See the article 'Fixing Residential Doors' for a listing of all the door problems and links to the resources needed to fix them
Inspecting the Door
The first thing to do is look at the door from the inside when it is closed. There should be an even gap across the top and down the latch side. This gap occurs between the door and the frame or jamb. It should be about an eighth of an inch and be consistent.
Often, you will see that the door on the hinge side is tighter against the frame at the bottom of the door. This is where most of the weight of the door is pushing against. When this happens the gap at the top will be uneven, wider at the strike side of the door. The top of the door will be closer to the jamb or frame at the top.
Sagging Doors
If the door is tight against the frame at the top and there is a gap at the bottom, the door is sagging. If the door is hitting the sill, it will still be indicated in the margin along the latch side. Is the gap wider at the bottom and narrower at the top? Yes, then the door is sagging. The sill is keeping it from sagging as much as it wants to.
Sagging doors are the problem most of the time. The weight of the door pulls against the top hinge and over time the door will sag. This is especially true when the screws for the top hinge are not long enough to go into the door frame.
Problems With Hardware
A sagging door will also cause problems with the door locks and dead bolts. If the door sags too much the latches will not work correctly. Before you start replacing hardware, or moving the strike plates, make sure the door is properly adjusted in the frame. See the article on 'Adjusting Door Lock Strike Plates' and 'Aligning Doors to Strike Plates' for more information.
Fixing a Sagging Door
Open the door back up and remove the two inner screws for the top hinge. How long are they? An inch or less? This means that the hinge is only being supported by the door jamb itself, not the framing lumber for the wall. Are the screws long, say 2 ½ to 3 inches. That's good, all you will need to do is tighten them up. Adjusting entry doors could be that easy.
If you have long screws, make sure the heads are not stripped. For short screws you need to obtain some 3” number 8 screws. Square or Torx drive are better, but phillips head will work. Install the long screws, angling them slightly toward the center of the jamb.
 Snug them up and then check the margins again. Still sagging? Tighten them a quarter turn at a time until the margins are even and the door closes properly.
More is not better in this situation. If you over tighten the door will bind in another direction and you will have to start over on your adjusting entry doors project. Tighten until the margins are even and the door closes easily and then stop. With the long screws in place you may have to snug them a little from time to time. Five minutes now that you know how. Door closes, Great! Go to the next project on your list.
Adjusting the Door In Another Direction
It is possible that the door could be binding in another spot. The door may be tight against the bottom of the jamb. This is more likely due to a door jamb that is out of alignment. See the article on 'Fixing Door Jambs' for information on what can be done with the jamb.
A long screw per the procedure above could be used to draw up the lower hinge. It is rare that this would need to be done, so use caution when trying to adjust the lower hinge. Tightening it could make the top of the door go out of alignment again.
Summary
Many of the problems you will have with exterior doors can be corrected by getting the door properly aligned. From the above, you have learned that most of the alignment or adjustment issues are related to the top hinge.
Securing and adjusting the top hinge is not difficult, once you have the right fasteners and tools.
Entry Door Repair
 Why would you need to make an entry door repair? What do people see when they walk up to your home? It is usually your front door. Do you really want them to see a sign saying Front Door Broken – Use Side Door? Most of the time there is no need for that. Entrance door repairs can be made without too much difficulty.
This article will discuss some common problems that occur with front doors. There are both visual and operational concerns with an entrance door. Visually, you may need to paint or caulk some items that need attention. You want your door to open and close correctly, the locks to provide security and the weatherstripping to keep the heat or cold out. These features can be addressed without replacing the door. Read on and evaluate what you need to do, to make your own entry door repair.
Entry Door Repair - Information
What Can You Save?
That depends on who you talk to. Many websites and companies will equate an entry door repair with front door replacement. A decent off the shelf pre-hung entrance door will run from $250 to $600. High end doors can run into the thousands of dollars. It will cost another $150 to $250 to have it installed, assuming there are no problems.
You may be fortunate and find a carpenter that will repair the door and be honest with you. Minimum it will involve a service call, around $50 plus any parts. This would be to adjust the door or weatherstripping. You will need to be the judge on whether or not you want to be sold a new door. So you could save from $50 to $850. The lower figure is for something that might take you fifteen minutes to accomplish.
How Hard Could It Be?
The range of tasks we are talking about start with simple adjustments on up to removing and replacing a section of the door jamb. Replacing your door is a subject for another website.
Check the Simple Things!
Over time doors get out of adjustment, this will cause them to sag and not close correctly. The common culprit is the top hinge. Check the adjustment on the door before you do anything. Weatherstripping, either replacing or adjusting is another simple fix. The alignment on the strike plate can also cause the lock not to work.
What Can Go Wrong?
Worst case, you take the door out and cannot get it put back in. Your entry door repair problem has escalated. This will leave you with a big hole in the front of your house. You can put plywood over it temporarily. You can also make things worse if you start adjusting things the wrong way. A sticking door could turn into a door that won't close at all. Make sure you understand what you are trying to accomplish before you do anything.
Troubleshooting Entry Door Problems
The steps below give you instructions for adjusting a door. This would also include dealing with a sticking door. Wood doors can swell and stick. Does the door stick every year during the rainy season? If it does, planing or sanding it may solve the problem. Most of the time, a sticking door needs to be adjusted. This is especially true if it is the upper strike side that is sticking.
Locks and Deadbolts Not Working
Is it the door lock or deadbolt that is not working? Locks and deadbolts have their own set of problems. See the article on 'Door Lock Repair', for information on adjusting, repairing and replacing door locks.
Another common reason that locks don't work right is a door that is not adjusted properly. When the locks don't align with the strike plates, the won't lock or won't stay locked. See the article 'Adjusting Exterior Doors' and 'Adjusting Door Locks to Strikes' for more information.
Door Is Leaking Air
Is the door leaking air or can you see daylight around it? You need to repair or replace the weatherstripping. See the article on 'Weatherstripping for Doors', for more information. Doors can leak both cold and heat out of them. You can save yourself some money by keeping it in good repair.
Damaged Door Jambs
Is your door jamb or door frame in need of repair? Is it cracked or split? It is also possible to have rotten wood near the base. The steps and info you need are found in the article 'Door Frame Repair'. Find out what you can do to repair the door frame without replacing the door.
Door Will Not Close Properly
Entry door problems will normally be associated with three key areas. The alignment of the door, the hinges and the hardware that is attached to the door. Read below to determine where your problem lies and the select the appropriate link.
Is the door hard to close or open. Try to determine where the friction is occurring. There are two spots that take the prize most of the time: (1) The upper corner on the latch side of the door (the side with the door knob). (2) The bottom of the door, again on the latch side. Both of these conditions indicate that the door is sagging. Over time the weight of the door pulls on the top hinge and loosens it up. See the article 'Adjusting Exterior Doors' for instructions on tightening the top hinge and checking the door for alignment. This is a very common entry door repair problem.
Swollen Wooden Doors
Humidity can make a wooden door swell in the summer, causing it not to close. If this is a persistent problem, you can sand or plane the door to take enough material off the door so that it will close. Caution should be used when doing this. Later, in the winter, the door will shrink and may result in a gap if too much wood is removed.
Are you sure the door is swelling? This is only going to be true if it is an all wood door and it is not sealed very well. Check the margins first before you start sanding or planing a door. See the article 'Sanding and Planing a Door' for instructions on sanding or planing a wood door.
Tight - Rusty - Squeaking Door Hinges
Another entry door problem is when the door is hard to move even when it is not going into the frame? Are the hinges squeaking or making noise? The hinges may be binding up. See the articles, 'Lubricating Door Hinges' and 'Replacing Door Hinges' for instructions and information on what to do with door hinges.
Summary
Hopefully, you have been able to get your entrance door working properly. Learning how to adjust a door is a handy thing to know. Doors will often act up. Many of the same principles apply with all doors. Getting the weatherstripping right is important when it gets cold.
For swinging doors, remember that the top hinge is doing all the heavy lifting. With a little patience you have been able to make your own entry door repair. Congratulations, not everyone can do this!