Search
Repair Topics
How To Patch Drywall
Knowing 'How To Patch Drywall' will save you a lot of money. The skills that you need are not that hard to learn. That combined with the 'Step by Step' instructions that we provide on this website will make you a 'Drywall Patching Pro' in no time.
Not sure if this is your problem? See the articles 'Troubleshooting Drywall Problems' and 'How To Spackle a Wall' for a listing of all the common drywall issues.
Of course you are probably wondering about whether you have a big drywall or sheetrock problem, compared to a relatively easy patching problem.
The next section provides a brief description of the various levels of difficulty you may be faced with. We start with the easiest problems and move on to more difficult ones.
Troubleshooting Drywall Patches
Before you learn how to patch drywall, you should understand what the various types of problems that you may encounter are like. Below, we describe the various drywall patches. These are described by the level of difficulty with the first being the easiest to deal with:
Dents, Dings and Small Holes
Okay, you want to paint the living room and when you take everything off the walls you find a lot of inmperfections. Places that had pictures or other items hung up, now have holes left in the wall. In addtion, you notice a lot of small dents in the wall. What do you do?
This is a common problem and is not that hard to solve. A small amont of wall preparation and a little bit of spackling compound will take care of this. For complete instructions, see the article 'How To Spackle a Wall'. We give you instuctions on what type of material to use and how to apply it.
Fixing and filling small holes will not take a lot of time,especially if you do it the right way. Follow the links in this section for comprehensive instructions.
Cracks In Drywall Walls and Ceilings
Everything seems perfect, the paint looks good, the wall is smooth, but wait! There is a hairline or maybe not so hairline crack. What caused this? Is someone to blame for this? What do I do?
There are lots of reasons for cracks in your walls and ceilings. Ranging from poor drywall installation to natural settling to a poorly constructed house. For some insight on the reasons for your cracks, take a look at this article that discusse 'reasons for cracks in drywall walls and ceilings'.
Is your house older? No builder to call and complain to? Well you will be faced with hiring someone or fixing it yourself. The first thing to determine is the 'size' or 'severity' of the crack.
Hairline or Small Cracks - Hairline cracks may appear and stay the same size for some time. If they don't change after a period of time you can repair them. Hairline cracks are covered in the article 'Fixing Minor Drywall Cracks'. This is the easiest crack repair and will not take a lot of time.
Then there are the cracks that look like a fissure caused by a severe earthquake. This type of crack will take a bit more work. The problem is that joint compound alone will not solve the problem. You are going to need some tape and multiple coats of compound to deal with it.
Still not the end of the world, just takes a little longer. For this problem, you need to see the article 'Fixing Big Drywall Cracks'. Yeah, these are macho cracks and need a serious 'Home Fixer' to take care of them.
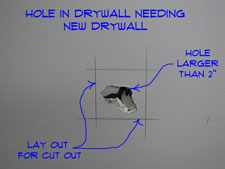
Fixing Holes In Drywall
Again we are in an area that is by degree. How 'big', 'Big', 'Big', 'Big', 'Big' is the hole? Well, you get the idea.
We talked about small holes, such as those left by a nail that hung a picture in the 'Spackling' section. Now we are talking about holes that are bigger, maybe you can put your finger through it or worse, maybe your cat can crawl through it.
To keep it simple we have narrowed it down to three sizes of holes. (1) Small holes that can just be filled with spackling. These are generally 1/4" or less in diameter. The 'spackling' segment above covered this. (2) The next step up is holes that are from 1/4" to 1 1/2". Why this distinction? Well, this hole can be dealt with using drywall tape and compound, replacing drywall is not required. (3) Large holes from 1 1/2" and up. These holes will require a drywall patch. Not insurmountable, just a bit more work.
Patching Textured Walls and Ceilings
Your patching project may be complicated by textured surfaces. These can occur both on walls and ceilings. When you have this issue you both have to patch the drywall and the textured surface.
I wish I could tell you that this was an easy problem to fix. However, it is not. First of all you need to understand that there are lots of styles of texture. To make it worse, each style will vary, depending on who installed it. Whoah! Wait a minute, am I saying that textures will vary depending on, not only the type, but also the installer? Are there no standards? No, not really.
Patching and fixing drywall texture will require a bit of expermintation.
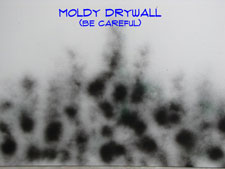
Removing Moldy Drywall
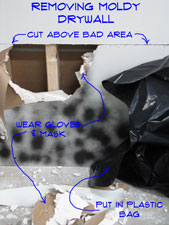 Removing moldy drywall is the best choice for larger infected areas. Or if the paper on the drywall has been ruined and/or the core of the drywall has started to disintegrate. You will need to remove and replace the drywall.
For drywall with mold on it, make sure you dispose of it in tightly sealed plastic bags. Take safety precautions, wear gloves and a mask when you are around moldy drywall.
See the government website for information on the issues, A Brief Guide to Mold, Moisture, and Your Home provides some good information. Disinfect the entire area after the bad drywall is removed. See the article 'Disinfecting Moldy Drywall' for more information.
Testing Moldy Drywall
You may be concerned that the mold that you have is the dangerous 'black mold' that everyone is afraid of. There are many thousands of types of mold that you could have in your home. Only a few of them are toxic and not all of the toxic ones are black.
There has been overactive use of scare tactics with regard to mold. Some of this comes from the media, and some of it comes from companies that want to sell expensive remediation services.
How can you tell what type of mold you have? You cannot tell by the naked eye. The only way to tell is to have it tested. With that said, testing can be expensive.
There are some relatively inexpensive test kits that can tell you whether or not you have a dangerous problem. You can find 'Test Kits' for purchase at the 'My Mold Detective' website. If you want to put your mind at ease, test the mold before you attempt to clean or remove it.
Preparation
Before you disturb moldy drywall, even if you are certain it is not the dangerous kind, you should seal off the area that you are working in. You do not want mold spores to be spread needlessly throughout the house. People with allergies, the young and the old are very sensitive to mold and may react to any type of airborne mold.
Use some plastic and blue or green tape to put a barrier around the area that you are working in. If you do not need to use a door, seal it off with tape. For doors that you need to go in and out of, create a flap in the plastic to walk through.
Remove unneeded items from the room such as carpets, draperies, loose furniture and anything else that you don't want mold spores to damage. If something is too big to move, cover it with plastic. If it is possible to have a fan exhaust the air to the outside this is good idea. Place the fan in a window with direction of air movement pointed to the outside.
Have a supply of large heavy duty trash bags on hand to place the moldy drywall and other debris in as you remove it. You will also need a broom and dust pan to sweep up the drywall dust.
Tools Required
You are going to need the following tools for this project:
- Hammer
- Pry Bar
- Keyhole Drywall Knife
- Utility Knife
- Tape Measure
- Battery Drill or Screwdriver
- 4' Level
Removing the Bad Drywall
For drywall that has been compromised by the water damage and mold you will need to replace it.
Drywall or sheetrock, as it is many times called, is fastened to the wood framing with nails and glue. If the house was built in the last thirty or so years it will likely have screws, especially in the field, holding it in place. To remove it, you need to locate the framing members.
Locating Framing Members
The first step is to determine how much drywall needs to be removed. You want to go somewhat beyond the moldy area. After that you are going to need to locate the studs. You can use a stud finder or tap the wall on either side of an electrical outlet. Since the outlets are attached to the studs, you will find a stud on one side or the other, of the outlet location. Find the center of the stud and measure in multiples of 16" from that point to the closest stud in the area you want to remove.
Once you have located the studs, use a level as a straight edge to mark out your cut lines. Ideally, it will be a square or a rectangle.
Where studs occur and the cut runs parallel, cut the drywall in the center of the stud.. It is harder to cut out the drywall at these locations, but is saves having to install extra framing members.
Cutting Perpendicular to the Studs
You can use a key hold saw to cut out the drywall that is perpendicular to the stud framing. You will have to stop at each stud or joist and skip over it. You should be able to get the majority of the cut done with the keyhole saw. You will need to finish off the cut over the framing with a utility knife.
Cutting Drywall Parallel With the Framing
You will need to use a utility knife to cut the drywall over the framing members. Ideally, you have located the center of the framing and drawn a line down the center. Initially, you will score this line with a utility knife. After you have scored the paper, you will run the utility knife over the cut repeatedly, applying more pressure each time until you cut completely through the drywall.
Removing Moldy Drywall
Make sure you are wearing your gloves and a mask prior to starting. The easiest way to remove sections of drywall is to use the hammer to knock a few holes in it. Once you have a hole you can get your fingers behind the drywall and pull outwardly. The drywall should pull away in bigger sections.
You are going to have places, especially around the fasteners where the drywall will be stubborn. You will need to use a pry bar and the hammer to loosen the drywall at these locations.
Place the pieces that you remove in the plastic bags as you remove them and keep the top of the back closed when not in use. The longer the moldy drywall is exposed, the more chance there is for mold spores to be released.
After you have remove all of the drywall, you will need to remove the leftover nails and screws. For nails you can use a claw hammer to pull them out. Use a Phillips bit in a battery drill to remove the screws. If you don't have a battery drill, you can use a screwdriver.
Replacing the Damaged Drywall
Installing new drywall involves cutting the sheets to the correct size and then fastening it in place. There are various measurements that need to be taken and laid out on the drywall panel. After that, the drywall needs to be cut correctly. Once the sheet is cut, it can be installed at the patch.
The article 'How To Cut Drywall' and 'Installing Large Drywall Patches' has information on all of the steps associated with installing new drywall patches.
Finishing the New Drywall Patch
After you have replaced the drywall where you tore out the old moldy drywall, you will need to tape and finish it. This situation is similar to any other drywall repair project, you have at most five steps to complete the finishing. (1) Applying the drywall tape. (2) Installing a first coat of drywall compound. (3) After a light sanding, you will apply a second coat of compound. (4) After another light sanding, you will want to skim the drywall with a light coat of mud to smooth out the surface. (5) The last step is to sand the drywall to prepare it for a coat of paint.
For a complete discussion on the steps involved with a drywall finishing project, see the article, 'Taping and Mudding Drywall'.
Conclusion
When you have too much of an area that is affected by mold, you will need to remove the drywall and replace it. This is a big job, but a neccessary one. Mold can cause health issues. It is also very dirty and gives off an offensive odor.
Going through the steps above should allow you to remove the drywall and dispose of it safely.
Cleaning Mold With Bleach
 Disinfecting moldy drywall will work fine for small areas. For larger areas, you will need to consider removing the drywall. For related information, see the articles 'Is Black Mold Dangerous' and 'Removing Mold From Drywall'.
Dealing With Mold Concerns
Is it advisable to try to remove mold yourself. That is your decision to make. Bleach will kill mold and remove it from many surfaces. Precautions need to be taken so that the mold is not breathed in. It also needs to be disposed of properly.
Check out this government website before you mess with mold. A Brief Guide to Mold, Moisture, and Your Home, it will give you some insight and safety tips. Another good article is Mold, on the CDC website. The EPA states that repairs of less than ten square feet can be performed by a homeowner, as long as they follow the guidelines.
Mold Removing Solutions
There are commercially manufactured mold disinfectants available. An example is the 'Moldex' website. They have multiple products that can kill and remove mold. Read the information and determine the product that best fits your needs.
Your home supply store should have a selection. A solution of a quarter to half cup of bleach to a gallon of water will also work.
Cleaning a Moldy Area
Were a mask and disinfect the area. Wipe down the area until the mold is gone.
Discard the rags after you are done and get rid of the dirty water. Let the area dry and make sure that the mold is gone. Use a good quality stain blocker/sealer such as Kilz or Zinnser as a primer. Paint the area as needed.
Drywall mold removal is a repair that should be made sooner than later. Address the problem at the first sign of mold. A musty smell is also an indicator of mold, even if you don't see it.
How To Get Rid of Mold on Drywall
 Drywall mold removal is needed when you find mold on your walls or ceilings. The 'black mold' scare has certainly brought this problem into the consciousness of the public. Not all mold, even mold that is black in color is the dangerous black mold. Unfortunately it takes laboratory testing to tell. Err on the side of caution in this matter. Treat any mold you see with a healthy respect.
Take precautions before you attempt a drywall mold removal project. Check out this government website before you mess with mold. A Brief Guide to Mold, Moisture, and Your Home, it will give you some insight and safety tips. Another good article is Mold, on the CDC website. The EPA states that repairs of less than ten square feet can be performed by a homeowner, as long as they follow the guidelines.
Testing Moldy Drywall
You may be concerned that the mold that you have is the dangerous 'black mold' that everyone is afraid of. There are many thousands of types of mold that you could have in your home. Only a few of them are toxic and not all of the toxic ones are black.
There has been overactive use of scare tactics with regard to mold. Some of this comes from the media, and some of it comes from companies that want to sell expensive remediation services.
How can you tell what type of mold you have? You cannot tell by the naked eye. The only way to tell is to have it tested. With that said, testing can be expensive.
There are some relatively inexpensive test kits that can tell you whether or not you have a dangerous problem. You can find 'Test Kits' for purchase at the 'My Mold Detective' website. If you want to put your mind at ease, test the mold before you attempt to clean or remove it.
Make sure you understand the precautions you need to take before proceeding. Review all the information on the EPA website. People have become very sick from breathing airborne mold. We do not want you or your family to be among them.
Mold is an indication of a moisture problem. A leak or some sort or seepage will cause mold. In addition to drywall mold removal you will need to address the problem that caused the mold. Fix the leak at the same time.
Drywall Mold Removal - Information
What Can You Save?
A contractor will charge you for the amount of work involved to remove and repair the drywall. This is called Mold Remediation and only specialty contractors are licensed to perform this service. Depending on the level and size of the area, these types of repairs could run hundreds perhaps thousands of dollars.
How Hard Could It Be?
Drywall mold removal can take you into some difficult projects. Taking precautions also adds to the level of work involved.
Check the Simple Things!
A small moldy area that is restricted to the surface may be treated with a mold killing solution. There are some that are commercially available. Bleach, diluted with water serves as the main ingredient in most of them.
What Can Go Wrong?
You can get sick if you breathe a dangerous kind of mold. Wear a mask or respirator. Try not to disturb the mold. Use a solution to disinfect the mold before proceeding with repairs. Quarantine the area until you have the problem solved. Use plastic or keep doors closed with a sign on them to segregate the area.
Drywall Mold Removal – The Steps Involved
When it comes to dealing with mold you have to basic choices. The first is to remove or disinfect the mold on the surface where the mold is occurring. If the mold has not penetrated deep into the wall, this can be effective. You will likely use a cleaner that contains bleach and other chemicals to accomplish this.
For instructions and information, see the article 'Disinfecting Moldy Drywall'. This article has guidelines and some information on what type of products can be used.
For mold that has penetrated deep into the drywall, you will need to remove the drywall. This is a much bigger job, since you will have to repair the drywall that has been removed. See the article, 'Removing Moldy Drywall' for a discussion on what to do and how extensive the project will be..
Summary
Drywall mold removal is a potentially dangerous repair. Take precautions and deal with the problem quickly. To the degree possible you should try not to disturb the mold. Put it in plastic bags and dispose of it properly. Make sure you solve the moisture problem or the mold will come back.
All drywall repairs involve some work. Don't despair they are not that difficult once you know a few basics. Hopefully your drywall mold removal project has gone well. You can move on to other home repair projects.
How To Patch a Large Hole in Drywall
 Why would you need to make a drywall hole repair? Maybe you had to repair something in your wall, perhaps plumbing, electrical or another concealed item. Could be that you had a water leak and the drywall is rotted and needs to be replaced. Or it could be the kids were wrestling and a hole resulted. Whatever the reason you are here because you need to replace some drywall.
Not sure if this is your problem? See the articles 'How To Fix Drywall', 'Patching Drywall' and 'How To Spackle Drywall' for more information.
Drywall is supported by the wood framing in your home, usually 2 x 4's. When you cut out drywall you will have to provide support for it. Most residential framing is spaced at 16" on center, although you will find 24" on center framing at some ceilings and even some walls.
Cutting the drywall back to the framing would seem to be the logical choice for providing support. There are a few reasons why you might not want to do that.
Drywall Hole Repair - Information
What Can You Save?
A drywall hole repair is a bit more involved than some other drywall repairs. Some drywall needs to be replaced and then taping needs to happen. Even with quick setting compound you can be looking at one to four hours to take care of something. There is some down time with drying time for the mud. Someone you hire will either wait or make return trips. The size of the patch matters but let's say between $50 and $250 dollars to hire someone to repair drywall in your home.
How Hard Could It Be?
A drywall hole repair will require replacing drywall and taping. Both of these activities require some work.
Check the Simple Things!
When you have a big hole in your wall there is nothing simple to do. Take a deep breath and prepare yourself for the character building experience you are about to have.
What Can Go Wrong?
Failing to take your time and make sure that your drywall hole repair is smooth can leave a patch that will show after it is painted. You would be amazed at how unforgiving drywall can be when the right light hits it. For a repair that is located at picture height you can find a picture to hang there. At other locations you will still have a problem to address. Drywall is messy in it's own way, take precautions to deal with the mess. Yes the dust can wind up in a room that is on the other end of the house. In fact it may get there quicker than you can.
Drywall Hole Repair – The Steps Involved
Adding Backing for Drywall Holes
Another acceptable method for supporting drywall is adding backing for drywall patches. This consists of screwing wood supports to the existing drywall.
Use the tape measure, level, pencil and keyhole saw to lay out a square or rectangular box around your hole. You want to be back to the undamaged portion of your drywall. There is no mystery about the square or rectangle, it is just easier to cut a new piece of drywall that is one of those shapes. Make sure you have the right thickness of drywall for the patch, usually 1/2", sometimes 3/8" or 5/8". Cut the patch about 1/8" to 1/4" smaller than the hole.
Find a couple pieces of scrap wood that are about three or four inches longer than the shorter dimension of the hole. Anything will work that will fit into the hole and still leave you enough room to get your fingers behind the wood. Furring strips, 1" x 2" or 1" x 3" are great.
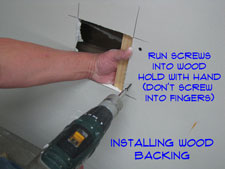 Hold the wood against the back side of the drywall with your fingers. Run three or four screws through the drywall into the wood to hold it in place. You need another piece of wood on the opposite side of the hole. You only need wood on two sides of the drywall hole repair. Install your replacement piece of drywall and run a couple of screws on each side into the wood. Gently, it is only the drywall holding the wood in place. Adding backing for drywall patches using this method is not that difficult, once you get the hang of it.
Now that you have your replacement piece of drywall installed you can jump to Step Five for instructions on taping and finishing the drywall. I admit that I have a lot of experience working with drywall. Still, comparing less than five minutes to install a patch to between twenty and thirty minutes for a 'hot patch'. I just think that this would involve a short debate. Of course debaters pride themselves on being able to say a lot about almost nothing. Well OK, that is really another discussion.
Big Holes in Drywall
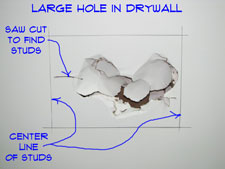
Fixing big holes in drywall is a bit more work. Bigger holes that are larger than the spacing for the framing need to be attached to the framing members. Drywall has a span rating, 1/2" drywall can span sixteen inches both horizontally and vertically, although you may find it spanning twenty four inches. 5/8" Drywall can span twenty four inches.
Your first task is to find the framing members on either side of the hole that needs to be repaired. You can use a stud finder or you can use as keyhole saw to cut laterally in each direction to find the framing. Once you have found your studs you want to lay out your patch on the centers of the studs.
Make sure you know which way the framing is running. For walls it is easy, vertically. For ceilings it is usually perpendicular to a bearing wall. Which walls are bearing? Great question with no easy answer. Outside walls that run the long dimension of your home are usually bearing, no guarantee though. You're patching the drywall anyway, make the hole a little bigger and stick you hand up there to find out.
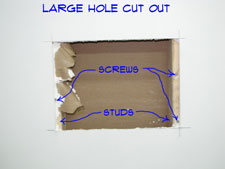 You need to cut back to the framing members to fix big holes in drywall. You can use the keyhole saw to cut laterally between the framing. For cutting along the framing you are going to have a bit more trouble. The problem is that there are nails or screws that hold the drywall in place. You will need to score the drywall with a utility knife along the stud.
Keep scoring the drywall deeper and deeper until you cut completely through it. When you hit a nail or a screw you are going to break the tip off the blade and it will not cut very well. In addition the gypsum dulls the blades quickly.
Replace or sharpen the blade as needed. Remember, utility knife blades are very sharp and cut skin easily. There is a tendency for blade to slip out of the groove and fly past where you want it to go. Make sure you are cutting away from any body parts. Be careful, I cannot stress that enough. With the patch removed you need to pull out the screws or nails. The edges of the remaining drywall will need some additional fastening. Install screws as required.
Adding New Drywall
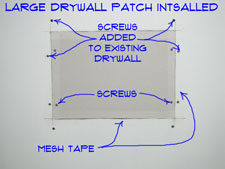
Patching with new drywall is not uncommon. The main thing is that you want to get the right size drywall for the patch. The article 'Drywall Sizes' gives you some tips on doing that.
Cut a replacement piece of drywall. Make sure you have the right thickness of drywall for the patch, usually 1/2", sometimes 3/8" or 5/8". Cut the patch about 1/8" to 1/4" smaller that the hole. Install the patch with drywall screws into the framing members.
When your patch bridges multiple studs you will need to install screws in the field of the drywall. Maximum spacing for screws in drywall is twelve inches. Put more than that as needed.
With your replacement piece of drywall installed you are ready to move onto Steps Five for taping and finishing the drywall. Depending on the size of your drywall hole repair you may have a sizable taping job. Don't worry, it is not much more work to do a big patch, than it is to do a small one.
Taping and Finishing a Large Hole Patch
For a complete discussion on taping and finishing drywall patches, see the aticle, 'Taping and Mudding Drywall'.
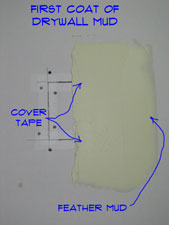
Taping a drywall patch begins with, you guessed it, the tape. You have two options on the tape. You can use 2” wide paper tape or fiberglass mesh tape. For a drywall hole repair, paper tape will require one extra step. First you have to apply mud and wipe the tape down to get it to stick to the drywall. Spread about and eighth of an inch of compound along two opposite sides of the drywall hole repair.
Cut a piece of paper tape about two or three inches longer than the joint you are taping. Center the tape over the joint. Use a four or a six inch knife to wipe the tape down, pressing the excess mud out from under it. The tape should be fairly tight to the wall. The flatter the better. Repeat this for the opposite side of the repair. After two sides are taped repeat for the remaining two sides. Make sure the tape laps onto the other pieces of tape by at least an inch.
Fiberglass mesh tape will stick to the surface of the drywall on its own. You do not need to put mud on first. You can install fiberglass tape on all four sides of the repair at the same time. You can apply a first coat of mud directly over the fiberglass tape. Fiberglass tape is definitely better for a drywall hole repair. Fiberglass tape is a little more expensive, six to eight dollars per roll for a full size roll. Compare that with two or three dollars for paper tape. I think it is worth the extra money for the time it saves. Taping a drywall patch will go quicker if you use mesh tape.
For a paper taped patch you have to leave and let it dry. Do not try to apply a coat of mud over top of wet tape, it will make you sad and you will blame yourself for a long time. Did you decide to use mesh tape, good, you are ready for the first coat of mud. When the paper tape is dry, you are also allowed to move on to the next step.
Summary
They say that drywall installers and finishers are a breed of their own. That is probably because not too many people like doing it. OK, this was a bigger job with several steps, but none of them should have taken that long. The trick is to be patient. Allow a drywall hole repair to run over the course of a couple of days. Find other things to do while the mud is drying. We hope that your experience with drywall hole repairs has not been too traumatizing. If you were traumatized, try to find a support group in your area. With the skills you have developed you will be ready to deal with holes in the future.