Search
Repair Topics
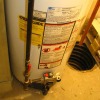
Electric Hot Water Heater Troubleshooting
 This article on electric hot water heater troubleshooting will help you to locate your 'no hot water' problem quickly and direct you to a solution to the issue. See below for guidelines on how to track down your problem. See the article on 'Gas Hot Water Heaters' if you don't have an electric heater. Not sure which kind you have, see 'Identifying Water Heater Types', for a description of each type.
Common electric water heater problems are 'Replacing Bad Heating Elements', and 'Checking Electric Water Heater Thermostats'. Some common problems for all Hot Water Heaters are, 'Pressure Relief Valves', 'Leaking Water Heaters' and the 'Water Heater Drain Valve'.
It could be if you do not have any hot water and you have an electric hot water heater. Sometimes the problem is too little hot water. There are a handful of items that can malfunction or wear out on an electric water heater. See if you can locate your problem and whether it is practical for you to fix it.
Electric hot water heater troubleshooting involves checking wiring that has a significant amount of current. In fact the combination of volts and amps in an electric water heater can be lethal. Be Careful!! See 'Electrical Safety Tips' for information on working safely around electricity.
That does not mean that this type of repair is impossible. It just means you need to have the right skills and take the right precautions. At the very minimum you want to have an understanding of what it is that needs fixed.
Electric Hot Water Heater Repair Costs
We are in the whitewater of cost potential here. A new hot water heating unit can run anywhere from $250 to $3,500. Installation costs can run from $200 to $1,600. This is all for a new system. Yes, you may only need a $20 part. Add that to a service call and you should be looking at $100, more or less. Just keep in mind that with the potential above you might get some serious selling when you try to get someone to fix your hot water heater.
Electric hot water troubleshooting starts out at a fairly difficult level. You need some testers to track down your problem. To make it worse, the testers are not that easy to use. Add to that the significant danger involved with the 240 volt power that is feeding your electric hot water tank.
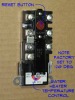
 Check the breaker, has it tripped for some reason. The next easy thing would be the Reset button on the heating elements. Unfortunately, when the water heater is making either of these things trip, there is usually another problem.
We are talking about serious electricity here. 240 volts at thirty amps. Have people been killed from that kind of current? Yes they have. Don't even look at anything unless the power is off. No hot water is a bummer and you may not have a quick fix. Assuming it is not something simple like a tripped breaker you could be looking at minimal or no hot water until you can get the problem resolved.
Electric Hot Water Heater Troubleshooting Information
Take a look at the possible problems below. Try to find a match for your situation. Follow the links to get to the right information
 No Hot Water
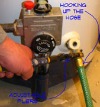
Check the circuit breaker first. Has it tripped? The breaker for the hot water heater should be a two pole breaker in your panel.
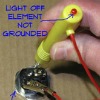
The next possibility would be an issue with the thermostat, limit switch or element. See the article 'Hot Water Heater Element Testing' and 'Electric Water Heater Thermostats' for the information on tracking down this kind of problem. Another possibility would be loose wires. Go to the article 'Electric Hot Water Heater Wiring', for direction on the wiring issues you might face.
 Not Enough Hot Water
The first thing to check is the thermostat. Go to 'Adjusting the Thermostat' for a discussion. There might be problems with the heating elements, see 'Hot Water Heater Element Testing' to check and see if one or both of them are bad.
Loose wiring could also cause this problem, check out 'Electric Hot Water Heater Wiring' for answers.
The dip tube is another possibility. The article 'Hot Water Heater Dip Tube' addresses this problem.
 Takes Too Long to Reheat
It could be as simple as adjusting the thermostat, see 'Electric Hot Water Heater Thermostats' for instruction.
It could also be an issue with the lower thermostat or the lower element. Check out the article 'Hot Water Heater Element Testing' for more information.
Another possibility would be sediment build up in the bottom of the tank. See 'Flushing a Water Heater' for information on cleaning out your tank.
 Water Too Hot
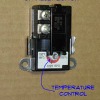
The top candidate for is that the thermostat is set too high. Electric water heater thermostats are not readily accessible and take a bit of work to locate. The article 'Electric Hot Water Heater Thermostats' provides instructions on locating the thermostats and how to change the settings.
You might also want to review the article on 'Hot Water Heater Temperature Settings', this article provides information on how to safely set the temperature for your water heater.
Next would be a malfunctioning thermostat. Another possibility would be a thermostat that is not seated properly. The articles 'Hot Water Heater Element Testing' andcover these issues.
 Noisy Heating Elements
This is caused by scale build up on the elements or having the wrong elements. The elements can be cleaned or replaced. Although this cleaning them may not be worth the effort.
Electric water heater elements are not that expensive, so replacing them may be the wise course. See the articles 'How To Purchase a Water Heater Element' and 'How To Replace Electric Water Heater Elements' before you decide on what to do.
Low density elements are preferred and it may be a good idea just to change them when you have things apart. See 'Hot Water Heater Elements' for info on what to do.
 Black or Rusty Colored Water
This is caused by scale build up on the elements or a dissolved anode. See 'Hot Water Heater Elements' for dealing with the elements and 'Hot Water Heater Anode Rods' for the anode rod.
The water heater anode rod keeps the tank from rusting. A dissolved rod means your tank has started to rust. Replacing or cleaning the elements may also be a solution.
 Foul Odor
This is caused by a build up of bacteria in the tank. Flushing the tank may help. Replacing the anode rod with a different type of metal will also help. See the article 'Flushing a Water Heater' or 'Hot Water Heater Anode Rods' to deal with bacteria in the tank or a bad anode.
 Pressure Relief Valve Leaking
As the name implies, this valves releases excess pressure before it gets dangerous. When it goes bad it releases before the danger point. Issues with this item are found in ' Checking & Testing Water Heater Pressure Relief Valves'.
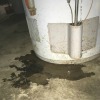 Hot Water Tank is Leaking
Depending on the location of the leak, this might be a big problem. Go to the article 'Repairing a Leaking Hot Water Heater' to track down your problem.
WARNING!! HOT Water, Dangerous Electrical Current and Natural Gas are used for Hot Water Heaters. BE CAREFUL!!! WARNING!!!
Electric Hot Water Heater Troubleshooting - Article Topics
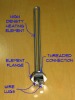 Repairing a Hot Water Heater Element
The hot water heater elements can go bad over time and stop working. Most hot water heaters have two of them. It is possible for just one to go bad or both of them. The elements cost between ten and twenty dollars. Can you change one yourself? How do you know if it is bad?
Follow the above link to get to an article that discusses the elements in detail. Find out if this is the type of repair you can do yourself?
 Repairing an Electric Water Heater Thermostat
Each heating element has a thermostat that controls it. When the thermostat quits working it will not allow power to go to the heating element. The result is that you will not have hot water. How can you tell if the thermostat is bad? Is it something you can repair? Can an electric hot water heater troubleshooting exercise, identify this type of a problem?
Follow the above link to get to an article that discusses hot water heater thermostats in depth. Find out if this is the type of repair you can make?
 Hot Water Heater Element Testing
How can you tell when the hot water heater element or thermostat is bad? Unfortunately, they don't have a color indicator that tells you when they are bad. Find you out what you need to test this type of device. It may be a little intimidating at first, but after you get the idea, it's not that hard.
For all the latest facts on testing the components in your water heater, you can follow the above link. Don't be afraid, others have gone this way and been able to tell their stories.
 Wiring an Electric Water Heater
It is possible that your problem is in the wiring that powers your electric water heater. Troubleshooting an electric water heater can include taking a look at the wiring that feeds it. Caution and a healthy respect for electricity is needed. After you take a look at the information, you can decide if you want to try this. No shame in calling in the pros at this point.
Learn what there is to know about electric water heater wiring by following this link. It is actually pretty simple, it's just a lot of electricity.
 Installing an Electric Water Heater
This is a last resort when all other options fail. Or you just want to get a new electric water heater. Newer water heaters are more efficient and have fewer problems than older ones.
It will take several hours and you will need some help to accomplish this task. You can save a considerable amount of money if you do the work yourself.
Problems Common to All Water Heaters
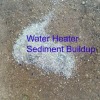 Dealing With Hot Water Heater Sediment
Sediment can build up in the bottom of your hot water heater over time. This can affect the amount of hot water you have and potentially damage other components. The lower elements of electric hot water heaters can burn out due to sediment. There are steps you can take to remove the sediment. Learn what they are by following this link.
Flushing a Hot Water Tank
Learn what you need to do to get rid of the sediment inside your hot water tank. It can be a little messy, but it will get you hot water tank working the way it is supposed to. A garden hose and a pair of pliers is all you need. Click on the link above to get to the information.
Repairing a Leaking Hot Water Heater
How serious is it when a hot water heater is leaking? That depends a lot on where it is leaking and how much. Some things can be tightened to stop the leaks. A tank that is leaking is not good news.
Find out if you need to look through your papers for the warranty. See if this is something you can fix. Click this link to get the good or not so good news.
 Repairing a Water Heater Dip Tube
What's a dip tube anyway? Believe it or not, it is an important feature of your hot water tank. Find out what can go wrong with this part and what you need to do to fix it. Just take my word for it, it is important. The amount of hot water you have will be affected by it, when it is broken. Follow this link for information.
Repairing a Water Heater Pressure Relief Valve
The name tells you everything. When pressure builds up inside your hot water tank, this valve releases. This is a safety feature. A defective valve will release when the pressure is still within safe limits. How to you know when it is bad? How hard is it to fix?
Click on the link above to find answers to these questions. Can you replace this valve if you need to? How hard is it? More questions that this article answers.
Electric Hot Water Heater Troubleshooting Summary
There are several possible problems you can be having with your electric hot water tank. Sorry, but there are more issues than one article can cover. We have tried to point you in the right direction for finding the answer to your problem. Some of the answers to your problem may be more than you want to tackle.
On the other hand, some repairs are not that hard. You be the judge. Electric hot water heater troubleshooting involves some problems that are fairly simple. Hopefully, even if you wind up calling a technician, you will be able to discuss the problem with him intelligently. Asking the right question will often save you money.
Using a Dustless Drywall Sander
You will appreciate dustless drywall sanding a lot more after your spouse is done yelling at you for making such a mess. Drywall dust is, without a doubt, one of the messiest substances known to man. The dust is so fine and it travels fast. It is amazing where it can get and how much of it can get there.
Tracking it through the house is another popular mistake. All of the praise you can get from a good drywall job will be negated by the scorn you will receive from making a mess.
For related information, see the articles 'How To Patch Drywall' and 'Taping and Mudding Drywall'.
Drywall dust does not have to win. It does not have to ruin your drywall repair project. Find out the options you have for dealing with drywall dust. It could be as simple as the kind of drywall mud you use.
You have two options when it comes to dustless drywall sanding. One would be to deal with the dust before it gets everywhere. The other would be to not create any dust in the first place. The method you choose will depend on several factors. Doing a better job of finishing the drywall can also help.
Containing Drywall Dust
Do not underestimate how pervasive drywall dust can be. It has the ability to get everywhere. It will put a layer of fine white powder on everything. When you are planning on dry sanding, you need to protect the area.
Containing the mess is a good idea with any repair project. Cover the floors before you start. Drape plastic over the doorways and seal them with blue masking tape. Put walk off mats down wherever you will be going in and out of the area.
Another silent enemy is your heating and cooling system. Cover up the registers and cold air returns. Dust that gets sucked into you heating system can wind up spreading through the whole house. Even when you use dustless drywall sanding techniques it is a good idea to isolate the area.
Drywall projects are among the messiest you will get involved with on your home. The other problem is that it normally takes place inside of your home.
Vacuum Sanding Drywall
Vacuum sanding drywall is another option. You do this by attaching a sanding head to a shop vac. This method has the advantage of achieving the same quality as conventional sanding. The vacuum cleaner captures the dust as it is generated. Sanding heads that can attach to a shop vac can be purchased for around $20. Not a big investment for saving yourself some cleaning.
Unfortunately, there are a few issues to contend with. Vacuum sanding drywall with a shop vac is not totally dust free. Some dust escapes the suction and can still get in the air. Drywall dust is very fine and can clog a filter on a shop vac very quickly, even if the filter is new. When this happens the shop vac will start to blow out as much dust as it picks up. Not a pleasant thought. Purchasing the sanding head is not a major investment. However, it is still an expense.
You need to use sanding screen with this type of sanding head. The holes in the screen allow the air to pass through. You need to purchase the screen and a sanding head before you can start. Make sure you have a clean filter for the shop vac. Sand the drywall the same way you would with a regular sanding head. Sand lightly, in long even strokes until the surface is smooth. Use your hand to make sure the area is smooth.
Check the filter often, cleaning as needed. The mess will be massive if the filter clogs. After you are done you want to clean the filter thoroughly.
Dustless Drywall Compound
A few years ago a new product was introduced to be used in the war on drywall dust. Dustless drywall compound made its debut and dustless drywall sanding took a giant leap forward. The United States Gypsum company started producing a light weight dustless drywall compound.
Light weight drywall compounds have always been a friend to do it yourself homeowners. They are easier to work with and require less sanding than the older standard compounds. Adding dust free technology to an already popular compound was a great innovation.
Dust free does not mean mess free. The way the compound works is that the dust particles stick to each other forming larger particles that fall harmlessly to the ground. This residue is easily swept up and disposed of. The fine white dust that becomes airborne is not a factor.
With this product, dustless drywall sanding has never been easier. Most home supply stores carry this compound. The USG brand is called "Sheetrock Joint Compound - with Dust Control". It is sold in one gallon and three and a half gallon pails.
Summary
Patching and repairing drywall is one of the messier home repair projects you can tackle. The white powder, the gypsum, can get everywhere. When sanded the white powder is very fine and gets in the air. Once it is in the air, it travels through the house, putting a layer of fine white powder on every surface.
The smart thing to do is employ some form of dustless drywall sanding in your project. You can eliminate most or all of the fine white dust. This will make everyone in the house happier. It will also save a lot of cleaning time. You are already tired from the repair project. No need to get exhausted cleaning up afterward.
Wet Sanding Drywall
Wet sanding drywall is a common method that is used to smooth the surface of the drywall compound. It really isn't sanding at all. Instead a sponge or rag is used to dissolve the drywall compound.
For related drywall taping and finishing information see the articles 'Taping and Mudding Drywall', 'How To Patch Drywall' and 'Fixing Holes in Walls and Ceilings'.
Advantages of Wet Sanding
This method has some advantages. The first would be that it does not require any special tools. A sanding block and a rag or a sponge along with a pail of water are all the tools that are needed. Done carefully, this method can yield a smooth surface that is ready for paint. The biggest advantage to wet sanding drywall is that there is no dust at all. All the excess drywall compound is dissolved by the water and winds up in the pail of water. Great!
Drawbacks to Wet Sanding Sheetrock
Wet sanding drywall does have some drawbacks. First the feathering of the edges is not quite as smooth as regular sanding. This may or may not be noticeable after the patch is painted. Second, it is very easy to remove too much compound. When this happens you are forced into coating the area again. Lastly, you can groove the surface without realizing it. Again, when this happens you will have to coat the area again.
How To Wet Sand Drywall
Always use something that is flat and fairly stiff for this method. Never use just a rag and your fingers to finish the drywall. You will groove it almost immediately. They do sell sponges at drywall and home supply stores for this purpose. They are not expensive and work pretty well. Use a damp sponge, not soaking wet. Wring it out often while you are smoothing the surface. Make several light passes and do not put too much pressure on the sponge.
Another option for this type of dustless drywall sanding would be a sanding block and a rag. The same principles apply, not too much water and light pressure. Don't try to do too much with each pass. Don't remove too much compound.
How To Clean Up Drywall Dust
Do not underestimate how pervasive drywall dust can be. It has the ability to get everywhere. It will put a layer of fine white powder on everything. When you are planning on dry sanding, you need to protect the area.
Containing the mess is a good idea with any repair project. Cover the floors before you start. Drape plastic over the doorways and seal them with blue masking tape. Put walk off mats down wherever you will be going in and out of the area.
Another silent enemy is your heating and cooling system. Cover up the registers and cold air returns. Dust that gets sucked into you heating system can wind up spreading through the whole house. Even when you use dustless drywall sanding techniques it is a good idea to isolate the area.
Drywall projects are among the messiest you will get involved with on your home. The other problem is that it normally takes place inside of your home.
Dustless Drywall Compound
A few years ago a new product was introduced to be used in the war on drywall dust. Dustless drywall compound made its debut and dustless drywall sanding took a giant leap forward. The United States Gypsum company started producing a light weight dustless drywall compound.
Light weight drywall compounds have always been a friend to do it yourself homeowners. They are easier to work with and require less sanding than the older standard compounds. Adding dust free technology to an already popular compound was a great innovation.
Dust free does not mean mess free. The way the compound works is that the dust particles stick to each other forming larger particles that fall harmlessly to the ground. This residue is easily swept up and disposed of. The fine white dust that becomes airborne is not a factor.
With this product, dustless drywall sanding has never been easier. Most home supply stores carry this compound. The USG brand is called "Sheetrock Joint Compound - with Dust Control". It is sold in one gallon and three and a half gallon pails.
Drywall Sizes and Thicknesses
 Drywall has different sheet sizes for different products. It also has different thicknesses. For a patch or remodel project, getting the right size is important. Below you will find a listing of all of the drywall sizes, weights and thicknesses available for common drywall types. See the on 'Types of Drywall' below for information on the various kinds of drywall products you may need.
Are you involved in drywall repair project? See the articles 'Drywall Patching', 'How To Cut Drywall' and 'Taping and Mudding Drywall' for information on installing drywall products.
Confused about about whether you have 'Drywall' or 'Sheetrock'. See the article 'Sheetrock vs Drywall' for an explanation.
Drywall sizes matter when you go to do a drywall repair or project. First you need to get enough material. Then there is the weight. Yes you can get a 12' sheet, but can you handle it to install it?
Drywall also comes in different thicknesses. Why, you might wonder. The type of drywall and the application affect the thickness.
So why do we have different drywall sizes? One reason is the joints. Drywall joints and seams need to be finished with tape and mud. Using longer drywall can reduce the number of joints. In commercial buildings, drywall is installed vertically. A length is selected that will be long enough to reach the ceiling without any joints.
The thicker you make drywall the stronger it is. This is especially important in horizontal applications like ceilings. Drywall that is too thin will sag over time, producing an unsightly appearance.
This article on drywall sizes is a resource. It is intended to provide basic information. We do not classify this information as a repair. Therefore, the Common Sense evaluation is not included. Instead we provide you with facts about sizes and types of material that you will use.
Residential Drywall Sizes
Drywall is manufactured on continuous feed lines. It is cut to length after toward the end of the line. So in theory there is no limit to the lengths for drywall. There are however, practical limitations. Handling and weight being two important ones.
Drywall can be special ordered in any length you want up to twenty or so feet long. The down side to this you have to buy one or more full semi loads to get it specially cut. Not practical for a home owner. For most of us, staying with the standard lengths is our lot in life.
Why Drywall Size Matters
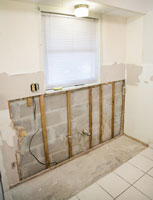
Getting the right size sheet will minimize joints and make the job easier. The repair in the picture could be completed with one sheet of drywall, provided you get the right size.
Handling drywall can be a problem with larger sheets. You have two main issues. One is being able to physically lift and install a large drywall panel. Even with help this might be challenging. The other is getting it into the spot you need it. Getting drywall around corners, up or down stairways and through door openings will pose problems.
Determining Existing Drywall Thickness
If you are replacing damaged drywall you can cut a hole and then use a tape measure to check the thickness. Otherwise you may need to check at a plumbing or electrical penetration. Exercise extra care when checking thicknesses for garages and ceilings. This is where thicker drywall may occur.
Another thickness issue is plaster walls. You may run into walls in your home that have rock lath and plaster on them. Rock lath is a type of drywall that is 3/8" thick. Another 3/8" to 1/2" of plaster is applied over the rock lath. This leaves you with a material that is thicker than most standard drywall. See the article 'Plaster Wall Repairs' for more information.
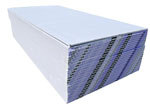
Drywall Sizes
- 1/4" Drywall - This the thinnest drywall you can buy. It is not a good idea to use this drywall by itself, it is too weak to provide much support. It is ideal for going over other surfaces. Laminating new 1/4" drywall over badly damaged areas can be an easy way to solve a drywall repair problem.
 Another use is in curved applications. This drywall bends easily and can wrap around curved walls. Normally you would use two layers of 1/4" drywall in lieu of one layer of 1/2" drywall.
Drywall Sizes: 4' x 8' Sheets - This type of drywall is usually only available in one size.- Weight per 4' x 8' Sheet - 29.58 lb
Availability - The big box home supply stores do not usually stock these drywall sizes and thickness. Drywall supply stores do have it in stock. You can find one in the phone book.
- 3/8" Drywall - Several decades ago, 3/8" drywall was the standard thickness. Now it is used where the particular thickness is needed. It can also be used to laminate over existing walls and ceilings. It is proportionally lighter than its 1/2" and 5/8" cousins, but also not as strong. It could be used by itself on walls, but this in not recommended. It should not be used on ceilings in most situations.
- Drywall Sizes: 4' x 8' Sheets - This type of drywall is usually only available in one size.
- Weight per 4' x 8' Sheet - 43.65 lb
Availability - This thickness is available at most home supply and drywall supply stores.
- 1/2" Drywall - This is the most popular thickness of drywall. It is likely that the majority of drywall in your home is this thickness. It can be used for walls and ceilings. It comes in regular, moisture resistant and fire rated varieties.
- 1/2" Drywall now comes in a 'Light Weight' version from most manufacturers. The light weight product can be 25% to 30% light than the standard version.
- It is a good idea to check on the thickness you need before purchasing drywall. 1/2" will likely be correct most of the time.
Drywall Sizes: 4' x 8', 9', 10', 12' and 14' Sheets - This thickness of drywall comes in several standard lengths. It can also be ordered in special lengths (quantity restrictions apply). - Standard Weight per 4' x 8' Sheet - 57.6 lbs
- Light Weight per 4' x 8' Sheet - 39.2 lbs
Availability - Thickness is available at most home supply and drywall supply stores. Home supply stores usually carry 8' and 12' lengths. Drywall supply stores will have other lengths. Most home supply stores now carry the light weight drywall in this thickness. - For more information on cutting and installing drywall or sheetrock, see the article 'How To Cut Drywall'.
- 1/2" Cement Board - The thickness of the cement board used normally matches the thickness of drywall. Most of the time this will be 1/2" in a residential home.
- Cement Board Sizes: 3' x 5', 4' x 8' Sheets - These are the common sizes for cement board. Cement board was originally intended for use as a tile backer board. The 3' x 5' size comes from the dimensions of a tub enclosure.
- Weight per 4' x 8' Sheet - 81 lb
Availability - This thickness and the sizes indicated are available at most home supply and drywall supply stores.
- 5/8" Drywall - This thickness is usually made in a fire resistant form. It is used on ceilings and in garages. It has extra fiber in it that helps it to resist fire. The fibers also make it stronger for ceilings. It is proportionally heavier than 1/2" drywall.
- Drywall Sizes: 4' x 8', 9', 10', 12' and 14' Sheets - This thickness of drywall comes in several standard lengths. It can also be ordered in special lengths (quantity restrictions apply).
- 5/8" Drywall now comes in a 'Light Weight' version from most manufacturers. The light weight product can be 25% to 30% light than the standard version.
- Standard Weight per 4' x 8' Sheet - 76.8 lb
- Light Weight per 4' x 8' Sheet - 51.2 lbs
- Availability - Thickness is available at most home supply and drywall supply stores. Home supply stores usually carry 8' and sometimes 12' lengths. Drywall supply stores will have the other lengths.
- 5/8" Cement Board - This thickness of cement board is less common in homes. It is used extensively in commercial buildings. Double check the thickness before you assume you have this size.
- Cement Board Sizes: 3' x 5', 4' x 8' Sheets - These are the common sizes for cement board. Cement board was originally intended for use as a tile backer board. The 3' x 5' size comes from the dimensions of a tub enclosure.
- Weight per 4' x 8' Sheet - 124 lb
Availability - This thickness and the sizes indicated are available at most drywall supply stores. Home supply stores do not normally carry these drywall sizes and thickness. - For more information on cutting and installing cement board, see the article 'How To Cut Cement Board'.
See the following articles for related drywall topics:
Types of Drywall
It is possible for you to have four or more types drywall in your home. The different types are used for different purposes. Wet locations like bath rooms and showers need materials that resist moisture. Garages usually need fire code drywall.
The following is a list of common types of drywall found in residential construction:
- Regular Drywall - This is probably the most common type you will find. It is used on most of the walls and ceilings. It is made of a gypsum core sandwiched between two layers of heavy papers. This type of drywall is the easiest of all to cut.
Available Drywall Sizes: 1/4", 3/8", 1/2"
- Firecode Drywall - This drywall is thicker than the half inch material. It also has a special gypsum core that resists heat and provides fire protection. The heavier fibrous core is harder to cut but still possible.
Available Drywall Sizes: 1/2", 5/8"
- Moisture Resistant Drywall - As the name implies this drywall is used for areas like bathrooms that have higher humidity. Sometimes called green board (it comes in different colors now depending on the manufacturer), it is in between regular and firecode for difficulty.
Available Drywall Sizes: 1/2", 5/8"
- Glass Mat Drywall - This drywall is a variation of moisture resistant drywall. With the prevalence of mold issues, glass mat drywall was developed to eliminate mold growth on the drywall. The facing is made of fiberglass instead of paper. Mold will not grow without organic material present. You may find some of this drywall in a newer home.
Available Drywall Sizes: 1/2", 5/8"
- Cement Board - A further step in moisture resistance. This is not drywall at all (drywall is made of gypsum, cement board has no gypsum in it).It is made by sandwiching a special cement core between two layers of fiberglass mat. This type of drywall is used behind ceramic tile and marble for high moisture areas. This material is the hardest of all to cut.
Available Drywall Sizes: 1/2", 5/8"
The types of drywall listed above may be found in your home. Many homes only have one or two kinds. Don't be shocked if you find something you are not familiar with. When doing a repair, you want to make sure you are getting the right thickness and type that you need.
Summary
Now that you know all of the drywall sizes available, you will be ready for your next drywall repair project. All you need now is some information on working with drywall. See the article 'How to Cut Drywall', for information on cutting drywall. The article 'Taping and Finishing Drywall', has information on finishing the seams.
For bigger pieces of drywall you should get help. It's not worth putting you back out for a drywall repair. Keep in mind the drywall size that you need and can handle when purchasing the material. Get some help when you got to install the drywall, it will make things a lot easier.