Search
Repair Topics
Residential Door Hinge Types
 Are you looking for different types of hinges for doors? There are different kinds and sizes.
For related information see the articles, 'Door Hinge Repair' and 'Troubleshooting Door Problems'.
A hinge is a hinge, right? Well not exactly, hinges are similar, but they differ in type and size. Do you know what type of door hinge that you need? This article will help you determine what type you need and how you can go about finding them.
Most door hinges are classified as 'butt hinges', that makes is simple, right? Well, sort of. Butt hinges describe the two entities that are 'abutted' together. The door and the frame are examples. The term 'Butt Hinge' is somewhat broad and can describe multiple types. For residential hinges, you do not have that many types. Whew! Did you think we were getting into a tough subject?
It is a little tough, when you factor in the size and style issues. There are several sizes that you can encounter. In addition, each size can have different styles. Don't despair, most styles and sizes are fairly common and you should be able to figure it out.
Types of Hinges for Doors - Information
This article on different types of hinges is a resource. It is intended to provide basic information. We do not classify this information as a repair. Therefore, the Common Sense evaluation is not included. Instead we provide you with facts about types and sizes of hinges that you will need to use.
Different types of hinges for doors are often sold in pairs. However, you will find some online stores that quote a 'per hinge' price. Be careful when ordering on line. The price doubles or triples when you get enough to do a single door.
Door Hinge Styles
There are several door hinge styles to choose from. They 'style' of hinges on your existing doors will likely play a major role in your decision.
Concerned with the size of the hinge? See 'Door Hinge Sizes' for more information. Related articles are 'Door Hinge Repair' and 'Door Hinge Installation'.
Butt Hinges – The standard term used for door hinges. It has nothing to do with the hinge itself. Instead, it refers to the fact the two surfaces are 'abutting'. In the case of a door it would be the door and the frame.
Loose Pin – This is a standard feature for most residential hinges. The pin can be removed for easy removal of the door. The pin is driven out from the bottom.
Fixed Pin – Less common for residential doors. You may find this type on older doors. The entire hinge needs to be removed to take the door down. Ball bearing hinges are often fixed pin hinges.
Ball Bearing – Ball bearing hinges provide smoother operation for the hinge. Instead of metal rubbing on metal, the ball bearings provide the surface to move on. These hinges cost more and are not generally found in residential installations.
Spring Loaded – This style of hinge has a spring built into to force the door closed. Garage man doors and screen doors are examples of doors that you want to shut automatically. The spring loaded hinges are rated for a certain amount of weight. You may need as many as three on a heavy door. Lighter doors only require one.
Ball or Finial Tip – This is a variation of a loose or fixed pin butt hinge. There is a decorative ball or finial on the top and bottom of the pin.
Door Hinge Finishes
There are many types of door hinge finishes. Add to the that different naming conventions. What is the difference between 'Bright Brass' and 'Polished Brass'? Then there are the restoration hardware finishes and the list goes on and on.
One thing to take note of is the quality of the hinges. Some finishes are only a surface coating over a steel base. These thin coatings will disintegrate over time, sometime flaking off. The result is a hinge that looks bad, even though it may still be functional. The 'you pay for what you get' applies to the finish.
- Brass – This is probably the most common type you will find. Brass does not rust making it a good choice for hinges. Brass does discolor and tends to start looking bad over time. Cheaper hinges may only have a brass coating.
Available Brass Finishes: Bright or Polished, Antique, Brushed or Satin
- Bronze – Similar to brass these hinges do not rust. These types of door hinge finishes can stain and discolor over time making a functional hinge look bad. Cheaper hinges may only have a coating on them over steel.
Available Bronze Finishes: Oil Rubbed or Antique, Smooth or Lacquered, Brushed or Satin
- Nickel – A popular finish for hinges. It is durable and usually comes in a satin or brushed finish. It looks similar to stainless steel and good quality hinges of this type will not rust.
Available Nickel Finishes: Brushed or Satin, Smooth
- Stainless Steel – Good quality stainless steel hinges will not rust or discolor. These hinges tend to be more expensive and are found less often. They are more common in commercial installations.
Available Stainless Steel Finishes: Brushed or Satin, Smooth
- Chrome– Looking for a mirror like finish? Chrome may be the answer. Chrome door hinge finishes are applied over another type of metal. Quality is an issue. Poor quality chrome hinges have a coating that can flake off, making the hinge unattractive.
Available Chrome Finishes: Bright or Polished
- Painted– Hinges can be painted. This is found on older doors or restoration style hardware. Factory painting may stay intact and fit in with a particular decor. There is no limitation to colors that can be used. Paint build up over time can affect the operation of the door and paint can flake off at friction points.
Available Paint Finishes: White or Black, Unlimited Custom Choices
The above list of door hinge finishes is not comprehensive. It gives you the general idea of what is available. When you are replacing different types of hinges the best advice is to take a hinge with you when you shop. Color and quality are best compared with the item in hand.
Summary
Do you feel better able to deal various types of hinges for doors? Replacing hinges on a door is not that hard if you get the right hinges. Corners and size are an issue. Getting a hinge that is a different size will require that you do some carpentry work on the door and frame. Avoid this if you can.
Replacing hinges for appearance issues is also possible. Some hinges work fine, but they look bad. Remember, quality is an issue with hinges. Cheap hinges will not last over time. Hopefully, you are done learning about different types of door hinges and are ready to move onto your next project.
Troubleshooting Closet Doors
Troubleshooting closet doors and fixing the associated problems is common. You probalbly have many closet doors in your home. They may vary in style and size, but they all have one thing in common. Closets are meant for storing things and the doors hide the stored items from view. Closet doors do need attention and quit working correctly periodically. When that happens you need to do some repair work.
Frank Lloyd Wright refused to include closets in the homes he designed. He said that they promoted clutter. Clutter or not, we all have things that we want to store. Thus, closets are very popular. In fact 'lots of closet space' is a selling feature for a home.
Closets and closet doors are a standard feature in homes. The doors differ in size and type. Since they do not get the use that regular door get they tend to be a little less sturdy and can get knocked out of adjustment. Adjusting the doors on closets is often the repair that is needed. Fortunately, it is not that hard to do.
There are three popular styles of closet doors. Each style can have different types of doors, such as mirrors or louvers. A few decades ago most closet doors had sliding doors. Then an innovation came along and the bifold door is the undisputed king of closet doors. Regular swing doors are also used for closets.
Troubleshooting Closet Doors – Finding Help
Below you will find some common problems. There is a brief description and a link that will lead you to additional information. Our evaluation sections of the pages will help you to decide if you want to make the repair. The "What Can You Save?" and "How Hard Could It Be?" sections give you a quick overview of the repair. This will help you decide if it is using good judgment to make the repair yourself.
The "Check the Simple Things First" section will clue you in to easy fixes to check for. Many times something easy will eliminate a problem without the aggravation of an involved repair. In an effort to warn you about what you are in for, there is the "What Can Go Wrong" section. Forewarned is forearmed as they say. Knowing what to watch out for is always helpful.
Repairing Bifold Closet Doors
Bifold doors have become very popular in residential construction. These doors are inexpensive and easy to install, making them a first choice with builders. Adjustment are the main problem. Four panel bifold doors can be a little challenging to adjust. The door has to align in several directions.
Installing Bifold Doors
You may decide that a new bifold door is what you want. Perhaps the old door is tired looking. In addition, you found out that a new one is not that expensive. Can you install the door yourself? Is it hard? Find out what you are up against by following the link above. This is something you can do yourself and save the price of a carpenter.
Mirrored Bifold Closet Doors
Similar to normal bifold doors, these doors have mirror units on the door panels. They serve as a full length mirror in addition to hiding the contents of the closet. They are a little heavier than a normal bifold. The have the same problems as regular bifolds, adjusting being the biggest one.
Troubleshooting Closet Doors - Summary
Troubleshooting and repairing issues with closet doors is a simple task most of the time. It is often just a matter of adjusting the door or replacing some inexpensive parts. A few minutes work and your door will be quiet and smooth.
Now that you have reviewed the information on troubleshooting closet doors, you are ready to research other home repairs. Do you have a list? Or is it a job jar? Whatever your tracking method, you can go to the next item. Unless you have earned a break.
How To Snake a Kitchen Sink
 Snaking a kitchen sink is more work and makes a bigger mess than some of the other options. Kitchen sinks tend to have a lot of grease going down the drain. This makes them resistant to being cleaned out easily. Sometimes a snake is the only thing that will work.
For related information see, 'How To Snake a Drain', 'Kitchen Sink Plumbing' and 'How To Clean a Drain'.
Removing Plumbing Pipes
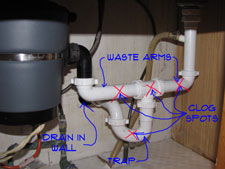
A kitchen sink normally drains through an 1 1/2" pipe that is connected to your homes sewer pipes. Thes pipes drain out into a sewer or septic system.
To use a snake you need to disconnect the trap assemply pipes from the drain inlet. The drain inlet will be located on the wall behind the sink or on the floor below it. Use adjustable pliers or a pipe wrench to remove the fittings.
See the article on 'Sink Drain Plumbing' for information on what parts you may need to replace. This article also provides information on how to tighten the pipes properly.
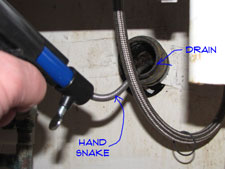
Using a Hand Snake
Some of them have a crank or they may just have a movable handle the allows you to turn the snake. Usually you will not need an electric snake for a sink drain. Unless you have one that attaches to a drill. Use that if you have it.
You want to run the snake in at the wall. Use the adjustable pliers and take off the nut for the outlet the goes into the wall.
You will have to turn it and apply pressure to get it to go around the bends in the pipes. Twenty five feet is usually plenty for a sink drain. On a rare occasion you will have to go farther. You should get some resistance when you get to the clog. If the pipe still has water in it you should be able to hear it when the clog breaks free.
Run the snake back and forth until it moves freely. Pull the snake out being careful not to get the dirty water everywhere. Put the drains back together and try the sink. Success? The water goes down? Wonderful, this clogged kitchen sink drain is now just a bad memory.
Using an Electric Snake
A small snake that will attach to an electric drill will also work on a kitchen snake. The procedure is similar to a hand snake. One difference is that you want to keep the snake housing close to the inlet for the drain. Too much slack on the snake may allow it to twist and tangle when it hits an obstruction.
Use gentle pressure on the snake to get it to go around bends in the pipe and past obstructions.
An electric snake turns faster than a hand snake, so dirty water splattering everywhere is a problem. Try to cover as much of the area as you can.
Determining Success
A major drawback to using a snake on a kitchen sink line is that it is difficult to tell when the drain has opened up. This is especially true if the snake is going through grease. If you can get a hose to the drain inlet, you can try running water down the drain. Warm water is the best, but cold will work. Be careful and be ready to shut the water off quickly if the drain has not opened up.
If you cannot run water down the drain, you will need to put the trap back together in order to test the sink. Assemble the trap and try running water down the drain. If it goes down you are sucessful. Run hot water down the drain for a while to help wash away the grease and residue.
Unclogging a Kitchen Sink
A clogged kitchen sink drain is one of those things you don't want to have to deal with. Dirty water, can't use the sink and the family complaining. Your garbage disposal and dishwasher are also affected. What can you do to resolve the problem. Getting rid of the clog is the logical solution.
For related information, see the articles 'How To Clean a Drain' and 'Sink Drain Plumbing'.
Most kitchen sink clogs are fairly easy to deal with. The trap is a popular spot for clogs. Less often it will be in the short section of pipe that the drain is connected to. A short run with a snake will take care of the problem.
Take a look at the information below and decide if you want to tackle a clogged kitchen sink drain. Use the evaluations section first and then check out the steps involved. If you still feel comfortable, go for it.
Fixing a Clogged Kitchen Sink - Information
What Can You Save?
Clogged kitchen sink drains are fairly easy to deal with. Many plumbing and drain cleaning companies have flat rates for removing a stoppage. That means no discount if it turns out to be a simple problem. It will probably run between $75 and $125 if it is not too difficult. There is usually a set time for the repair, when the serviceman exceeds that the meter starts running.
How Hard Could It Be?
Using a plunger is pretty easy. Running a snake through the line is more work.
Check the Simple Things!
Using a plunger is pretty simple. I must warn you that plungers have limited effectiveness on kitchen sinks. I don't recommend drain cleaners. Nasty chemicals, the environment and the fact that they don't work that well.
What Can Go Wrong?
One problem with a clogged kitchen sink is that you have to take the trap off to run a snake into it. You can't tell when you have the problem solved and you can't run water into the drain while you are snaking it. You may put it back together and find out it is still clogged. Not getting things back together will leave the sink unusable. This is a messy job, take precautions and move or cover things that you don't want soiled.
Fixing a Clogged Kitchen Sink - The Steps Involved
You have three levels of difficulty with a clogged kitchen sink drain. First is one that can be broken free with a plunger. This will be discussed in Step One. Next you have an entrenched clog in the trap. It won't break free with the plunger, but it is not hard to get to. See Step Two for this situation. Lastly you have a clog that is in the drain line. In no man's land, inside the wall or under the floor. Tough to get to. See Step Three for your next course of action.
Before you get started you want make sure that you do not have a more serious problem. Is the sink the only fixture that is affected? When you run water in the kitchen sink does it try to come up in the toilet or bathtub drain? Is water coming up through a drain in the basement? Yes to any of these questions means the clog is in one of the main lines, a bigger problem. No to all, good! All you have is a clogged sink drain.
Removing the kitchen sink trap is going to be your likely next step unless the plunger worked. Grease is a common problem in a clogged kitchen sink drain. Grease is resistant to plunging.
The first thing you need to do with a clogged kitchen sink is locate the problem. You can determine which section of the drain is the culprit by what is clogged. Is it just the disposal that is clogged?
If it is see the article 'Fixing a Garbage Disposal Clog', for more information. Is it the other sink that is clogged? The problem is in the waste arm connected to the sink. Take that piece off between the sink and the tee.
Are both sinks clogged? Then the problem is further on. Try the trap first and then as a last resort use the snake. Same principles apply for a kitchen sink. Apply pressure and turn the snake. Run it as far as you can and make sure you dislodge the obstruction.
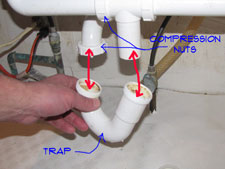 To remove the waste arm or the trap you need a pair of adjustable pliers and a pail. The trap will have water in it and the sink may still have water in it. Loosen the fittings and remove the likely culprit. This part is a little nasty, brace yourself. Check for a clog. Find one? Use something to get it out and dump it in the trash. Put the pipes back together. Use the pliers and tighten the nuts about a quarter to a half of a turn past hand tight.
Do you have to replace some parts on the drain? See the article 'Sink Drain Plumbing', for some extra information.
Other Methods
Often times, when everything else seems to be working fine, you’ll notice that your sink is clogged and you don’t know what to do. Should you call a plumber? Do you bug your husband and wait days before he could actually fix it? These are common scenarios that most households experience, and it’s always best that you’re equipped with information, especially with DIY methods, including ways on how to unclog kitchen sink.
Don’t pour down an entire bottle of unknown hazardous chemicals or don’t bother calling a plumber this time. You can get things done on your own without risking your own health. Learn how to do this on your own by taking into consideration these different options:
Option 1: The Traditional Plunger Method
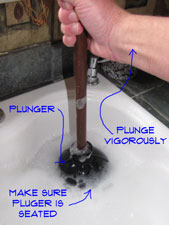
This is the most common and typically one of the most effective methods that are often being used when it comes to unclogging the kitchen sink. You need a small plunger (smaller than the ones you use in your toilet) and plunge vigorously until the drain has been cleaned. You need effort to be successful in doing this.
Plunge the drain about six to ten times until you have noticed that the drain is cleared out. Repeat if necessary. Remember, you need to add a little bit of water on your sink and forceful plunges for this method to work.
 Kitchen sinks usually have two bowls. This makes plunging a kitchen sink little problematic. The extra pipe and the second sink tend to diffuse the pressure the plunger develops. It will still work for some clogs, but it is less effective on tougher ones.
A plunger needs to develop pressure to work. If you plunge one side of a kitchen sink the pressure pushes out the other drain and the clog is unaffected. You have to hold the stopper in place on the other side. The better you stop up the other sink, the better your chances are.
Make sure there is enough water to cover the plunger. Hold the stopper in place or have someone else hold it. Make sure the plunger is seated firmly around the drain. Plunge vigorously several times. Hopefully the clog has broken free and the water is draining down. If you answered yes you have successfully dealt with a clogged kitchen sink drain.
Still clogged? Check and see if you have the other sink sealed good. Make sure the plunger is seated firmly on the flange. Give it one more try. Still no good? You will need to bring in the big guns, read on.
Option 2: Baking Soda And Salt or Baking Soda And Vinegar
If you’re not in the mood to plunge hard, or if your efforts have not paid off, you may try using baking soda plus salt or baking soda with vinegar to unclog the kitchen sink. Here’s what you need to do:
Vinegar:
You need to pour half a cup of baking soda to your drain, followed by half a cup of white vinegar. You’ll notice that an acidic reaction will take place, and finish it off by pouring hot water. You may have to repeat this option several times for this option to be successful.
Salt:
Combine half a cup of baking soda and salt and pour it into your drain. This method works best if you leave it overnight, so doing it before going to bed is ideal. The following day, pour approximately 2 cups of boiling water down the drain.
Option 3: Commercial Drain Cleaners
Although the baking soda works wonders, if you don’t have the time to wait overnight or in a hurry, you can always go with commercial drain cleaners. The only downfall when using these is that you can hurt your hands and it may get burned when the agent touches your hands. Make sure that you’re wearing gloves and wash your hands immediately after using them. If you feel a burning sensation, you should immediately call your doctor.
Using this is easy – just follow the instructions on the label, as the amount you need to pour generally depends on the brand. Most of the time, these commercial drain cleaners would you require you to flush cold water after pouring down the train for a couple of minutes, so make sure that you read the instructions as they may vary according to brand.
Option 4: Take Out The Clean-Out Plug
This option is only ideal if most of the solutions mentioned above do not work. Take out the clean-out plug, usually beneath your sink (ring-like part). This is where most of the blockages are and manually take them out. You can use a plumber’s snake to take it off the sink or alternatively, you may also use a wire coat hanger.
Water may splash once you've taken this part out so be ready as you may get wet. You’ll need a bucket for the liquid and goggles too. Among all the other ways on how to unclog kitchen sink, this is by far the most time-consuming and difficult, so only go for this one if you know how to remove the clean-out plug and if you’re confident that you can put it back easily.
Option 5: Hot Water
If you've noticed that your sink is not completely blocked, but water flows very slow, hot water usually does the trick. You can try this option before any other else mentioned above. If it doesn't work, feel free to choose one of the options to unclog your kitchen sink.
Regardless of your choice, be sure that you’re careful and be prepared to get wet. Put on some working clothes and wear gloves just for your own safety.
Clogged Bathtub Trap
A clogged bathtub trap is a bigger problem to fix, but not impossible. Unfortunately, it does mean some extra work.
Before you assume that it is the trap you want to make sure that you to check a couple of other things. Two common problems with bathtub drains are hair in the strainer and a stuck or broken pop-up assembly. See the articles 'Fixing Bathtub Drain Clogs' and 'Repairing Bathtub Drain Stoppers', for more information and instructions.
Locating a Bathtub Trap
Bathtub drains have traps to keep sewer gas from getting into the house. For a bathtub that has a basement or crawl space below it you may be able to see it from below. When the house is built on a slab or for an upstairs bathtub, there should be an access panel on the opposite side of the wall. This might be in a closet or bedroom wall in the room that is on the other side of the drain end of the tub.
Unfortunately, this trap differs from the ones under your sinks. Usually the fitting are glued or soldered together and do not come apart. For a clog in the trap you will have to run a snake through it. I do not recommend drain cleaners. Very bad chemicals that are not environmentally friendly is one reason. The other is that they don't work that well.
Bathtub Trap Clean Out
Some bathroom traps have a clean out plug on them. This a nice feature and makes cleaning out the trap much easier. The clean out plug will be located at the bottom of the trap. Before you remove the plug you want to have a pail underneath that will catch the water.
If the bathtub is full of water, it is not a good idea to use the clean out plug. All of the water in the tub my come gushing out. With a full bathtub, you want to snake out the trap, see below.
Using a Snake On a Bathtub Trap
The bathtub drain is usually in close proximity to the larger main line that the toilet is hooked to. This means that you don't need a long snake. Generally less than 25' in length. It should be a small snake, one that is suitable for a sink line.
Accessing the Snake Entrance
Do Not try to snake a bathtub drain through the drain in the bottom of the tub. There is no way to control which way the snake will go. In addition, the strainer opening is too restrictive to get a snake through, it will bind the snake and may cause it to twist.
Do Not try to snake a bath tub drain without removing the pop-up assembly. The snake will catch on the assembly and may ruin the linkage, the snake or both.
Take off the cover for the overflow and remove the linkage and plunger for the stopper. This is normally the spot the has the control for the drain, either a lever or a dial that causes the drain to operate.
Using the Snake
Run the snake down through the opening. The toughest part will getting through the trap. Apply pressure and turn the snake until it twists through the trap. Try to judge the distance you need to go to get to the stack behind the toilet.
Run the snake through a couple of times. If the tub has water in it, the draining of said water is a sure sign you have been successful.
Checking the Drain
If you do not have water in the tub, try running water into the tub and see if it is draining. If so, put the pop-up assembly back in and fill the tub part way. Let it drain out with the water running.
Water Running Out Slowly
If you have snaked the drain and made sure the 'Bathtub Linkage' is working correcly, then you may still have some issues at the strainer, see the article 'Bathtub Drain Clogged' for information and instructions.
Summary
Got it? Water going down? Great this clogged bathtub drain problem is solved.