Search
Repair Topics
Bathtub Drain Stopper Types
Many bathtubs have a metal lever at the bathtub overflow that controls the drain. There is a metal plunger that is connected to the handle by linkage. Sometimes the pins that hold the linkage together can corrode and break. This will cause the plunger to stay in the closed position. Try the handle and see if it feels like it is controlling something. When it moves freely without any resistance, it is likely broken.
Remove the screws that hold the overflow cover in place. When you pull the cover away the linkage should be attached to it. If it is, check the plunger and make sure it is moving up and down the vertical tube freely. Has the linkage separated from the lever. Yes, then you will have to try and fish the linkage out with a pair of pliers or a coat hanger. The linkage is held together with cotter pins. You will have to obtain some replacements for the one that has broken.
Assemble the linkage and put making sure it is securely attached to the handle. Put it back into the vertical tube and put the screws back into the cover plate. Try the handle and see if the stopper moves up and down freely.
With the stopper up the drain should work. When it is down the tub should fill. Simple but effective technology. Got it? Does the drain work? Outstanding you have solved this clogged bathtub drain problem.
Bathtub Drain Clogged
 You have a clogged bathtub drain, what are you going to do about it? All plumbing fixtures in your home are important. For some reason not being able to take a shower or a bath, carries with it special significance. Air fresheners and deodorant may help, but is that the route you want to go?
For related topics, see the articles 'Troubleshooting Drain Problems', 'How To Snake a Drain' and
A bathtub drain consists of the drain, connected to a horizontal drain pipe. This is connected to a vertical tube that attaches both to the trap and the overflow. Inside the vertical tube there is a metal plunger that closes of the drain when you want to fill the tub.
There are four spots where a clogged bathtub drain is likely to occur. (1) The strainer for the drain. (2) At the drain plunger. (3) At the trap. (4) In the drain line that leads away from the tub. Dealing with a clog increases in difficulty as you get deeper into the tub drain system. Read on and see if you feel like tackling this repair.
Clogged Bathtub Drain - Information
What Can You Save?
Prices will vary. Some companies may charge a service call, $50 to $75. Other companies may have a flat fee that could be as high as $125. Just remember it could be a five minute job, before you call.
How Hard Could It Be?
A clogged bathtub drain can vary in difficulty depending on where the clog is. Usually it is not that difficult.
Check the Simple Things!
Hair in the strainer would be the simplest thing. Take the strainer out with a screwdriver and remove the hair. This is the culprit a lot of the time.
What Can Go Wrong?
The worst thing that could happen would be to fail in freeing up the clog. You may still need to call a drain cleaning company if the clog is beyond your reach. Drain cleaning and plumbing repairs tend to be a little messy. Take precautions by moving things in the damage path and keeping rags handy.
Troubleshooting Clogged Bathtub Drains
The first thing you need to do is determine if you actually have a clogged bathtub drain. When you run the sink or flush the toilet, does some or all of the water back up into the bathtub? Are the toilet or the sink running slowly? Does water from a fixture somewhere else in the house back up into the bathtub. A yes answer to any of these questions could mean one of the main sewer lines is clogged. This is where you may need some professional help. Efforts to clean the bathtub drain will be futile if the sewer is clogged.
Hair is the biggest culprit for clogging a bathtub drain, see the section below on how to remove it. It only takes a few minutes and a screw driver.
If it is not in the strainer it may be further down in the trap. Bathtubs have traps similar to the sinks in your home. Your worst problem will be a clogged trap or line to the sewer. A snake may be required. See the article 'Clogged Bathtub Trap' for a review of this topic.
The second think that can cause a clog is a malfunctioning stopper assembly. Unlike other drains in your house, the bathtub drain has moving parts. The 'Bathtub Drain Linkage' can be responsible for a clogged bathtub drain. Use this link to review this topic.
Not your problem? See 'Plumbing Repair' or 'Plumbing Drains' for a complete listing of related plumbing topics.
Removing Hair
Hair, especially long hair can have a tendency to clog a bathtub strainer. When my two daughters were still living at home, cleaning the hair out of the drain was a regular part of my life. The good news is that it is a quick easy job.
Use a screwdriver to remove the strainer. Pull it out and see if there is a ball of hair there. Use the screwdriver to dig it out. You probably don't want to keep it, so flush it down the toilet or throw it in the trash.
Some bathtubs have a strainer that closes with your toe to stop the drain. You use this when you want to fill the bathtub. Similar to the strainer, you want to remove it and check for hair. There are different kinds but it should have a screw of some sort that holds it together.
See if the drain works now by running decent amount of water down it. Does that water go down? Yes, Great you have successfully fixed a clogged bathtub drain. Yes, it really was that easy, just accept it.
Plunging a Bathtub Drain
Plunging a bathtub drain is not a recommended course of action. It is likely to fail.
I am not going to tell you not to try a plunger on a clogged bathtub drain. What I will say is that it has a poor chance of succeeding. The vertical tube for the overflow will diffuse the pressure too much to make the plunger effective.
You can try holding a rag over the overflow to block the opening. Unfortunately the air in the tube will compress much easier than the clog will dislodge. Try it if you want, I won't say 'I told you so'.
Block off the overflow and plunge several times and then try the drain to see if it helped. It probably didn't but it is possible. By this point you should have checked the stainer for hair, See Step One.
Summary
It is my hope that your clogged bathtub drain was easy to deal with. Removing a little hair, not hard at all. Did you need to repair the stopper assembly? Still not that hard. Or were you one of those unfortunate few that had to use a snake. OK, I admit it, not fun, dirty and a bit more work. Did you get through it? Are you a better person for it?
Now what do you do? As a homeowner you probably have a list of things to do. Don't feel like it right now? Take some time to enjoy the success of this project.
Ceiling Fan Pull Chains
 Most fans have a pull chain to control the fan and one to control the light.
Do you have a different problem? See 'Electrical Repair' for a complete listing of all electrical topics.
You may have individual switches for your fan and light and have a speed control at the switch. Good for you. Many fans are controlled with pull chains. Three speeds for the fan and one click to turn the light on and off.
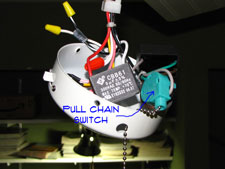
The pull chain switches can go bad or freeze up. Is the fan stuck on one speed? As a rule they are wired permanently into the fan.
They can be replaced by splicing the wires inside the housing. Obtain a new switch and loosen the retaining nut. Make sure the power is off and cut the wires to the switch.
Splice the wires together with wire nuts and put the switch back into the housing. Turn the power back on and give it a try. The fan or light works, great you are done with your ceiling fan troubleshooting.
Noisy Ceiling Fan
Ceiling fan troubleshooting when noise is the problem can be a challenge.
Do you have a different problem? See 'Electrical Repair' for a complete listing of all electrical topics.
Motor noise is a big complaint. Over time the windings on the motor may deteriorate. The motor will hum louder as a result. Not a lot you can do about this, short of replacing the fan.
You should not use a dimmer switch for a fan. Incorrect power will cause the motor to hum and possibly ruin it. Only use speed controls that are compatible with the fan you have. See the owners manual to find out what to use.
Vibration is also an issue. Even when the fan is properly balanced it still vibrates. The better quality the fan the more vibration isolation it likely has. Is it a cheaper older fan? You might be able to add a rubber gasket at the base plate. Again, there may not be a lot you can do for normal vibration.
Is something rattling inside the fan? Take the housing apart and check for loose parts or screws. Tighten anything that is loose. Make sure all the wires are tucked into the proper locations.
Wobbling Ceiling Fans
 When the blades are out of balance the fan will wobble. A wobbling fan may also be a noisy fan. The wobbling will cause things to loosen up.
Not your problem? See the articles 'Ceiling Fan Troubleshooting' and 'Electrical Repair' for all the electrical articles.
The first thing to check would be the housing. Is it mounted securely to the bracket. Tighten anything that is loose. Does the mounting plate seem loose? Remove the housing and tighten the mounting plate.
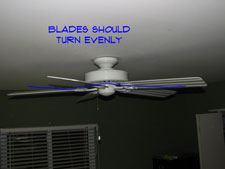
The primary reason a fan will wobble is the blades. The blades are attached to mounting brackets. The brackets are attached to the flywheel. All of the blades need to be evenly spaced, at the same pitch, in alignment with one another, weigh the same and not have bent brackets. I've got to be kidding right? Not really.
Watch the fan on slow speed both from below and from the side. You should be able to tell if something is out of kilter. Do you have a warped fan blade? You can try bending it or get a replacement set of blades. Does one of the brackets seem bent? You can try bending it as well, be careful, they can break.
The same would be true if you see a blade that is pitched differently than the others. Try bending it, so they are all even. Be careful or your ceiling fan troubleshooting project will turn into a ceiling fan replacement project.
You usually get a balancing kit with a new fan. Some weights with adhesive on them. Taping a quarter or metal washer on the back will also work. Try adding a weight to the blades one at a time and see if things improve. This is not an exact science and you may need to experiment.