Repair Topics
Types of Electrical Circuits
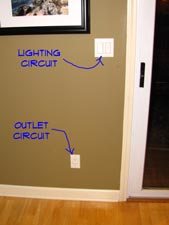 Basic house wiring can involve several types of electrical circuits and wiring configurations. A few types of circuits you might normally find in a home are described below along with reasons why they might trip. Amperage of the breakers may vary. For special appliance circuits you will need to know the required amperage of the device.
Not sure if this is your problem? See the aricles 'Household Electrical Repair' and 'Residential Electrical Wiring' for more information and a listing of electrical topics.
Outlet circuits - Local codes and requirements will vary, but you will usually have between around six outlets on a single circuit. This number could be lower for circuits that are planned for appliances that use a lot of power. Kitchens, garages and workshops might be examples. These types of electrical circuits will include a 15 or 20 amp single pole breaker.
If this type of breaker trips, it is usually due to an overload. Too many devices are running at the same time. This will be especially true if you are running high wattage items, like heaters or fans. Try unplugging one item and reset the breaker. If it holds, try moving the item to an outlet on another circuit.
Lighting Circuits - Many homes are wired with the lights on separate circuits. You may have ten to fifteen lights wired to a single circuit. These circuits will usually be on a 15 amp single pole breaker.
Lighting circuits are not prone to being overloaded unless you have fixtures with auxiliray plugs in them. If you have a lighting circuit that continues to trip you will have to see if you have a short or a 'malfunctioning breaker'.
Room Circuits - Another method of laying out circuits would be to have an entire room on one circuit or two small rooms. This method can simplify the identification of breakers in the panel. The breaker type would likely be a 15 or 20 amp single pole.
Similar to outlet circuits, a room circuit breaker will likely trim when it is overloaded. Try shutting off one item at time and reseting the breaker to see what is causeing the problem.
Special Circuits - Certain appliances like a furnace or a refrigerator may be given dedicated circuits. The wiring would be for only the one device and the breaker would be sized per the requirements of the appliance. Dedicated circuits may also be installed for computer equipment.
240 Volt Circuits - Heavy duty appliances such as ranges, hot water tanks, air conditioners and dryers will require 240 volt dedicated circuits. These types of electrical circuits will have double pole breakers sized for the requirements of the device.
GFCI Circuits - Ground fault interrupters are a safety feature for outlets that are near any wet conditions. A special circuit with a GFCI protected breaker may be set up to cover the bathrooms, kitchens and outside receptacles. GFCI receptacles can also be used and may affect other outlets within the circuit they are installed in. GFCI circuits will be 15 or 20 amp single pole circuits.
This type of breaker is designed to prevent shocks from wet environments that can cause a device to ground out through a person. If any of the wiring gets wet it will trip the breaker. Remove the item that has gotten wet and do not plug it back in until it is thoroughly dry.
AFCI Circuits - Newer homes are equipped with arc fault circuit interupter breakers. These are designed to improve safety by preventing fires. They are more expensive and are wired differently that normal breakers. These are required in homes built since 2008 for many circuits in a home. These breakers have a test button, a neutral terminal and an extra wire that goes to the neutral bar. You will need to check with your local building department for arc fault requirements in your area.
Arc fault breakers can sense an 'arcing' occurance. A short in a wire will definately trim them. However, they are very sensitive and can at times be tripped by something as simple as plugging in a device. Try reseting the breaker after the item is plugged in. The breaker should hold, it is the arcing that trips it.
Summary
Do you have an electrical project you are working on? Some related articles are 'electrical repair', 'fixing outlet problems', 'wiring light fixtures', 'troubleshooting ceiling fans', 'wiring switches' and 'wiring three way switches'. Follow the links for more information.
This article gives you a brief overview of the different types of breakers in your home. We have also included what will cause them to trip. This will help you when you try and figure our why you are losing power.
The above is not a comprehensive listing of all the possible types of electrical circuits and combinations of electrical device. It does give you an idea of what you are likely to encounter.
Main Service Panel
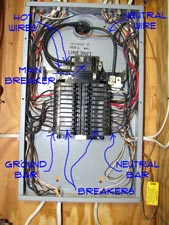 Basic house wiring starts with your main service panel. This is where the main power comes into the house from the street. It is also the place where breakers need to be reset when they trip and the power goes off.
Not sure if this is your problem? See the articles 'Basic Residential Wiring' and 'Home Electrical Repair' for a listing of all the electrical topics.
Purpose of the Main Breaker Panel
Sometimes call a 'load center' or 'distribution panel', this is the nerve center of the homes electrical system.
At the top you will usually find a main breaker. I say breaker, but some houses still have fuse boxes. Fuse boxes are becoming less and less common. A main breaker may be anywhere from 50 amps to 200 amps for an all electric home.
Most new homes have between 100 and 200 amp services installed. The main breaker shuts off the power to the two bars that run down the center of the panel. These are the hot lugs of the panel. In one way or another, all the basic house wiring in your home involves these three wires.
How a Main Panel Works
Located along the sides you will find a ground bar and a neutral bar. The neutral bar is connected to the main neutral wire coming into your home. You will normally hook white and sometimes bare ground wires into this bar. The ground bar as the name implies is hooked to grounding wire that is attached to a ground rod or sometimes a copper plumbing pipe. Note: Attaching a ground wire to a plumbing pipe does not meet code in most places.
Black, red and sometimes white wires are hooked to the individual breakers, depending on the type of circuit. The breaker interrupts the hot wire, similar to what a light switch does. Some breakers are two pole, providing 240 volt current for heavy duty appliances. Every other breaker, as you move vertically down one side is hooked the same hot side. Thus a two pole breaker picks up power from both sides of the panel.
Installing a new panel is a pretty big job and will usually be left up to the professionals. Not impossible for a homeowner, but it you will need to read more than one article about basic house wiring before you tackle it. Unless of course, you cousin is an electrician, then you are good to go. Adding a circuit may be something you would consider tackling.
Safety Concerns
Do not work in the panel without shutting off the main breaker. Even then you still have power in the top of it. Don't have a main breaker? Then you will probably have a disconnect below the meter. Essentially the same as main breaker, just in a different location.
See the article 'Electrical Safety at Home' for tips on what to do to prevent shocks and injuries when working with electricity.
Common Main Panel Repairs
Tripped Breakers
Without a doubt this is the main reason you will be interested in the main panel. Whenever you lose power to an area of the house, the 'breaker panel' is the first place that you go.
A tripped breaker is easily identified. It will be at about the mid point between fully on and off. You have to switch the breaker to off and then turn it back to the on position.
Replacing Breakers
Circuit breakers can go bad. If one keeps tripping when there is no extra load on it and no short, then it is likely not working properly. You need to get the correct breaker for a replacement.
See the article 'Replacing Circuit Breakers' for instructions on how to replace one.
Adding Breakers
Adding a circuit breaker usually means adding a circuit. A new circuit mean more electrical devices and the associated wiring. This is a bigger job that may be prohibitive for more than one reason.
First would be the wiring. Would you have access to run the wiring. This might not be a problem in an attic, basement or garage. But in areas that are already finished it can be a big problem.
If you are able to run the new wiring, you may be able to add a new circuit. See the article 'Adding New Circuit Breakers' for more information and instructions on what to do.
Basic House Wiring
 The ability to repair basic house wiring in you home is a skill you can acquire. Electrical wiring in a residential house is not that complicated, but it can be dangerous. A proper understanding of how the wiring and electrical fixtures work is essential.
This article will point you to the resources that will give you the knowledge that you need. If you are looking for information on a specific problem, see the article on 'Home Electrical Repair', it has listings on all of the major electrical and wiring problems you are likely to encounter in your home.
Some popular pages related to residential wiring are, 'Doorbell Wiring', 'Phone Jack Wiring', 'Installing Electrical Outlets', 'Wiring a Light Switch' and 'Wiring a Ceiling Fan'.
Understanding Residential Wiring
Most homes in the United States have two hot wires and one neutral coming into them. Supplying a stated 240/120 volts. The actual voltage received is normally slightly less 230/115 volts. This type of power is commonly called single phased power. Most residential homes have this type of basic house wiring.
The power coming into your home is also called alternating current. There are people in the world that can explain what that means exactly, but none of them are writing this article. Alternating current is used to allow electricity to be transported over long distances. Leave it at that, the guys that can explain it will talk in a language you won't understand.
The first power plant using alternating current came on line in Niagara Falls, New York in 1894. Nikola Tesla is credited with the development of a system the would allow power to sent long distances. Thus, making it practical.
When you use one hot wire and the neutral you get 115 volt power. Most small electrical devices and lights run on this current. Heavy duty items like ranges, hot water tanks and dryers use both hot wires and the neutral to achieve 230 volts.
You may not want to tear into replacing you electrical service, but doing some basic house wiring may not be out of the question. The first thing you want to do is get a healthy respect for electricity. It is dangerous and can hurt or kill you. Take precautions when working around electricity.
Basic House Wiring Rules
The first rule to remember is that basic house wiring can be dangerous. Never attempt to do it without a good understanding of how it works and safe work practices. This article is intended to provide basic information and is not a comprehensive discussion of all aspects of house wiring. See the article on 'Electrical Safety Tips for Homeowners' for more information.
In addition local and national electrical codes apply. You will need to consult your local building department to get information on what is acceptable for basic house wiring in your area.
Basic House Wiring the Safe Way
You never want to work on basic house wiring in your home with the power on. See the article 'Electrical Safety Tips' for more information. Just shutting off a switch is not enough. On the job electricians use lock out tag out procedures to make sure circuits are not inadvertently turned on while they are being worked on. You turned off the switch, so everything is fine right?
It is much safer to turn the circuit off at the panel before working on the device. Someone could accidentally turn on the switch by mistake and an accident ensues. You should additionally tape off the breaker and mark it as being worked on. <strong>Does you teenage son know where the electric panel is? What will he do if his stereo or video game goes off?
WARNING!! Make Sure the Power is OFF Before Working With Electricity!!! WARNING!!!
In addition you need to take it one step further. Have a non contact voltage tester with you and check the box before you mess with it. It is possible for more than one circuit to run through the same box. You may have shut one of them off, but there could still be hot wires in the box. The number of combinations you can find in basic house wiring is staggering. Always double check.
Circuits in panel boxes are sometimes poorly marked. It may take some experimenting to get the right circuit. Take the time and make sure the power is off. Take a look at the article 'Electrical Safety Tips' for a more information on electrical safety.
Troubleshooting Wiring Problems
Safety First
Before you even think about fixing anything in your home that involves electricity, you want to make sure you are doing it in a safe way. Electricity is DANGEROUS and you can be HURT or even KILLED if you are not careful. With that said, there are some basic precautions that will keep you from getting hurt. The article 'Electrical Safety at Home' provides warnings and precautions that you need to follow.
Making sure the 'POWER IS OFF' before you work on any electrical device is always the first thing you should do. Understanding how electricity works and the task you are performing should be done before you begin. Using the proper tools and wearing the right personal protective equipment is also very important.
The Electrical Safety Foundation International website has a wealth of information on dealing with electricity in a safe manner. There is a page on this website that has several suggestions for Do It Yourself Electrical Safety.
Main Service Panel
The nerve center of you home electrical system is the 'Main Service Panel'. It contains the circuit breakers or fuses for the electrical power in your home. Most of the time it will also have a 'Main Disconnect' for the homes power supply.
Whenever the power goes off in a section of your home, the main service panel is the first place to go. See the article on 'Troubleshooting Electrical Circuit Problems' to determine if you have a blown fuse or tripped breaker.
During a flood or any time the home is damaged, you will want to turn off the main breaker at the panel.
Types of Electrical Circuits
The main service panel or distribution panel as it is sometimes called, branches out into several circuits. Some circuits are just for outlets in your home and others are for lighting.
You also have what are called 'Dedicated Circuits' for special items such as a furnace or washer and dryer. When a specific item stops working the first thing to check is the breaker for that item. Your panel should have labels for what each circuit breaker is assigned to.
Circuit Breaker Types
The main function of a breaker or fuse is to keep circuits from overloading. Wires and devices are only rated for a certain amount of current. If too much electricity passes through a wire it will overheat and can cause a fire.
Circuit breakers are designed to trip when the amount of current exceeds a certain level. This is a safety feature that is required by code. Breakers are also used to regulate the power to certain devices, some requiring a little power, others require a lot of power.
Newer circuit breakers can also detect shock hazards and arcing conditions. Again, safety features to prevent fires and injury. This article provides information on how the various types of breakers work and the issues that arise.
Electrical Wire Types
Electrical wire comes in many sizes and is made from different materials. There are certain hazards that can arise from certain types of wire.
Additionally, the size of the wire will determine how much current can go through it. You will want to use the correct size wire whenever you are installing or replacing electrical devices.
Adding a Circuit to a Panel
Adding circuits in an existing home may be required for various reasons, such as remodeling or the purchase of new appliances. There are several factors to consider before a new circuit is added.
Residential Wiring
This article provides basic information about the types of wiring and methods that are used in most homes. It is important to understand what the various wires do and how that are connected to each other.
Newer wiring is color coded, to let the installer know what the wire is for. However, colors are not an absolute indicator of how a wire is being used.
Installing Electrical Fixtures
Changing existing outlets, switches and fixtures is a common electrical task. Get tips and tricks for performing these tasks.
Problems With Electrical Circuits
See this article for information on problems with wiring and circuits. It will help you determine what is causing you difficulty and provide you with information on how to solve problems.
For problems with electrical outlets see 'troubleshooting outlets' and 'wiring light switches' for information on these two common problems.
Basic House Wiring Summary
Adding a plug or replacing a fixture is not that hard. Make sure you acquire an adequate knowledge of basic house wiring before you begin.
I know it sounds like a broken record, but make sure you take precautions when you work with electricity. It is dangerous and you can be hurt. When you are careful, it is not that hard.
Below we have listed several articles that deal with specific electrical topics. Hopefully, you can find what you need in these articles for the repair you are attempting.
Adjusting Garage Door Torsion Springs
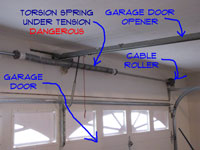 'Adjusting Garage Door Torsion Springs' should not be attempted by most homeowners. They can be very dangerous.
Not your problem? See 'Door Repair' and 'Overhead Garage Door Repair' for a complete listing of garage door and door topics.
The problem is that they have to be worked on when the door is down and the springs are under tension. When you release the set screw you have to have a rod in place and be holding it to control the force of the spring. Adjusting garage door springs of this type is not recommended for the average homeowner.
WARNING!! Torsion Springs can be VERY DANGEROUS, Precautions and thorough knowledge are REQUIRED!!! Do not attempt this repair without the proper skills.
There are those die hard do it yourself pros that insist on doing everything themselves. Are you one of those? Well then you should check further online for instructions. Clopay a manufacturer of residential garage doors has some instructions that may apply to your situation, Supplement to Torsion Springs, follow this link to check it out. There is another article that gives you and in depth discussion of this type of spring. The article provides installation instructions for springs and adjustment information, Torsion Spring Information.
I have been in construction most of my life and I personally know a few garage door installers. I have worked on torsion springs and I must confess that it made me nervous. I will not relate some of the horror stories, however, I will say that people have been seriously hurt, messing around with this type of spring.
Before you call a garage door serviceman, write down exactly what the door is doing. Verify by examining them that the springs are not broken. Springs either work or the don't, there is not much in between. Write down the width and height of your door and the type of springs you have. Ask for a quote over the phone for a cost on adjusting both springs. Make sure you specify both. Sometimes they will try to quote you for one spring and want to charge you double when they show up.
Call at least three places and try to make sure they are actually different places. Get quotes from all three. If they won't quote it over the phone, call someone else. A door that works, but does not close all the way does not need to be replaced. Make up your mind that you are not buying a new door. You be the judge if you want to be sold new springs. For another seventy-five to one-hundred dollars you can have new springs and the adjustment is free.
Torsion springs have cycle ratings. The minimum is 10,000 with the highest being 100,000. Get quotes for new springs at the same time. Remember, ask for both of them. Ask about the cycles and get the longer lasting ones if you can. Buying new springs when they just need to be adjusted is your decision. Weigh the age of the door and the cost when deciding.
Adjusting Extension Springs
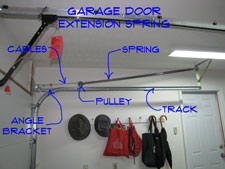 'Adjusting Extension Springs' can be done in two ways. One is by moving the hook that holds the cable to another hole to decrease or increase the tension. The other is by loosening the clamp on the cable and adjusting the length of the cable.
Not your problem? See 'Door Repair' and 'Overhead Garage Door Repair' for a complete listing of garage door and door topics.
What is the door doing? Is there a gap along the floor when it is closed. Too much tension on the springs. Is the gap on one side only. The springs are not balanced and the side where the gap occurs needs to be adjusted.
Safety Concerns
Garage doors are heavy and can be dangerous of they are not controlled. A garage door that is not attached to the springs can fall and cause injury. See below to make sure the door is secured before you work on it.
Brace Door Before Adjusting Extension Springs
To be able to adjust the springs, the door must be in a position that release the tension on the springs. For extension springs this is in the up position. To keep the door from falling, it must be clamped to hold it in place.
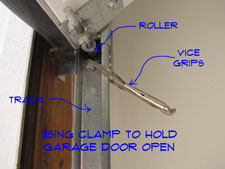
Raise the door and release the garage door opener. Push the door up as far as you can to release the tension on the springs. Use two pair of vice grips or two C clamps to clamp the track below the roller. You don't want the door coming down while you are working on it. Try tugging on the door to make sure the clamps are tight.
Making Adjustments
To lower the tension on the spring you want to move the hook one hole away from the door frame, toward the inside of the garage. This will reduce the length of the spring when it is stretched. By doing this you will lower the tension on the spring when the door is down.
This should allow the door to close and not leave a gap. Try adjusting it one hole at a time until it closes properly. Is the gap gone? No, keep trying one hole at a time. Yes, your attempt at adjusting garage door springs has been successful. Good job!
For a door that seems hard to lift the opposite would be true. Moving the hook one hole toward the door frame or toward the outside will increase the tension. Again go one hole at a time and try it. Increasing the tension may cause the door not to close all the way.
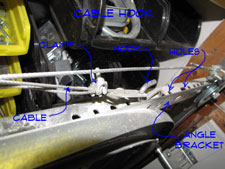 If you find that one hole is too much, you will have to adjust the cable. Go to Step Two. Adjust it back if this happens and look into getting a garage door opener to do the lifting. See that? Adjusting garage door springs may be as simple as moving the hook from one hole to another.
Did you run out of holes? Or do you need a finer adjustment than the holes are allowing for? Your cable will have a clip with a knot on it or a clamp where the cable attaches to the hook. Loosen the knot or the clamp to adjust the cable. Make the cable longer to reduce the tension and shorter to increase it.
The cable is looped, so if you increase the length about the distance between two holes on the angle, it will yield an adjustment of about half of what moving it from one hole to another would. Is the door working properly now? Yes, then you are done adjusting garage door springs. Go to the next repair on your list.
Summary
Extension springs are not that hard to adjust. You mostly have them on smaller doors that are easier to handle. You can see from the above, that there are a couple of ways to adjust them. To get your garage door in tip top shape, you may need to adjust the track and lubricate it. See the articles 'Adjusting Garage Door Track', 'Oiling Garage Door Hinges' and 'Lubricating Garage Door Rollers' for more information.


