Search
Repair Topics
Checking for Loose Ceiling Fan Wires
 You have power to the switch, but the fan still does not work. You could have a loose wire inside the fan housing.
Don't have ceiling fan wiring issue? See 'Ceiling Fan Troubleshooting' or 'Electrical Repair' for all the electrical topics.
Checking for Loose Wiring
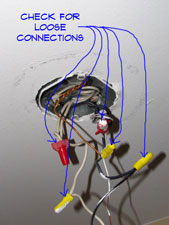
You are going to need some help to hold the fan while you check the wires. If your fan has a hanging hook it will be a lot easier. Turn the breaker off at the panel and tape it so no one turns it on. Loosen the housing screws and lower the fan. Double check with a tester to make sure nothing is hot. OK, now this ceiling fan troubleshooting thing is getting a little tougher.
Check the connections for the fan wires where they are connected to the wires in the box. Tighten the nuts and make sure everything is snug. There may be another internal set of connections within the fan housing. Check those and see if any are loose. Check the connections at the pull chain switches. Put the housing back on. Turn the power back on at the breaker panel.
Checking the Power at the Ceiling Box
 You will need to take the fan completely down to see if you have power in the box. Turn the power back off at the panel and tag it. Loosen the housing and lower the fan (get some help). Unhook the wires and put the wire nuts back on them. Turn the power on at the panel.
Turn the fan switch on and use a non contact tester to see if you have power to the box. You have power? Then the problem is in the fan unit. Check all the connections again. Check the pull chain switches and the connections leading up to them.
No power in the box? Your problem is at the switch or in one of the connections inside the box. Use the voltage tester to try and tell where the break down is. Remember, not messing with the wires while the power is on.
You don't want to get shocked during your ceiling fan troubleshooting project. Shut the breaker off and pull the connections out of the box. Turn the power back on and use the tester to see where your problem is.
Summary
Hopefully you have found your problem and your ceiling fan troubleshooting project has been successful. Are you installing a new fan? See the article 'Installing a New Ceiling Fan' for instructions and tips on what to do.
Testing Ceiling Fan Power
 It may seem overly simple, but testing for ceiling fan power is a good first step. If the fan won't run at all it is likely not getting power. See below to determine if this is your problem
See 'Ceiling Fan Troubleshooting' or 'Electrical Repair' if this is not your problem.
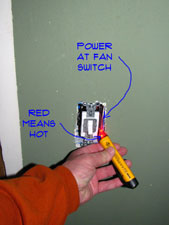
Use a non contact voltage tester to see if you have any power at the switch. If there is no power you want to check the circuit breaker first to see if it is tripped. If you have no power at all that is the likely culprit.
Do you have power to the switch and the fan still will not work. Check the article 'Wiring a Light Switch' for information on how to tell if the switch is bad.
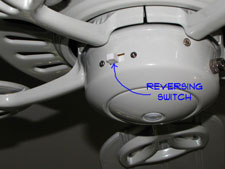
Is it the fan that won't work? Do the lights work? Yes, then you want to check the reversing switch on the side of the housing. If the switch is part way in between the forward or reverse positions, the fan won't work. Push the reversing switch to one side and see if the fan works. Make sure you turn the fan off before you check this.
Is the fan working and not the light? Did you check the bulb? Try another one, and make sure it is tight in the socket. It is possible to get bad bulbs fresh out of the package. Check the pull chain and make sure the light is turned on. Yes, ceiling fan troubleshooting also includes the simple things.
The other possible problem for the fan and the light are the pull chain switches. Pull chain switches that are obviously stuck are a good sign of trouble. See Step Five below for more information.
WARNING!! Make Sure the Power is OFF Before Working With Electricity!!! WARNING!!!
Ceiling Fan Troubleshooting
 Ceiling fan troubleshooting is needed when your fan is not working correctly. There are (6) Key Topics in this series.
'Checking for Ceiling Fan Power' and 'Loose Ceiling Fan Wires' discuss the electrical issues your fan can have.
The article on 'Wobbling Ceiling Fans' covers balancing and fan blade issues. A 'Noisy Ceiling Fan' is another annoying problem.
'Ceiling Fan Pull Chains' control the air movement and the light. 'Ceiling Fan Air Movement' provides information on adjusting the air flow.
There are several things that might be giving you trouble. The fan may not work, the light won't turn on. Is it wobbling or making noise? Is it stuck on one speed? Focusing on the right problem will help you get your ceiling fan working like a champ again.
Originally ceiling fans were powered by water and belts. Too expensive for the average person. Today they are powered by electricity and usually have a light with them. They are popular both for the ability to move air and for the visual appeal. Most of them have three, four or five blades.
A new ceiling fan can be a little pricey, anywhere from $50 to hundreds of dollars. Did not want to spend that right now? See if you can get your fan working better and wait to get a new one. Read the information below and check the evaluation sections. After the you can start your ceiling fan troubleshooting.
Ceiling Fan Information
What Can You Save? - The price of a new fan is the main item. You could call an electrician out and he might charge you $50 to $75 to repair the old one. He may tell you it is toast and sell you a new fan. Could be quite a bit more depending on the fan you get. A few hundred dollars is a lot to spend if you can fix it yourself.
How Hard Could It Be? - The main problem with ceiling fan troubleshooting is the size and weight of the fan. Taking it off to check the wiring could be a little difficult. These repairs will have a Difficulty Level of: A Bit of Work. These repairs require a Skill Level of: Determined Handyman. For and explanation of the terms in this section, see 'How to Use This Site'.
Check the Simple Things! - Light bulbs, did you check them? The circuit breaker would be the next easy thing. Make sure it is not tripped. Check the fan reversing switch on the side of the housing. The fan won't run if it is not pushed in place correctly.
What Can Go Wrong? - I already mentioned that they are heavy. Newer fans have a hanging hook to support the weight while it is being worked on. Older ones do not. Get some help, dropping the fan will not do it any good. Weighting the blades to stop a wobble could make it worse.
Ceiling Fan Issues
If your fan won't work, the first thing that you want to do is make sure it has power. 'Checking for Ceiling Fan Power' covered how you can do this.
Checking the wiring in the ceiling fan and at the ceiling box is a bit more work. The article 'Checking for Loose Ceiling Fan Wiring' discusses how you can locate a power issue inside of your fan.
Fixing a 'Wobbling Ceiling Fan' is not that hard if the blades are still in good shape. Find out what to look for.
Another common problem is a 'Noisy Ceiling Fan'. This article helped you to solve this problem.
One part that can break on a ceiling fan is the pull chain. 'Ceiling Fan Pull Chains' talked about what to do when one of these fails.
Is your ceiling fan providing enough air? The article 'Ceiling Fan Air Movement' provided information on what you can do to adjust your fan.
Were you able to locate your problem? Better yet, were you able to solve your problem? We hope so. Most issues with a ceiling fan can be resolved without too much difficulty. Tightening things up or fixing a loose wire should not have taken too long.
Not a lot you can do with an old fan that is noisy. You may want to start saving your coupons to get a new one. The newer ones are a lot quieter and move the air much better. We hope you have found your ceiling fan troubleshooting experience to be rewarding. If not rewarding, successful.
Common Bifold Door Sizes
 Your interest in 'Bifold Door Sizes' is likely related to a repair or replacement project on a closet door.
For information on repairing bifold doors, see the article 'Troubleshooting Bifold Doors'. If you are considering a replacement project, see the article, 'Installing Bifold Doors'.
Table of Bifold Door Sizes
Bifold door sizes do have limitations. Some sizes can be special ordered if you have time to wait. This is a list of common bifold door sizes that are fairly standard and readily available.
- 2' 0" x 6' 8" Bifold - Two 12" Panels
- 2' 6" x 6' 8" Bifold - Two 15" Panels
- 2' 8" x 6' 8" Bifold - Two 16" Panels
- 3' 0" x 6' 8" Bifold - Two 18" Panels
- 4' 0" x 6' 8" Bifold - Four 12" Panels
- 5' 0" x 6' 8" Bifold - Four 15" Panels
- 6' 0" x 6' 8" Bifold - Four 18" Panels
Some manufacturers may offer a few additional sizes in addition to the ones listed above. Likely these will need to be ordered. Remember, even with additional availability, there are limitations to the sizes. Check with your door supplier before you assume that something is available.
The above sizes should also be available in a shorter version. Again, check on availability before you commit to a size.
Measuring a Bifold Door Opening
The opening size for a bifold door is measured from the finish face of the opening, not the trim. A casing type molding is often used around a bifold door. The trim hangs over the edge of the opening to cover the gap around the edge of the door.
Most bifold door openings are finished with drwyall. So the width of the opening is measured from the face of drywall on one side to the face of the drywall on the other side.
The height is measured from the finished floor to the finished face of the drywall on the head.
The width and the height will determine what size bifold can be used. This is sometime called the 'rough opening' or 'R.O.', although for a bifold the measurments are taken from the finished opening.
It should be obvious from the foregoing the retrofitting a bifold into another style door opening may be a problem. Even in new construction, rough openings for common bifold doors are set during the framing stage. The rough openings differ in from standard doors that have jambs.
Allowing for Bifold Door Hardware
A critical issue for bifold door is the hardware at the top and bottom of the door. Bifold door slabs need to be shorter and/or the openings need to be taller to allow for the hardware.
As a rule the height of the door opening needs to be 1 1/2" to 2" higher than the height of the door. When you are buying a new bifold door, there should be an opening size listed. This will need to match the opening measurements that you took.
If you are using an existing bifold door in a different opening, you will have to guage the amount to allow for hardware. It will usually be around 1 3/4".
Related Bifold Door Articles
- To install a new bifold door, see the article 'Installing Bifold Doors'.
- Many problems associated with bifold doors can be fix by adjusting them. See the article 'Adjusting Bifold Doors'.
- For a discussion on general bifold door repair, see 'Repairing Bifold Doors'.
Summary
As you can see from the foregoing, there are several bifold door sizes available. However, the margins and rough in sizes for bifold doors is different from regular doors.
How Bifold Doors are Sized
Before purchasing a bifold door, it is important to know how bifold doors are sized. Stated bifold door sizes are in nominal increments. Similar to regular doors, the sizes are expressed in the finished opening size. For instance, a 3' 0" bifold door fits inside of a 36" wide finished opening. The leaves of the bifold are appropriately undersized to allow for clearance around the door.
The same is true of the height of the door. Bifold door sizes are based on having a track at the top and a pivot bracket at the base. Generally, you need an extra 1 3/4" of height beyond the height of the door panel. The bifold doors are undercut 1" standard. For a nominal 6' 8" opening, you need a finished height of 6' 8 3/4" (80 3/4").
Translated that means a 79" door plus 1 3/4" for the track and brackets. Since this height is sometimes a problem, you can get bifold doors that are 2" shorter. The doors are 77" plus 1 3/4" equals 78 3/4". This will work for openings that are 80" finish or slightly less.
Another thing to keep in mind, about how bifold doors are sized, is that bifold doors are sized in pairs. A 2' 0" bifold door will have (2) 12" leaves that are held together by hinges. Again the spacing of the panels is allowed for in the nominal size.