Search
Repair Topics
Removing Obstructions From a Toilet
 The last and less desirable reason for a slow flushing toilet is an obstruction. Most of the time when a toilet clogs it is due to the volume that is going through the trap. Other times, something may get dropped in the toilet that won't go through the trap, this will cause the toilet to clog.
There are three articles that discuss 'Toilet Clogs'. See 'How To Unclog a Toilet', 'Plunging a Toilet' and 'Using a Toilet Auger'. Just about any type of obstruction can be dealt with using the information in these articles.
Children are great and well worth the few problems that they create. Sometimes, not likely the fault of the children, things get thrown in the toilet that shouldn't be there. Toothbrushes, small toys and other objects can get caught in the trap.
How To Remove Objects
When objects get caught in the trap, the toilet still works, but poorly. The obstruction will catch things that go by, slowing down the operation of the toilet. The solution is to get rid of the obstruction.
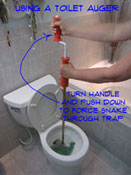
A toilet auger is the best tool to use when you have this problem. The problem will likely get worse and the clogs will become more frequent. In time the plunger will no longer work and something will have to be done. A slow flushing toilet has now become a clogged toilet.
Using a Toilet Auger or Snake on a Toilet
A toilet snake is an oddly shaped device that has a short section of metal snake that goes through it. It has a hand crank and the snake portion is just long enough to get through the trap on the toilet. Since most objects get caught in the trap, the auger works very well.
See the article, 'Unclogging a Toilet With a Snake' for instructions on how to do it and where to obtain an auger.
Removing Toilet Inlet Sediment
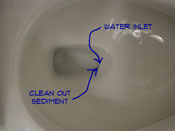 Another reason for a slow flushing toilet is a clogged inlet valve. The water from the tank is fed into the bowl via an inlet that is built into the porcelain bowl.
This might not be your problem, see 'How To Fix a Toilet' or 'Plumbing Repair' for all of the plumbing related articles.
Sediment can build up in this inlet. This will cause the water coming into the bowl to slow down. As a result the toilet will not flush correctly.
How a Toilet Works
Toilets are designed to create a siphonic action in the bottom of the bowl. A siphonic toilet uses a combination of water pressure and gravity to accmplish this. Since 1994, toilets in the United States can only use 1.6 gallons per flush. Not really a lot of water when you consider that some of the water gets used to clean the bowl and the balance is used to create the siphon, a water cyclone, to use an analogy.
There is an inlet at the very bottom of the bowl, that jets the water in to the outlet pipe to create the siphon. Over time, this inlet can build up with sediment. When this happens, the sediment needs to be cleaned out, or the toilet won't flush properly.
Even when the entire 1.6 gallons is used, if it does not get into the drain fast enough, you won't create a siphon. When this happens, you have what is commonly refered to as a 'Slow Flushing Toilet'.
Older toilets, with older toilets, the problem can be more pronounced. It may seem that with the extra water that an older toilet uses, that there is plenty to go around. However, this is not true.
For one thing, older toilets are, well, 'older' so the sediment has had a lot more time to build up, probably in locations you cannot readily see. The second thing is that older toilets were designed to use a certain amount of water, could be as much as 7 gallons per flush. If all of that water is not used in the proper amount of time, the toilet will flush poorly.
Safety Concerns
Toilets are somewhat dirty by nature. Even in the cleanest house, the dirtiest place is likely to be the toilet. Use gloves when working on or inspecting a toilet.
Disinfecting the toilet prior to any repairs or inspection is also a great idea. Dangerous bacteria can live in, even a seemingly clean toilts.
Where To Look for Sediment
There are several inlets for water in your toilet. Some of them are to rinse the bowl, but the biggest on is at the bottom and it is needed to create the siphon.
There are a series of small water inlets under the rim of the toilet bowl. You will need a mirror to be able to inspect them. They are small, but neccessary. The rinsing water also contributes to the siphonic action. If you see any discoloration or build up, this will need to be cleaned up.
As mentioned above, there is a larger inlet at the bottom of the bowl that creates a jet. This inlet is very important for the operation of the toilet. Again, you may need to use a mirror to inspect this inlet. Do you see any discoloration or build up? If you do, it needs to be removed.
Cleaning Out the Sediment
Some of the inlet holes are small so you will need something the can get inside them and break up the sediment.
You can use a small screwdriver or awl to clean out the sediment. It builds up over time and can be pretty stubborn. Try to get rid of as much of it as you can. Use a little elbow grease and get all of the sediment out of the inlet.
Use the mirror to keep checking on how well you are doing at getting the sediment cleaned out. Try to remove as much as you can.
Summary
Sediment takes a long time to build up. The negative results develop slowly, almost unnoticably over time. At some point the sediment becomes a big enough problem to keep your toilet from working. That is when you need to do something about it.
The toilet tank water level is another aspect of a slow flushing toilet. See the article 'Adjusting the Toilet Tank Water Level' for more information.
Toilet Tank Not Filling
 A toilet tank not filling correctly can cause problems with how the toilet flushes. Toilets need a certain amount of water to work properly, too little water and the toilet will clog or flush slowly.
It may make economic sense to lower the water level in the tank, to save money. However, it does not make good toilet flushing sense.
Too little water in the tank can cause the flush slowly or not at all. This will cause the toilet to clog and create and unpleasant situation. Toilets are engineered to work with a certain amount of water. Make sure that when the tank fills it is near the top of the tube for the flush valve.
See the article 'How to Fix a Toilet' if this is not your problem, it covers all of the toilet repair topics.
Toilets are designed to use a certain amount of water to flush. With the water consumption limitations imposed by the government, all of that water is needed for the toilet to work properly. Reducing the level in the tank will cause the toilet to flush poorly. A 'slow flushing toilet' is a sign of too low a water level.
What Is the Proper Toilet Tank Water Level?
With the lid taken off you should be able to see a round vertical tube in the center of the tank. It will have the toilet flapper and a fill tube attached to it. The vertical tube is part of the toiltet flush valve.
The proper water level for most tanks is near the top of that vertical tube. Some tanks will have a line and an indication that is is the 'fill line'. If you have markings inside your tank, you want make sure the water is set to that level.
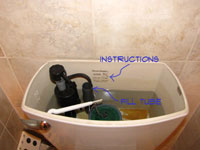 For tanks with no markings, you will set the water level just below the top of the fill tube. Stay about 1/2" down from the top. You do not want to get too close to the top, otherwise it will run over and trickle into the tank.
Adjusting a Toilet Fill Valve
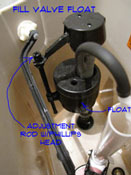 When you look into the toilet tank you will see off to one side another vertical elment the has a built in float on it. It will also have a tube that is connects it to the fill tube in the center. The bottom of this assembly is connected to the water supply line for the toilet.
This is the fill valve. The fill valve has a float on it that can be adjusted to set the water level in the tank. Most fill valves have a float that slides up and down on the vertical fill valve. There is a retaining clip or a screw device that allows for adjustment.
When the water is too low in the tank, you want to raise it. Simple, right? Yes it is, fortunately, the float adjusts the same way the water needs to go. To raise the water level, raise the float. To lower the water, lower the float.
A fluidmaster vertical fill valve will have an adjustment shaft with a phillips screw inset at the top. Turn the shaft clockwise to raise and counterclockwise to lower. Older ones will have a metal shaft with a spring clip on it. Pinch the spring clip and raise or lower the float as desired.
Adjusting a Toilet Ball Float
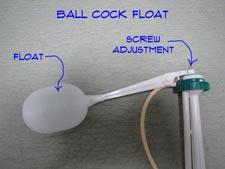 Some toilets will have a ball cock that acts as a float. This will be connected to a horizontal rod that is connected to the fill valve. There will be a adjustment screw where the rod connects to the fill valve.
To raise the water level you want to raise the float. Adjust the set screw or the clip on the float.The direction to turn the screw will depend on the design of the float valve. You may have to experiment a little to determine whether you are raising or lowering the float. The same rules apply with floats, raise it to raise the water level and lower it to lower the water level.
Checking the Toilet Tank Water Level
Before you pat yourself on the back for a job well done, you want to do a couple of test runs. Flush the toilet and let it fill back up.
It should stop filling at the mark on the tank or just below the top of the fill tube (approximately 1/2" below the top). If it fills too high it will start trickling into the fill tube and down into the toilet, wasting water. Make corrections as needed.
Check the water level on your tank periodically to make sure that it continues to fill properly. This will help to avoid toilet clogs and noisy water wasting situations.
Slow Flushing Toilet
 What can you do about a slow flushing toilet? This problem is common in older toilets. Addressing issues with the water quantity and flow will help this issue.
Not sure if this your problem? See the article 'How to Fix a Toilet' for a complete listing of all of the toilet repair topics.
There are (3) Key Topics associated with a 'Slow Flushing Toilet': (1) 'Adjusting the Toilet Tank Water Level' covers a low water supply in the toilet tank. (2) Older toilets and houses with hard water can get a sediment build up in the water inlet. 'Cleaning Out Toilet Sediment' covers this issue. (3) 'Removing Toilet Blockages' talks about partially blocked toilets that will flush slowly.
Toilets are engineered to use a certain amount of water to flush. When the water rushes into the bowl, it creates a siphon that removes the waste and rinses the bowl. Too little water or water that gets there too slow can cause the toilet to flush poorly.
Water Usage for Toilets
Toilets that used a large supply of water would be prone to slow flushes. Hard water and sediment can also be a factor.
A toilet that flushes slowly can be very annoying. When a toilet does not flush properly, clogs are frequent. A clogged toilet is more than irritating. The dirty messy water is no fun and can be a health hazard.
In the mid nineties, toilets had to start using 1.6 gallons of water per flush. Prior to that time toilets could use 3.5 to as high as 7 gallons of water. The design of toilet would require that the full amount be used. In an effort to conserve, some homeowners would adjust the water level down. This will cause the toilet to flush slowly, since there is not enough water pressure to create the proper siphon effect.
Issues With a Slow Flushing Toilet
What Can You Save? - A plumber can usually take care of this problem in a single service call. Normally this will run from $75 to $100. One danger is that the toilet will be condemned and the plumber will try to sell you a new toilet.
How Hard Could It Be? - Fixing the common causes of a slow flushing toilet is not difficult. | These repairs will have a Difficulty Level of: Simple | These repairs require a Skill Level of: Job Jar Specialist | For and explanation of the terms in this section, see 'How to Use This Site'.
Check the Simple Things! - Adjusting the float to set the water level to the correct height is the easiest fix. Most toilets are designed to work properly with the water level at the maximum level in the tank.
What Can Go Wrong? - Not fixing a slow flushing toilet can lead to toilet clogs. A clogged toilet can be very disruptive. Not to mention the mess that can be made by the dirty water. Another issue is that the toilet may need to be flushed multiple times, wasting water.
Troubleshooting a Slow Flushing Toilet
The amount of water in the toilet tank is critical to proper flushing. The article 'Adjusting the Toilet Tank Water Level' provides instructions on adjusting it to the proper level.
Another common problem is a build up of sediment in the inlets for the bowl. If the water does not get into the tank quickly enough, it won't flush properly. See 'Cleaning Out Toilet Sediment' for a review.
'Removing Toilet Obstructions' discusses how a clog or partial clog can affect the operation of your toilet. Removing them is the only choice.
Summary
Were you able to deal with your slow flushing toilet? It may have been as simple as adjusting the float. This is especially true for older toilets. In years gone by, toilets needed a lot of water to flush properly. When the tank level gets too low, the proper siphoning will not start.
Another common problem is sediment in the inlet valve. Again, older toilets are more likely to have this trouble. Then there is the 'object' stuck in the trap. No one knows how is got there, but it sure has caused a problem. Dislodging objects is not too hard and hopefully, you are up and running again.
How To Install a Sink Drain
 Their is a certain order that should be followed for assembling sink drain pipes. Tail pieces or waste outlets should be hooked up first. The outlet for the trap should go into the wall next. The tee (for a kitchen sink) should go in next.
Usually the last item would be the "J" for the trap. For a double kitchen sink you would want to put the tailpiece and waste arm on one side, then the tee and then the tailpiece and waste arm on the other side.
For a bathroom sink you start with the tailpiece/pop up assembly. Next would be the outlet that goes in the wall. Lastly the "J" for the trap.
Most of the time it is self explanatory. Even if you get them out of order, it is not a big deal to back up and redo them. Assembling sink drain pipes is one of the easier plumbing projects.
Put everything in hand tight to make sure it all fits. Snug up the fittings and check the alignment of everything. Once you are sure that everything is fitting you can tighten the nuts.
For plastic fittings they say hand tight is good enough. I usually don't trust that and go about a quarter to a half turn past hand tight with the adjustable pliers. Metal nuts may require a full turn or two past hand tight. There is some give in these types of fittings. So don't tighten them with a torque wrench.
The concepts are similar for replacing a single piece. Try to keep from disturbing the other pieces when you tighten the new one. Aggravating when you fix one leak and create two others.
Cutting
Cutting sink drain pipes is not difficult. Especially if you go with the less expensive pvc plastic pipes.
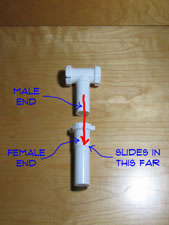
Notice the fittings fit inside one another. So the fittings that slip together have either a male or female end. No explanation on that on, you can figure it out. Some ends are threaded to mate up with a matching piece, like the P Trap.
Due to this feature you will have to allow for the overlap when you measure your pieces. You can tell on the outside of the female piece how far in the other piece will slide in. Mark the piece you are cutting accordingly.
Your use a hack saw to cut the pipe whether it is metal or plastic. The cuts do not have to be perfect due to the overlap. Dry fit the pieces to make sure the are fitting correctly. The piece of drain pipe that goes into the wall will also be cut long. It will go inside the pipe a couple of inches and be held in place by the nut and washer.
Assembling
Their is a certain order that should be followed for assembling sink drain pipes. Tail pieces or waste outlets should be hooked up first. The outlet for the trap should go into the wall next. The tee (for a kitchen sink) should go in next.
Usually the last item would be the "J" for the trap. For a double kitchen sink you would want to put the tailpiece and waste arm on one side, then the tee and then the tailpiece and waste arm on the other side.
For a bathroom sink you start with the tailpiece/pop up assembly. Next would be the outlet that goes in the wall. Lastly the "J" for the trap.
Most of the time it is self explanatory. Even if you get them out of order, it is not a big deal to back up and redo them. Assembling sink drain pipes is one of the easier plumbing projects.
Put everything in hand tight to make sure it all fits. Snug up the fittings and check the alignment of everything. Once you are sure that everything is fitting you can tighten the nuts.
For plastic fittings they say hand tight is good enough. I usually don't trust that and go about a quarter to a half turn past hand tight with the adjustable pliers. Metal nuts may require a full turn or two past hand tight. There is some give in these types of fittings. So don't tighten them with a torque wrench.
The concepts are similar for replacing a single piece. Try to keep from disturbing the other pieces when you tighten the new one. Aggravating when you fix one leak and create two others.