Search
Repair Topics
Plaster Wall Repairs
 Making plaster wall repairs can be a little different than repairing drywall, why? For one thing plaster is installed differently than drywall. Drywall comes in sheets, two pieces of paper with a gypsum core in the middle. Only the seams receive drywall compound to finish it off.
Plaster and drywall are sometimes used interchangeably, not sure if you have a plaster wall? See the article 'How To Patch Walls and Ceilings' and 'Drywall Repair Problems' for a listing of all the topics.
An old style plaster wall is installed with three coats of troweled material over a substrate. Plaster requires a lot more skill than drywall, not to mention a lot more work. When the plaster dries the coats bond together into one monolithic wall or ceiling. How difficult it is to repair plaster is determined by how stable the plaster is now.
Small repairs can be done with drywall compound and drywall tape. It is even possible to use pieces of drywall to make larger repairs. Plaster is a gypsum based product, the same as drywall, so the two materials are compatible.
Plaster Wall Repairs - Information
What Can You Save?
There is a wide range of cost for this type of repair. The minimum would be around $100 with several hundred or even thousands possible. Drywall and plaster repairs often require, multiple steps, thus increasing the cost.
How Hard Could It Be?
Plaster wall repairs involve both work and skill. With a little practice, the skill can be acquired. You will not be able to get around the work.
Check the Simple Things!
You can fix minor cracks and holes with spackling. You can purchase a small can at a home supply store. See the article 'How To Spackle Drywall' for instructions on this easy repair. The article 'How To Repair Drywall', provides a general discussion on wall and ceiling repair topics.
What Can Go Wrong?
Plaster wall repairs and their cousins, drywall patching, can be a messy job. Drywall or plaster dust is very fine and gets everywhere. Take precautions and protect the area. Using some plastic to close off the area is a good idea. Getting a good finish on the repair will take some practice. You may have to put an extra coat or two on, with some sanding in between. See the article 'Taping and Mudding Drywall' for some pointers on working with drywall compound.
Troubleshooting Plaster Wall Problems
Fixing small holes and dings in plaster walls is the same as a drywall wall. 'Spackling Plaster Walls' covers this topic.
When you have a bigger hole in your wall it is more of a problem. The article 'Fixing Holes in Plaster Walls' covered what can be done and how to fix it.
Plaster products are less common than drywall. They are also harder to use. Since plaster and drywall are made from the same materials, can they be mixed? The article 'Using Drywall on Plaster Walls' covered how to do this.
Plaster is similar to drywall, since it is made from the same products. However, the way it is installed is completely different. Human error is also a factor with plaster. Over time plaster can fail and start to fall off the wall. The article 'Plaster Wall Failure' discussed what can be done when this happens.
Summary
Do you have plaster walls in your home? At first you may be intimidated with the thought of trying to repair them. There is no need for fear. Plaster and drywall are very similar. In fact plaster was the predecessor of drywall and in many ways if very similar.
Hopefully, you were able to obtain some the materials at a home supply store that worked on your problem. Once it is sanded, a smooth drywall surface can look as good as a plaster wall. Now that this project is complete, you can move on to other home repairs.
Fixing Phone Jack Wiring
 Why would you need to do any phone jack wiring? I can remember a few years ago calling a new phone order in to the phone company. The customer service person, explained to me the various charges. Then she outlined the extra charges for anything that would need to be done inside the home beyond the junction box. All I can remember was the $45 for the first fifteen minutes and $25 for each fifteen minute period after that.
I had already pre-wired the house, but that certainly scared me. I went back and checked all the wiring to make sure I did not need anything done inside the house. How hard could it be to warrant $120 per hour, and that was several years ago.
Phone jack wiring is not that difficult. The only complexity is that we now have more options. Wireless phones, internet phones and of course the old stand by, wired phone jacks. Check out the information below to see if you are up to this type of repair. Look at the evaluation section first to determine if it is worth it.
Fixing Phone Jack Wiring - Information
What Can You Save?
Did you call the phone company? You could save a lot. Assuming you called someone that had rates that would be somewhere on this planet, you could be looking at $50 to $75 for someone to come out. Could be more, fishing new wires for phones into an existing home can be time consuming.
How Hard Could It Be?
Phone jack wiring is not that hard. The difficulty comes with getting the wires to where you want them. We are excluding installing new phone wires in your home, for this article.
Check the Simple Things!
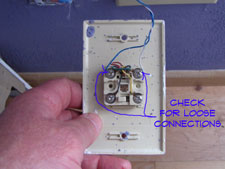
Loose wires are the obvious simple solution. Check the connections. Does something change when you jiggle the wire? Yes, it could be that simple. Connections are very sensitive. Make sure you are getting a good connection at all critical locations before you mess with anything else.
What Can Go Wrong?
Well, being without a phone is a definite problem. This is low voltage wiring so there is not a lot of danger.
Types of Phone Wiring
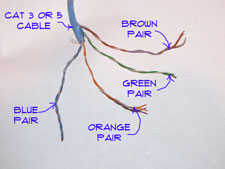
The older your home the better chance you have of finding different types of phone wiring. For home built in the last ten years the wiring is supposed to meet Cat 3 Standards. Cat 5 wire now being the preferred wire. The advantage to this type of wire is that it eliminates 'cross talking' (hearing another conversation over your line) and interference from radio frequencies.
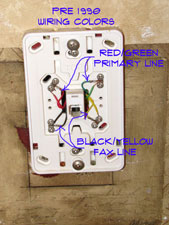
Homes that are older than that might have the 'quad' wiring that was used for several decades. This wire had four conductors, not twisted as the new standard requires, they were red, green, yellow and black. Phone jacks and other phone devices that you purchased would be color coded to match this wire. The red and green wires would be the primary line and a second line could be hooked to the yellow and black wires.
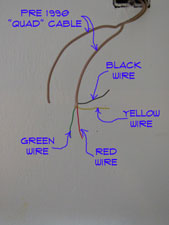 In theory this would work fine. The problem is that they are not twisted pairs and are susceptible to the 'cross talking' and interference previously mentioned. This type of wire may be fine for a single line or could even accommodate a fax line. You may get the fax noise bleeding into the voice line if you use it this way.
If you are planning on a home office or multiple hard wired lines for whatever reason, you will want to upgrade the wiring. Cat 5 Wire comes with four twisted pairs. The colors are Blue/White with Blue stripe (Primary Line); Orange/White with Orange stripe (Second Line); Green/White with Green stripe (Third Line); Brown/White with Brown stripe (Fourth Line). That is how the colors are supposed to be used. That does not always mean that they were used that way in your home.
Twisted pair wires should not be mixed with each other. Back to that whole 'cross talk' thing. Instead always use the pairs together as they come in the cable. One pair, one line, simple, right?
You may run into other types of wire in older homes. When possible you may want to replace older or non standard types of wire. The newer wire is designed for communications and does a much better job.
Types of Telephone Service
There are different types of telephone service that you may encounter in your home. The type of service affects the wiring that you will have.
Analog - Standard land lines or analog lines are the kind we had for decades. The phone company brings one or more lines into your home via a terminal block. This block is usually located on the outside of your home.
Your internal phone wires are hooked to it and the phones work. This type of wiring has its own power in it. That is how you are able to hear the dial tone. Most new phones with features require more power and have 120 volt adapters attached to them.
DSL - Stands for Digital Subscriber Line. Without getting into tech talk this technology gives you high speed internet over a standard analog phone line. How fast and in which direction it is provided will be determined by the service your phone company provides. In practice, you often get a voice line and a DSL line in one package.
DSL lines are hard wired into your home and use wired jacks similar to the hook up the phones. There is usually a splitter that allows you to separate the phone line from the digital service for the computer.
Wireless - You are still able to have wireless phones in your home if you purchase a set up that uses a base unit. The base unit is hooked to the hard wired phone line and transmits to the other wireless phones. This allows you to put phones anywhere in the home. You can purchase a pretty decent system with three or four phones for less than a hundred dollars.
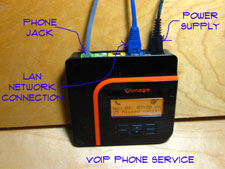
VoIP - Stands for Voice over Internet Protocol. This allows you to have a telephone that works via a high speed internet connection, usually a cable modem. The advantage to these systems is a lower cost. An adapter is hooked up the modem and usually provides a phone jack. You will need to disconnect the phone company's wiring from any line that is being hooked to the hard wiring in your home. You can burn up the adapter if you do not.
The intricacies of mixing a VoIP system with various other types of phones in your home is beyond the scope of this article. You may get a self explanatory kit from your provider that tells you exactly how to hook it up. Follow the instructions carefully, call the tech line if needed. Take a look at this webpage for some additional information, How to Distribute VoIP Throughout a Home. This website provides a pretty in depth discussion on what to do for this type of system.
Cell Phones - Many people have scrapped the idea of having a home phone number altogether. They just use their cell phones for all of their calling needs. Nothing wrong with this, just remember to plug it in. You don't need any phone jack wiring at all for a cell phone connection.
The older your home the better chance you have of finding different types of phone wiring. For home built in the last ten years the wiring is supposed to meet Cat 3 Standards. Cat 5 wire now being the preferred wire. The advantage to this type of wire is that it eliminates 'cross talking' (hearing another conversation over your line) and interference from radio frequencies.
Homes that are older than that might have the 'quad' wiring that was used for several decades. This wire had four conductors, not twisted as the new standard requires, they were red, green, yellow and black. Phone jacks and other phone devices that you purchased would be color coded to match this wire. The red and green wires would be the primary line and a second line could be hooked to the yellow and black wires.
In theory this would work fine. The problem is that they are not twisted pairs and are susceptible to the 'cross talking' and interference previously mentioned. This type of wire may be fine for a single line or could even accommodate a fax line. You may get the fax noise bleeding into the voice line if you use it this way.
If you are planning on a home office or multiple hard wired lines for whatever reason, you will want to upgrade the wiring. Cat 5 Wire comes with four twisted pairs. The colors are Blue/White with Blue stripe (Primary Line); Orange/White with Orange stripe (Second Line); Green/White with Green stripe (Third Line); Brown/White with Brown stripe (Fourth Line). That is how the colors are supposed to be used. That does not always mean that they were used that way in your home.
Twisted pair wires should not be mixed with each other. Back to that whole 'cross talk' thing. Instead always use the pairs together as they come in the cable. One pair, one line, simple, right?
You may run into other types of wire in older homes. When possible you may want to replace older or non standard types of wire. The newer wire is designed for communications and does a much better job.
Wiring a Telephone Jack
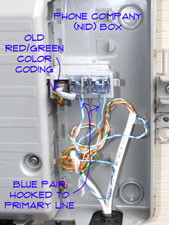 The whole concept of phone jack wiring is pretty simple if you stay with the pairs. How many lines do you have coming into your home? For each line you should have a pair of wires that is coming out of your terminal box or Network Interface Device (NID) in phone company speak.
Often the phone company will mark the lines with the number that is associated to them. This would normally be true where you have multiple lines. With only one line it should be a no brainer.
 The first thing you want to do is determine which pairs are associated with which lines in your home. The phone company will likely use the normal hook ups. Using red/green; or blue/white for the primary line. Write down which pairs go to which lines.
Most over the counter phone jacks and devices will still use the red/green colors for the primary line. So if you are hooking up a fax line to a jack you will attach the orange/white pair to the red/green terminals on the jack. Is the jack for the regular phone line? You would hook the red/green or blue/white wires to the red/green terminals. Simple? So is rocket science to an MIT graduate.
Just keep the pairs together, don't mix them up. If you get them backwards you can usually tell. Try the primary line, does the fax machine screech in your ear? Does your daughter answer on her line? You have something reversed. Switch the wires and try again. Test all the lines before you get everything put back together.
Are all the phone jacks working now? Good, this phone jack wiring project is history.
Troubleshooting Phone Jack Problems
 Troubleshooting phone jacks will often involve loose or broken wires. Assuming your phone service is working at other jacks in the home you would want to check the connections. You saw how thin that wire is, yes it can break.
Take the cover plate off and check the wires. Are they loose? Do they appear to be broken? Try redoing the connections, possibly cutting a little off of the wire and stripping them again. A break is likely to occur right at the connection lug. Hook them back up and see if the phone jack works.
Phone jack wiring will usually be connected together on the back of each jack. Check other nearby jacks to see if there are any loose or broken wires that could be feeding the problem jack. Unless you have been doing some remodeling, it is unlikely that the wire in the wall had gotten damaged. Not impossible, just unlikely.
Are all your jacks working now? Great, you have successfully dealt with some phone jack wiring issues. How to you feel? I thought so, proud.
Summary
As technology continues to advance there will no doubt be more and more ways that phones can be hooked up. Today there are still a lot of phones that are hooked to hard wires. It is low voltage wire and can break.
Remember that each phone line needs a pair of wires to work. Keep the pairs together. Locate the right pair for the phone jack you are working on, two minutes with a screwdriver and presto, a working phone line. Phone jack wiring can be that simple.
Overhead Garage Door Repair
 Overhead garage door repair, can you develop the skills you need? Garage doors are the biggest heaviest doors in any home. No surprise that they often need attention.
See the descriptions below for all the topics or take a quick jump here:
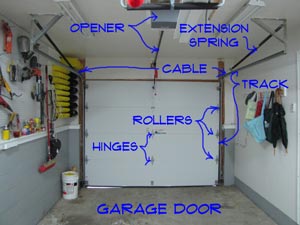
'Adjusting a Garage Door', 'Garage Door Spring Repair', 'Garage Door Opener Problems', 'Weatherstripping for Garage Doors', 'Garage Door Hinges', 'Garage Door Rollers'. Follow these links for more information and instructions.
They also have the most moving parts. Parts can wear out or break, things can get out of alignment. All it takes is one item that is not working and the whole door can be rendered useless.
The garage door springs do the heavy lifting. When the door is down they are stretched. When you lift the door, the springs recoil and lift the weight of the door for you. The door follows tracks and uses rollers to stay in place. The moving parts need to be lubricated and and the tracks need to stay in alignment. There are also hinges that hold the panels together. If any of these items fail, you will need to make an overhead garage door repair. You can get the know how, to repair garage doors without too much difficulty. Read on.
Overhead Garage Door Repair - Finding Help
Below you will find some common problems that you might encounter with your garage door. There is a brief description and a link that will lead you to additional information on garage doors and the related repair issues. Our evaluation sections of the pages will help you to decide if you want to make the repair. The "What Can You Save?"and "How Hard Could It Be?" sections give you a quick overview of the repair. After you have reviewed this section, you can decide if it makes sense for you to attempt your own 'Overhead Garage Door Repair'.
 The "Check the Simple Things First" section will clue you in to easy fixes to check for. Garage doors, like other household items have simple things that break or quit working properly. Many times something easy will eliminate a problem without the aggravation of an involved repair. In an effort to warn you about what you are in for, there is the "What Can Go Wrong" section. Forewarned is forearmed as they say. Knowing what to watch out for is always helpful.
Overhead Garage Door Repair Topics
Below you will find brief descriptions of the issues you may have run into. Click the link for the related article to find out more information.
Garage Door Spring Repair
The springs are the workhorse of your garage door. Over time, metal fatigue can cause them to break. With a broken spring the door is very difficult if not impossible to lift. For broken springs you will need to replace them. See 'Replacing Garage Door Springs', for more information.
The quality of the springs can vary and the difficulty level changes with the type. You may not want to tackle this repair, but understanding what you will need will allow you to hire someone at a reasonable cost.
Your garage door spring problem might be an adjustment issue. It could be very simple. Take a look at 'Adjusting Garage Door Springs' for more information.
Adjusting a Garage Door
When the door is out of alignment it can bind and not work correctly. Adjusting the garage door may be an inexpensive solution to your problem.
Before you call the repairman, find out if an adjustment is all you need.Find out what you can to adjust the door without doing a complete overhaul.
Repairing Garage Door Rollers
The garage door rollers allow the door to move up and down in the track. They can break or seize up. You can either lubricate them or replace them as needed. Replacing them is not that hard, they are less than five dollars. Ten minutes and you're done.
Use this link to find out everything you could possibly want to know about garage door rollers. There is really not that much to know, but it sounds good.
Repairing Garage Door Hinges
The garage door hinges are used to allow the door panels to move independently of each other. On the sides of the door, they have a sleeve for the rollers built into them. Hinges can rust, seize up or break. This is also an inexpensive and simple repair.
Learn the secrets about garage door hinges that have been passed down through the centuries via a secret code. No, not really, they are pretty easy click the link above for more information.
Garage Door Opener Problems
With a garage door opener, you have no lifting at all, just push a button. It does not eliminate the need for springs. It has moving parts and is also an electrical device.
A garage door opener is one of those things that can have some simple problems that cause it not to work. Check out the simple repairs first. Find out what repairs are practical to make by clicking the link above.
Repairing Garage Door Weatherstripping
For an attached garage you want to keep out both cold and heat. The garage door is a big opening. The weatherstripping will cut down on the air leaks and save you money on fuel. Click the link above and check out this topic.
Overhead Garage Door Repair - Finding Help
We have attempted to provide you with links to the information that you need. Hopefully after examining the specific topics you were able to determine if you want to make your own overhead garage door repair. Many of the repairs are practical for the average homeowner.
Leaking Hot Water Heater Tank
A leaking hot water heater tank is generally a death knell for your water heater. Once the tank goes bad there is little you can do. However, water heater tanks do last a long time, so you want to make sure that it is not something else before you assume that the tank is bad.
Not sure if this is your problem? See the articles 'Gas Water Heater Troubleshooting' and 'Troubleshooting Electric Water Heaters' for a complete listing of water heater topics.
Water Leaking Onto the Floor
Just because you see water on the floor does not mean that your tank is leaking. It could be leaks from other spots on the water heater that are less costly to fix.
Is the water leaking at the base of the tank? Look inside the metal casing below the tank. Do you see water? Is the water persistent? Have you checked the other fittings on the tank?
Water Heater Drain Valves
The water heater drain valve is near the bottom of the hot water tank. They can and do start to leak. A bad enough leak at this location can puddle up on the floor and make you think the tank is leaking.
See the article 'Leaking Water Heater Drain Valves' for information and instructions on what to do with this component.
Pressure Relief Valves
The temperature and pressure relief valve is located near the top of the hot water tank. However, it has an extension pipe that directs the water toward the floor. Sometimes this is routed to a drain.
If the relief valve vents water it will wind up on the floor. Although this is a problem, it is not as serious a problem as a leaking water tank. See the article, 'Checking a Water Heater Pressure Relief Valve' for instructions to rule out this possibility.
Condensation
Condensation is a somewhat rare occurance that would only happen when the tank is filled with cold water. When you start up a water heater that is new or has been worked on, it is filled with cold water. When you start it up, the tank will get some condensation on it that will drip down onto the floor.
Make sure it is not condensation, see the article 'Water Heater Condensation' for more information. The tank is likely corroded or cracked. Your really do have a leaking hot water heater.
Other Leak Locations
Water Lines
The hot water heater has a cold water supply line and a hot water outlet line that are filled with pressurized water. Leaks from the water line may be an issue.
See the article on 'Leaking Hot Water Heater Pipes' for information on what to look for and how to correct this problem.
Vent Back Draft
Gas water heaters have vents at the top. A vent that is back drafting can cause condensation on the top of the hot water heater. See the article 'Checking Water Heater Vent Draft' for information and what to look for.
Leaking Tanks
A chronic leak at the floor, that cannot be explained any other way probably means that the tank is leaking.
Unfortunately, you cannot repair the tank. The water heater will need to be replaced. How long to you have before it lets go completely? Great question, but there is no good answer. You may get away with mopping up the water for a while until you can replace it. Or, worst case scenario, it could let go immediately and you will have a big mess on your hands.
Changing the water heater is a big job. Depending on he location of the hot water heater the age of the plumbing and your own skill level you may not want to tackle this job.
See the articles 'Installing a Gas Water Heater' and 'Installing an Electric Water Heater' for a description of what is involved.
Hot Water Heater Condensation
Hot water heater condensation can scare you when it happens. It may appear that your tank is leaking.
Sometimes when you run a lot of cold water into the tank, for instance when it is used quite a bit, you will get condensation that drips onto the floor. How can you tell if it is condensation?
First, it will be a minimal amount of water and it will stop when the tank warms up. Wait a few hours and see if the water is still dripping. Is it gone? Good, it dried up and you don't have a leaking hot water heater after all.
Is it still dripping after a few hours or the next day? You're sure the water in the tank is hot and you still have a drip? This is not good news. See the article 'Leaking Water Heater Tank' and see if it is your tank that is leaking.