Search
Drywall
Replacing Water Damaged Drywall
In some cases, replacing water damaged drywall is the only option. You have examined the damaged area and it is clear that you need more than paint. It is best to remove the compromised drywall and replace it with new drywall.
See the article 'Water Stains on Drywall' for information on sealing a stain without removing the drywall.
Examining the Damaged Drywall
You need to determine how much drywall needs to be removed. Too much water will deteriorate the paper facing and weake the core of drywall. When this happens, the old drywall needs to be removed and new drywall installed.
Is the drywall mushy and the paper easily torn? Is the paper separating from the surface of the gypsum? Has it sagged and pulled away from the framing members? Are the fasteners rusty and popped through the paper? Is there mold on the drywall?
A yes answer to one or more of the questions in the previous paragraph will mean that the drywall needs to be replaced.
If the water stain appears to be only on the surface of the drywall and it has dried completely, you may be able to seal it and re-paint.
Fixing the Leak
There is no point in repairing the drywall if you have not stopped the leak that is damaging the drywall. Water intrusion that ruins drywall can come from a number of sources. A leaking roof is certainly a candidate. Plumbing leaks are also common culprits.
See the articles 'Troubleshooting Plumbing Problems' and 'Fixing Leaking Pipes' for information and instructions on what to do to get rid of the water issue.
Removing the Bad Drywall
Drywall is fastened to the wood framing with either screws or nails and sometimes glue. To remove it, you need to locate the framing members. If you don't you will have to add additional supports to fasten the drywall to.
Locating Framing Members
Once you have determined how much drywall needs to be removed, you want to lay this out on the wall surface. The make the installation of the new drywall simpler, you want to use a straight edge to mark out the area to be cut out. Ideally, it will be a square or a rectangle. You can use a stud finder to locate the stud framing.
Try to lay out the cut out area so that the edges that are paralell to the stud framing are centered on thed studs. It is harder to cut out the drywall at these locations, but is saves having to install extra framing members.
Cutting Perpendicular to the Studs
You can use a key hold saw to cut out the drywall that is perpendicular to the stud framing. You will have to stop at each stud or joist and skip over it. You should be able to get the majority of the cut done with the keyhold saw. You will need to finish off the cut over the framing with a utility knife.
Cutting Drywall Paralell With the Framing
You will need to use a utility knife to cut the drywall over the framing members. Ideally, you have located the center of the framing and drawn a line down the center. Initially, you will score this line with a utility knife. After you have scored the paper, you will run the utility knife over the cut repeatedly, applying more pressure each time until you cut completely through the drywall.
Replacing the Damaged Drywall
Installing new drywall involves cutting the sheets to the correct size and then fastening it in place. There are various measurements that need to be taken and laid out on the drywall panel. After that, the drywall needs to be cut correctly. Once the sheet is cut, it can be installed at the patch.
The article 'How To Cut Drywall' has instructions on all of the steps associated with installing new drywall patches.
Finishing the New Drywall Patch
After you have installed the new drywall where you tore out the old damaged drywall, you will need to tape and finish it. This situation is similar to any other drywall repair project, you have at most five steps to complete the finishing. (1) Applying the drywall tape. (2) Installing a first coat of drywall compound. (3) After a light sanding, you will apply a second coat of compound. (4) After another light sanding, you will want to skim the drywall with a light coat of mud to smooth out the surface. (5) The last step is to sand the drywall to prepare it for a coat of paint.
For a complete discussion on the steps involved with a drywall finishing project, see the article, 'Taping and Mudding Drywall'
Water Stains on Drywall
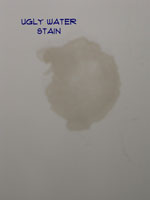
 Water stains on drywall when they are on a wall or ceiling can be pretty unsightly. Finding a plant to put in front of it may work for awhile. Not much you can do to mask a water stain on your ceiling.
Not sure if this is your problem? See the articles 'How To Fix Drywall' and 'Patching and Repairing Drywall' for more information and a complete listing of all the drywall topics.
As long as the drywall is still in good shape and the water leak has been stopped you can just repaint the area. You need to seal the stain with a good quality stain blocker such as Kilz or Zinsser. Once the stain blocker has dried you can paint the area with normal paint.
See how easy it is to repair water damaged drywall when it is just a water stain. Painting can take care of the problem. Just use the right paint. Time to move on to your next project. Can't find your to do list, well how about taking it easy in front of the television.
Stains are a common problem in any home. This website only touches on them occasionally. Do you have other stains you need to deal with? We found a great website that has a lot of good information on stains. Follow this link Stain Guide, for some helpful tips.
Water Damaged Drywall
 Something has leaked and now you need to repair water damaged drywall. What went wrong? Did the toilet overflow? Is your roof leaking? Before you worry about the drywall, you need to figure out what happened and fix that problem.
Not sure if this is your problem? See the articles 'How To Patch Drywall' and 'Drywall Repair' for a listing of related topics along with solutions for problems.
Locating Leaks
Work backwards from the leak. What is above it? Remember that water runs down hill, so the damaged drywall is below the problem. Do you have a bathroom above the spot. You have a lot of water that runs through a bathroom. Is something clogged? Is something leaking?
Once you have dealt with the leak you can attend to your drywall problem. To repair water damaged drywall may not be that hard. Sometimes it is just a stain. Don't make the mistake of thinking that a coat of paint will solve it. Actually, paint may solve the problem, but it needs to be the right kind of paint. Drywall that has been exposed to repeated or severe water intrusion will most likely need to be replaced. Are you a strong person? You can deal with this. It's only drywall, how hard could it be?
Water Damaged Drywall - Information
What Can You Save?
A contractor will charge you for the amount of work involved to repair water damaged drywall. Best case you could have someone fix it in a single visit, around $50 to $75. Multiple visits will cost more spending $200 to $300 would not be unheard of. Could be more, drywall is considered a labor intensive trade.
How Hard Could It Be?
To repair water damaged drywall may require replacing drywall and taping. Both of these activities require some work. Hopefully, you will only have to paint with the right kind of paint.
Check the Simple Things!
Where the drywall is still solid and dry. It is possible that you just need to repaint the stain with a good quality stain blocking paint. Don't use regular paint, water stains will bleed through.
What Can Go Wrong?
To repair water damaged drywall you may run into mold. Take precautions before you attempt to remove moldy drywall. Check out this government website before you mess with mold. A Brief Guide to Mold, Moisture, and Your Home, it will give you some insight and safety tips. Another good article is Mold, on the CDC website. Drywall patches that are poorly done can look just as bad as the problem you started with. Drywall is also messy, the white dust and drywall compound has an amazing ability to get everywhere. Use drop cloths and plastic to contain the damage path.
Repair Water Damaged Drywall – The Steps Involved
Drywall is a layer of gypsum sandwiched between two sheets of paper. Too much water can cause the core of the drywall to break down and the paper to separate from the core. Remember that there is no point in fixing the drywall until you have repaired the water leak.
Fixing 'Water Stains on Drywall' explains what to do when a leak stains the dryall. You will learn whether or not it is possible to paint over the spot.
When the paper and core of the drywall become compromised, you are left with no other choice besides replacement. The article 'Replacing Water Damaged Drywall' gives you pointers and led you to the right information.
When the water damage occurs on a ceiling you may have texture involved. Fixing 'Water Damaged Ceiling Texture' is covered in this article.
Summary
Remember the steps? Follow them in order. Fix the leak first and then repair the water damaged drywall. You could have a fairly simple problem or you could have a bigger job to do. This depends on the severity of the water damage and how quickly it was fixed. We hope this project was not too difficult and that is was successful. Move on to other projects, or just get some rest.
Using Drywall on Plaster Walls
Can you use drywall to make plaster wall repairs? The answer to that question is mostly a yes. Using drywall on plaster walls is acceptable, but there are considerations. The first issue is thickness. Plaster systems can vary in thickness, depending on the type of system used. You may find that the plaster is thicker than standard drywall.
You can uses shims or cardboard to pack out the framing behind the drywall patch. Use the proper thickness of shim for the depth you have. An example would be a 7/8" plaster system. You would need 3/8" shims to get the drywall to the same surface as the plaster. For instructions on installing a drywall patch, see the article 'Drywall Hole Repair'. This article has information on installing additional framing and the actual replacement drywall.
The other issue would be the surface texture of the plaster. Plasterers use all sorts of techniques to finish a surface. Or the plaster itself may have a different finish then the drywall you are installing. A smooth piece of drywall in the middle of a textured plaster wall may stick out.
You may need to do a little experimenting to get the drywall surface to look the same as the plaster. This is especially true if you have some sort of troweled texture in the plaster. See the article 'Texturing Drywall', for more information. This article will give you a few pointers on how to match a plaster texture.
Plaster Wall Failure
Plaster wall failure occurs for several reasons. Plaster is an extremely versatile product. The fact that is labor intensive and takes a long time to install has led to its replacement in most residential applications. One drawback to plaster is the fact that it is mixed in the field.
Human error and varying conditions can change the composition, and quality, of the plaster mix. Over time the coats of plaster can start to separate from one another. Or the entire plaster assemble may separated from the substrate.
Large areas of plaster can fall off or loosen up. When this happens, you are faced with a large plaster wall repair. Installing plaster for large areas is generally not practical. It can be done, but it is usually beyond the skill level of the average homeowner. See the articles on 'Drywall Patching' and 'Mixing Drywall and Plaster' for information on using drywall for a plaster wall failure. You can also see 'Spackling a Plaster Wall' for minor repairs.
For those that want to know what it takes, we will give you a quick run down. Plaster is normally installed in three coats. The scratch coat goes on first and is a fairly thin layer of base coat. The idea behind this coat is to get a good bond to the substrate. A wire tool is used to put scratches into the coat before it dries. The scratched provide 'keys' for the other coats to fill and bond to.