Search
Drywall
Wet Sanding Drywall
Wet sanding drywall is a common method that is used to smooth the surface of the drywall compound. It really isn't sanding at all. Instead a sponge or rag is used to dissolve the drywall compound.
For related drywall taping and finishing information see the articles 'Taping and Mudding Drywall', 'How To Patch Drywall' and 'Fixing Holes in Walls and Ceilings'.
Advantages of Wet Sanding
This method has some advantages. The first would be that it does not require any special tools. A sanding block and a rag or a sponge along with a pail of water are all the tools that are needed. Done carefully, this method can yield a smooth surface that is ready for paint. The biggest advantage to wet sanding drywall is that there is no dust at all. All the excess drywall compound is dissolved by the water and winds up in the pail of water. Great!
Drawbacks to Wet Sanding Sheetrock
Wet sanding drywall does have some drawbacks. First the feathering of the edges is not quite as smooth as regular sanding. This may or may not be noticeable after the patch is painted. Second, it is very easy to remove too much compound. When this happens you are forced into coating the area again. Lastly, you can groove the surface without realizing it. Again, when this happens you will have to coat the area again.
How To Wet Sand Drywall
Always use something that is flat and fairly stiff for this method. Never use just a rag and your fingers to finish the drywall. You will groove it almost immediately. They do sell sponges at drywall and home supply stores for this purpose. They are not expensive and work pretty well. Use a damp sponge, not soaking wet. Wring it out often while you are smoothing the surface. Make several light passes and do not put too much pressure on the sponge.
Another option for this type of dustless drywall sanding would be a sanding block and a rag. The same principles apply, not too much water and light pressure. Don't try to do too much with each pass. Don't remove too much compound.
How To Clean Up Drywall Dust
Do not underestimate how pervasive drywall dust can be. It has the ability to get everywhere. It will put a layer of fine white powder on everything. When you are planning on dry sanding, you need to protect the area.
Containing the mess is a good idea with any repair project. Cover the floors before you start. Drape plastic over the doorways and seal them with blue masking tape. Put walk off mats down wherever you will be going in and out of the area.
Another silent enemy is your heating and cooling system. Cover up the registers and cold air returns. Dust that gets sucked into you heating system can wind up spreading through the whole house. Even when you use dustless drywall sanding techniques it is a good idea to isolate the area.
Drywall projects are among the messiest you will get involved with on your home. The other problem is that it normally takes place inside of your home.
Dustless Drywall Compound
A few years ago a new product was introduced to be used in the war on drywall dust. Dustless drywall compound made its debut and dustless drywall sanding took a giant leap forward. The United States Gypsum company started producing a light weight dustless drywall compound.
Light weight drywall compounds have always been a friend to do it yourself homeowners. They are easier to work with and require less sanding than the older standard compounds. Adding dust free technology to an already popular compound was a great innovation.
Dust free does not mean mess free. The way the compound works is that the dust particles stick to each other forming larger particles that fall harmlessly to the ground. This residue is easily swept up and disposed of. The fine white dust that becomes airborne is not a factor.
With this product, dustless drywall sanding has never been easier. Most home supply stores carry this compound. The USG brand is called "Sheetrock Joint Compound - with Dust Control". It is sold in one gallon and three and a half gallon pails.
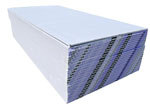
Drywall Sizes and Thicknesses
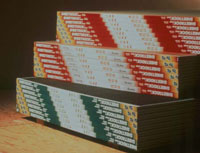 Drywall has different sheet sizes for different products. It also has different thicknesses. For a patch or remodel project, getting the right size is important. Below you will find a listing of all of the drywall sizes, weights and thicknesses available for common drywall types. See the on 'Types of Drywall' below for information on the various kinds of drywall products you may need.
Are you involved in drywall repair project? See the articles 'Drywall Patching', 'How To Cut Drywall' and 'Taping and Mudding Drywall' for information on installing drywall products.
Confused about about whether you have 'Drywall' or 'Sheetrock'. See the article 'Sheetrock vs Drywall' for an explanation.
Drywall sizes matter when you go to do a drywall repair or project. First you need to get enough material. Then there is the weight. Yes you can get a 12' sheet, but can you handle it to install it?
Drywall also comes in different thicknesses. Why, you might wonder. The type of drywall and the application affect the thickness.
So why do we have different drywall sizes? One reason is the joints. Drywall joints and seams need to be finished with tape and mud. Using longer drywall can reduce the number of joints. In commercial buildings, drywall is installed vertically. A length is selected that will be long enough to reach the ceiling without any joints.
The thicker you make drywall the stronger it is. This is especially important in horizontal applications like ceilings. Drywall that is too thin will sag over time, producing an unsightly appearance.
This article on drywall sizes is a resource. It is intended to provide basic information. We do not classify this information as a repair. Therefore, the Common Sense evaluation is not included. Instead we provide you with facts about sizes and types of material that you will use.
Residential Drywall Sizes
Drywall is manufactured on continuous feed lines. It is cut to length after toward the end of the line. So in theory there is no limit to the lengths for drywall. There are however, practical limitations. Handling and weight being two important ones.
Drywall can be special ordered in any length you want up to twenty or so feet long. The down side to this you have to buy one or more full semi loads to get it specially cut. Not practical for a home owner. For most of us, staying with the standard lengths is our lot in life.
Why Drywall Size Matters
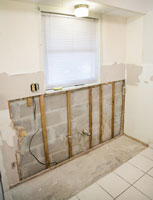
Getting the right size sheet will minimize joints and make the job easier. The repair in the picture could be completed with one sheet of drywall, provided you get the right size.
Handling drywall can be a problem with larger sheets. You have two main issues. One is being able to physically lift and install a large drywall panel. Even with help this might be challenging. The other is getting it into the spot you need it. Getting drywall around corners, up or down stairways and through door openings will pose problems.
Determining Existing Drywall Thickness
If you are replacing damaged drywall you can cut a hole and then use a tape measure to check the thickness. Otherwise you may need to check at a plumbing or electrical penetration. Exercise extra care when checking thicknesses for garages and ceilings. This is where thicker drywall may occur.
Another thickness issue is plaster walls. You may run into walls in your home that have rock lath and plaster on them. Rock lath is a type of drywall that is 3/8" thick. Another 3/8" to 1/2" of plaster is applied over the rock lath. This leaves you with a material that is thicker than most standard drywall. See the article 'Plaster Wall Repairs' for more information.
Drywall Sizes
- 1/4" Drywall - This the thinnest drywall you can buy. It is not a good idea to use this drywall by itself, it is too weak to provide much support. It is ideal for going over other surfaces. Laminating new 1/4" drywall over badly damaged areas can be an easy way to solve a drywall repair problem.
 Another use is in curved applications. This drywall bends easily and can wrap around curved walls. Normally you would use two layers of 1/4" drywall in lieu of one layer of 1/2" drywall.
Drywall Sizes: 4' x 8' Sheets - This type of drywall is usually only available in one size.- Weight per 4' x 8' Sheet - 29.58 lb
Availability - The big box home supply stores do not usually stock these drywall sizes and thickness. Drywall supply stores do have it in stock. You can find one in the phone book.
- 3/8" Drywall - Several decades ago, 3/8" drywall was the standard thickness. Now it is used where the particular thickness is needed. It can also be used to laminate over existing walls and ceilings. It is proportionally lighter than its 1/2" and 5/8" cousins, but also not as strong. It could be used by itself on walls, but this in not recommended. It should not be used on ceilings in most situations.
- Drywall Sizes: 4' x 8' Sheets - This type of drywall is usually only available in one size.
- Weight per 4' x 8' Sheet - 43.65 lb
Availability - This thickness is available at most home supply and drywall supply stores.
- 1/2" Drywall - This is the most popular thickness of drywall. It is likely that the majority of drywall in your home is this thickness. It can be used for walls and ceilings. It comes in regular, moisture resistant and fire rated varieties.
- 1/2" Drywall now comes in a 'Light Weight' version from most manufacturers. The light weight product can be 25% to 30% light than the standard version.
- It is a good idea to check on the thickness you need before purchasing drywall. 1/2" will likely be correct most of the time.
Drywall Sizes: 4' x 8', 9', 10', 12' and 14' Sheets - This thickness of drywall comes in several standard lengths. It can also be ordered in special lengths (quantity restrictions apply). - Standard Weight per 4' x 8' Sheet - 57.6 lbs
- Light Weight per 4' x 8' Sheet - 39.2 lbs
Availability - Thickness is available at most home supply and drywall supply stores. Home supply stores usually carry 8' and 12' lengths. Drywall supply stores will have other lengths. Most home supply stores now carry the light weight drywall in this thickness. - For more information on cutting and installing drywall or sheetrock, see the article 'How To Cut Drywall'.
- 1/2" Cement Board - The thickness of the cement board used normally matches the thickness of drywall. Most of the time this will be 1/2" in a residential home.
- Cement Board Sizes: 3' x 5', 4' x 8' Sheets - These are the common sizes for cement board. Cement board was originally intended for use as a tile backer board. The 3' x 5' size comes from the dimensions of a tub enclosure.
- Weight per 4' x 8' Sheet - 81 lb
Availability - This thickness and the sizes indicated are available at most home supply and drywall supply stores.
- 5/8" Drywall - This thickness is usually made in a fire resistant form. It is used on ceilings and in garages. It has extra fiber in it that helps it to resist fire. The fibers also make it stronger for ceilings. It is proportionally heavier than 1/2" drywall.
- Drywall Sizes: 4' x 8', 9', 10', 12' and 14' Sheets - This thickness of drywall comes in several standard lengths. It can also be ordered in special lengths (quantity restrictions apply).
- 5/8" Drywall now comes in a 'Light Weight' version from most manufacturers. The light weight product can be 25% to 30% light than the standard version.
- Standard Weight per 4' x 8' Sheet - 76.8 lb
- Light Weight per 4' x 8' Sheet - 51.2 lbs
- Availability - Thickness is available at most home supply and drywall supply stores. Home supply stores usually carry 8' and sometimes 12' lengths. Drywall supply stores will have the other lengths.
- 5/8" Cement Board - This thickness of cement board is less common in homes. It is used extensively in commercial buildings. Double check the thickness before you assume you have this size.
- Cement Board Sizes: 3' x 5', 4' x 8' Sheets - These are the common sizes for cement board. Cement board was originally intended for use as a tile backer board. The 3' x 5' size comes from the dimensions of a tub enclosure.
- Weight per 4' x 8' Sheet - 124 lb
Availability - This thickness and the sizes indicated are available at most drywall supply stores. Home supply stores do not normally carry these drywall sizes and thickness. - For more information on cutting and installing cement board, see the article 'How To Cut Cement Board'.
See the following articles for related drywall topics:
Types of Drywall
It is possible for you to have four or more types drywall in your home. The different types are used for different purposes. Wet locations like bath rooms and showers need materials that resist moisture. Garages usually need fire code drywall.
The following is a list of common types of drywall found in residential construction:
- Regular Drywall - This is probably the most common type you will find. It is used on most of the walls and ceilings. It is made of a gypsum core sandwiched between two layers of heavy papers. This type of drywall is the easiest of all to cut.
Available Drywall Sizes: 1/4", 3/8", 1/2"
- Firecode Drywall - This drywall is thicker than the half inch material. It also has a special gypsum core that resists heat and provides fire protection. The heavier fibrous core is harder to cut but still possible.
Available Drywall Sizes: 1/2", 5/8"
- Moisture Resistant Drywall - As the name implies this drywall is used for areas like bathrooms that have higher humidity. Sometimes called green board (it comes in different colors now depending on the manufacturer), it is in between regular and firecode for difficulty.
Available Drywall Sizes: 1/2", 5/8"
- Glass Mat Drywall - This drywall is a variation of moisture resistant drywall. With the prevalence of mold issues, glass mat drywall was developed to eliminate mold growth on the drywall. The facing is made of fiberglass instead of paper. Mold will not grow without organic material present. You may find some of this drywall in a newer home.
Available Drywall Sizes: 1/2", 5/8"
- Cement Board - A further step in moisture resistance. This is not drywall at all (drywall is made of gypsum, cement board has no gypsum in it).It is made by sandwiching a special cement core between two layers of fiberglass mat. This type of drywall is used behind ceramic tile and marble for high moisture areas. This material is the hardest of all to cut.
Available Drywall Sizes: 1/2", 5/8"
The types of drywall listed above may be found in your home. Many homes only have one or two kinds. Don't be shocked if you find something you are not familiar with. When doing a repair, you want to make sure you are getting the right thickness and type that you need.
Summary
Now that you know all of the drywall sizes available, you will be ready for your next drywall repair project. All you need now is some information on working with drywall. See the article 'How to Cut Drywall', for information on cutting drywall. The article 'Taping and Finishing Drywall', has information on finishing the seams.
For bigger pieces of drywall you should get help. It's not worth putting you back out for a drywall repair. Keep in mind the drywall size that you need and can handle when purchasing the material. Get some help when you got to install the drywall, it will make things a lot easier.
How To Patch Drywall
Knowing 'How To Patch Drywall' will save you a lot of money. The skills that you need are not that hard to learn. That combined with the 'Step by Step' instructions that we provide on this website will make you a 'Drywall Patching Pro' in no time.
Not sure if this is your problem? See the articles 'Troubleshooting Drywall Problems' and 'How To Spackle a Wall' for a listing of all the common drywall issues.
Of course you are probably wondering about whether you have a big drywall or sheetrock problem, compared to a relatively easy patching problem.
The next section provides a brief description of the various levels of difficulty you may be faced with. We start with the easiest problems and move on to more difficult ones.
Troubleshooting Drywall Patches
Before you learn how to patch drywall, you should understand what the various types of problems that you may encounter are like. Below, we describe the various drywall patches. These are described by the level of difficulty with the first being the easiest to deal with:
Dents, Dings and Small Holes
Okay, you want to paint the living room and when you take everything off the walls you find a lot of inmperfections. Places that had pictures or other items hung up, now have holes left in the wall. In addtion, you notice a lot of small dents in the wall. What do you do?
This is a common problem and is not that hard to solve. A small amont of wall preparation and a little bit of spackling compound will take care of this. For complete instructions, see the article 'How To Spackle a Wall'. We give you instuctions on what type of material to use and how to apply it.
Fixing and filling small holes will not take a lot of time,especially if you do it the right way. Follow the links in this section for comprehensive instructions.
Cracks In Drywall Walls and Ceilings
Everything seems perfect, the paint looks good, the wall is smooth, but wait! There is a hairline or maybe not so hairline crack. What caused this? Is someone to blame for this? What do I do?
There are lots of reasons for cracks in your walls and ceilings. Ranging from poor drywall installation to natural settling to a poorly constructed house. For some insight on the reasons for your cracks, take a look at this article that discusse 'reasons for cracks in drywall walls and ceilings'.
Is your house older? No builder to call and complain to? Well you will be faced with hiring someone or fixing it yourself. The first thing to determine is the 'size' or 'severity' of the crack.
Hairline or Small Cracks - Hairline cracks may appear and stay the same size for some time. If they don't change after a period of time you can repair them. Hairline cracks are covered in the article 'Fixing Minor Drywall Cracks'. This is the easiest crack repair and will not take a lot of time.
Then there are the cracks that look like a fissure caused by a severe earthquake. This type of crack will take a bit more work. The problem is that joint compound alone will not solve the problem. You are going to need some tape and multiple coats of compound to deal with it.
Still not the end of the world, just takes a little longer. For this problem, you need to see the article 'Fixing Big Drywall Cracks'. Yeah, these are macho cracks and need a serious 'Home Fixer' to take care of them.
Fixing Holes In Drywall
Again we are in an area that is by degree. How 'big', 'Big', 'Big', 'Big', 'Big' is the hole? Well, you get the idea.
We talked about small holes, such as those left by a nail that hung a picture in the 'Spackling' section. Now we are talking about holes that are bigger, maybe you can put your finger through it or worse, maybe your cat can crawl through it.
To keep it simple we have narrowed it down to three sizes of holes. (1) Small holes that can just be filled with spackling. These are generally 1/4" or less in diameter. The 'spackling' segment above covered this. (2) The next step up is holes that are from 1/4" to 1 1/2". Why this distinction? Well, this hole can be dealt with using drywall tape and compound, replacing drywall is not required. (3) Large holes from 1 1/2" and up. These holes will require a drywall patch. Not insurmountable, just a bit more work.
Patching Textured Walls and Ceilings
Your patching project may be complicated by textured surfaces. These can occur both on walls and ceilings. When you have this issue you both have to patch the drywall and the textured surface.
I wish I could tell you that this was an easy problem to fix. However, it is not. First of all you need to understand that there are lots of styles of texture. To make it worse, each style will vary, depending on who installed it. Whoah! Wait a minute, am I saying that textures will vary depending on, not only the type, but also the installer? Are there no standards? No, not really.
Patching and fixing drywall texture will require a bit of expermintation.
Removing Moldy Drywall
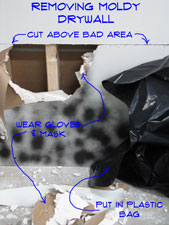 Removing moldy drywall is the best choice for larger infected areas. Or if the paper on the drywall has been ruined and/or the core of the drywall has started to disintegrate. You will need to remove and replace the drywall.
For drywall with mold on it, make sure you dispose of it in tightly sealed plastic bags. Take safety precautions, wear gloves and a mask when you are around moldy drywall.
See the government website for information on the issues, A Brief Guide to Mold, Moisture, and Your Home provides some good information. Disinfect the entire area after the bad drywall is removed. See the article 'Disinfecting Moldy Drywall' for more information.
Testing Moldy Drywall
You may be concerned that the mold that you have is the dangerous 'black mold' that everyone is afraid of. There are many thousands of types of mold that you could have in your home. Only a few of them are toxic and not all of the toxic ones are black.
There has been overactive use of scare tactics with regard to mold. Some of this comes from the media, and some of it comes from companies that want to sell expensive remediation services.
How can you tell what type of mold you have? You cannot tell by the naked eye. The only way to tell is to have it tested. With that said, testing can be expensive.
There are some relatively inexpensive test kits that can tell you whether or not you have a dangerous problem. You can find 'Test Kits' for purchase at the 'My Mold Detective' website. If you want to put your mind at ease, test the mold before you attempt to clean or remove it.
Preparation
Before you disturb moldy drywall, even if you are certain it is not the dangerous kind, you should seal off the area that you are working in. You do not want mold spores to be spread needlessly throughout the house. People with allergies, the young and the old are very sensitive to mold and may react to any type of airborne mold.
Use some plastic and blue or green tape to put a barrier around the area that you are working in. If you do not need to use a door, seal it off with tape. For doors that you need to go in and out of, create a flap in the plastic to walk through.
Remove unneeded items from the room such as carpets, draperies, loose furniture and anything else that you don't want mold spores to damage. If something is too big to move, cover it with plastic. If it is possible to have a fan exhaust the air to the outside this is good idea. Place the fan in a window with direction of air movement pointed to the outside.
Have a supply of large heavy duty trash bags on hand to place the moldy drywall and other debris in as you remove it. You will also need a broom and dust pan to sweep up the drywall dust.
Tools Required
You are going to need the following tools for this project:
- Hammer
- Pry Bar
- Keyhole Drywall Knife
- Utility Knife
- Tape Measure
- Battery Drill or Screwdriver
- 4' Level
Removing the Bad Drywall
For drywall that has been compromised by the water damage and mold you will need to replace it.
Drywall or sheetrock, as it is many times called, is fastened to the wood framing with nails and glue. If the house was built in the last thirty or so years it will likely have screws, especially in the field, holding it in place. To remove it, you need to locate the framing members.
Locating Framing Members
The first step is to determine how much drywall needs to be removed. You want to go somewhat beyond the moldy area. After that you are going to need to locate the studs. You can use a stud finder or tap the wall on either side of an electrical outlet. Since the outlets are attached to the studs, you will find a stud on one side or the other, of the outlet location. Find the center of the stud and measure in multiples of 16" from that point to the closest stud in the area you want to remove.
Once you have located the studs, use a level as a straight edge to mark out your cut lines. Ideally, it will be a square or a rectangle.
Where studs occur and the cut runs parallel, cut the drywall in the center of the stud.. It is harder to cut out the drywall at these locations, but is saves having to install extra framing members.
Cutting Perpendicular to the Studs
You can use a key hold saw to cut out the drywall that is perpendicular to the stud framing. You will have to stop at each stud or joist and skip over it. You should be able to get the majority of the cut done with the keyhole saw. You will need to finish off the cut over the framing with a utility knife.
Cutting Drywall Parallel With the Framing
You will need to use a utility knife to cut the drywall over the framing members. Ideally, you have located the center of the framing and drawn a line down the center. Initially, you will score this line with a utility knife. After you have scored the paper, you will run the utility knife over the cut repeatedly, applying more pressure each time until you cut completely through the drywall.
Removing Moldy Drywall
Make sure you are wearing your gloves and a mask prior to starting. The easiest way to remove sections of drywall is to use the hammer to knock a few holes in it. Once you have a hole you can get your fingers behind the drywall and pull outwardly. The drywall should pull away in bigger sections.
You are going to have places, especially around the fasteners where the drywall will be stubborn. You will need to use a pry bar and the hammer to loosen the drywall at these locations.
Place the pieces that you remove in the plastic bags as you remove them and keep the top of the back closed when not in use. The longer the moldy drywall is exposed, the more chance there is for mold spores to be released.
After you have remove all of the drywall, you will need to remove the leftover nails and screws. For nails you can use a claw hammer to pull them out. Use a Phillips bit in a battery drill to remove the screws. If you don't have a battery drill, you can use a screwdriver.
Replacing the Damaged Drywall
Installing new drywall involves cutting the sheets to the correct size and then fastening it in place. There are various measurements that need to be taken and laid out on the drywall panel. After that, the drywall needs to be cut correctly. Once the sheet is cut, it can be installed at the patch.
The article 'How To Cut Drywall' and 'Installing Large Drywall Patches' has information on all of the steps associated with installing new drywall patches.
Finishing the New Drywall Patch
After you have replaced the drywall where you tore out the old moldy drywall, you will need to tape and finish it. This situation is similar to any other drywall repair project, you have at most five steps to complete the finishing. (1) Applying the drywall tape. (2) Installing a first coat of drywall compound. (3) After a light sanding, you will apply a second coat of compound. (4) After another light sanding, you will want to skim the drywall with a light coat of mud to smooth out the surface. (5) The last step is to sand the drywall to prepare it for a coat of paint.
For a complete discussion on the steps involved with a drywall finishing project, see the article, 'Taping and Mudding Drywall'.
Conclusion
When you have too much of an area that is affected by mold, you will need to remove the drywall and replace it. This is a big job, but a neccessary one. Mold can cause health issues. It is also very dirty and gives off an offensive odor.
Going through the steps above should allow you to remove the drywall and dispose of it safely.