Electrical
How To Replace a Circuit Breaker
When installing a new circuit breaker, the first thing you need to find out is who the manufacturer is. Breakers need to match the panel they are used in. Ideally you would take the name of the manufacturer and the old breaker with you when you go to the supply store. Make sure you get an exact match.
Size does matter when you are installing new circuit breakers. First you need to make sure you get a breaker with the same amperage. Common single pole breakers are 15 and 20 amp. That does not mean a 30 amp single pole is never used. Get a breaker that is the same amperage as the original one.
Are you confused now? Did I forget to explain the single pole, double pole thing. You have two types of breakers in your panel. You guessed it, single pole (120 volt circuits) and double pole (240 volt circuits). Both types can be in several different amperage ratings. To get the sense of it, your outlets and lights will usually be on single pole circuits. Your range and dryer will be on a double pole circuit.
With that said, you want to get a breaker with the 'right number of poles' (What's a pole, anyway?), the right 'amperage' and made by the right manufacturer. Simple, right? Actually it is not that hard. There are not that many manufacturers and the amperages are standard. Installing a new circuit breaker with the wrong breaker will not work.
Oh! I'm sorry, I forgot, there is the physical size of the breaker. To add insult to this, most manufacturers make full size and half size breakers. Usually, 1" for full size and 1/2" for half size (minis as they are often called). So all of the above applies to two different sizes.
Mini breakers are ideal for adding circuits to a panel that is full. Two minis take the place of one full size breaker. Are you faced with this problem? You will have to replace one breaker with two breakers if you are adding to a panel that is full.
Wow, did I say this was easy. Installing a new circuit breaker the right way, takes a little bit of effort. Think it through and you will be fine.
One more issue with the circuit breakers. Newer homes are equipped with arc fault circuit breakers. These are designed to improve safety. They are more expensive and are wired differently that normal breakers. These are required in homes built since 2008 for many circuits in a home. These breakers have a test button, a neutral terminal and an extra wire that goes to the neutral bar. You will need to check with your local building department for arc fault requirements in your area.
Installing the Breaker
A circuit breaker is very similar to a light switch. It interrupts the hot conductor or power conductor. The difference is that a circuit breaker has limits to the amount of power it allows to go through. Remember, the 'electricity police'.
So you really only have two elements for the circuit breaker. The breaker and the slot it goes into. The other element is the hot wire(s) for the circuit. It's really not that simple, but it sounds good. I take that back. Installing a new circuit breaker in a replacement situation is that simple. One wire and the slot.
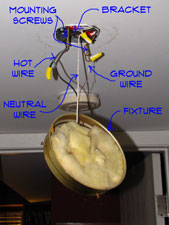
Almost every circuit has two other elements. The neutral wire and the ground wire. The neutral wire completes the path so the electrons have a loop to go through. Don't ask questions at this point, you won't understand the answers.
The last element is the ground. The ground is a safety feature. If the neutral ever fails the electricity will go to the ground before it goes through your body. Great feature in my opinion. You can liken it to a safety harness on an iron worker. Fifty stories up it is a hassle to put on a harness. As long as he does not slip the harness is never used. One slip and the harness saves his life. Well worth the hassle.
Before you begin installing a new circuit breaker, make sure the main breaker is off. The circuit breakers are friction fit into the panel. Generally you pull up on the side away from the center and they pop out. You hook them in the center, keeping them at an angle and press them into place. How easy is that? The breaker has a lug or lugs on it to hook up the hot wires.
For a single pole circuit it will usually be the black wire. Sometime a red wire if two circuits are being fed with a three conductor cable. Double pole breakers have two lugs. Sometimes a black and a red wire. Sometimes a black and a white. You put the hot wires in the lugs for the breaker. The neutral goes on the neutral bar (mostly white wires attached) and the ground goes into the ground bar (all bare copper wires attached)
How To Install a Light
Knowing how to install a light fixture can be useful and save money. Many light fixtures are relatively easy to install, there are just few steps and some precautions to take.
For related information see the articles, 'Troubleshooting Residential Wiring' and 'Basic House Wiring'. These articles have other resources related to electrical light wiring.
Removing the Old Light Fixture
 Before removing a light fixture you want to turn off the power to the light. Don't just turn off the switch. With the switch off you will still have hot wires in the boxes. Tag the breaker so that no on turns it on.
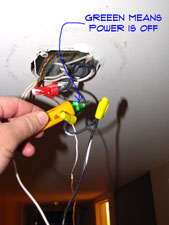
It is possible to have wires from more than one circuit running through a box. Use a not contact voltage tester to make sure everything is off before you touch any of the wires.
On some fixtures you will have to remove the globe and the light bulbs to get at the base plate. Most lights are held in place by a couple of screws. For fixtures with a globe and base plate, they will likely be phillips head screws. Fixtures with and open frame work and exposed fasteners will have a matching cap screw.
Loosen the screws and allow the light to hang by the wires. This is where you might consider taking a picture. Got a photographic memory? Great, don't bother with the picture. For the rest of us mortals a picture could be a life saver later.
Check one more time to make sure the power is off before you unhook the wires. Use a tester to do this. A non contact tester is the best. Satisfied that the power is off? Now you can unhook the wires, save the wire nuts, just in case.
Installing the New Light
Installing a light fixture is not a difficult task. Be honest, how much time did you spend deciding on the which fixture to buy? It is quite possible that you will have far less time invested in the actual installation of the light fixture.
 At this point, you should have already removed the old fixture. Now comes the hard part. you will need to look at the instruction for assembling your new fixture. Your new fixture will likely come with a new mounting bracket and a screw kit. Locate all of the parts and you are ready to begin.
Subject to what you read in the instruction, installing a light fixture will likely proceed in the following order: (1) Install the mounting bracket to the box. (2) Hook up the wires for the base plate. (3) Install the base plate. (4) Install the trim and/or globes. (5) Install the bulbs. Assemble the fixture per the instructions. Be careful, the parts are usually fairly delicate. If you have to force something, you are probably doing it wrong.
For the wiring, hook the black up to the hot leg from the switch. The white wire from the light will hook up to the neutral, usually the white wire. Most new lights also come with a ground wire. This hooks up to the bare ground wire.
There are lots of different sizes and styles of lights. You will need to take a look at the directions when you assemble the fixture. You may need some help with medium to large fixtures. Especially when you are trying to hold it up and connect the wires.
Light Wiring Diagram
 Wiring layouts for lights can vary from house to house. Wiring lights for residential homes is fairly straightforward. Lights use a standard 15 or 20 amp 120 volt circuit. Lights can also be fed by circuits that have other things on them such as outlets.
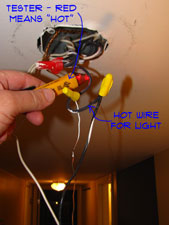
The power for the light can be in the box for the switch or at the light. When the power is at the switch you will generally hook the hot wire to one side of the switch and the hot wire for the switch leg to the other side. You can use a tester to see which one hot.
The white wire coming back from the light will get hooked to the white neutral from the power feed. The ground wire will always hook to the ground and to the switch if it has a ground lug.
When the power is in the light box, wiring lights is a little different. The white wire in the switch leg is going to be used as a hot traveler to the switch (or coming back from the switch). Some electricians will put black tape on the white when it is used like this. The white or black wire coming back from the switch will be hooked to the black or hot for the light. The white or neutral for the light will be hooked to the white/neutral for the power supply. The switch leg will always interrupt the hot power supply. The switch should always be between the power supply and the light.
Wiring lights in a retrofit situation is usually fairly easy. You hook the wires to the new light the same way they were hooked to the old one. Here's a trick, take a digital picture of the wiring before you take the old light down.
How To Wire Lights
 Wiring lights in your home is needed if your fixtures quit working properly. Light sockets, ballasts and other components may wear out. Replacing the defective fixture with a new one may seem like the course of wisdom. New fixtures can be inexpensive and easy to obtain.
OK admit it, you really didn't like that light fixture anyway. Or was it your spouse, 'that light is ugly, let's get a new one'. For whatever reason you want to install a light. What are the concerns? Is it hard? This is something you can do.
For related electrical problems you want to see the articles 'How To Wire a Light Switch', 'Residential House Wiring', 'Ceiling Fan Troubleshooting' and 'Wiring Three Way Switches'. These articles provide additional information and instructions on what to do.
This article will help you decide if this is something you want to attempt. Check out the evaluation sections and see how hard it is. How much could you save if you do it yourself?
Wiring Lights - Information
What Can You Save? - There are no absolutes here. The size and complexity of the fixture matters. A chandelier or ceiling fan is more work that a hall light. Let's say around $75. Could be $50 or it could be $150. You also have to consider the hassle of finding someone and getting them to come out.
How Hard Could It Be? - Wiring lights is not that hard. Sometimes the fixtures have a lot of pieces. Big fixtures can be heavy. These repairs will have a Difficulty Level of: A Bit of Work. These repairs require a Skill Level of: Handyman. For and explanation of the terms in this section, see 'How to Use This Site'.
Check the Simple Things! - Check to bulbs. New bulbs right out of the package can be bad. Did you check the breaker? Loose wires would be the next easy thing. Remember to shut the power off before you mess with the wires.
What Can Go Wrong? - Light fixtures can be quite reasonable to purchase. They can also be quite expensive. Get some help with complex, heavy fixtures. Dropping them will likely ruin it. This is an electrical item, you can get hurt. Shut the power off, tag the breaker and double check the box with a tester.
Troubleshooting Light Fixture Problems

What are the light fixture problems that can be fixed? You are allowed to buy a light new light fixture if you want to. But, is the old one really beyond hope. Don't blame the poor old light fixture if it is just a little worn out. As always, start with the simplest things and then move to the harder ones.
Did you check the bulb? 'Of course I did, dummy', you're saying about now. Try another one, I nearly pulled what little hair I have left for close to an hour once, because a brand new bulb in a package was bad. Did you check the breaker? Make sure it is not tripped.
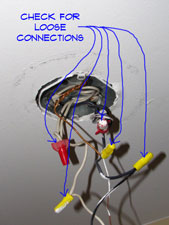
The next thing to do would be to check for loose connections, both on the fixture and inside the box. Turn the power off first. Tighten any think that seems to be loose. Turn the power back on with the fixture hanging. Check it with a non-contact tester. Do you have power to the fixture? No power to the box? You have a different problem.
Check the switch, do you have power there? With the switch on, still no power to the light? Yes, the switch could be bad. The article 'Wiring a Light Switch', has more information on this subject.
No power anywhere? This is bad, tracing circuits and tracking down basic wiring problems in a home is beyond the scope of this article. See the article 'Basic House Wiring', for some additional insight.
WARNING!! Make Sure the Power is OFF!!! BEFORE You Work on Electrical Devices!!!
Troubleshooting Light Wiring Problems
Wiring Diagrams
There are several ways that light switches can be hooked up inside of the back boxes. For a homeowner, it can be a little daunting to figure out which wire is going to what. Wiring diagrams can help, see the article 'Light Wiring Diagrams' for the available diagrams.
Installing Light Fixtures
When you decide to replace a fixture, you will first need to remove the old one. After you get the old fixture removed, you will need to install the new one. See the article 'Installing a Light Fixture' for information and instructions on what to do with your light fixtures.
Issues With Light Switches
There are different types of light switches that you might have in your home. There are, of course, different problems with each type. See 'Wiring Single Pole Switches' for simple switch problems, 'Wiring Three Way Switches' for lights that have more than one switch that controls them, and 'Wiring Dimmer Switches' for adjustable switches.
Summary
How hard a wiring lights project is depends mostly on the fixture you select. Some fixtures are a little hard to get together. I hate to say it, but you probably had to look at the instructions. The wiring is fairly simple.
No question, you probably spent the most time trying to decide which fixture to buy. After that ordeal, putting up the light seemed easy. We hope that your project was successful and you have moved onto more interesting things.
Three Way Switch Wiring Diagram
This article needs copy.


